
Related Manuals for SereneLife SLPAC406W


Summary of Contents for SereneLife SLPAC406W
- Page 1 Visit Our Website SCAN ME serenelifehome.com SLPAC240W - SLPAC406W - SLPAC242B - SLPAC408B Portable Air Conditioner USER GUIDE...
- Page 2 About SereneLife SereneLife products are designed to create a more comfortable living space, indoors and out. Our team presents innovative lifestyle solutions throughout the year that promote simplicity and serenity. We’re committed to delivering the most dependable products so you can live a better, more serene life.
- Page 3 CONTENTS FEATURES AND TECHNICAL SPECS BEFORE YOU BEGIN FOR YOUR SAFETY PRODUCT OVERVIEW INSTALLATION OPERATION CLEANING AND CARE TROUBLESHOOTING DECOMMISSIONING REGISTER PRODUCT READ AND SAVE THESE INSTRUCTIONS California Prop 65 Warning WARNING: This product may expose you to chemicals, which is known to the state of California to cause cancer, birth defects and other reproductive harm.
- Page 4 Features: • E cient & Powerful Cooling • Metal Control Box to Prevent from Fire and Exploding • Rotary Compressor • Universal Castors for Moving Freely • Lightweight & Portable A/C Unit • Compact Freestanding Room Air Conditioner • (3) Operation Modes: AC Cooling / Dehumidi er / Fan •...
- Page 5 BEFORE YOU BEGIN PRODUCT DESCRIPTION Our powerful portable air conditioners serve as excellent cooling solutions for single rooms, creating a comfortable atmosphere in your space. Additionally, they feature ventilation and dehumidifying functions to circulate air and remove moisture. These self-contained systems do not require any permanent installation, allowing you to move them to the space where they are most needed.
- Page 6 THE FOLLOWING SHOULD ALWAYS BE OBSERVED FOR SAFETY • This appliance is intended for use by experts, trained users in shops, light industry, farms, or for commercial use by laypersons. • Children over the age of 8 and persons with reduced physical, sensory, or mental capabilities can use this appliance if they have received proper supervision or instruction on safe usage.
- Page 7 OPERATIONAL PRECAUTIONS WARNING To reduce the risk of re, electric shock, or injury to persons or property: • If the supply cord is damaged, it must be replaced by the manufacturer, its service agent, or similarly quali ed persons to avoid hazards. •...
- Page 8 Any person involved in working on or breaking into a refrigerant circuit should possess a currently valid certi cate from an industry- accredited assessment authority. This certi cate authorizes their WARNING competence to handle refrigerants safely in accordance with an industry-recognized assessment speci cation.
- Page 9 Presence of re extinguisher If any hot work is to be conducted on the refrigeration equipment or any associated parts, appropriate re extinguishing equipment shall be available at hand. Have a dry powder or CO2 re extinguisher adjacent to the charging area. No ignition sources No person carrying out work related to a refrigeration system that involves exposing any pipework containing or having contained ammable refrigerant...
- Page 10 • Ensure markings on the equipment remain visible and legible. Illegible markings and signs shall be corrected. • Refrigeration pipes or components are installed in a position where they are unlikely to be exposed to any substance that may corrode refrigerant-containing components, unless the components are constructed of materials inherently resistant to corrosion or suitably protected against corrosion.
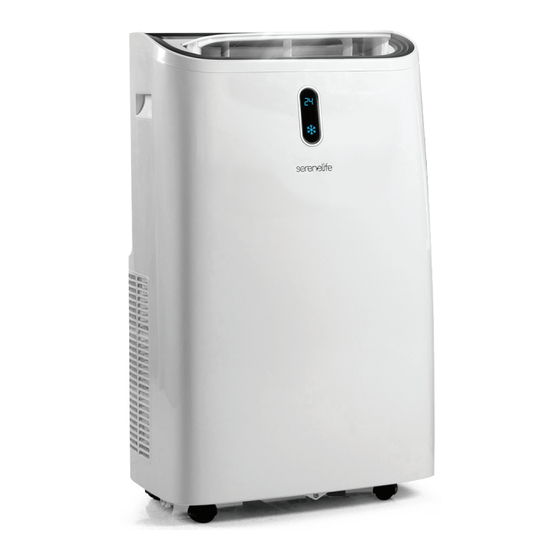
- Page 11 PRODUCT OVERVIEW PRODUCT DIAGRAM 1. Control panel 2. Air outlet with adjustable louver 3. Front Panel 4. Air inlet with air lter 5. Recessed handle 6. Air Exhaust 7. Drain opening with sealing plug 8. Castor Note: The appearance is provided for reference purposes only. For detailed information, please refer to the actual product.
- Page 12 Choose Your Location • If tipped more than 45°, allow the unit to remain upright for at least 24 hours before starting up. • Place the unit on a rm, level surface with at least 19.6 inches of free space around it for proper air circulation.
- Page 13 ATTACH THE EXHAUST HOSE The air conditioner requires venting outside to allow the exhaust air, containing waste heat and moisture, to escape the room. Do not replace or extend the exhaust hose, as it may decrease e ciency or, worse, result in the unit shutting down due to low back pressure.
- Page 14 Step 4: Close your window to secure the kit in place. Ensure the window kit is held rmly in place, and use duct tape if necessary. It is recommended to seal o the gap between the adapter and the sides of the window for maximum e ciency.
- Page 15 Step 6: Adjust the length of the exible exhaust hose to ensure the distance between the unit and the window is more than 27.5 inches, and the height from the exhaust hose to the oor is more than 35.4 inches. Avoid bends in the hose.
- Page 16 FUNCTION KEYS AND INDICATORS 1. POWER: Press to switch the machine on or o . 2. MODE: Press to switch the operation mode between cool, dry, and fan. 3. MODE Indicator: Displays the Mode Setting among cool, dry, and fan. 4.
- Page 17 SETTINGS Start-up and Shutdown • Press POWER to turn on the unit. • Press MODE button to select the desired operation mode. • Press POWER again to turn o the power. Operation Modes The unit has four operation modes: Cool, Dehumidi er, Fan, Sleep. The unit's working temperature under cooling mode is 61°F-95°F.
- Page 18 TIMER SETTING (1 hour - 24 hours) The timer has two ways of operation: • To turn o (When power on): Press the Timer key to activate the timer function. Press Up/Down repeatedly to set the delay OFF time. • To turn on (When power o ): Press the Timer key to activate the timer function.
- Page 19 Notes: 1. Keep the water plug properly. 2. During drainage, the body can be tilted slightly backward. 3. If the water container cannot hold all the water, before the water container is full, insert the water plug into the water outlet as soon as possible to prevent water from owing onto the oor or carpet.
- Page 20 CLEANING AND CARE CLEANING THE AIR FILTER (Every Two Weeks): Dust collects on the lter and restricts air ow. The restricted air ow reduces the e ciency of the system, and if it becomes blocked, it can cause damage to the unit.
- Page 21 TROUBLESHOOTING Symptom: The unit is not operating. Inspection: • Check the power connection securely. • Check if the water level indicator lights up. • Check the room temperature. Solutions: • Insert the power cord securely into the wall outlet. • Empty the drain pan by removing the rubber plug.
- Page 22 Symptom: Water Leakage. Inspection: • Over ow while moving the unit. • Check if the drain hose is kinked or bends. Solutions: Empty the water tank before transport. Straighten the hose to avoid a trap. Symptom: Excessive Noise. Inspection: Check if the unit is securely positioned. Check for any loose, vibrating parts.
- Page 23 Decommissioning STORAGE For long-term storage of the air conditioner unit, follow these steps to ensure proper decommissioning and preservation: 1. Unplug the Unit: Disconnect the power supply by unplugging the unit from the electrical outlet. 2. Remove Exhaust Hose and Window Kit: Take out the exhaust hose and window kit that were originally stored with the unit.
- Page 24 Disposal Instructions Releasing refrigerant into the atmosphere is strictly forbidden. WARNING 1. Do Not Dispose as Unsorted Municipal Waste: Electrical appliances, including the air conditioner unit, should not be disposed of as unsorted municipal waste. 2. Use Separate Collection Facilities: Utilize separate collection facilities for the disposal of electrical appliances.
- Page 25 Register Product Thank you for choosing SereneLife. By registering your product, you ensure that you receive the full bene ts of our exclusive warranty and personalized customer support. Complete the form to access expert support and to keep your SereneLife purchase in perfect condition.
- Page 26 Questions or Comments? We are here to help! Phone: 1.718.535.1800 Serenelifehome.com/ContactUs...
Need help?
Do you have a question about the SLPAC406W and is the answer not in the manual?
Questions and answers