Advertisement
Your Product

Inside the box
You will find the accessories in the tray at the top.

Get to know your product
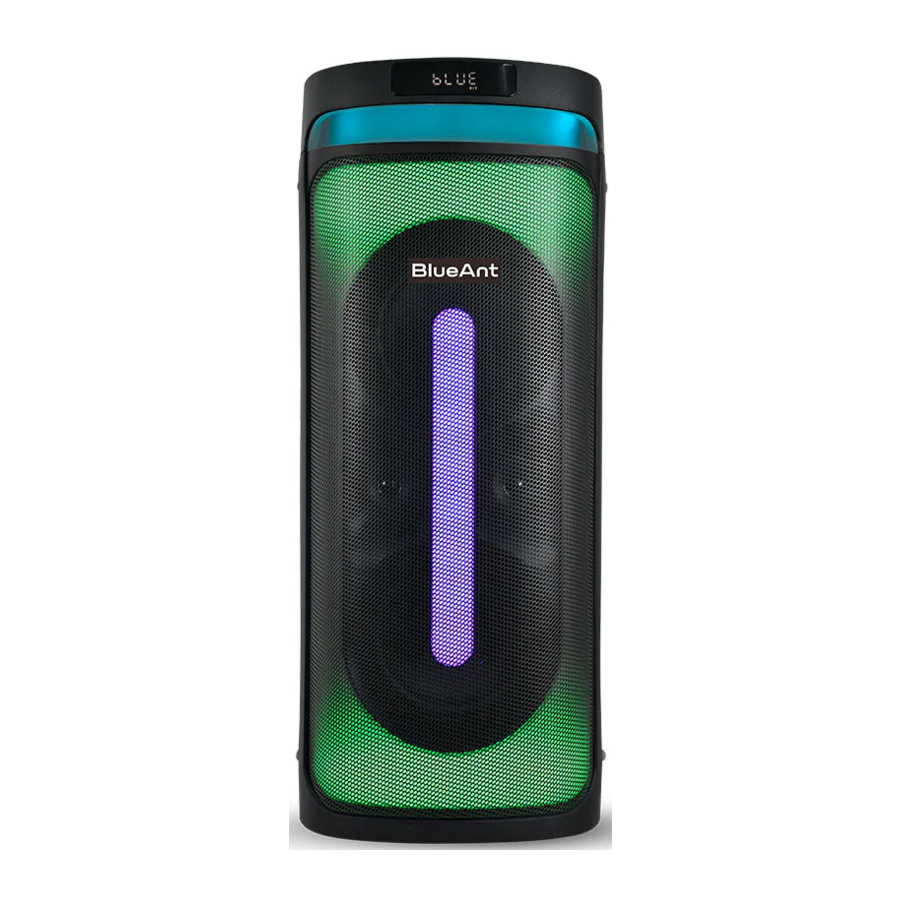
Front of the unit

Display
The X6 has a display at the top to show the status of various features.
The Mode will be displayed on the display as, "Blue", "USB", "Card" or "Line". When playing a track from USB or Micro SD card, the display will show the track number and location in the track.
When the X6 is plugged into AC power, the top left will show a RED indicator when charging, and a GREEN indicator when fully charged.
The bottom right has a battery meter that shows the remaining charge left.
Handle
The top features a handle to make it easier to carry the X6.
LED'S
The front of the X6 is full of LED'S with 15 different modes that move in time with the music.
Speakers
The X6 has 2 x 165mm Woofers and 2 x 64mm tweeters.
Back of the unit
DO NOT expose the X6 speaker to liquid whilst playing or charging, as doing so may be dangerous, and result in permanent damage to the speaker or charger.

Charging
The back of the speaker has the power port to plug in the supplied power cable. Please only use the supplied power cable to charge the speaker. A full charge may take 5-6 hrs. The battery indicator light on the display will turn RED while charging.
When fully charged the battery indicator light on the display will turn GREEN. The bottom right of the display has a battery indicator to show the remaining charge left.
Power Switch
AC Mode
The speaker can be used in AC mode while charging. Simply select AC on the back of the speaker to turn the speaker on and use it in AC mode.
Off
The middle position of the power switch is off.
Battery Mode
Once your speaker is charged, you can select Battery mode. If you unplug the power cable you will have to select Battery mode to use your X6. If the X6 in on Battery mode and the power cable is plugged in, the X6 will continue to top up its charge. On the front of the speaker is a display with a red light when charging. The light turns green when fully charged.
There is a battery bar on the bottom right of the display to show how much battery is left. Each bar represents 33% charge. When playing back music, the volume will be the same on AC mode or Battery mode.
The play time will vary by the type of music, volume level, EQ LED settings and environmental conditions. As a guide you will get around 8 hrs of play time at 50% volume on LED L01.
For continuous playtime, simply plug in the AC power cable to keep the party going.
Output Port
This RCA output is used to enable connecting to external device for recording or other purposes.
Bass Invertor Tube
This improves the Bass output of the speaker.
Power On
When you power on the X6, the speaker goes to Bluetooth mode by default.
Top of the unit

 Mode (M) Button
If you want to change to a different mode, simply press the Mode (M) button. The order of modes is below
- Bluetooth
- USB
- SD Card
- AUX
Bluetooth Mode
The X6 announces Bluetooth mode and goes into Bluetooth pairing or searches for a paired phone. The display has the word Blue flashing to signify the X6 needs to be paired to a phone. Search for and pair the "BlueAnt X6".
Once paired and connected to your phone, music tracks can be controlled on the speaker using the X6 buttons or from the phone. The volume controls on the speaker are synced to the phone volume.
USB Mode
When you press mode button, the X6 will go to USB mode and announce "USB playback". The display will show USB. The X6 supports FAT32 formatted USB devices upto 32GB. File formats supported are: MP3, WAV, FLAC, WMA.
SD Card Mode
When you press mode button again, you will go to Micro SD card mode and the X6 will announce "SD card playback". The display will show "Card". The X6 supports FAT32 formatted Micro SD cards upto 32GB. File formats supported are: MP3, WAV, FLAC, WMA.
AUX Input Mode
When you press the mode button again you will go to AUX in mode and the X6 will announce "Auxiliary Input". The display will show "Line".
Select this mode to playback from an external source via 3.5mm input. In this mode skip forward, back, play and loop buttons do not do anything and music must be controlled by the external source device.
The X6 volume control can only control speaker volume and not the volume of the source device.
To return to Bluetooth mode, simply press the  Mode button again.
 Loop Button
This button can be in USB and SD Card playback modes, NOT in Bluetooth mode. Press once to loop one song - display will show "ONE". This will continuously play the current song. Press once more to cancel loop one song mode - display should show "-ONE".
Press and hold for 3 seconds to loop all songs - display will show "ALL". This will play all songs on the source and then start again. Press and hold for 3 seconds again to cancel loop all songs. Display will show "-ALL". When LOOP is not selected, all songs will play once and then playback will stop.
 Skip Forward Button
This is used to skip forward to the next track in Bluetooth, USB and SD card playback modes.
 Skip Back Button
This is used to skip back to the previous track in Bluetooth, USB and SD card playback modes.
 Play Button
Once you have paired your phone or source device, inserted a USB device or Micro SD card, you can press the PLAY button to start playing back music. To pause music, simply press the play button again.
 Speaker Volume Dial
The X6 has 32 levels of volume. These are synchronized with a connected phone when using Bluetooth mode. The default volume is reset to 8 (25%) every time the X6 is powered on. When you reach level 32 (100%), the X6 will announce "maximum volume".
*NB your phone may have volume 16 steps, these match the same percentage of volume on the X6. e.g. 16 (100% volume) on your phone is 32 (100%) on the X6. 8 (50%) on your phone is 16 (50%) on the X6.
Volume is not synchronized when using AUX mode.
Using the Microphones
To avoid feedback, please do not point the microphone at the speaker or bring the microphone within 30cm of the speaker.
- Connect the cable to the microphone as per the below, Diagram A.
Insert microphone cable into the microphone 3 as shown in the diagram. Push until it clicks into place.
![]()
- Plug one microphone into the
![]() microphone port. To use the second microphone plug it into the
microphone port. To use the second microphone plug it into the ![]() guitar port.
guitar port. - The microphone (s) feature an ON/OFF switch. Please ensure the microphone is in the ON position to use.

 microphone port. To use the second microphone plug it into the
  guitar port.
  Guitar & Microphone
The X6 has a Guitar and Microphone input. It is also possible to use the Guitar input as a second Microphone input.
 Bass Boost Button
The X6 has two built-in EQ's- Standard and Bass Boost. The Bass boost button is used to switch the EQ of the X6 between Standard and Bass Boost. The default EQ is Standard. The X6 resets back to Standard EQ every time it is powered on.
 LED' s
There are 15 modes of LED and Off. These LED's synchronize with the music being played back. To change LED mode, click the LED button. Each click will move forward to the next mode. If you want a more subtle LED, then L15 is the handle only. To turn off the LED press and hold the LED button for 3 seconds. To turn the LED back on, simply click the LED button.
 Phone & Tablet Holder
The top of the X6 features a slot that can be used to hold your phone or tablet when in use.
 Microphone Volume
The default microphone volume is 20%. Microphone volume has 16 steps. To adjust the Microphone volume, press the Microphone button and then turn the Speaker volume dial. When you have finished adjusting the Microphone volume, press the Microphone button once more. This will then revert the Speaker volume dial to controlling the speaker volume.
Echo
Echo can be applied to the Microphone input only. The default Echo level is 0. Echo has 16 steps. To adjust the level of Echo, press and hold the Microphone button for 3 seconds and then turn the Speaker volume dial. When you have finished adjusting the level of Echo, press and hold the Microphone button for 3 seconds once more. This will then revert the Speaker volume dial to controlling the speaker volume.
 Guitar Volume
The default guitar volume is 20%. Guitar volume has 16 levels. To adjust the Guitar volume, press the Guitar button and then turn the Speaker volume dial. When you have finished adjusting the Guitar volume, press the Guitar button once more. This will then revert the Speaker volume dial to controlling the speaker volume. *NB the Guitar input does not have ECHO. The Guitar input can be used as a second Microphone input.
 Duo Mode Button
It is possible to use two X6's together. This is known as Duo mode.
Press the Duo mode button on the 2nd X6 speaker. The X6 will announce "Duo mode pairing". The display on the X6 will flash with the word "Duo".
The two X6's will connect with each other and announce "Duo mode connected". Music will now be played on both speakers.
The Music controls and the Bass Boost Button are controlled on the main speaker. The LED's work independently on each speaker, as do the guitar and microphone controls.
To disconnect Duo mode, simply click the Duo mode button on either speaker.
The 2nd X6 will announce "Bluetooth" and the display will show "Blue", meaning it is looking for a phone to connect to. To reconnect Duo mode, simply press the "Duo mode" button on the 2nd speaker again.
The two X6's will connect with each other and announce "Duo mode connected".
When you connect two X6's together, you get a wide stereo soundstage.
Important Safety Information
PLEASE READ THIS ENTIRE DOCUMENT CAREFULLY, BECAUSE IT CONTAINS IMPORTANT INFORMATION ABOUT THE USE OF BLUEANT DEVICES

PROTECT YOUR HEARING
BLUE-ANT DEVICES CAN REACH VOLUMES ABOVE 100 DECIBELS
ONLY CHARGE WHEN DEVICE IS CLEAN AND DRY
Care and Handling
Your BlueAnt Bluetooth device is a precision engineered instrument. To ensure its ongoing performance, you should look after it as you would any quality consumer electronic product, and use it in accordance with the instructions. BlueAnt recommends that you take the following precautions. Avoid leaving your device In direct sunlight.
- Do not leave your device, or use your device, in any area where the temperature may exceed 45 degrees Centigrade, such as inside a closed car on a hot day. Remember that on a hot day, the temperature inside a closed car may be significantly higher than the outside air temperature.
- Do not leave your device, or use your device, in any area where the temperature is likely to drop below 0 degrees Centigrade (32 degrees Fahrenheit).
- Do not leave your device, or use your device, in any area exposed to humidity, dust, soot, other foreign objects, smoke, or steam as this may cause your device to malfunction.
PROLONGED USE AT HIGH VOLUMES MAY AFFECT YOUR HEARING CAPACITY AND MAY RESULT IN NOISE INDUCED HEARING LOSS (NIHL). TURN OFF THE POWER TO YOUR DEVICE WHEN NOT IN USE.
- Do not use any household or industrial grade detergents or cleaners to clean your device. If your device becomes dirty or smeared, in most instances a wipe with a dry or slightly damp cloth should be sufficient to clean it.
- Do not leave your Bluetooth device plugged into a wall for long periods after it is fully charged. BlueAnt does not recommend long periods of continued charging.
- Before charging your BlueAnt device, make sure that the AC outlet, adaptor and cable are not damaged. If you notice any abnormalities, seek advice from a qualified professional.
- If travelling internationally, ensure that your BlueAnt wall or car power adapter is approved for use in the country where you plan to use it and that the adapter voltage is suited to the local power supply.
- Should a fault develop with your BlueAnt product, contact BlueAnt for advice on how to proceed. Do not attempt to repair or alter any BlueAnt product yourself.
Approved Accessories
The use of accessories not approved by BlueAnt, including but not limited to batteries, antennas, wall adapters, car charger, ear gels and foam tips and convertible covers, may cause your BlueAnt device to malfunction or in the case of non approved electrical accessories may cause the device to exceed RF energy exposure guidelines.
Battery Care
For optimum performance and safety please avoid the following:
- High or low extreme temperatures that a battery can be subjected to during use, storage or transportation; and
- Low air pressure at high altitude
- Disposal of a battery into fire or a hot oven, or mechanically crushing or cutting of a battery, that can result in an explosion;
- Leaving a battery in an extremely high temperature surrounding environment that can result in an explosion or leakage;
- A battery subjected to extremely low air pressure that may result in an explosion or the leakage.
Limited Global Warranty
For warranty and technical support, please email care@blueantwireless.com or head over to our website www.blueantwireless.com or call 1300 669 049
Register your BlueAnt product for warranty and new product updates at register.blueantwireless.com
BlueAnt Wireless
Suite 6, 861 Doncaster Road
Doncaster, Vic, 3109 Australia
HELP & SUPPORT
Visit support.blueantwireless.com
Email: care@blueantwireless.com
Contact: 1300 669 049
Register your BlueAnt product for warranty and new product updates at register.blueantwireless.com

Documents / Resources
References
Download manual
Here you can download full pdf version of manual, it may contain additional safety instructions, warranty information, FCC rules, etc.
Advertisement


Need help?
Do you have a question about the X6 and is the answer not in the manual?
Questions and answers