Advertisement
PRODUCT INFORMATION
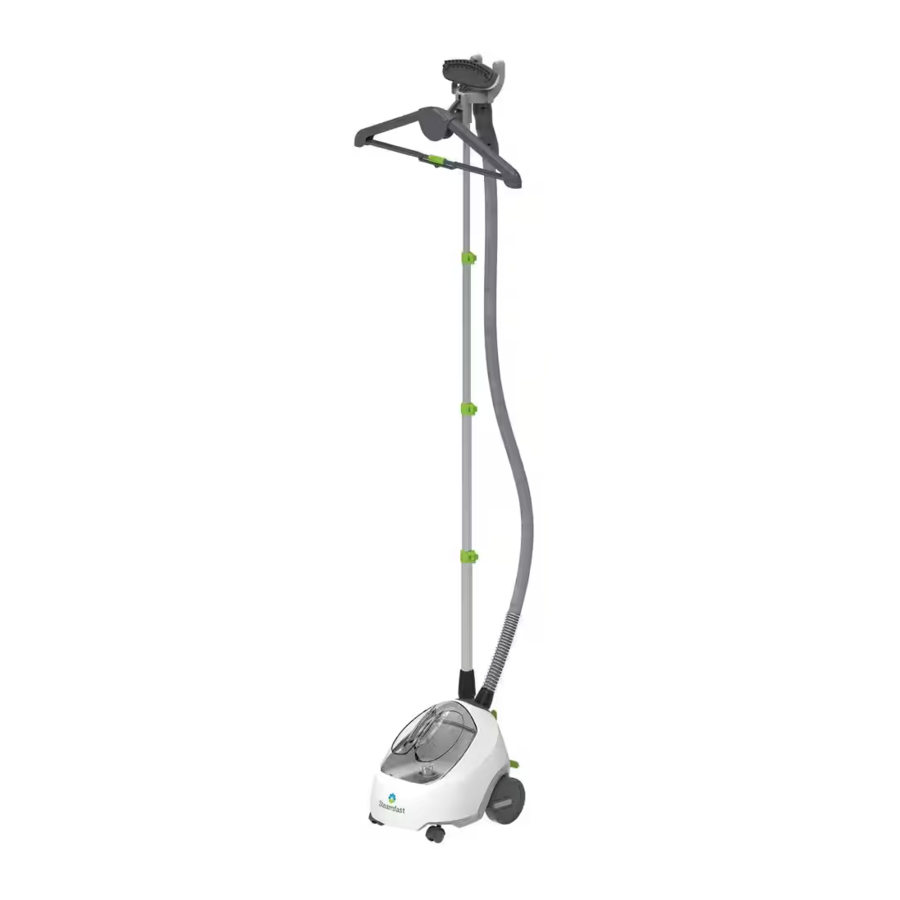
The following features and accessories are included with your Full Size Fabric Steamer. Carefully inspect the packing material for all parts listed below. To obtain possible missing parts, refer to Product Support for Consumer Service contact information.
UNIT FEATURES & ACCESSORIES

- Steam Nozzle
- Pole Top
- Hanger Anchor Holes
- Clothes Hanger Hooks
- Steam Nozzle Cradle
- Handle
- Hose
- Hose Base
- Telescopic Pole
- Pole Base
- 6 Water Tank
- Valve Cap
- Water Reservoir
- Lighted On/Off Switch
- Boiler (internal)
- Cord Wrap
- Drain Plug
- Fabric Brush
- Hanger
- TheSteam Nozzle (1) emits the flow of hot, penetrating steam produced by the Boiler. The Fabric Brush connects to the Steam Nozzle.
- ThePole Top (2) connects to the top section of the Telescopic Pole. The Pole Top is comprised of the Steam Nozzle Cradle and Clothes Hanger Hooks, and includes the Hanger Anchor Holes.
- TheHanger Anchor Holes (2a) serve as the connection point for attaching the included Hanger.
- TheClothes Hanger Hooks (2b) are included as an alternative to the included Hanger. The Clothes Hanger Hooks can support garments hung from any clean rust-free hanger.
- TheSteam Nozzle Cradle (2c) provides a safe and convenient place to hang the Steam Nozzle when not in use.
- TheHandle (3) is engineered to stay cool while providing maximum grip and comfort.
- TheHose (4) directs steam flow from the main unit to the Steam Nozzle.
- TheHose Base (4a) is the threaded receptacle onto which the Hose is screwed and secured to the front of the main unit.
- TheTelescopic Pole (5) connects to the main unit at the Pole Base. The Telescopic Pole is divided into four sections, three of which can be extended and lowered to a variety of heights for optimal user comfort and convenient storage.
- ThePole Base (5a) is the receptacle into which the Telescopic Pole is inserted and secured to the top of the main unit.
- TheWater Tank (6) is the container that holds water to be transferred into the Water Reservoir. The Water Tank is removable for convenient filling, up to a maximum capacity of 70 oz (2,070 ml).
- TheValve Cap (6a) regulates the flow of water between the Water Tank and the Water Reservoir, and must be removed in order to fill the Water Tank with water.
- TheWater Reservoir (7) holds water before it is transferred to the Boiler and converted into steam.
- TheLighted On/Off Switch (8) powers the unit on and off. When set to the "I" (on) position, it illuminates to provide a clear visual indication that the unit is receiving power.
- TheBoiler (9) is the internal heater where water transferred from the Water Reservoir is converted into steam.
- TheCord Wrap (10) is designed to hold the power cord when not in use.
- TheDrain Plug (11) is opened to easily empty the Water Reservoir of any remaining water.
- TheFabric Brush (12) connects to the Steam Nozzle and is designed to brush away particles such as lint, hairs and loose threads.
- TheHanger (13) connects to the Pole Top via the Hanger Anchor Holes. The Hanger is designed to support garments for easy, accessible steaming, and quickly collapses for convenient storage.
ASSEMBLING YOUR FULL SIZE FABRIC STEAMER
TELESCOPIC POLE
The Telescopic Pole is made up of four sections (FIGURE 1):

FIGURE 1
- TOP (SECTION 1)
- MIDDLE-TOP (SECTION 2)
- MIDDLE-BOTTOM (SECTION 3)
- BOTTOM (SECTION 4)
SECTIONS 1, 2 & 3 are adjustable in length. By using the three extension locks, these sections may be extended or retracted in order to achieve the desired length. Refer to Adjusting Telescopic Pole section for more details.
NOTE: SECTION 4 (BOTTOM) is the widest section of the Telescopic Pole. This is the section that fits into the Pole Base.
CONNECTING TELESCOPIC POLE

- Make sure Pole Base coupling is loosened – rotate it counter-clockwise if necessary.
- Look down inside Pole Base, and locate two guide ridges (FIGURE 2-A). Align guide grooves on Telescopic Pole (FIGURE 2-B) with guide ridges inside Pole Base.
- With guide grooves aligned with guide ridges, insert SECTION 4 of Telescopic Pole into Pole Base (FIGURE 2-C).
NOTE: If you have trouble locating two guide ridges inside Pole Base, insert SECTION 4 of Telescopic Pole into Pole Base, then twist pole to properly align the guide grooves and guide ridges. - Screw coupling clockwise to lock Telescopic Pole in place (FIGURE 2-D). Telescopic Pole should now be secured to the Pole Base.
CONNECTING POLE TOP

- Look at underside of Pole Top to locate two guide ridges (FIGURE 3-A).
- Align Pole Top guide ridges with guide grooves on SECTION 1 of Telescopic Pole.
NOTE: It is recommended to orient Pole Top so Nozzle Cradle faces backwards towards rear of the unit. - Slide Pole Top onto SECTION 1 of Telescopic Pole (FIGURE 3-B). Press down firmly until Pole Top fits securely in place.
CONNECTING HANGER

- Locate brackets on back of Hanger (FIGURE 4-A).
- Align Hanger with Hanger Anchor Holes on front of Pole Top. Insert brackets into holes, then slide Hanger down to lock it in place (FIGURE 4-B).
ADJUSTING TELESCOPIC POLE
To adjust the length of SECTIONS 1, 2 & 3 of the Telescopic Pole:

FIGURE 5
- Release extension lock directly below SECTION 1 by swinging hinge outward as shown. SECTION 1 can then be extended / retracted (FIGURE 5).
- Once SECTION 1 is at desired length, close hinge to once again secure extension lock.
- Repeat STEPS 1 & 2 for SECTIONS 2 & 3 of the Telescopic Pole, using the extension lock directly below each of those sections.
NOTE: It is recommended to extend Telescopic Pole to its full height during steamer operation; this will ensure optimal steam flow through the Hose.
CONNECTING HOSE

- Place end of Hose onto threaded Hose Base (FIGURE 6-A).
- Rotate coupling in clockwise direction until Hose is tightly secured onto Hose Base (FIGURE 6-B). Hand tighten only. Do not over-tighten.
- Hang Steam Nozzle on specially designed Steam Nozzle Cradle (FIGURE 6-C).

To prevent steam from causing bodily injury or damage to surfaces, always hang Steam Nozzle on Steam Nozzle Cradle when not in use. Do not lay Hose on the floor as condensation may build up, causing unwanted water droplets in the steam. Do not pull on the Hose with excessive force as this may damage it, resulting in a steam leak.
CONNECTING FABRIC BRUSH

- Make sure Lighted On/Off Switch is set to "O" (off) position, and that unit is not emitting any steam.
![]()
Do not try to connect Fabric Brush while unit is emitting steam, as this can cause burns and injury. - Align Fabric Brush with Steam Nozzle as shown (FIGURE 7).
- Press Fabric Brush firmly onto Steam Nozzle. The two pegs will fit into the two larger holes on face of the nozzle, while latch fits over top of the nozzle (FIGURE 7-A).
Your new SF-520 Full Size Fabric Steamer is now fully assembled and ready for use. Please continue reading this manual for instructions on using the Full Size Fabric Steamer, as well as directions for proper cleaning, storage and troubleshooting.
To avoid tip over, always use steamer on stable and level surface.
HOW TO USE
FILLING WITH WATER

- Remove Water Tank from main unit.
- Holding Water Tank upside-down, unscrew and remove Valve Cap by rotating it in a counterclockwise direction (FIGURE 8-A).
- Fill Water Tank with water through Valve Cap hole. At full capacity, the Water Tank holds 70oz (2,070 ml) of water, and will provide a continuous steam time of approximately 63 minutes. For quick steaming tasks, a smaller amount of water can be used.
NOTE: In order to minimize potential mineral build-up and prolong the life of your Full Size Fabric Steamer, distilled or de-mineralized water is recommended.
![]()
Only water should be used in unit – other chemicals or cleaning agents may cause internal damage. Do not attempt to substitute any other water tank for the one designed for use with this unit. - Replace Valve Cap by rotating it in a clockwise direction.
- Place Water Tank back onto main unit (FIGURE 8-B). The sound of water flowing from Water Tank into Water Reservoir should be audible for a short period of time.
NOTE: Water Tank can be removed and refilled at any time during operation – there is no need to turn unit off or allow any cooling period.
![]()
Do not attempt to operate unit with an empty Water Tank.

GENERAL OPERATION
NOTE: Be sure that Water Tank has been filled and, if desired, the Fabric Brush is connected before following these steps.
- For first-time use, remove protective plastic cover that is shipped on electrical plug. Plug power cord into a convenient electrical outlet. Do not change the plug in any way.
![]()
This unit uses a polarized electrical plug, with one prong that is larger than the other. This plug will fit into a wall outlet only one way. If the plug does not correctly fit in the outlet, contact a licensed electrician to install a proper outlet. Do not attempt to alter plug or circumvent this safety feature in any way. - Set Lighted On/Off Switch to "I" (on) position, and verify that switch is illuminated.
- After approximately 45 seconds of heating time, unit will begin producing a flow of steam from Steam Nozzle.
NOTE: It is common for the unit to produce gurgling sounds and small amounts of water during the first few minutes of steaming. This is due to water condensation inside cold Hose, and should be reduced as the Hose heats up. - Once steam flow is steady and excess condensation has been removed from Hose, you may proceed with your steaming tasks. Refer to Fabric Steaming section for more information about steaming garments and other fabrics.
![]()
Always be sure that Steam Nozzle is pointed in a safe direction (away from yourself, other people, pets and plants) when steaming. - When you are finished using the Full Size Fabric Steamer, immediately set Lighted On/Off switch to "O" (off) position and unplug power cord from electrical outlet. Refer to Storage & Care for proper cleaning and storage procedures.
FABRIC STEAMING
STEAMING GARMENTS:
- To expand Hanger for use, fold the two arms upward until the lower support arms line up straight (FIGURE 9-A). Slide lock to secure arms in place (FIGURE 9-B). A garment may now be placed on the Hanger.
![]()
- Alternatively, place garment on a clean, rust-free clothes hanger. Place hanger (with garment) on one of the Clothes Hanger Hooks (FIGURE 10).
![]()
Use care when handling garments hanging on unit. Pulling on the garment with too much force may cause the unit to tip over.

- Direct Steam Nozzle towards bottom of garment. Steam will rise along inside and outside of fabric, removing wrinkles. Slowly slide Steam Nozzle vertically, from bottom to top of garment (FIGURE 11).
NOTE: Do not allow kinks to form in Hose at any time during use.

- Direct Steam Nozzle away from garment and smooth fabric with your free hand.
- Repeat STEPS 3 & 4 as necessary until fabric is fresh and wrinkle-free.


BURN HAZARD. Do NOT touch the Steam Nozzle or surrounding area. Use CAUTION to avoid touching the heated plate when refilling the unit.
GENERAL STEAMING TIPS:
- For most effective results, hold Steam Nozzle within 1/2" of fabrics, or press it directly against surfaces.
- Curtains and draperies can be steamed while still hanging.
- To remove wrinkles from towels, handkerchiefs and napkins, drape them over a rod or towel rack and gently steam them.
- Heavier fabrics may require repeated steaming to achieve desired results.
- To remove exceptionally stubborn wrinkles, steam both sides of fabric.
- Be especially careful when steaming any delicate fabrics that may be damaged by heat or water spotting.
- To remove particles like lint, hairs and loose threads, connect the Fabric Brush to the Steam Nozzle.
STORAGE & CARE
PROPER STORAGE
Preparing your Full Size Fabric Steamer for storage is quick and simple. When you have finished your steaming tasks, follow the steps listed below.
- Set Lighted On/Off Switch to "O" (off) position, and unplug power cord from electrical outlet.
- Allow unit to cool (minimum 30 minutes for complete cooling).
- Bring unit to a convenient sink or tub.
- Remove Water Tank from unit. Unscrew Valve Cap and drain all remaining water from Water Tank. Replace Valve Cap when finished.
- Open Drain Plug and drain all remaining water from Water Reservoir to prevent overfilling during your next use. Securely replace Drain Plug and place empty Water Tank back onto main unit.
- For storage convenience, you may wish to collapse Telescopic Pole to its most compact height.
- Wrap power cord around Cord Wrap. Store Full Size Fabric Steamer in a cool dry location.
MINERAL BUILD-UP
A common maintenance need for steam appliances is the removal of build-up caused by high mineral content in many municipal water supplies. This mineral build-up may limit the effectiveness and reduce the life of your Full Size Fabric Steamer.
The best way to minimize mineral build-up is to use distilled or de-mineralized water when using your Full Size Fabric Steamer. In addition, it is recommended that the cleaning procedure below be followed at least once a month in order to remove any deposits that form. This will help to extend the life of your Full Size Fabric Steamer and keep it functioning at its maximum potential.
To remove mineral build-up:
- Press Power Switch to "OFF" position and unplug power cord from electrical outlet.
- Allow unit to cool (minimum 30 minutes for complete cooling).
- Bring unit to a convenient sink or tub.
- Remove Water Tank from unit. Unscrew Valve Cap and drain all remaining water from Water Tank.
- Drain all remaining water from the Water Reservoir through Hose Base.
- Fill a measuring cup (not included) with 12 oz (355 ml) vinegar.
- Pour vinegar into Water Tank, then replace Valve Cap and place Water Tank back onto main unit.
- Allow vinegar to flow into Water Reservoir / Boiler and soak for 30-40 minutes.
- Plug power cord into an electrical outlet and set Power Switch to "ON" position. Allow unit to steam until no vinegar remains.
- Drain any remaining cleaning solution from the Water Reservoir through Hose Base.
- Remove and refill Water Tank to maximum capacity (70 oz / 2,070 ml) with fresh water and place it back onto main unit. Allow all fresh water to flow into Water Reservoir / Boiler and be steamed out. Refill and repeat as necessary until vinegar odor has completely dissipated.
- When finished, press Power Switch to "OFF" position and unplug power cord from electrical outlet. Follow normal storage procedure as outlined in Proper Storage section above.
TROUBLESHOOTING
| PROBLEM | POSSIBLE CAUSE | SOLUTION |
| Unit fails to heat up. Lighted On/ Off Switch DOES NOT illuminate when set to "I" (on) position. | Unit is not plugged in. | Plug power cord into electrical outlet. |
| Household circuit breaker / ground fault interrupter has tripped or blown a fuse. | Reset circuit breaker / ground fault interrupter, or replace fuse. For assistance, contact a licensed electrician. | |
| Unit is damaged or in need of repair. | Immediately cease usage and unplug. Contact Consumer Service for assistance. | |
| Unit fails to heat up. Lighted On/ Off Switch DOES illuminate when set to " I" (on) position. NOTE: Always allow sufficient time for unit to heat up and begin producing steam. | No water in Boiler. | Refer to Filling Boiler With Water procedure to refill Boiler. |
| Mineral build-up in unit. | Refer to Storage & Care section. | |
| Unit is damaged or otherwise in need of repair. | Immediately cease usage and unplug. Contact Consumer Service for assistance. | |
| Excessive gurgling in Hose and Steam Nozzle / water drips from Steam Nozzle. | Condensation build-up inside of Steam Nozzle / Hose. | Some gurgling is a natural effect of the steaming process. For excessive gurgling or dripping water, point Steam Nozzle downward and shake thoroughly to remove excess water droplets. |
| Mineral build-up in tank. | Refer to Storage & Care section. | |
Steam output is weak or intermittent | Water level in Water Reservoir is running low. | Refer to Filling With Water procedure to refill unit with water. |
| Mineral build-up in unit. | Refer to Storage & Care section. |
PRODUCT SUPPORT
ACCESSORIES & PARTS
When ordering replacement accessories for your Full Size Fabric Steamer, you may refer to the part numbers below. Replacement accessories may be ordered through our Web site:
www.steamfast.com
You may also contact Consumer Service directly: consumerservice@steamfast.com or 1-800-711-6617
FABRIC BRUSH
A520-001

HANGER
A510-002

IMPORTANT SAFETY INSTRUCTIONS
This owner's guide and any additional inserts are considered part of the product. They contain important information about safety, use, and disposal. Before using the product, please familiarize yourself with all operating and safety instructions. Please keep all documents for future reference and pass these documents on, together with the product, to any future owner. See steamfast.com to view, download and print the most current version of this owner's guide.
When using your appliance, basic precautions should always be followed, including the following:
INTENDED USE: Use appliance only for its intended use. This product is intended to be used indoors for garment steaming in the United States. This product is not intended for commercial or industrial use. The manufacturer assumes no responsibility for damage or injury due to unauthorized use or product modification. Failure to follow these directions will void the product warranty.

Risk to Children and Impaired Persons
Supervision is required during the installation, operation, cleaning and maintenance of this product by children 12 years of age and younger and anyone with reduced physical, sensory or mental capabilities. Children should be supervised to ensure that they do not play with the appliance, its parts and packaging material.
- Close supervision is required for any appliance used by or near near children and pets. Do not leave the appliance unattended while it is connected.
BURN HAZARD - To reduce the risk of burns or injury to persons, observe the following:
- Use caution when handling this steam unit. Burns could occur from touching hot metal parts, hot water, or steam. Use special care to avoid contact with hot water when turning the product upside down to empty the reservoir.
- Burns can occur from touching hot plastic parts, hot water, or steam. Do not touch Steam Nozzle or attempt to connect any accessories while unit is in use. Use caution when you turn unit upside-down - there may be hot water inside.
- Do not attempt to use unit without properly filling Water Tank. To avoid burns from escaping steam when refilling tank: Allow all remaining steam pressure to release and always allow unit to cool before refilling.
- To reduce the risk of contact with hot water emitting from steam vents, check appliance before each use by holding it away from body and turning on steam. Do not operate unit if steam vents are blocked.
- Do not point steam vents at people or pets as serious injury or damage can occur.- Do not steam articles while wearing. Remove article before using this appliance.
To avoid damage to the unit or power cord, and to reduce risk of fire, electrical shock and injury to persons, observe the following:
- Do not use the product if it has been dropped, if there are visible signs of damage, or if it is leaking. Shock, fire, or injury may occur.
- Do not allow cord to touch hot surfaces. Let appliance cool completely before putting away. Loop cord loosely around appliance when storing.
- Never yank cord to disconnect from outlet; instead, grasp plug and pull to disconnect.
- This appliance has a polarized plug (one blade is wider than the other.) To reduce the risk of electrical shock, this plug is intended to fit in a polarized outlet only one way. If the plug does not fit fully in the outlet, reverse the plug. If it still does not fit, contact a qualified electrician. Do not attempt to defeat this safety feature.
- If an extension cord is absolutely necessary, a 12.5 ampere rated cord should be used. Cords rated for less amperage may overheat. Care should be taken to arrange the cord so that the cord cannot be pulled or tripped over.
- A loose fit between wall outlet (receptacle) and plug may cause overheating and distortion of the plug. Discontinue use of the product in this outlet. Contact a qualified electrician to replace loose or worn outlets.
- To reduce the risk of electric shock, do not immerse the appliance in water or other liquids.
- Always disconnect appliance from electrical outlet when filling with water or emptying, and when not in use.
- To reduce the likelihood of circuit overload, do not operate another high wattage appliance on this same circuit.
- Only use distilled water to fill unit. Do not use cleaning agents or other substances to fill unit. Cleaning agents and other substances could result in injury or damage to the unit.
- Use caution when carrying unit up stairs or over obstacles, or when using unit on or near an uneven surface, as tilting the unit could result in hot water spitting, which could result in injury.
- Unit is only meant to be used with recommended accessories. Using other types of attachments may cause damage to unit or injury.
- Do not use unit where aerosol-based products are being used, or where oxygen is being administered.
- Always allow unit to cool (minimum 30 minutes for complete cooling) and empty Water Tank before storing. Place Steam Nozzle in Steam Nozzle Cradle when cooling, to avoid heat damage to surfaces.

SERVICING WARNING—To reduce risk of fire, electrical shock and injury to persons, observe the following:
- Do not operate the appliance with a damaged cord, or if the appliance has been dropped or damaged. To reduce the risk of electric shock, do not disassemble or attempt to repair the appliance, take it to a qualified service person for examination and repair. Incorrect reassembly or repair could cause a risk of fire, electric shock, or injury to persons when the appliance is used.
- If Lighted On/Off Switch does not illuminate when unit is plugged in and Switch is set to "ON" position, unit is not operating normally. Immediately disconnect cord from power supply, then refer to troubleshooting guide of this manual for assistance.
- Clean your product regularly, only as is instructed in this manual. Prior to cleaning, turn off the power on your product and unplug. Do not use gasoline, thinners, solvents, ammonias or other chemicals for cleaning. Refer to the cleaning instructions provided.
SAVE THESE INSTRUCTIONS
Documents / Resources
References
Download manual
Here you can download full pdf version of manual, it may contain additional safety instructions, warranty information, FCC rules, etc.
Advertisement


Need help?
Do you have a question about the SF-520 and is the answer not in the manual?
Questions and answers