
Related Manuals for Steamfast SF-275


Summary of Contents for Steamfast SF-275
- Page 1 M O D E L : S F - 2 7 5 ENGLISH P. 2 C A N I S T E R S T E A M C L E A N E R O W N E R ’ S G U I D E...
-
Page 2: Important Safety Instructions
8. Do not operate unit with a damaged power cord or if the unit has been dropped or damaged. To avoid risk of electrical shock, do not disassemble unit; contact Steamfast Consumer Service for examination and repair. Incorrect reassembly can cause a risk of electrical shock when unit is used. - Page 3 WARNING: Changes or modifications to this unit not expressly approved by the party responsible for compliance could void the user’s authority to operate the equipment. SAVE THESE INSTRUCTIONS Questions or comments? • steamfast.com • consumerservice@steamfast.com • 1-800-711-6617 Speak your mind! We invite you to review this product online: steamfast.com/reviews...
-
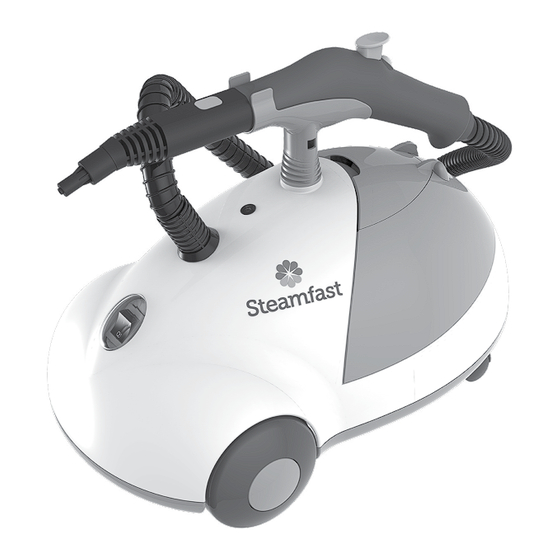
Page 4: Product Information
Product Information The following features and accessories are included with your Canister Steam Cleaner. Carefully inspect the packing material for all parts listed below. UNIT FEATURES & ACCESSORIES Lighted On/Off Switch Steam Ready Light Storage Compartment Reservoir (internal) Handle Steam Lock Switch Steam Button Carry Handle Main Nozzle... - Page 5 Product Information • The Lighted On/Off Switch (1) activates and deactivates the unit, and illuminates to provide a clear visual indication of whether the unit is powered on. • The Steam Ready Light (2) illuminates while the Reservoir is heating, then turns off when the unit is ready to begin steaming.
- Page 6 Assembling Your Canister Steam Cleaner STEAM MOPPING ACCESSORIES WARNING: Do not try to connect accessories while unit is emitting steam. EXTENSION WANDS 1. Select one of the Extension Wands, and align rear end of wand with Main Nozzle. Rectangular hole in wand should align with gray lock/release button on nozzle. 2.
-
Page 7: Microfiber Pads
Assembling Your Canister Steam Cleaner MICROFIBER PADS 1. Lay one Microfiber Pad on flat surface, with two fastener strips facing upward. 2. Align Mop Head above Microfiber Pad. Make sure Mop Head is oriented with pad as shown, and centered as best as possible (FIGURE 3-A). 3. - Page 8 Assembling Your Canister Steam Cleaner STEAM CLEANING ACCESSORIES WARNING: Do not try to connect accessories while unit is emitting steam. STEAM JET NOZZLE / SQUEEGEE / TRIANGLE BRUSH 1. Select one of the three accessories (Steam Jet Nozzle, Squeegee or Triangle Brush – Steam Jet Nozzle shown as example), and align rear end of accessory with Main Nozzle.
-
Page 9: Carry Handle
Carry Handle, until secured to main unit. FIGURE 7 ORDERING ACCESSORIES & PARTS Replacement accessories and parts for your Canister Steam Cleaner (model SF-275) may be ordered through our web site: www.steamfast.com You may also contact Consumer Service directly: consumerservice@steamfast.com or 1-800-711-6617... - Page 10 Using Your Canister Steam Cleaner FILLING RESERVOIR 1. Place Canister Steam Cleaner on a flat, level surface. 2. Make sure Lighted On/Off Switch is set to “OFF” position and grounded power cord is unplugged from electrical outlet. 3. Flip Storage Compartment lid open, and cautiously unscrew and remove Reservoir cap. 4.
-
Page 11: General Operation
Using Your Canister Steam Cleaner GENERAL OPERATION NOTE: Be sure that Reservoir has been filled and that all desired accessories are connected before following these steps. 1. For first time use, remove protective plastic cover from electrical plug. Plug power cord into a convenient electrical outlet. -
Page 12: Mineral Build-Up
Storage, Care & Product Support PROPER STORAGE Preparing your Canister Steam Cleaner for storage is quick and simple. When you have finished your steaming tasks, follow the steps listed below. 1. Set Lighted On/Off Switch to “OFF” position and unplug power cord from electrical outlet. 2. -
Page 13: Troubleshooting
Troubleshooting PROBLEM POSSIBLE CAUSE SOLUTION Unit fails to heat up. Lighted On/ Unit is not plugged in. Plug power cord into electrical outlet. Off Switch DOES NOT illuminate Household circuit breaker / ground Reset circuit breaker / ground fault when set to “ON” position. fault interrupter has tripped or interrupter, or replace fuse. -
Page 14: Warranty Information
Warranty Information Steamfast, a division of Vornado Air, LLC. Steamfast warrants to the original consumer or pur- chaser this Steamfast (“Product”) is free from defects in material or workmanship for a period of two (2) years from the date of purchase. If any such defect is discovered within the warranty period, Vornado, at its discretion, will repair or replace the Product at no cost. - Page 15 1-800-711-6617 | steamfast.com | consumerservice@steamfast.com T275-001 RA, V03...
Need help?
Do you have a question about the SF-275 and is the answer not in the manual?
Questions and answers