XP-PEN Artist 12, Artist 12 SML Manual
- Manual (19 pages) ,
- User manual (15 pages)
Advertisement
Product Overview
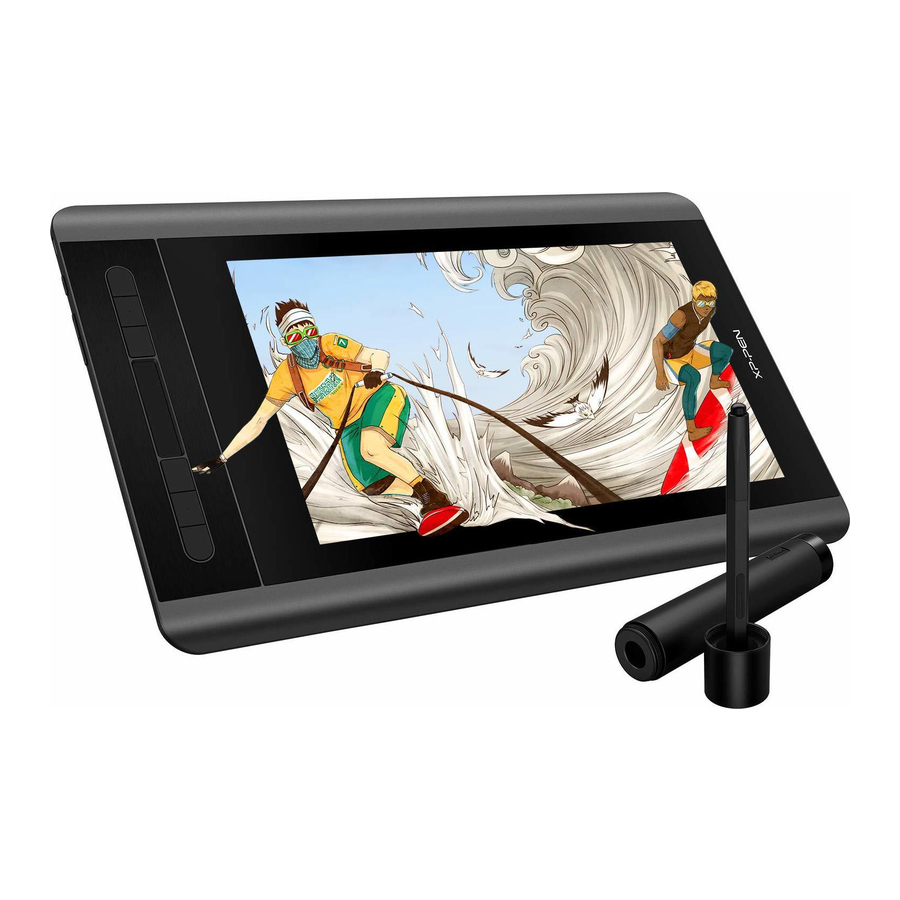
Overview

See Image 1-1.
- Display/Working area
- Express keys
- Touch bar
- USB port
- Status indicator light
- Blue: The Artist 12 is connected to your computer and powered on.
- Red: The Artist 12 is powered on, but not connected to a computer.
- No Light: The Artist 12 is powered off.
- Brightness up
- Brightness down
Active area

See Image 1-2.
Connecting the Device
- The RED USB cord plugs into the USB extender cable. (See Image 2-1)

- Plug the USB cord into the Artist 12.
- Plug the Artist 12 HDMI and USB cords into your computer.
- If can't turn on, please plug the USB extender cable into adapter and wall outlet. (See Image 2-2)

- Press the power to turn on the Artist 12.


Notes:
If your tablet displays a "No Signal" error message:
- Unplug the Artist 12's HDMI and USB cords, then plug them back in. If possible test out different USB or HDMI ports. Ensure that each cord is connected well. Reboot your computer, then turn the Artist 12 off and back on.
- Test the Artist 12 on a different computer to check for hardware issues.
- If the error persists on different computers and does not solve it, please contact XP-Pen support.
Driver Installation
Supported operating systems:
Windows 10, 8 or 7
Mac OS X 10.10 or above
NOTES:
- Disable any antivirus or firewall software and close any non-essential background software before beginning the installation. Some software, such as OneDrive and Dropbox, may monopolize important files and prevent a successful installation. On Windows computers, check the system tray on the bottom-right of the screen and close any software unrelated to your computer hardware.
- Uninstall any existing tablet software before attempting to install the Artist 12 driver. Other tablet drivers may conflict with the Artist 12 driver or prevent installation entirely.
- You can download the latest driver version from the XP-Pen website (www.xp-pen.com). If you choose to download the driver from the website, be sure to extract the ".zip" file contents before running ".exe" or ".pkg."
Windows
- Please download the latest driver version from the XP-Pen website (https://www.xp-pen.com/download/index/id/65.html) and be sure to extract the ".zip" file contents onto your desktop before running ".exe".
- After a successful installation, the driver's icon (
![]() ) will appear in your system tray. If the icon is not present, uninstall the driver, reboot, and repeat step 1.
) will appear in your system tray. If the icon is not present, uninstall the driver, reboot, and repeat step 1. - Right click your desktop and choose "Display Settings", change your dual monitor settings to "Extend these displays".
- Set your desktop and Artist 12's resolution to 1920x1080, then apply and exit.
- Double-click the tablet driver's system tray icon to open your tablet settings. Set your Artist 12's "Current Screen" to Monitor 2, then apply and exit. (See Image 3-1)

 ) will appear in your system tray. If the icon is not present, uninstall the driver, reboot, and repeat step 1.

Note:
To use Paint Tool Sai (SAI) with the Artist 12, please open your computer's Display settings and set "Size to text, apps, etc" to 100%. See Image 3-2.
Mac
- Please download the latest driver version from the XP-Pen website (https://www.xppen.com/download/index/id/65.html).
- Extract the ".zip" file contents before running ".pkg".
- If you run into the error message below, please open "System Preferences" - "Security & Privacy" and "unlock" the driver. (See Image 3-3)
![]()
- If you run into the error message below, please complete the following steps. (See Image 3-4)

- Open "System Preferences," then "Security & Privacy". (See Image 3-5)

- Click "Open Anyway" button. (See Image 3-6)

- Input your username and password, then click "Unlock." (See Image 3-7)

- Open "System Preferences," then "Security & Privacy". (See Image 3-5)
- Follow the on-screen instructions, then reboot your computer. (See Image 3-8)

- Open [System preferences] > [Display] > [Arrangement]. (See Image 3-9)

- In the Arrangement tab, you may choose to Mirror Displays. With Mirror Displays enabled, both monitors' resolutions should be set to 1920x1080.
- Open [Finder] > [Applications] > [Touch Tablet] > [Pen Tablet Setting].
- In the Monitor tab, set Monitor Mapping to Artist 12. (See Image 3-10)

- With Mirror Displays disabled, set your Artist 12's resolution to 1920x1080.
- Open [Finder] > [Applications] > [Touch Tablet] > [Pen Tablet Setting].
- In the monitor tab, set Monitor Mapping to Artist 12. (See Image 3-10)


Driver Settings UI
Notes:
- The Artist 12's shortcut keys are designed to work with US English keyboards. Keys may not function correctly with the other keyboard languages. (See Image 4-1)
![]()
- By default, the Artist 12 express keys are mapped to standard Photoshop keyboard shortcuts. Keys can be customized to function efficiently in other software.

Windows

Double-click the driver's icon (  ) in system tray. See Image 4-2
Pen Function Settings

You may customize the functions of your tablet pen's barrel button here. Use the "Function Key" option to program custom keystrokes. (See Image 4-3)
Note:
Stylus top side supports eraser function.
Click Sensitivity & Current Pen Pressure
You can adjust pen pressure to "Output" or "Press" sensitivity on here. Current Pen Pressure shows the current pressure level being exerted on your tablet and can be used to test pen pressure. (See Image 4-4)

Current Screen
The Artist 12 may be configured for use with single or dual monitors. Generally, this should be set to "Monitor 1" or Monitor 2." (See Image 4-5)

Mouse Mode
Absolute (Pen) Mode: Standard tablet mode; Each point of the tablet's work area corresponds to an absolute point on your computer display.
Relative (Mouse) Mode: Mouse mode; The tablet's work area does not correspond to absolute points on your computer display and your pen works as a standard mouse. See Image 4-6

Import & Export Profiles
You can use the Import & Export Profile function to save/load your barrel buttons and shortcut keys setting. See Images 4-7 & 4-8

Note:
When you complete setting up your barrel buttons and shortcut keys, click the OK button to save and exit the tablet settings menu first.
Windows Ink
This capability can be toggled on and off here. Enabling this will allow support for Windows Ink and applications that run using Windows Ink. See Image 4-9.

Express Keys Setting
See Images 4-10 & 4-11
In this tab, you may edit the functions of the Artsit 12's shortcut keys. Use the "Definition" option to program custom keystrokes.
Disable express keys: When you enable it, all of the express keys function will be disabled.
Hide hints: When you enable it and press any express key, the message will not popup on the bottom of your screen.


You also can define 5 touch bar functions on it.
Click "Default" to revert to manufacturer settings. (See Image 4-12)
Note:
You can set each shortcut key for different software.
- Click the "+" button to go to Select Program tab. (See Image 4-13)

- You can choose Default or use Browse to select your choice of software. (See Image 4-14)

- Return to the shortcut key settings tab, click the tablet icon then customize the shortcut keys. When you are finished, click the OK button and exit the tablet settings menu.


Calibration
The Calibration tab allows you to set up calibration for your tablet. See Image 4-15

Display Setting

See Image 4-16
- Color Temperature: Use to adjust the Artist 12's color balance.
- User: Use to adjust red, green and blue color levels on the Artist 12's display. Brightness and contrast can also be adjusted here.
- Rotate: You may rotate the Artist 12's display in this tab.
Default
You can click Default button to driver default settings.
XP-Pen Logo

If a driver update is available, you will see a blue arrow here (  ). Click the arrow to update your driver.
Click our logo to visit our website. (See Image 4-17)
Mac
Notes:
- The Artist 12's shortcut keys are designed to work with US English keyboards. Keys may not function correctly with the other keyboard languages.
- By default, the Artist 12 express keys are mapped to standard Photoshop keyboard shortcuts. Keys can be customized to function efficiently in other software.

To open the Artist 12's driver settings, open Finder > Applications > PenTabIetSetting. See Image 4-18
Pen

See Image 4-19
- In this tab, you may customize the functions of your stylus's barrel button, adjust pressure sensitivity, and test your pen pressure.
- Click "Default Button Setting" to revert to manufacturer settings.
Note:
Stylus top side supports eraser function.
- Pen Pressure:
When the "Disable pen pressure" function is enabled, you can disable the pen pressure function. - Output:
You can adjust pen pressure to "Output" or "Press" sensitivity on here.
It shows the current pressure level being exerted on your tablet and can be used to test pen pressure.
Import & Export Profiles
You can use the Import & Export Profile function to save/load your barrel buttons and shortcut keys setting. See Image 4-20 & 4-21


Monitor
The "Monitor" tab allows you to configure your tablet for use Main monitor (monitor 1) or Artist 12 (monitor2). See Image 4-22

Express Keys
In the Express Keys tab, you may choose your preferred functions for the Artist 12's shortcut keys. Use the "Reset Customer Defined" option to program custom keystrokes. See Image 4-23 & 4-24


Calibration

See Image 4-25
The Calibration tab allows you to calibrate your tablet or rotate your display.
To calibrate, click Calibration and follow the on-screen instructions.
Rotate: You may rotate the Artist 12's display in this tab.
About
This tab displays the current version of your driver software. See image below.

Driver Uninstall
Windows
In the Start menu, open [Settings] → [Apps & features]. Find "Pentablet" and click "Uninstall." Follow the on-screen instructions.
Mac

Open [Finder] → [Application] → [Pen Tablet], then click "Uninstall Pen Tablet" and follow the on-screen instructions. See Image 5-1.
NOTE:
When attempting to reinstall the Artist 12 driver, be sure to reboot your computer after the uninstall is complete.
FAQ
-
Where can I download the latest driver
- Latest driver releases can be downloaded from our website (www.xp-pen.com).
-
I can't use the stylus to control the cursor
- Please turn on your Artist 12 and make sure you can see the display.
- Please install the driver again then find the tablet icon in the system tray or desktop.
- Open it then test the pen pressure gauge inside
- If you can't test the pen pressure, please uninstall the driver and reboot. Make sure your computer login account has Administrator authority.
- The Artist 12 supports plug and play, please test your stylus pens function before reinstalling the driver. If you have control, please disable your antivirus then go to the XP-Pen website to download the latest driver.
- When the download is complete, please extract the contents of the folder to run the.exe or.pkg installation file.
- Open the tablet setting again then make sure can you use the pen pressure on it
- How do I know that the Artist 12 driver installed successfully?
- After installing the driver, the Artist 12's driver icon
![]() should be visible in your system tray on the bottom-right of your screen (Windows OS) and desktop. Pen input will control the cursor and pressure sensitivity will be functional in the driver.
should be visible in your system tray on the bottom-right of your screen (Windows OS) and desktop. Pen input will control the cursor and pressure sensitivity will be functional in the driver.
- After installing the driver, the Artist 12's driver icon
- Why can't I use the pen pressure on the drawing software?
- Please make sure the drawing software can support pen pressure
- Make sure you have the latest driver installed.
- Open the tablet setting and make sure you can test the pen pressure in it
- Enable the "windows ink" function then click the 0k button to exit. Open the drawing software again and test your pen pressure.
- Please note our tablets do not come with drawing software.
 should be visible in your system tray on the bottom-right of your screen (Windows OS) and desktop. Pen input will control the cursor and pressure sensitivity will be functional in the driver.
Safety Precautions
This manual uses the following symbols to ensure that the XP-PEN Tablet is used correctly and safely. Be sure to read and observe the Safety Precautions.

Do not use this product in a control system area that requires a high degree of safety and reliability.
In such a system, this product could negatively affect other electronic devices and could malfunction due to the effect of those devices.

Turn the power off in areas where use of electronic devices is prohibited.
Turn the power off your tablet when onboard an aircraft or in any other location where use of electronic devices is prohibited, otherwise it may negatively affect other electronic devices in the area. Unplug the USB connector from this product and turn the power off.

Keep the product away from infants and young children.
Accessories to this gadget may present a choking hazard to small children. Keep all accessories away from infants and young children.

Do not place this product on unstable surfaces.
Avoid placing this product on unstable, tilted surfaces or any locations exposed to excessive vibrations. This may cause the tablet to fall or impact surfaces which can result in damage and/or malfunction to the tablet.
Do not place heavy objects on top of this product.
Do not place heavy objects on the product. Do not step on, or place your body weight on this product as this may cause damage.
Avoid extreme high or low-temperature exposure to the XP-Pen tablet.
Do not store this product in areas that drop below 5°C or above 40°C. Avoid locations with excessive temperature fluctuations. This may result in damage to the product and its components.


Do not disassemble
Do not disassemble or modify this product. Doing so may expose you to heat, fire, electric shock and injury. Disassembling the product will void your warranty.
Do not use alcohol for cleaning
Never use alcohol, thinner, benzene or other mineral solvents that may discolor and cause deterioration to the product.
Do not expose to water
Be cautious of water and all liquids that may be near the tablet. Exposure to water or liquid could damage the product.
Avoid placing metallic objects and especially magnetic objects on the tablet.
Placing metallic and/or magnetic objects on this product during operation may cause malfunction or permanent damage.
Do not strike the pen against hard objects.
Striking the pen against hard objects can cause damage to the pen.
Avoid gripping the pen too tightly, and DO NOT use excessive weight/pressure on the Express Key button and pen.
The stylus pen is a high-precision instrument. Avoid pressing too tightly on the Express Key button, and keep any objects from covering the pen to avoid potential damage. Keep the pen away from areas of high dust, contaminants, or any particulate matter that can effect or damage the pen.
If you have any questions, please contact us at:
Web: www.xp-pen.com
Email: service@xp-pen.com
Documents / Resources
References
![www.xp-pen.com]() Graphic drawing tablets & Digital Art Pads With Screen | XPPen
Graphic drawing tablets & Digital Art Pads With Screen | XPPen![www.xp-pen.com]() Download latest Drawing Tablets Drivers And User Manual | XPPen
Download latest Drawing Tablets Drivers And User Manual | XPPen![www.xppen.com]() Download latest Drawing Tablets Drivers And User Manual | XPPen
Download latest Drawing Tablets Drivers And User Manual | XPPen
Download manual
Here you can download full pdf version of manual, it may contain additional safety instructions, warranty information, FCC rules, etc.
Advertisement


Need help?
Do you have a question about the Artist 12 and is the answer not in the manual?
Questions and answers