Advertisement
- 1 Technical Specification
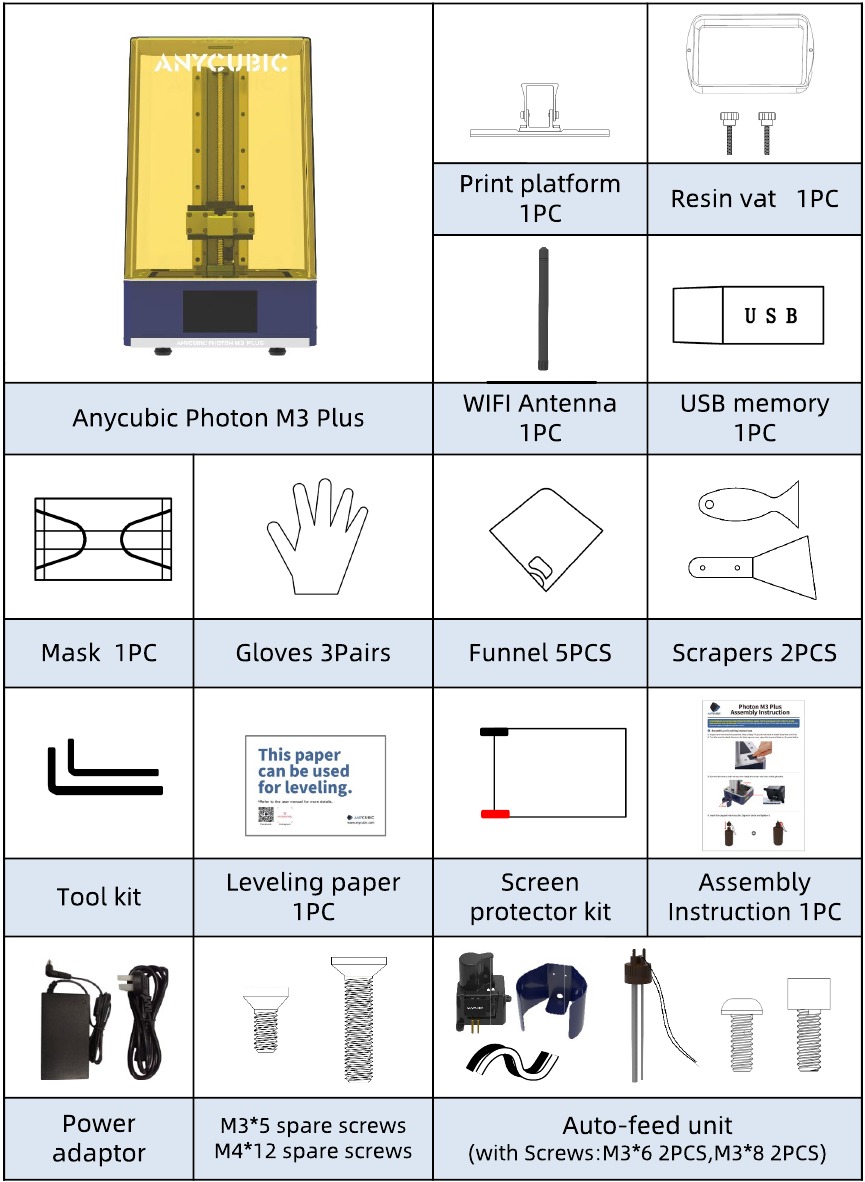
- 2 Packing List
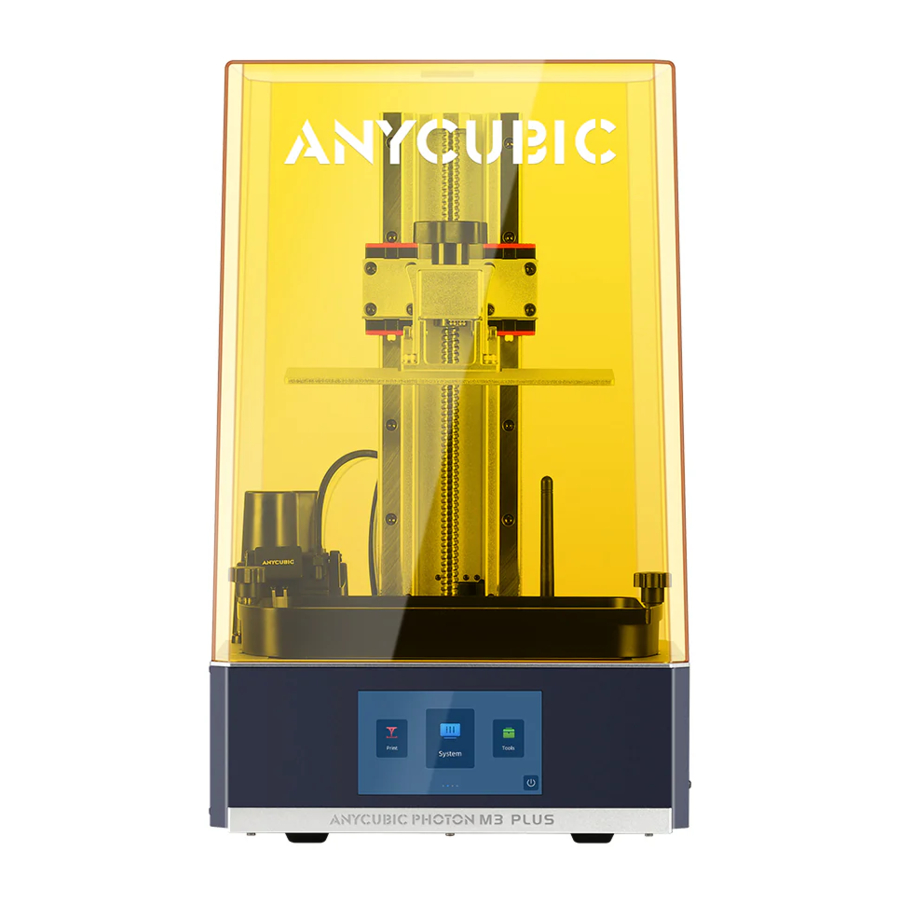
- 3 Product Overview
- 4 Menu Directory
- 5 Assembly and Leveling Instructions
- 6 Auto-feed Instructions
- 7 Troubleshooting
- 8 First Print Instructions
- 9 Slicing Software Overview
- 10 Anycubic Cloud
- 11 FAQ
- 12 Machine maintenance
- 13 Safety Instructions
- 14 Documents / Resources
Technical Specification
| Printing | |
| Model | Anycubic Photon M3 Plus |
| Operation | 5-inch capacitive touch screen |
| Software | Anycubic Photon workshop |
| Connectivity | USB memory stick, Anycubic Cloud |
| Specifications | |
| Technique | LCD Shadow Masking |
| Light source | UV-LED (wavelength 405nm) |
| XY Resolution | 34.4μm 5760*3600 (6K) |
| Z axis Accuracy | 0.01 mm |
| Suggested Layer Thickness | 0.01 ~ 0.15mm |
| Suggested Print Speed | MAX 100mm/h |
| Rated power | 120W |
| Physical Dimensions | |
| Dimension | 360mm (L) *290mm (W) *475mm (H) |
| Build volume | 197mm (L) *122mm (W) *245mm (H) |
| Materials | 405nm UV-resin |
| Net weight | ~12 kg |
| Recommended Printing Parameters | |
| Layer Thickness | 0.05 mm |
| Normal Exposure Time | 1.5 s |
| Off Time | 0.5 s |
| Bottom Exposure Time | 23 s |
| Bottom Layers | 6 |
| Z Lift Distance | 6 mm |
| Z Lift Speed | 6 mm/s |
| Z Retract Speed | 6 mm/s |
| Anti-alias | 1 |
Note:
The recommended printing parameters above is for reference only, which is more suitable for Anycubic resin.
Packing List
Product Overview


Auto-feed unit
Menu Directory


System


Tools


Cloud

Assembly and Leveling Instructions
- Unpack the machine and take out the accessories. Skip to Step 7 if you do not want to install auto-feed unit first.
- Turn the machine back. Remove the black square cover upon the base and take out the wire below.

- Connect the wire to resin sensor, then install the sensor and resin-holding bracket.

- Insert the cap part into Anycubic 1kg resin bottle and tighten it.

- Pass two pipes through the limit hole on the back of the machine from the bottom up. Connect ports II with feeding pipe (black) and connect ports I with air pipe (transparent). Please completely follow this way of connection to avoid the damage of auto-feed unit. Then, connect the cap part wire to machine.

- Place resin bottle on the bracket.
TIPS: When you change resin, it is recommended to tighten the cap through rotating bottle to avoid blockage caused by twisting pipes.
![]()
- Turn the machine back to the front. Then plug in the power cord and turn on the printer.

- Rise the Z axis to a certain height to ensure that the curing screen will not be scratched when the printing platform is installed.

- Tear off the protective film before leveling and printing.

- Loosen the four screws on the printing platform.

- Install and secure the printing platform.

- Place the leveling paper on the curing screen. Then click on the touch screen. Wait for descent of Z axis.

- Press on top of the platform gently, and then tighten the four screws to secure the platform.

- Lastly, click "Z=O" and confirm to save the zero position. Click "Enter" and Z axis will automatically lift up. Then, take out the paper.

- Raise printing platform until the curing screen can be observed completely. Return to Tools menu and click "Exposure". Select an image, set the test time and then click "Next". The corresponding image should be displayed completely on curing screen.

- Install resin vat with both needles being set in it.

- Install WIFI antenna.


Auto-feed Instructions
Ensure the auto-feed unit has been installed and the resin in bottle is enough to print. The function is for supplement only, please pour resin into resin vat before printing.

Click "Tools" → "Auto-feed" → "Feed in". It will feed in automatically if resin in the vat is sufficient during printing. Click "feeding speed" to set the speed.
- Auto-feed only works when machine is printing.
- The unit feeds every five minutes normally.
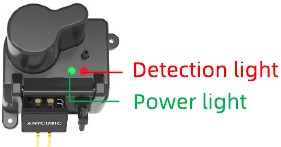
- Green light indicates that the unit has been powered.
- Red light indicates that resin is not detected by needles. When needles detects resin, the light goes off.
If the insufficiency of the resin in bottle is detected when it is printing, the machine will beep to warn and disable auto-feed function. Please add or change resin first and click auto-feed button to enable it if necessary.
Notice:
- If you use non-Anycubic resin, it is suggested to check whether red light goes out normally when resin reaches both needles before printing. If not, the resin cannot be automatically fed.
- To save resin, pour the remaining resin that is out of the reach of pipes to resin vat.
- DO NOT vigorously shake or turn over the resin bottle when cap part is installed. If the inside of cap is stained by resin, please immediately clean it to avoid malfunction or damage of autofeed unit.
Troubleshooting
| Issues | Troubleshooting | Solution | |
Do not feed in during printing | Red light is off | The resin in vat reaches both needles | Wait until the resin is insufficient. |
| The resin in vat does not reach both needles | The power light(green) is off, reconnect the wire under detection unit. | ||
| Two needles touch each other. Please contact the tech support. | |||
| Resin abnormally gets into the air pipe to cause malfunction of the unit. A replacement is needed. | |||
| Red light is on | Waiting status | It feeds every five minutes normally. Wait for the next feeding. | |
| Feeding status | The wrong connection of air pipe and feeding pipe cause malfunction of auto-feed unit. A replacement is needed. | ||
| The machine shows resin in bottle is insufficient and disable auto-feed function | Resin in bottle is insufficient | Add resin to bottle | |
| Resin in bottle is sufficient but machine shows its status as No Resin | The two screws on the cap is loosened | Tighten the screws | |
| The wire connecting cap and machine is disconnected | Connect the wire to machine | ||
| Nothing wrong with screws and wire | The resin cannot be used for auto-feed | ||
Consistent feeding cause overflow of resin | Red light does not go off when resin reaches both needles | The resin cannot be used for auto-feed unit | |
| The lowest points of needles is rose | Check whether you completely follow the assembly instructions | ||
| Two needles are distorted. Please contact the tech support. | |||
*Please contact the tech support if the troubleshooting above cannot solve your problem.
First Print Instructions
*Please check FEP film carefully before and after every printing. If the FEP film is broken, replace it immediately to avoid further damage to machine.

Wear masks and gloves (to avoid direct skin contact with resin), and slowly pour the resin into the vat. The resin cannot exceed the vat's maximum scale. Then, put on the cover and the side with sticker needs to face backward. Insert the USB memory into the USB port, print the test file in it. Or connect the machine to Anycubic Cloud and remotely control the printing. The printing time on the screen is for reference only, we make no guarantee that it is the actual printing time.
Notes:
- It is recommended that use the USBdrive we provided. Otherwise, please use the USB drive whose memory size not exceed 8G and ensure that it is formatted to FAT/FAT 32.
- The print files should be placed at the root directory of USB drive to avoid read error.

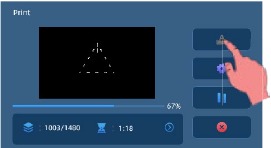
If it is necessary, click "Pause" to pause the printing and wait for platform rising automatically. Then click "Start" to resume printing.
File list

File list is consist of USB driver file list and local file list. The print files sent remotely from Anycubic Cloud will be saved to local file list.
The first two level directory can be checked. For example, insert USB drive and then select USB drive file to open its first level directory. And click the file icon to open the second level directory.
Machine settings

Click Settings in Tools interface to adjust the machine setting according to the personal requirement.
Door detection: The function is disabled by default. If this function is enabled, the printer can detect whether the cover is on or not. Printing will pause when the cover is removed, and will continue when the cover is put back.
UV power: Set UV power to adjust the exposure intensity. The default value is 80%. Its range is
Fan power: Set fan power to adjust the wind force of fan. The default value is 80%. Its range is
Handling models and residues
After printing, wait until the resin stop dropping from the platform and then unscrew and remove the platform. The model can be removed by scraper carefully. The removed model should be washed with ethanol 95vol% concentration. The printed model may need post curing to achieve better hardness by direct sunlight or UV-curing box.


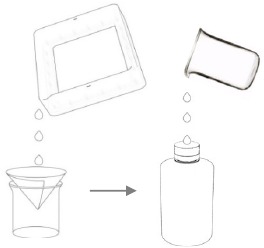
Inevitably, in case of incomplete curing or failed prints, there might be some cured resin left in the vat. It is suggested to filter the resin by a funnel and then store the liquid in a sealed container. The residues left on the platform or in the vat can be wiped off with paper towel.
Before each prints, please ensure there is no solid residues in the vat or on the platform, otherwise the FEP film may be crushed and broken during printing.
Power off

If you want to power off the 3D printer completely after printing, please click the icon in home menu to shut down, then turn off the power switch and disconnect the power cord. Otherwise, it may cause data loss and malfunction.
Slicing Software Overview
3D printer reads sliced file and prints models. It is necessary to convert 3D files (stl./obj.) into sliced files for machine to recognize. Software that realize the process is called slicing software, for example, Anycubic Photon Workshop.
Anycubic Photon Workshop can be used to export sliced file. You should select Anycubic Photon M3 Plus as machine type first, then manipulate the model and set the parameters. Lastly, export the sliced file (.pwmb).
The instruction of Anycubic Photon Workshop has been saved in the USB memory, it is recommended that read it carefully if it is the first time for you to use Anycubic Photon Workshop.
Anycubic Cloud
- Connect Anycubic Photon M3 Plus to Anycubic Cloud to upload and manage printing over WIFI and Ethernet.
- Connect with Ethernet: Plug one end of the network cable into the network port.

- Connect with WIFI: Install the antenna first. Click "Cloud" → "WLAN", turn on to search for available network and select one. Then, enter the password and click OK to connect.

- Connect with Ethernet: Plug one end of the network cable into the network port.
- To download the application, search "Anycubic Cloud" in App Store or Google Play. Sign up and log in Anycubic Cloud. Then, select "Global" server in Cloud interface on the printer.


- Open Anycubic Cloud - workbench 3D printers, click "Add Printers". Open Cloud interface on the printer, check Machine CN and enter it to "Add Printers" interface in Anycubic Cloud; or click "
![]() " icon and then scan QR code with your smart phone. Lastly, confirm to add printers.
" icon and then scan QR code with your smart phone. Lastly, confirm to add printers.

- When printer is added successfully, you can control printing remotely. If necessary, you can install an extra camera unit to monitor printing in real time.
 " icon and then scan QR code with your smart phone. Lastly, confirm to add printers.
FAQ
-
Model do not stick to platform
- Bottom exposure time is insufficient, increase the exposure time.
- Contact area between the model and platform is small, please add raft.
- Bad leveling.
-
Layer separation or splitting
- The machine is not stable during printing.
- FEP film in the vat is not tight enough or it need a change for new one.
- The printing platform or resin vat is not tightened.
- The lift speed is too fast.
- The printing object is hollowed without punching.
-
Layer shift
- Add supports.
- Reduce the lift speed.
-
Floccules left in resin vat
- The exposure time is too long. Reduce the normal exposure time and bottom exposure time.
Machine maintenance
- If Z axis make noisy sound, please apply lubricant to Z lead screw.
![]()
- Clean off the residues cured on FEP film when the printing fail: Set full-screen exposure for 20s and then remove the cured resin sheet to protect the film. Do not use sharp objects to scrape off the residues on the FEP film.

- Be careful when remove the platform, do not let it fall onto the curing screen.
![]()
- Do not left the resin in the vat for over two days if not using it. Please filter and store the resin properly.
![]()
- Firmware update: Click "System" → "lnformation" → "Version check" to check whether the current firmware can be updated. To update firmware, you can copy latest firmware file to USB driver and then click Local upgrade button. When the latest version is detected by OTA and the upgrade button of OTA upgrade highlights, you can click the button to upgrade directly.

- After printing, please clean up the platform (wipe with paper towels or wash with alcohol), and ensure no residue left before next print (filter the residue with funnel).
- If the outside of printer is stained with resin, use alcohol to clean.
- To switch the resin colors, please clean the original resin vat first.


Safety Instructions
Always follow the safety instructions during assembly and usage, to avoid any unnecessary damage to the 3D printer or individual injury
Please contact our customer service first if you have any issue after receving the products.

Be cautious when using the scraper. Never direct the scraper towards your hands.

In case of emergency, please immediately cut off the power of 3D printer and contact the technical support.

ANYCUBIC 3D printer includes moving parts that can cause injury.

It is recommended to use protection glasses when cleaning/sanding the printed models to avoid small particles contacting

Keep the ANYCUBIC: 3D printer and its accessories out of the reach of children.

Vapors or fumes may be irritating at operating temperature. Always use the ANY 3D printer in an open and well ventilated area.

ANYCUBIC 3D printer must not be exposed to water or rain.

ANYCUBIC 3D printer is designed to be used within ambient temperature ranging 8°C-40°C, and humidity ranging 20%-50%. Working outside those limits may result in low quality printing.
Do not disassemble ANYCUBIC 3D printer, please contact technical support if you have any question.
Please visit https://support.anycubic.com to contact us if you have any question. You can also gain more information such as software, videos, models from the website.

Anycubic support center
Documents / Resources
References
Download manual
Here you can download full pdf version of manual, it may contain additional safety instructions, warranty information, FCC rules, etc.
Advertisement


Need help?
Do you have a question about the Photon M3 Plus and is the answer not in the manual?
Questions and answers