Harvia THE WALL SW45 / SW60 / SW80 Manual
- Instructions for installation and use manual (72 pages) ,
- Instructions for installation and use manual (44 pages) ,
- Instructions for installation and use manual (96 pages)
Advertisement
- 1 INTRODUCTION
- 2 INSTRUCTIONS FOR USE
- 3 TROUBLESHOOTING
- 4 SAUNA ROOM
- 5 INSTALLATION INSTRUCTIONS
- 6 WARNINGS
- 7 Documents / Resources
INTRODUCTION
The heater is designed for the heating of a sauna room to bathing temperature. It is not to be used for any other purpose.

INSTRUCTIONS FOR USE
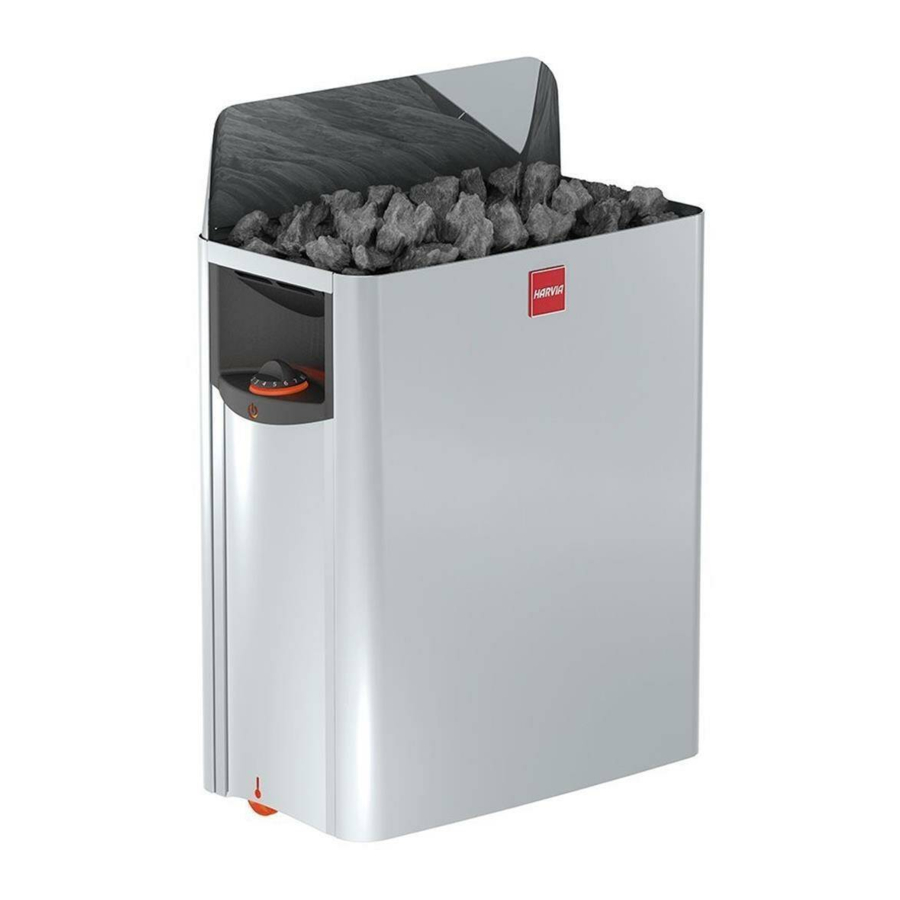
Piling of the Sauna Stones
The piling of the sauna stones has a great effect on the functioning of the heater (figure 1).

Sauna heater stones are significant in terms of the unit's safety. In order for the warranty to remain valid, the user is responsible for proper maintenance of the stone space in accordance with the specifications and instructions.

Important information on suitable sauna stones:
- Suitable sauna stone materials are peridotite, olivine diabase, olivine and vulcanite.
- Only use cleavage surface and/or rounded stones for your sauna heater.
- If the heating elements of an electric sauna heater are in contact with the stones, rounded stones may only be used in the outer layers of the stone space, so that they do not come into contact with the heating elements.
- Ceramic stones and decorative stones may only be used if they have been approved by the manufacturer and are used according to the their instructions.
- Note that decorative stones are only suitable on the top layer of the stone space. Decorative stones must be placed loosely to ensure sufficient air circulation. Place any decorative stones so that they do not touch the heating elements of an electric sauna heater. If you have a woodburning stove, make sure the stones do not touch the stove's hot inner frame.
- The warranty does not cover any defects that have been caused by the use of decorative stones or by sauna stones not recommended by the manufacturer.
- The stones should be 5–10 cm in diameter.
- Wash off dust from the stones before piling them into the heater.
- Do not pile more than 20 kilograms of stones.
Please note when piling the stones:
- Heating elements must be completely covered.
- Place the stones sparsely to ensure that air can circulate between them.
- No such objects or devices should be placed inside the heater stone space or near the heater that could change the amount or direction of the air flowing through the heater.
Maintenance
Due to large variation in temperature, the sauna stones disintegrate in use. Rearrange the stones at least once a year or even more often if the sauna is in frequent use. At the same time, remove any pieces of stones from the bottom of the heater and replace any disintegrated stones with new ones. By doing this, the heating capability of the heater stays optimal and the risk of overheating is avoided.
Heating of the Sauna
When operating the heater for the first time, both the heater and the stones emit smell. To remove the smell, the sauna room needs to be efficiently ventilated. If the heater output is suitable for the sauna room, it will take about an hour for a properly insulated sauna to reach the required bathing temperature (See "Unit Output"). The sauna stones normally reach the bathing temperature at the same time as the sauna room. A suitable temperature for the sauna room is about 65–80°C.
Using the Unit
 Before switching the heater on always check that no objects have been placed on top of the heat- er or inside the given safety distance. See "Warnings".
- Heater models SW45E, SW60E and SW90E are controlled using a separate control unit. See the instructions for use of the selected control unit model.
- Heater models SW45, SW60, SW80 and SW90 are equipped with a timer and a thermostat (figure 2). The timer is used to set the on-time for the heater and the thermostat for adjusting a suitable temperature.

Figure 2. Knobs (SW45, SW60, SW80, SW90)- Timer knob
- Thermostat knob

Turning the unit on immediately
(SW45, SW60, SW80, SW90)
Turn the timer knob clockwise to the "on" section (0-4 hours). The heater starts heating until the timer returns to 0 and the lights turn on.
Turning the unit off
(SW45, SW60, SW80, SW90)
The heater is switched off, when the timer reaches zero. You can switch the heater off at any time by manually turning the timer knob counter-clockwise. The lights will also turn off.
Turn off the heater after you have finished bathing. It may sometimes be advisable to leave the heater on for a short time, to ensure that the wooden structures are properly dried.
Make sure that the heater has been turned off and stopped heating after the on-time has passed. The timer and thermostat lights are not lit when no current goes through the heater.
Adjusting the Temperature
(SW45, SW60, SW80, SW90)
The thermostat maintains a desired temperature in the sauna. To find the most suitable temperature, try alternating the thermostat setting.
 Begin by setting the thermostat to the maximum position. If the temperature rises uncomforatbly high, slightly turn the thermostat knob counter-clockwise. Please note that a small change in the high temperature end results in a notable change in air temperature.
Throwing Water on Heated Stones
The air in the sauna room becomes dry when warmed up. Therefore, it is necessary to throw water on the heated stones to reach a suitable level of humidity in the sauna. The effect of heat and steam on people varies – by experimenting, you can find the levels of temperature and humidity that suit you best.
Aim water only on the stones.
| Water properties | Effect | Recommendation |
| Humus concentration | Colour, taste, precipitates | <12 mg/l |
| Iron concentration | Colour, odour, taste, precipitates | <0,2 mg/l |
| Manganese (Mn) concentration | Colour, odour, taste, precipitates | <0,10 mg/l |
| Hardness: most important substances are magnesium (Mg) and lime, i.e. calcium (Ca) | Precipitates | Mg: <100 mg/l Ca: <100 mg/l |
| Chloride-containing water | Corrosion | Cl: <100 mg/l |
| Chlorinated water | Health risk | Forbidden to use |
| Seawater | Rapid corrosion | Forbidden to use |
| Arsenic and radon concentration | Health risk | Forbidden to use |
Table 1. Water quality requirements

The maximum volume of the ladle is 0.2 litres. If an excessive amount of water is poured on the stones, only part of it will evaporate and the rest may splash as boiling hot water on the bathers. Never throw water on the stones when there are people near the heater, because hot steam may burn their skin.
The water to be thrown on the heated stones should meet the requirements of clean household water (table 1). Only special aromas designed for sauna water may be used. Follow the instructions given on the package.
Instructions for Bathing
- Begin by washing yourself.
- Stay in the sauna for as long as you feel comfortable.
- Forget all your troubles and relax.
- According to established sauna conventions, you must not disturb other bathers by speaking in a loud voice.
- Do not force other bathers from the sauna by throwing excessive amounts of water on the stones.
- Cool your skin down as necessary. If you are in good health, you can have a swim if a swimming place or pool is available.
- Wash yourself after bathing.
- Rest for a while and let your pulse go back to normal. Have a drink of fresh water or a soft drink to bring your fluid balance back to normal
Symbol descriptions
 | Do not cover. |
TROUBLESHOOTING
All service operations must be done by professional maintenance personnel
The unit does not heat up
- Check that the fuses of the heater are in good condition.
- Check that the connection cable is connected (See "Electrical connections").
- Check that the overheat protector has not gone off (See "Resetting the Overheat Protector").
The sauna room heats slowly. Water thrown on the sauna stones cools down the stones quickly
- Check that the fuses to the heater are in good condition.
- Check that all heating elements glow when the heater is on.
- Turn the temperature to a higher setting (See "Throwing Water on Heated Stones" and the instructions for use of the control unit)
- Check that the heater output is sufficient (See "Unit Output").
- Check that the sauna room ventilation has been arranged correctly (See "Sauna room ventilation").
The sauna room heats quickly, but the temperature of the stones remain insufficient. Water thrown on the stones runs through.
- Check that the heater output is not too high (See "Unit Output").
- Check that the sauna room ventilation has been arranged correctly (See "Sauna room ventilation").
Panel or other material near the unit blackens quickly
- Check that the requirements for safety distances are fulfilled (See "Minimum Safety Distances").
- Check that no heating elements can be seen behind the stones. If heating elements can be seen, rearrange the stones so that the heating elements are covered completely (See "Piling of the Sauna Stones").
- Also see "Blackening of the Sauna Walls" in the "Sauna room structure" section.
The product emits smell
- See "Heating of the Sauna"
- A hot heater may emphasize odours mixed in the air that are not, however, caused by the sauna or the heater. Examples: paint, glue, oil, seasoning.
The product makes noise
- Occasional bangs are most likely caused by stones cracking due to heat.
- The thermal expansion of heater parts can cause noise when the heater warms up.
- SW45, SW60, SW80, SW90: Note that the mechanical timer makes a ticking noise when functioning properly.
SAUNA ROOM
Sauna room structure

Figure 3.
See Figure 3.
- Insulation wool, thickness 50–100 mm. The sauna room must be insulated carefully so that the heater output can be kept moderately low.
- Moisture protection, e.g. aluminium paper. Place the glossy side of the paper towards the sauna. Tape the seams with aluminium tape.
- Vent gap of about 10 mm between the moisture protection and panel (recommendation).
- Low mass 12–16 mm thick panel board. Before starting the panelling, check the electric wiring and the reinforcements in the walls required by the heater and benches.
- Vent gap of about 3 mm between the wall and ceiling panel.
- The height of the sauna is usually 2100–2300 mm. The minimum height depends on the heater (see table 2). The space between the upper bench and ceiling should not exceed 1200 mm.
- Use floor coverings made of ceramic materials and dark joint grouts. Particles disintegrating from the sauna stones and impurities in the sauna water may stain and/or damage sensitive floor coverings.
NOTE! Check from the fire authorities which parts of the firewall can be insulated. Flues which are in use must not be insulated.
 NOTE! Light protective covers which are installed directly to the wall or ceiling may be a fire risk.
NOTE! Make sure that the water dripping onto the sauna floor enters the floor drain.
Blackening of the Sauna Walls
It is perfectly normal for the wooden surfaces of the sauna room to blacken in time. The blackening may be accelerated by:
- sunlight
- heat from the heater
- protective agents on the walls (protective agents have a poor heat resistance level)
- fine particles disintegrating from the sauna stones which rise with the air flow.
Sauna room ventilation
- The air in the sauna room should change six times per hour.
- Mechanical ventilation: The supply air vent must be located in the upper part of the sauna so that it does not interfere with the operation of the temperature sensor. (Figure 4).

- Pressure ventilation: The supply air vent should be installed below or next to the sauna heater. The diameter of the supply air vent should be between 50 mm and 100 mm.
- Exhaust air vent. Place the exhaust air vent near the floor, as far away from the heater as possible. The diameter of the exhaust air pipe should be twice the diameter of the supply air pipe.
- Optional vent for drying (closed during heating and bathing). The sauna can also be dried by leaving the door open after bathing.
- If the exhaust air vent is in the washroom, the gap underneath the sauna door must be at least 100 mm. Mechanical exhaust ventilation is mandatory.

 The temperature sensor must always be installed in the specified place. If the minimum distance from the supply air vent is not met, the ventilation must be altered!
Do not place the supply air vent so that the air flow cools the temperature sensor
Unit Output
When the walls and ceiling are covered with panels and insulation behind the panels is adequate, the heater output is defined according to the volume of the sauna. Non-insulated walls (brick, glass block, glass, concrete, tile, etc.) increase the need for heater output. Add 1,2 m³ to the volume of the sauna for each non-insulated wall square meter. For example, a 10 m³ sauna room with a glass door equals the output requirement of about a 12 m³ sauna room. If the sauna room has log walls, multiply the sauna's volume by 1,5. Choose the correct heater output from Table 2.
Sauna Room Hygiene
Bench towels should be used during bathing to prevent sweat from getting onto the benches.
The benches, walls and floor of the sauna should be washed thoroughly at least every six months. Use a scrubbing brush and sauna detergent.
Wipe dust and dirt from the heater with a damp cloth. Remove lime stains from the heater using a 10% citric acid solution and rinse.
INSTALLATION INSTRUCTIONS
Before installation
Before installing the heater, study the instructions for installation. Check the following points:
- Is the output and type of the heater suitable for the sauna room? The cubic volumes given in table 2 must be followed.
- Is the supply voltage suitable for the heater?
- The location of the heater fulfils the minimum requirements concerning safety distances given in fig. 5 and table 2.

- See Resetting the Overheat Protector

Note! Only one electrical heater may be installed in the sauna room. The heater should be installed so that the warning texts can be read without difficulty after the installation.
| Heater | Output | Dimensions(X/Y/Z, fig. 5) | Stones | Sauna room | |||
| Weight | Volume | Height | |||||
| kW | mm | kg | max. kg | See "Unit Output" min. m³ | max. m³ | min. mm | |
| SW45 | 4,5 | 430/260/610 | 11,1 | 20 | 3 | 6 | 1900 |
| SW60 | 6,0 | 430/260/610 | 11,6 | 20 | 5 | 8 | 1900 |
| SW80 | 8,0 | 430/260/700 | 13,6 | 20 | 7 | 12 | 1900 |
| SW90 | 9,0 | 430/260/700 | 13,6 | 20 | 8 | 14 | 1900 |
| SW45E | 4,5 | 380/260/610 | 9,2 | 20 | 3 | 6 | 1900 |
| SW60E | 6,0 | 380/260/610 | 9,7 | 20 | 5 | 8 | 1900 |
| SW90E | 9,0 | 380/260/700 | 10,7 | 20 | 8 | 14 | 1900 |
Table 2. Installation details
Minimum Safety Distances
The minimum safety distances are shown in figure 5. It is absolutely necessary to install the heater according to these values. Neglecting them causes a risk of fire.
Safety Railing
If a safety railing is built around the heater, the minimum distances given in fig. 5 or in the railing's instructions for installation must be observed.
Electrical connections
The heater may only be connected to the electrical network in accordance with the current regulations by an authorised, professional electrician.
Electical connections in figure 11.


- The heater is semi-stationarily connected to the junction box (figure 8:2) on the sauna wall. The junction box must be splash-proof, and its maximum height from the floor must not exceed 500 mm.
- The connecting cable (figure 8:1) must be of rubber cable type H07RN-F or its equivalent.
NOTE! Due to thermal embrittlement, the use of PVC-insulated wire as the connecting cable of the heater is forbidden. - If the connecting and installation cables are higher than 1000 mm from the floor in the sauna or inside the sauna room walls, they must be able to endure a minimum temperature of 170°C when loaded (for example, SSJ). Electrical equipment installed higher than 1000 mm from the sauna floor must be approved for use in a temperature of 125°C (marking T125).
Device Insulation Resistance
When performing the final inspection of the electrical installations, a "leakage" may be detected when measuring the heater's insulation resistance. The reason for this is that the insulating material of the heating elements has absorbed moisture from the air (storage, transport). After operating the heater for a few times, the moisture will be removed from the heating elements.
Do not connect the power feed for the heater through an RCD (residual current device)!
Installation of the Control Unit and Sensor
(SW45E, SW60W, SW90E)
The control unit includes detailed instructions for fastening the unit on the wall. Install the sensor (WX248) as shown in figure 6. If the heater is installed further than 100 mm from wall, the sensor must be installed on the ceiling.

The temperature sensor must always be installed in the specified place. If the minimum distance from the supply air vent is not met, the ventilation must be altered!
The supply air vent of the sauna room must not be located near the temperature sensor. The flow of air from the valve cools the air by the time it reaches the temperature sensor, giving an incorrect reading. As a result, the sauna heater may become too hot. The air vent's minimum distance from the sensor: Figure 4.
Suitable control units
- Harvia C105S
- Harvia C150
- Harvia C170VKK
- Harvia C90
- Harvia Senlog CF9
- Harvia Xenio CX110 / CX110XW
- Harvia Xenio CX110C / CX110CXW
- Harvia Xenio CX170 / CX170XW
See the latest control unit models in our website www.harvia.com.
Installing the Product

See figures 6, 7, 8 and 9.
- Connect the power cable (fig. 8:1) to the heater.
- Install the wall mount horizontally to the wall using suitable fasteners. Make sure that the heater is supported not only by the wall panel (figure 7). Take note of the floor's slope. Using the wall mount ensures the 80 mm safety distance.

- Lift the heater into the mount and make sure it is centered (figure 9:1-3).
- Install the steam guide to the heater and the wall mount (figure 9:4-5).
- Secure the heater to the wall mount by screwing two screws behind the steam guide (figure 9:6).
- Connect the power cable to the wall outlet.

Replacing the Heating Elements

See figure 10. Disconnect all electrical connection, remove the stones and lift the heater off the wall mount.
- Bend open two tabs securing the element support.
- Pull out the element support.
- Open the service hatch.
- Remove the element cable and screw.
- Replace the faulty element. Re-assemble the heater in opposite order.
Resetting the Overheat Protector
SW45E, SW60E, SW90E: See the instructions for use of the selected control unit model.
SW45, SW60, SW80, SW90: The heater is equipped with an overheat protector. If the sensor's ambient temperature rises too high, the overheat protector will permanently cut off power to the heater. Resetting the overheat protector is shown in figure 12.

The reason for overheating must be resolved before resetting the overheat protector!
Overheat protector of the device can go off also at temperatures below -5˚C / 23˚F (storage, transport, environment). Before installation take the device to the warm environment. The overheat protector can be reset when the temperature of the device is approx 18˚C / 64˚F. The overheat protector must be reset before using the device.

WARNINGS
- Staying in the hot sauna for long periods of time makes the body temperature rise, which may be dangerous.
![]()
Keep away from the heater when it is hot. The stones and outer surface of the heater may burn your skin.- Keep children away from the heater.
- Do not let young, handicapped or ill people bathe in the sauna on their own.
- Consult your doctor about any health-related limitations to bathing.
- Consult your child welfare clinic about taking little babies to the sauna
- Be very careful when moving in the sauna, as the platform and floors may be slippery.
- Never go to a hot sauna if you have taken alcohol, strong medicines or narcotics.
- Never sleep in a hot sauna.
- Sea air and a humid climate may corrode the metal surfaces of the heater.
![burn hazard]() Do not hang clothes to dry in the sauna, as this may cause a risk of fire. Excessive moisture content may also cause damage to the electrical equipment.
Do not hang clothes to dry in the sauna, as this may cause a risk of fire. Excessive moisture content may also cause damage to the electrical equipment.
Documents / Resources
References
Download manual
Here you can download full pdf version of manual, it may contain additional safety instructions, warranty information, FCC rules, etc.
Advertisement


Need help?
Do you have a question about the THE WALL SW45 and is the answer not in the manual?
Questions and answers