Skydio X2D Manual
- Operator's manual (89 pages) ,
- User manual (80 pages) ,
- Maintenance manual (22 pages)
Advertisement
Equipment
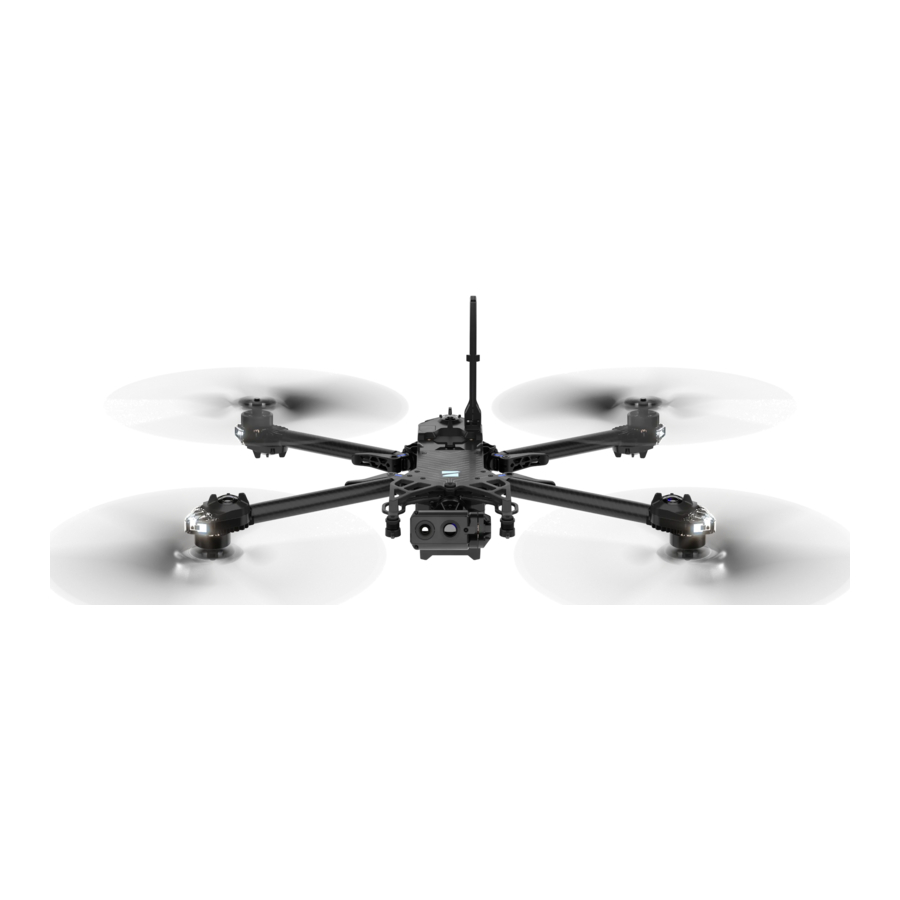
Hardware Overview

- Chassis
- Navigation camera (6)
- Gimbal
- Motor pod (4) RGB/IR/Strobe navigation lights
- Propeller hub
- Propeller blades clockwise (6) counter-clockwise (6)
- Arm (4)
- Arm clamp (4)
- Antenna(s)
- MicroSD card ports & seal
- USB-C port & seal
- Cooling outlet (2)
- Hard stop (4)
- Battery
- Gimbal isolator (3)
- Power button
Skydio Hardware

- Color EO camera
- Thermal IR camera
- Gimbal pitch motor
- Gimbal roll motor
- Telephoto camera
- Cooling fan outlet
Payload bay

- Touchscreen
- USB-C charge port
- Cooling fan
Fleet Management
Updates
Fleet management of your Skydio drones includes updates, passwords, data storage, and deleting media as needed. Ensure that your batteries have a full charge to complete the update.
- Access the files from Skydio Fleet Manager for Offline Drones
- .zip file which is the update for your X2D vehicle
- .tar file which is the update for your Skydio Enterprise Controller
- Generate the.zip file and download the.tar file
- Insert a memory drive into your computer
- Copy the offline_ota folder and the.tar file into the root level of your memory drive
- So that they are not contained inside any other folders
- Safely eject the memory drive from your computer
- Insert the memory drive into the USB-C port on the vehicle
- Power on the vehicle
- The update will begin automatically
- The lights on your drone will pulse blue
- The camera gimbal will disengage and go slack
- The process may take several minutes
- When the update is complete, the camera gimbal will re-engage
- Remove the memory drive
- Power on your Skydio X2D and Skydio Enterprise Controller and connect
- Select the INFO menu
- Select Paired Drone
- verify that the software version listed matches the software version provided by Skydio
Update Skydio Enterprise Controller
- Power on your controller
- Select the INFO menu
- Select Controller Update
- Insert the memory drive into your controller
![]()
- Select Update
- Navigate to the memory drive root folder
- Select the update.tar file
- Select Done
- The update will begin automatically
- Allow up to five minutes for the update to complete
- During this process, your controller may restart multiple times
- Verify that the version number matches the version number provided by Skydio

Data Storage
There are two 256 GB UHS Speed Class 3 (or faster) microSD cards one for storing media and one for recording flight logs. Each card will occasionally need to be cleared of data and reformatted. Reformatting the cards will delete the stored data, ensure that any data is safely transferred.
- Select the INFO menu and drone name under Devices
- Select Manage Data and either
- Format Media Card or
- Format Logs Card
- Select Delete when the warning message displays
- Select OK in the confirmation message

- Select OK in the confirmation message

The Media menu displays a gallery of unencrypted images and videos and allows you to manage captured images and videos. To access the media viewer:
- Select the Review menu
- Individual thumbnails can be selected to view in full screen
- Select single or multiple to export
- Select the trashcan to delete
Passwords
You will be prompted to set a password for your X2D system. It is recommended that you occasionally update your password per your organizations guidelines. To change your original password:

- Select the INFO menu
- Select change password

The password cannot be recovered or reset. Ensure that your password is entered correctly and is written down and stored in a safe location. If the password is lost, the controller will need to be replaced.
Maintenance
Cleaning
It is recommended to wipe down your drone after flights in environments with significant dust or debris.
Do not submerge your drone or batteries or place them under running water. Water volumes from flight in precipitation are much lower than those from a faucet or hose. Water may get into areas where the drone is not designed to withstand and you may compromise the sensors.
- Wipe down your drone with a dry or water-damp microfiber cleaning cloth
- Only use lens cleaner on cameras
- Do not submerge your drone or batteries
- Do not place your drone or batteries under running water
- Use a compressed air canister to remove any debris in hard to reach areas
- If needed, mild soap and water may be used to remove heavier dirt or debris. Avoid getting any soap near ingress areas on the drone
- Keep all the drain holes on the drone and battery clear. If any debris is blocking a drain hole (e.g., mud), use compressed air or gently scrape with a toothpick to remove
Skydio X2D and the Enterprise Controller are not weatherproof. Do not operate in rain, fog, snow, or similar environments. Do not rest the controller in sand, dirt or terrain where particles can get trapped in the fan.
Arm Clamps
If during your pre-flight inspection you observe that the arm clamps on Skydio X2D are not tight, you should inspect and tighten the tension bolts on the clamps. This process involves loosening and tightening the tension bolt set screws.

- Tension bolt set screw
- Tension bolt
- Torque driver
Do not lubricate any of the hinges on your X2D arm, even if they squeak. Doing so may compromise the position of the arms when in flight, resulting in erratic flight and possible collision.
Extend the motor arm:

- Open the arm clamp located at the base of the arm
- Lift the arm out and away from the body of the vehicle and rotate 180°
- Listen and feel for a click when the motor arm are fully extended
- Fold the arm clamp to the locked position on the arm
- Ensure that the blue marks align
- Loosen the tension bolt set screw

- On the arm clamp tension bolt using the torque driver
- Tighten the tension bolt

- Using the torque driver
- Turn the driver clockwise until you hear a click indicating the desired torque level has been achieved
- Tighten the tension bolt set screw

- Turn the torque driver clockwise until you hear a click indicating the desired torque level has been achieved
- Repeat steps 1-6 on the remaining arms


Replace Propeller Blades
If you purchased the Skydio X2D Propeller Kit or an X2D bundle, you received the equipment necessary to replace your propellers:

- Even dot pattern props (6)
- Odd dot pattern props (6)
- Replacement propeller screws (12)
- Torque driver tool
For optimal performance, Skydio recommends replacing your propellers after 100 hours of flight time or if they are damaged. Always replace all three propellers in the hub. Replacing all three propellers will reduce any potential variation between the propellers and track propeller flight time.
Propellers with hairline cracks or large breaks, chops, or bends should be replaced immediately. Do NOT fly the X2D with propellers that are not in good condition as serious bodily harm or injury may occur.
- Identify the damaged propeller
- Hold onto the motor or the propeller hub to stabilize the motor
![]()
- Unscrew the propeller pin using the Torque driver
![]()
- Slide the propeller out of the propeller hub, then repeat with the remaining two propellers in the hub
- Replace all three propellers in that hub. All three replacement propellers must come from the same replacement kit
- Dispose of the removed propellers
![]()
Propeller blades are sharp. Handle with care. Always ensure X2D is turned off before replacing the propellers to avoid injury. Do NOT attempt to replace the propellers while the Skydio X2D is powered on. Doing so is an extreme safety risk and may lead to serious bodily harm or injury.
- Identify the propeller blade markings that match the propeller hub

- Install the propeller with matching marks facing upward
- Ensure that the propellers are oriented in the correct direction clockwise or counter-clockwise
- Located on both sides of the propeller blades are distinct markings
- Find the markings that match the propeller hub and install with the markings facing upward, to ensures that the propeller are in the correct direction (clockwise or counter-clockwise) and orientation.
- Slide the new propeller into the hub
- Insert a new screw from your replacement kit
- Wiggle the screw as you insert the screw to ensure that it seats properly into the hub
- Hold the motor hub to stabilize
- Fasten the screw using the torque driver

- Turn clockwise until you hear a click indicating the desired torque level has been achieved
![]()
Do not reuse screws even if they look to be in good condition. Whenever you replace your X2D propellers, use the new screws provided in your replacement kit.
- Turn clockwise until you hear a click indicating the desired torque level has been achieved
- Inspect to ensure successful installation:

- Propeller screw threads should extend slightly beyond the bottom of the propeller hub
- Dot patterns match between propeller blades and hub
- Propellers can rotate through full range of motion with minimal friction around the propeller screws and do not bind with the hub spokes


Incorrect propeller installation (i.e. failure to match the markings on the propeller to those on the hub) is a safety hazard and may result in potential serious damage to the aircraft and bodily harm or injury to you and bystanders.
Replace Hard Stops
The hard stops prevent the motor arms from over-extending when deployed.

Inspect all four hard stops to ensure they are free of damage and working properly. With motor arms extended and viewing the drone head-on, X2D motor arms should be parallel to the chassis. If an arm is angled upward or downward when fully extended, this is an indication that there is a broken hard stop and it should be replaced.

To replace your hard stops, you will need the T3 driver and replacement hard stops.

- Extend the arm that is either above or below the arm with the damaged hard stop

- Leave the arm with the damaged hard stop folded in
- Loosen the hard stop screw using the T3 driver
- Remove the screw
- Rotate the hard stop so the flange protrudes from the drone
- Grab the hard stop by the flange and pull out
- Rotate the hard stop back and forth to dislodge
- Install the new hard stop(s)

- Place the new hard stop in the socket - the larger diameter pin should be inserted into the drone, and the smaller diameter pin should face outward
- Line up the hole in the hard stop flange with the hole in the drone and insert the screw
- Tighten until the hard stop is secure


Batteries
Skydio X2D uses lightweight, rechargeable lithium polymer batteries (LiPo) that provide higher specific energy than other lithium batteries. Following the guidelines listed below will ensure long battery life and safe operation.
Lifespan
The lifespan of a Skydio X2D battery is 200 battery cycles. A battery cycle is the depletion of at least 80% of the charge. After this point, you may experience a decline in charging and performance. Battery life is highly dependent on your use case, and Skydio recommends replacing your battery when the flight time has degraded below what is acceptable for your use case.
Temperature
- Charging should be completed in an open area
- It is normal for the device to become warm to the touch
- Do not operate Skydio X2D or charge batteries at temperatures below -14°F (-10°C)
- Do not charge your batteries when the ambient temperature is above 95°F (35°C)
- If your batteries do get cold, warm them up in a room-temperature environment - DO NOT use higher heat (hairdryer, etc.) to accelerate heating.
Storage
- Fully charge and discharge vehicle and controller batteries every two months
- Store batteries at room temperature 71°F to 82°F (22°C to 28°C)
- Store batteries in a cool, dry area with less than 75% relative humidity
- Batteries in an idle state (14 days of idle time with no flights) will start to self-discharge in an effort to retain capacity. This may take several days to complete and it is normal for the battery to be slightly warm during this discharge process.
Damage
- Do not disassemble the batteries
- Avoid dropping or striking the batteries
- Do not attempt to use batteries that are damaged, dented, or ruptured after a crash or drop
- Do not immerse the batteries in water or other liquids
- Lithium polymer batteries can leak, overheat, melt, release harmful gas, burst or ignite when exposed to heat, water, and other liquids or when pierced, punctured, or ruptured
- If any substances leak from the battery pack and get into your eyes, do not rub them. Seek medical attention immediately!
- Contact your local waste facility to verify if lithium polymer batteries are permitted for disposal
- Do not insert any foreign material into the battery terminals
- Do not disassemble the battery enclosure
Preflight Inspection

Schedule
| Description | Performed By | Action | Frequency |
| Check for damage, wear, and proper alignment of the blades, propeller hub and interface to motor | Operator | Inspect | Routinely |
| Examine motor mounts for stability and damage | Operator | Inspect | Routinely |
| Inspect for external signs of wear or damage | Operator | Inspect | Routinely |
| Check light cover for damaged | Operator | Inspect | Routinely |
| Inspect fan exhausts for obstructions or damage | Operator | Inspect | Routinely |
| Ensure arms rotate smoothly without obstruction | Operator | Inspect | Routinely |
| Check for damage in the battery connection pins | Operator | Inspect | Routinely |
| Check for batteries for swelling | Operator | Inspect | Routinely |
| Examine navigation cameras for clarity and damage. Check for lens damage and recessed cameras | Operator | Inspect | Routinely |
| Manually spin motors to check for smooth operation | Operator | Check | 10 flight hours |
| Check arm stops for proper functioning | Operator | Check | 10 flight hours |
| Inspect for cracks or damage hard stop | Operator | Inspect | 10 flight hours |
| Inspect arm clamps | Operator | Inspect | 10 flight hours |
| Inspect 6 navigation camera protective fins are present and free of damage | Operator | Inspect | 10 flight hours |
| Check for damage or wear in the battery bay | Operator | Inspect | 10 flight hours |
| Check fan inlets for blockages or damage | Operator | Inspect | 10 flight hours |
| Examine sensor cameras for lens clarity | Operator | Inspect | 10 flight hours |
| Check gimbal motors for movement | Operator | Inspect | 10 flight hours |
| Inspect gimbal isolators for wear or damage | Operator | Inspect | 10 flight hours |
| Charge stored vehicle batteries | Operator | Charge | 2 months |
| Charge stored controller batteries | Operator | Charge | 2 months |
| Check visible motor wires for fraying or damage | Operator | Inspect | 50 flight hours |
| Inspect all fasteners for tightness and wear | Operator | Inspect | 50 flight hours |
| Inspect welds on arms for cracks or weaknesses | Operator | Inspect | 50 flight hours |
| Inspect for damage on gimbal frame, confirm that screws are secure | Operator | Inspect | 50 flight hours |
| Check all USB-C port seals for leaks or damage | Operator | Inspect | 50 flight hours |
| Test lights for proper operation | Operator | Inspect | 50 flight hours |
| Check cables for damage | Operator | Inspect | On Install |
| Replace damaged or worn propellers | Operator | Replace | 250 flight hours |
| Replace damaged or worn hard stops | Operator | Replace | 250 flight hours |
| Replace batteries as needed due to health warnings, visual inspection, or damage | Operator | Replace | On fault or damage |
| Replace battery lifecycle | Operator | Replace | 200 cycles |
| Replace faulty motors or arms | Skydio | Replace | On fault or damage |
| Factory service to replace cameras and recalibration and repeat end of line tests | Skydio | Replace | On fault or damage |
| Replacement or update sensor | Operator | Replace | On fault or damage |
Documents / Resources
References
Download manual
Here you can download full pdf version of manual, it may contain additional safety instructions, warranty information, FCC rules, etc.
Advertisement


Need help?
Do you have a question about the X2D and is the answer not in the manual?
Questions and answers