3M Versaflo TR-600 Series, TR-6710N-5, TR-6710N-40 Manual
- User instructions (35 pages) ,
- Quick start manual (3 pages) ,
- Manual (3 pages)
Advertisement
- 1 System Description
- 2 LIST OF WARNINGS AND CAUTIONS WITHIN THESE USER INSTRUCTIONS
- 3 LIMITATIONS OF USE
- 4 RESPIRATOR PROGRAM MANAGEMENT
- 5 NIOSH – APPROVAL, CAUTIONS & LIMITATIONS
- 6 UNPACKING & BATTERY CHARGER SETUP
- 7 COMPONENT DESCRIPTION & ASSEMBLY
- 8 BATTERY PACK CHARGING & INSTALLATION
- 9 BELTS AND BACKPACK
- 10 BREATHING TUBE
- 11 HEADGEAR
- 12 OPERATING INSTRUCTIONS
- 13 INSPECTION
- 14 ENTERING AND EXITING THE CONTAMINATED AREA
- 15 CLEANING AND STORAGE
- 16 TECHNICAL SPECIFICATIONS
- 17 TROUBLESHOOTING
- 18 TR-600 FILTER AND CARTRIDGE OPTIONS WITH COVERS
- 19 Documents / Resources
System Description
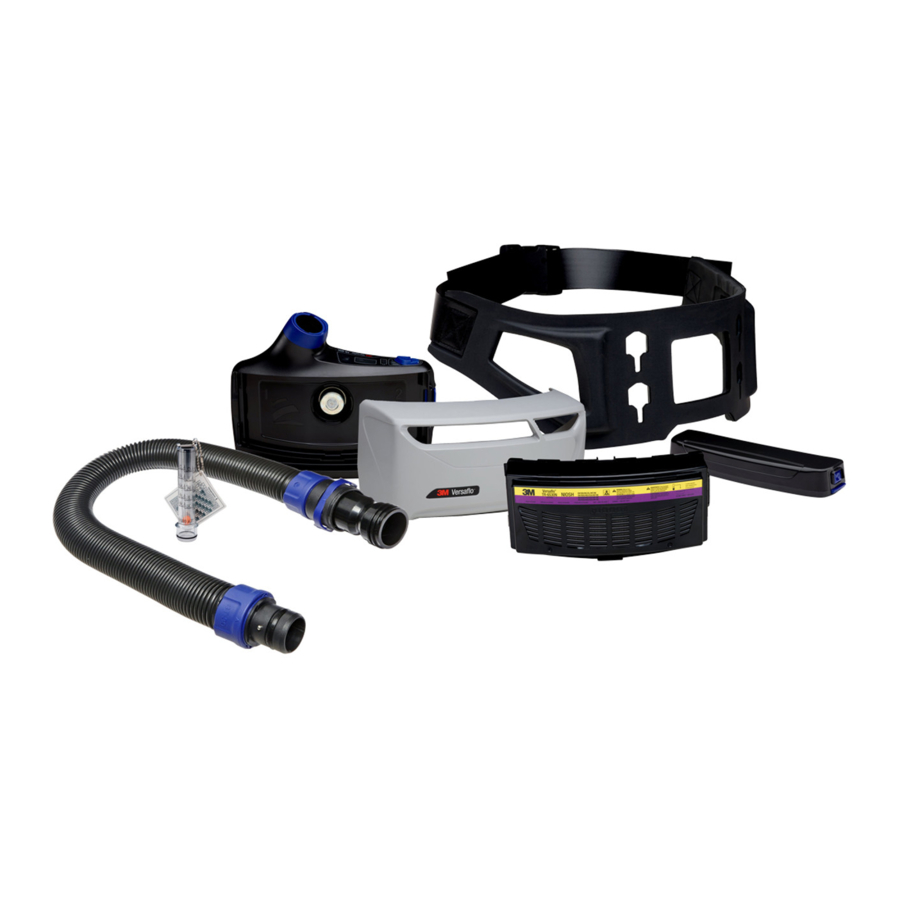
The 3M™ Versaflo™ Powered Air Purifying Respirator (PAPR) TR-600 Assemblies are part of the 3M™ Versaflo™ Family of respiratory protection products. The TR-600 PAPR assemblies are designed to be used with the 3M headgear listed on the approval label to form a complete National Institute of Occupational Safety and Health (NIOSH) approved respiratory system. When used in accordance with its NIOSH approval, TR-600 PAPR assemblies help provide respiratory protection against certain gases, vapors and particulates. 3M™ Versaflo™ systems and components are for professional occupational use only. The TR-600 is not an intrinsically safe system. See the "NIOSH Approval" section in these User Instructions for additional information regarding approvals.
The TR-600 belt mounted assemblies consist of a motor/blower unit, high efficiency (HE) particulate filter or combination chemical cartridge/HE filter, lithium-ion battery pack, and waist belt. The motor/blower unit draws ambient air through its filter/cartridge and supplies filtered air to the headgear via a breathing tube. For ease of use and training, most user interface points are colored blue. The blower provides three user selectable airflow settings. It is equipped with automatic flow control; the motor airflow is regulated during operation to compensate for the charge state of the battery, the increasing level of airflow resistance caused by particle filter loading, and changes in air density due to changes in elevation and air temperature. Should the airflow fall below the minimum design flow rate, an audible alarm and vibratory alarm will activate and the filter loading LED on the blower unit will flash red to warn the user to immediately leave the contaminated environment. Similarly, an audible, vibratory and visual low battery alarm will activate when the battery pack has approximately 10-15 minutes of charge remaining to warn the user to leave the contaminated area.
Multiple cartridges are available for specific chemicals, grouping of chemicals, and chemical families. The effective use time (service life) of the cartridge will vary depending on your specific environment. Under the Occupational Safety and Health Administration (OSHA) Respiratory Protection Standard (U.S. 29 CFR 1910.134), it is the employer's responsibility to ensure adequate worker protection including selecting the appropriate filter/cartridge for this PAPR system, and ensuring the cartridge is used within its service life. 3M provides free software to aid in filter/cartridge selection and service life calculations available at www.3m.com/workersafety.

- Battery packs should be charged immediately and fully upon receipt.
- Read and understand the contents of these User Instructions prior to use, including all warnings and advisories.
- This system is for professional occupational use only.
- The filter loading indicator is for particulate only. It does not convey any information about gas and vapor service life.
- The 3M™ Versaflo™ Powered Air Purifying Respirator TR-600 System is not designed or approved to meet intrinsic safety standards.
LIST OF WARNINGS AND CAUTIONS WITHIN THESE USER INSTRUCTIONS

- This product is part of a system that helps reduce exposures to certain airborne contaminants. Before use, the wearer must read and understand the User Instructions provided as a part of the product packaging. Follow all local regulations. In the U.S., a written respiratory protection program must be implemented meeting all the requirements of 29CFR 1910.134, including training, fit testing and medical evaluation. In Canada, CSA standard Z94.4 requirements must be met and/or requirements of the applicable jurisdiction, as appropriate. Misuse may result in injury, sickness or death. For proper use, see supervisor, User Instructions, or call 3M PSD Technical Service in USA at 1-800-243-4630 and in Canada at 1-800-267-4414.
- The 3M™ Battery Packs TR-630, TR-632, chargers, and the TR-600 PAPR assemblies are not intrinsically safe. Do not use in flammable or explosive atmospheres. Doing so may result in serious injury or death.
- Always correctly use and maintain the Lithium-ion battery packs. Failure to do so may cause fire or explosion or could adversely affect respirator performance and result in injury, sickness, or death.
- Do not charge batteries with unapproved chargers, in enclosed cabinets without ventilation, in hazardous locations, or near sources of high heat.
- Do not immerse without the battery storage and cleaning cover installed.
- Do not use, charge, or store batteries outside the recommended temperature limits.
- Charge in an area free of combustible material and readily monitored, and outside of a classified intrinsically safe area.
- Failure to follow these User Instructions may reduce respirator performance, overexpose you to contaminants, and may result in injury, sickness, or death.
- Do not use with parts or accessories other than those manufactured by 3M as described in these User Instructions or on the NIOSH approval label for this respirator.
- The 3M™ Versaflo™ Powered Air Purifying Respirator TR-600 Assembly is one component of an approved respiratory protection system. Always read and follow all User Instructions supplied with your 3M headgear and other system components in order to ensure correct system operation.
- Do not turn off the motor/blower, remove the facepiece or headgear, or reach your hand into the headgear while inside the contaminated area. This could allow contaminants to enter the respirator and may result in sickness or death.
- Always correctly use and maintain the filter/cartridge assembly. Failure to do so may reduce respirator performance, overexpose you to contaminants, and may result in sickness or death.
- Inspect filter/cartridge and inner circular sealing gasket before each installation. Replace filter/cartridge if damaged or if the circular gasket is damaged or missing.
- Always properly install the filter/cartridge into the blower unit.
- Keep inner circular sealing gasket clean.
- Never attempt to clean filter/cartridge by knocking or blowing out accumulated material. Doing so will damage the filter media.
- Use of the spark arrestor is mandatory for welding and all situations where the 3M™ Versaflo™ Powered Air Purifying Respirator TR-600 may be exposed to sparks, molten metal or other hot particulates. Failure to use the spark arrestor when needed may allow the filter to catch fire, or be damaged and allow contaminants to enter the respirator and may result in injury, sickness or death.
- Store the filter/cartridge as described in these User Instructions within the recommended storage temperature conditions and observe filter expiration dates.
- The filter loading indicator is for particulate loading levels only. It does not provide any information about gas and vapor service life. Attempting to use the filter loading indicator for gases and vapors may result in sickness or death.
- Dispose of lithium-ion battery packs according to local environmental regulations. Do not dispose of in standard waste bins, in a fire or send for incineration. Failure to properly dispose of battery packs may lead to environmental contamination, fire or explosion and may result in serious injury or death.
- To reduce exposure to hazardous voltage:
- Do not attempt to service the chargers. There are no user-serviceable parts inside.
- Do not substitute, modify or add parts to the chargers.
- Inspect the chargers and power cords before use. Replace if any parts are damaged.
- Do not use the chargers outdoors or in wet environments.
LIMITATIONS OF USE
Do not wear this respirator system to enter areas where:
- Atmospheres are oxygen deficient.
- Contaminant concentrations are unknown.
- Contaminant concentrations are Immediately Dangerous to Life or Health (IDLH).
- Contaminant concentrations exceed the maximum use concentration (MUC) determined using the Assigned Protection Factor (APF) for the specific respirator system or the APF mandated by specific government standards, whichever is lower.
- Atmospheres are flammable or explosive.
Immediately exit the contaminated area if any of the TR-600 alarms activate.
Refer to the User Instructions provided with the applicable headgear and the additional cautions and limitations under the NIOSH Cautions and Limitations in these User Instructions.
The recommended operating temperature range is 14°F to 129°F (-10°C to 54°C)
The recommended operating altitude range is -328 feet (-100 meters) to 16404 feet (5000 meters). For use in elevations outside this range, contact 3M Technical Service.
Before use in environments subject to high magnetic fields, contact 3M Technical Service.
RESPIRATOR PROGRAM MANAGEMENT
Occupational use of respirators must be in compliance with applicable health and safety standards. By United States regulation, employers must establish a written respirator protection program meeting the requirements of the Occupational Safety and Health Administration (OSHA) Respiratory Protection standard 29 CFR 1910.134 and any applicable OSHA substance specific standards. For additional information on this standard contact OSHA at www.OSHA.gov. In Canada, CSA standard Z94.4 requirements and/or requirements of the applicable jurisdiction must be met as appropriate. The major sections of 29 CFR 1910.134 are listed here for convenience. Consult an industrial hygienist or call 3M Technical Service with questions concerning applicability of these products to your job requirements.
Major Sections of OSHA 29 CFR 1910.134
| Section | Description |
| A | Permissible Practice |
| B | Definitions |
| C | Respiratory Protection Program |
| D | Selection of Respirators |
| E | Medical Evaluation |
| F | Fit Testing |
| G | Use of Respirators |
| H | Maintenance and Care of Respirators |
| I | Breathing Air Quality and Use |
| J | Identification of Cartridges, Filters, and Canisters |
| K | Training and Information |
| L | Program Evaluation |
| M | Recordkeeping |
NIOSH – APPROVAL, CAUTIONS & LIMITATIONS
NIOSH APPROVAL
The 3M™ Versaflo™ Powered Air Purifying Respirator TR-600 Assembly is one component of a NIOSH approved respiratory system. Refer to these User Instructions and/or the NIOSH approval label provided with the TR-600 for a listing of components and optional accessories that can be used to assemble a complete NIOSH approved respirator system or contact 3M Technical Service.
NIOSH CAUTIONS AND LIMITATIONS
- Not for use in atmospheres containing less than 19.5 percent oxygen.
- Not for use in atmospheres immediately dangerous to life or health.
- Do not exceed maximum use concentrations established by regulatory standards.
- Do not use powered air-purifying respirators if airflow is less than four cfm (115 lpm) for tight fitting facepieces or six cfm (170 lpm) for hoods and/or helmets.
- Follow established cartridge and canister change schedules or observe ESLI to ensure that cartridge and canisters are replaced before breakthrough occurs.
- Contains electrical parts that may cause an ignition in flammable or explosive atmospheres.
- Failure to properly use and maintain this product could result in injury or death.
- Follow the manufacturer's User's Instructions for changing cartridges, canister and/or filters.
- All approved respirators shall be selected, fitted, used, and maintained in accordance with MSHA, OSHA, and other applicable regulations.
- Never substitute, modify, add, or omit parts. Use only exact replacement parts in the configuration as specified by the manufacturer.
- Refer to User's Instructions, and/or maintenance manuals for information on use and maintenance of these respirators.
- NIOSH does not evaluate respirators for use as surgical masks.
UNPACKING & BATTERY CHARGER SETUP
Unpacking
Inspect the package contents for shipping damage and ensure all components are present. Package contents will vary depending on components or kit ordered. The product should be inspected before each use following the procedures in the Inspection section of these User Instructions.
- The 3M™ Battery Packs TR-630, TR-632, chargers, and the TR-600 PAPR assemblies are not intrinsically safe. Do not use in flammable or explosive atmospheres. Doing so may result in serious injury or death.
- Always correctly use and maintain the Lithium-ion battery packs. Failure to do so may cause fire or explosion or could adversely affect respirator performance and result in injury, sickness, or death.
- Do not charge batteries with unapproved chargers, in enclosed cabinets without ventilation, in hazardous locations, or near sources of high heat.
- Do not immerse without the battery storage and cleaning cover installed.
- Do not use, charge, or store batteries outside the recommended temperature limits.
- Charge in an area free of combustible material and readily monitored, and outside of a classified intrinsically safe area.
Battery Charger Setup
There are two battery charging options for 3M™ Versaflo™ Powered Air Purifying Respirator TR-600 Batteries. The 3M™ Battery TR-641N kit includes (1) 3M™ Charger Cradle TR-640 and (1) 3M™ Power Supply TR-941N. The 3M™ 4-Station Battery Charger Kit TR-644N includes (1) 3M™ 4-Station Battery Charger Base/Power Supply TR-944N, and (4) 3M™ Charger Cradles TR-640. Refer to the Chargers and Battery Packs for the 3M™ Versaflo™ Powered Air Purifying Respirator TR-600 Assemblies User Instructions for additional information on proper battery pack use and maintenance.
NOTE: Immediately charge battery packs upon receipt and after each use.
The run times for the TR-600 will vary for each configuration and is dependent on headgear, filter/cartridge, selected airflow, filter loading, battery selected, battery condition, and environmental conditions.
The battery packs do not require a learn cycle to calibrate or re-calibrate the battery pack charge indicator. However, it may take up to three complete charge/discharge cycles for the battery to reach its maximum capacity and claimed run times.
Charge the battery pack:
- Inspect battery pack. If cracks or damage are noted, do not charge the battery pack. Properly dispose of the battery pack and replace.
- Place chargers in a cool, well-ventilated location free of particulates, combustible material, other airborne contaminants, and outside of a classified intrinsically safe area.
Optimal charging temperature range: 68°F to 77°F (20°C to 25°C)
Full charging temperature range: 32°F to 104°F (0°C to 40°C). Do not charge outside of this range. - Charging cradle setup:
- 3M™ Single Station Battery Charger TR-641N: Insert the DC supply cord from the 3M™ Power Supply TR-941N into the cradle. (Fig. 1a). Plug the power cord into an AC power source (100-240 V), such as a wall outlet.
![]()
- 3M™ 4-Station Battery Charger Tray TR-944N: Insert the 3M™ Battery Charger Cradle TR-640 into one of the charging ports on the TR-944N and slide back to lock into place. (Fig. 1b). (NOTE: the TR-941N power cord is not used with the TR-640, when the 4-station Charger is used.) Insert the DC supply cord supplied with the kit into the 4-station base. Plug the power cord into an AC power source (100-240 V), such as a wall outlet. You may charge any combination of up to four 3M™ Battery Packs simultaneously.
![]()
- 3M™ Single Station Battery Charger TR-641N: Insert the DC supply cord from the 3M™ Power Supply TR-941N into the cradle. (Fig. 1a). Plug the power cord into an AC power source (100-240 V), such as a wall outlet.


NOTE: The 3M™ Battery Charger Cradle TR-640 and 3M™ 4-Station Battery Charger Tray TR-944N do not use the same power supply. Use only the power supply supplied with your charger kit.
- Battery charging: Ensure the gold electrical contacts on the battery and charger are clean and free of debris. Insert the battery pack into the 3M™ Battery Charger Cradle TR-640 by sliding the back end of the battery pack in first. Set front end down and click into place (Fig. 2), charging will begin. Refer to Fig. 4 and Table 1 in the "Specifications" section of these User Instructions for a list of charger LED displays and meanings, and battery charge times.
![]()
- Removal:
- Press blue release tab and lift up on battery pack to remove from cradle.
- The 3M™ Battery Charger Cradle TR-640 can remain attached to the 3M™ 4-Station Battery Charger TR-944N if desired. To release the cradle from base, press down on the oval release tab on the base, slide cradle forward and lift out. Be careful not to pinch fingers as the cradle slides forward.

Refer to the "Storage" section in these User Instructions for information on short and long-term storage of the TR-630 and TR-632 battery packs.
COMPONENT DESCRIPTION & ASSEMBLY
The 3M™ Versaflo™ Powered Air Purifying Respirator TR-600 System has multiple component options and optional accessories. At a minimum, each NIOSH approved configuration of this PAPR system should include approved headgear or facepiece, breathing tube, motor/blower, filter/cartridge, battery, and a belt or backpack. Common accessories include prefilter/spark arrestor and filter cover. Refer to the supplied User Instructions for each of these components for additional information prior to use.
High Efficiency (HE) Particulate Filter, Chemical Cartridge/Filter, Prefilter, Spark Arrestor and Filter Covers
Always correctly use and maintain the filter/cartridge assembly. Failure to do so may reduce respirator performance, overexpose you to contaminants, and may result in sickness or death.
- Inspect filter/cartridge and inner circular sealing gasket before each installation. Replace filter/cartridge if damaged or if the circular gasket is damaged or missing.
- Always properly install the filter/cartridge into the blower unit.
- Keep inner circular sealing gasket clean.
- Never attempt to clean filters by knocking or blowing out accumulated material. Doing so will damage the filter media.
- Use of the spark arrestor is mandatory for welding and all situations where the 3M™ Versaflo™ Powered Air Purifying Respirator TR-600 may be exposed to sparks, molten metal or other hot particulates. Failure to use the spark arrestor when needed may allow the filter to catch fire, or be damaged and allow contaminants to enter the respirator and may result in injury, sickness or death.
- Store the filter as described in these User Instructions within the recommended storage temperature conditions and observe filter expiration dates.
- The filter loading indicator is for particulate loading levels only. It does not provide any information about gas and vapor service life. Attempting to use the filter loading indicator for gases and vapors may result in sickness or death.
The 3M™ Versaflo™ Powered Air Purifying Respirator TR-600 can be used with either a high efficiency (HE) filter or combination chemical cartridge/HE filter. The available filter and filter/cartridge options can be found at www.3M.com/workersafety or in the TR-600 Components, Accessories and Replacement Parts guide.
Particulate Filter Loading
The 3M™ Versaflo™ Powered Air Purifying Respirator TR-600 Motor/Blower has a combination HE filter loading/low airflow indicator (Fig. 14-5). This indicator is for particulate loading only; it does not apply to the service life of the carbon in the chemical cartridge for the combination HE filter/gas and vapor cartridges. With a new HE only filter, all LEDs on the indicator will light green. For certain combination HE filter/gas and vapor cartridges the inherent pressure drop, even on a new cartridge/filter, may prevent the top LED on the filter loading indicator from being lit. As the HE filter becomes loaded, the LEDs will begin to turn off. User must immediately leave the work area and the filter should be changed when the audible alarm or a red LED activates or when the chemical cartridge service life is exceeded – whichever comes first. See the "Operating Instructions" section of these User Instructions for further information on the HE filter/low airflow alarm.
Gas and Vapor Cartridge Service Life
The effective use time (service life) of a chemical cartridge (gas and vapor cartridge) will vary depending on your specific environment. The user must determine a service life period based on their specific work conditions. The 3M™ Service Life Software (www.3m.com/workersafety) may be able to assist user in this calculation.
Prefilter/Spark Arrestor
Use of the foam prefilter (3M™ Prefilter TR-6600) and metal mesh spark arrestor/prefilter (3M™ Spark Arrestor TR-662) is optional in many situations. They can be used individually or in combination. Both act by helping to block larger particles from reaching the main filter, and if changed (TR-6600) or cleaned (TR-662) frequently may help to extend the useable life of the main filter. The spark arrestor may be cleaned by rinsing it under water. NOTE: Use of the spark arrestor is mandatory for welding and all situations where the 3M™ Versaflo™ Powered Air Purifying Respirator TR-600 may be exposed to sparks, molten metal or other hot particulates. Failure to use the spark arrestor when needed may allow the filter to catch fire, or be damaged and allow contaminants to enter the respirator and may result in injury, sickness or death. The foam prefilter and the metal mesh spark arrestor must be used with a filter cover.
Filter Covers
Filter covers are available for each size of filter. Use of filter covers are highly recommended. Filter covers help protect the filter body and filter media from damage from external forces. The filter cover must be in place if operating the PAPR in a decon shower or while being subject to liquid spray. The filter cover helps the PAPR resist water spray directed towards the wearer, such as if going through a decon shower. The filter cover is required when using a prefilter or spark arrestor prefilter.
Install and remove HE filter, filter/cartridge, prefilter, spark arrestor and cover
Install and remove the filter/cartridge in non-hazardous locations only.
- Inspect the filter/cartridge to be installed:
- Filter/cartridge is intact with no tears, cracks, distortion or other damage.
- The inner circular gasket is present and intact with no tears, cuts or distortions. Wipe the filter seal with a clean cloth if necessary. Dispose of and replace filter/cartridge if damage is noted or suspected. NOTE: The 3M™ Versaflo™ Powered Air Purifying Respirator TR-600/TR-800 Filter/Cartridge Assemblies have both an inner circular gasket (Fig. 3-6) and outer rectangular barrier (Fig. 3-5). The inner gasket is the primary seal between the filter and blower. The outer barrier acts to keep dirt and debris from behind the filter.
![]()
- Filter cover,
- Spark arrestor/prefilter,
- Prefilter,
- Filter/cartridge,
- Outer barrier,
- Inner gasket
- To install the filter/cartridge:
- Confirm the TR-600 is powered off. Do not install or replace filter/cartridges while the motor/blower is running.

Option 1: Using the filter/cartridge with prefilter/spark arrestor and filter cover.
Fig. 4 (Recommended for most applications).
NOTE: Use the specified filter cover for the filter/cartridge. See "Specifications" section for correct pairing
- Hold the filter cover so it faces down (Fig. 4-1).

- (If required) Insert the metal mesh spark arrestor/prefilter into the cover, ensuring the cutouts are aligned properly (Fig. 4-2).
- (If required) Insert the foam prefilter, ensuring the cutouts are aligned properly (Fig. 4-3).
- Insert the filter/cartridge into the filter cover ensuring the bottom latching tab snaps into place (Fig. 4-4). The filter/cartridge label must be visible in the cover window (Fig. 13).
- Place the hinge side of the filter/cartridge into the motor/blower (Fig. 5-1) and snap latch side into the filter latch (Fig. 5-2).

- Gently tug on filter/cartridge to ensure proper attachment at both sides.


Option 2: Using the filter/cartridge without the filter cover.
(May typically be used in applications when filter/cartridges are changed very frequently to reduce potential for cross-contamination.)
NOTE: Using the filter/cartridge without the filter cover leaves it more susceptible to damage from external forces and liquid spray.
- Place the hinge side of the filter/cartridge into the motor/blower hinge (Fig. 5-1) and snap latch side into the filter latch (Fig. 5-2).
- Gently tug on filter/cartridge to ensure proper attachment at both sides.
- Removal of the filter/cartridge and cover (in non-hazardous locations only):
- Turn the unit off. Do not remove or replace filter/cartridges while the motor/blower is running.
- Hold the unit downwards so the back (belt side) faces you and the filter and cover face down on a flat surface (Fig. 6) to help minimize the potential for contamination of the motor/blower inlet.

- Press the blue filter latch on the left side (Fig. 6). The latch requires two fingers to engage. Pull the filter/cartridge out and away from the motor/blower.
- Remove the filter/cartridge cover. Hold the filter/cartridge upside down. Pull out on the blue tab at the bottom of the filter cover to unlatch it from the filter/cartridge. Pull the cover down and away from the filter/cartridge.

BATTERY PACK CHARGING & INSTALLATION
Battery Pack Charge Status
Battery pack charge status is indicated by pressing the indicator button on the top of the battery (Fig. 7). Number of bars illuminated indicates approximate battery pack charge capacity (5 bars: 80-100%; 1 bar: less than 20%) based on original battery capacity.

NOTE: As the battery pack ages, it will normally lose capacity. An older battery pack, or one that has been exposed to temperature extremes, may show less than 5 bars after completing a charge cycle (i.e. after a full charge as indicated by the battery charger, only 4 bars light indicating 60-80% of original capacity is available).
Install and Remove the 3M™ Versaflo™ Powered Air Purifying Respirator TR600 Battery Packs
NOTE: Only 3M™ Battery Pack TR-630 and 3M™ Battery Pack TR-632 can be used with the 3M™ Versaflo™ Powered Air Purifying Respirator TR-600 Motor/Blower. Attempts to use any other battery pack will void the NIOSH approval, system warranty, will not provide respiratory protection, and may damage the PAPR. Versaflo TR-600 battery packs will not function on other PAPR systems.
To install a charged battery pack, hold the unit so the filter cover faces you (Fig. 8).

- Inspect the hinge and latch on the battery pack and ensure it is clean and undamaged.
- Inspect the molding surrounding the electrical connection pins. It must be in place and intact.
- Ensure the gold electrical contact on the battery and pin area of the motor/blower are clean, dry, and free of debris.
- Hook the hinge end of the battery pack into its holder on the bottom of the unit (Fig. 8, step 1).
- Push the latch side of the battery pack into the motor/blower until the latch engages with an audible click (Fig. 8, step 2).
- Grasp the battery pack and gently pull to confirm pack is locked into place.
To remove the battery pack, hold the unit so the filter cover faces you. Press the blue battery pack latch and pull the battery pack down and out.
BELTS AND BACKPACK
The 3M™ Versaflo™ Powered Air Purifying Respirator TR-600 is approved for use with either a belt or backpack.
Belts
The TR-600 is approved for use with two premium belt options:
- The 3M™ Heavy Duty Belt TR-626 features a durable surface and leather straps,
- The 3M™ Easy Clean Belt TR-627 features a smooth deconable surface and urethane straps.
Select the belt appropriate for the work conditions.

To install the belt:
- With a filter/cartridge and filter cover installed, place the motor/blower face down on a table with outlet facing away from you.
- Place the 4 keyholes (Fig. 9-2) of the belt onto the 4 T-bars (Fig. 9-1) on the back of the motor/blower (Fig. 9-3).
- Push down on the belt between the top and bottom keyholes on each side using your thumbs (Fig. 9- 4).
- Slide the belt up (Fig. 9-5) until the belt snaps over the belt locking tabs on the bottom of the motor/blower (Fig. 9-6).
- Gently tug on belt to ensure it is securely attached to the motor/blower unit.
- Position the motor/blower. Typical use is to rest it in the small of the back. Tighten belt for a snug comfortable fit. A belt extender is available if additional length is needed.
- Secure excess belt length into the belt keeper. Excess belt length may be carefully trimmed if it will not be needed.
To remove the belt from the motor/blower, lift the lower, center portion of the belt over the locking edges and slide the belt down.
Backpack
The 3M™ Backpack BPK-01 with the 3M™ Backpack Adapter TR- 655 may be used in place of the belt (Fig. 10). Refer to the BPK-01 and TR-655 User Instructions for more information.

BREATHING TUBE
The 3M™ Versaflo™ Powered Air Purifying Respirator TR-600 PAPR is approved for use with 3M™ Versaflo™ Breathing Tubes. Select an approved breathing tube that is appropriate for the work conditions.
- Insert the end of the breathing tube with the bayonet fitting (two small prongs) into the parallel slots in the air outlet of the motor/blower (Fig. 11).
![]()
- Twist the breathing tube 1/4 turn to the right to lock it into place.
- Refer to the User Instructions for the headgear to be used for procedures to connect the breathing tube to the headgear.
- Removal – turn the motor/blower upside down so that the outlet faces down (Fig. 12) to help minimize the potential for contamination of the outlet.


HEADGEAR
The 3M™ Versaflo™ Powered Air Purifying RespiratorTR-600 is approved for use with many 3M™ Headgear options. Refer to the headgear User Instructions for information on attaching and donning the headgear to be used, and to determine assigned protection factor (APF) for the complete respiratory protection system. Consult 3M Technical Data Bulletin #175 for additional information on APFs and supporting test data.
OPERATING INSTRUCTIONS
Power 3M™ Versaflo™ Powered Air Purifying Respirator TR-600 on:
- Press and hold the smaller, blue power button (Fig. 13-1) for 1 second. The unit will turn on and perform a self-diagnostic. The flow level, filter loading and battery charge indicators will blink, the auditory alarm will sound and vibratory alarm will activate. Battery indicator (Fig. 13-4) will show current charge status of the battery pack. Filter indicator will show remaining capacity of the filter (Fig. 13-5). Continuous blinking and/or sounding of any alarm indicates a fault condition that must be corrected prior to use of the respirator system. If auditory, vibratory alarm or visual indicators do not activate at start-up, do not use system. Remove from service and see your supervisor.

- On/Off button,
- Flow control button,
- Airflow setting indicator,
- Battery charge status level/alarm indicator,
- Filter loading/alarm indicator,
- Tight-fitting mode indicator (future option)

Select airflow:
- There are three user selectable airflow settings – standard, medium, and high flow. The motor/blower will start at the standard flow setting. Pressing and holding the larger blue flow control button (Fig. 132) for 1 second will cycle the motor/blower to the next of three flow settings. One beep and flow LED on the flow setting indicator (Fig. 13-3) indicates standard flow, two beeps and two flow LEDs indicate medium flow, three beeps and three flow LEDs indicate high flow. Pressing the flow control button once more cycles back to the standard flow setting.
Power 3M™ Versaflo™ Powered Air Purifying Respirator TR-600 off:
- Press and hold the smaller, blue power button for 2 seconds (Fig. 13-1).
Display Sleep Mode
To conserve battery power, the display will go into 'sleep mode' after 30 seconds from the last button press. The flow speed indicator will periodically blink with the current flow setting (Fig. 13-3). To wake up the display, momentarily press any display button.
Battery Charge Status Indicator and Low Battery Alarm
The battery level/alarm indicator (Fig. 13-4) displays the remaining battery charge status. This charge status indicator mirrors the charge status indicator on the battery. The number of bars illuminated indicates approximate battery pack charge status remaining: 5 bars = 80-100%, 4 bars = 60-80%, 3 bars = 40-60%, 2 bars = 20-40%, 1 bar = < 20%, 1 bar flashing = < 10%. The charge status indicator is based on the original charge capacity. It does not recalibrate as the battery ages, and the number of bars illuminated with a fully charged battery will decrease as the battery naturally loses capacity. This is a safety feature so that throughout the life of the battery the number of charge status bars lit consistently indicates approximate run time remaining (with a given system setup and filter loading). When the low battery alarm sounds, users must immediately exit the hazardous area and replace the battery.
Filter Load Indicator and Low Flow Alarm
The filter loading indicator (Fig. 13-5) monitors the pressure drop in the system. Increase loading of contaminants on the filter is indicated by the progressive extinguishing of LEDs in the filter loading indicator. As the pressure drop increases the motor/blower fan speed increases to compensate. When the fan is no longer able to compensate and provide adequate airflow, the motor/blower will alarm. A low flow alarm is indicated by the bottom LED of the filter loading indicator flashing RED. When the low flow alarm sounds, users must immediately exit the hazardous area and replace the filter/cartridge and/or the prefilter/spark arrestor.
INSPECTION
Failure to follow these User Instructions may reduce respirator performance, overexpose you to contaminants, and may result in injury, sickness, or death.
- Do not use with parts or accessories other than those manufactured by 3M as described in these User Instructions or on the NIOSH approval label for this respirator.
- The 3M™ Versaflo™ Powered Air Purifying Respirator TR-600 assembly is one component of an approved respiratory protection system. Always read and follow all User Instructions supplied with your 3M headgear and other system components in order to ensure correct system operation.
- Do not turn off the motor/blower, remove the facepiece or headgear, or reach your hand into the headgear while inside the contaminated area. This could allow contaminants to enter the respirator and may result in sickness or death.
Before each entry into a contaminated area, the following inspection must be performed to help ensure proper function of the respirator system. Respirator systems are intended to help reduce exposures to certain contaminants and should always be handled with care and fully inspected prior to use. Refer to the specific assembly subsection of these User Instructions for proper assembly procedures.
- PAPR system:
- Closely inspect the entire PAPR system including the motor/blower, cover, filter/cartridge, breathing tube, battery, belt, headgear. Pay particular attention to component connection points for wear or damage. If parts are missing or damaged, replace them only with 3M™ Versaflo™ Powered Air Purifying Respirator TR-600 replacement parts before proceeding.
- Filter/cartridge:
- Closely inspect filter/cartridge plastic housing including the corners and latches, outer rectangular barrier, and inner circular filter seal gasket for cracks, tears, cuts, distortion, indentations or debris. Replace filter/cartridge if damaged. If the filter/cartridge has been mishandled or dropped, reinspect fully. If you have any concerns, contact 3M Technical Service for guidance.
- Ensure the filter/cartridge is properly installed in the PAPR unit.
- If the filter cover is used, the filter/cartridge label must be visible in the filter cover window (Fig. 14).

- If sparks or other hot particles are present, the spark arrestor with filter cover must be in place in front of the filter/cartridge and prefilter (if used). Failure to use the spark arrestor when needed may allow the filter to catch fire, or be damaged and allow contaminants to enter the respirator, and may result in injury, sickness, or death.
- Battery pack: Confirm that the battery pack is fully charged or charge is sufficient for duration of the work period. Ensure plastic surrounding electrical contact pins are intact. The battery pack must be latched to the motor/blower. Gently tug on the battery to ensure secure connection.
- Breathing tube: Examine the entire breathing tube for tears, holes or cracks. Bend the tube to verify that it is flexible. Ensure the gaskets located at both ends of the breathing tube (i.e. headgear and air source connections) are present and not damaged. The breathing tube should fit securely into the air source connection.
- Headgear: Follow the User Instructions supplied with your 3M headgear to ensure correct system operation.
- Airflow check:
The TR-600 is pre-calibrated to ensure required airflow. However, the 3M™ Airflow Indicator TR971 must be used to verify minimum required airflow is attained prior to each day's use. The TR-600 compensates for changes in air density, which is affected by elevation and air temperature. During use, if you suspect the TR-600 is not delivering a minimum of 6 cfm (170 lpm), exit the contaminated area, see your supervisor, and recheck the airflow with the 3M™ Airflow Indicator TR-971. The airflow is checked with your current filter installed.- Ensure float ball in the TR-971 moves freely in the tube and the gasket at the bottom end of the tube is in place.
- Insert the TR-971 into the outlet of the TR-600 motor/blower unit. If the breathing tube is in place, it must be removed to allow the airflow indictor to be inserted (Fig. 15-1).
![]()
- Turn the motor/blower unit on by pressing and holding the power button for 1 second. Run the 3M™ Versaflo™ Powered Air Purifying Respirator TR-600 for up to 1 minute to allow the airflow to stabilize.
- With the airflow indicator in a vertical position, ensure that the bottom of the floating ball rests at, or above, the minimum flow mark for the 'letter' representing your 'Zone' (Fig. 15-2). Airflow indicator must be in the vertical position for an accurate reading.

The airflow indicator is graduated into different 'zones' based on air density, which is based on elevation and ambient temperature. To determine your zone, determine the elevation and temperature for the environment where you are conducting the airflow check. See your supervisor if you are not certain of these values. Find the zone where your elevation and temperature intersect on the chart supplied with the airflow indicator (Chart 1). For additional guidance on conducting an airflow check, consult 3M Technical Data Bulletin #221 Conducting Airflow Check on the TR600 or contact 3M Technical Service.
![]()
Recommended use temperature range: 23°F to 131°F (-5°C to 55°C). Recommended elevation: -328 feet to 16404 feet (-100 meters to 5000 meters). Contact 3M Technical Service if intended use may be outside of these ranges.
NOTE: If the airflow indicator ball fails to rise at or above the minimum flow level, do not use the motor/blower unit. Refer to the 3M™ Versaflo™ Powered Air Purifying Respirator TR-600 Troubleshooting Guide or contact 3M Technical Service.
- Low flow alarm check: Check the low airflow alarm by simulating a low airflow condition. With the motor/blower on:
- Remove the airflow indicator and tightly cover the outlet of the motor/blower with the palm of your hand. The motor should automatically speed up, attempting to compensate for the low airflow condition.
- Continue to press your palm tightly against the end of the outlet, making a tight seal. In less than approx. 30 seconds, the unit will sound an audible and vibratory alarm, and the bottom bar on the filter loading/low flow indicator will flash red. (Fig 13-5).
- Remove your hand from the end of the breathing tube. In less than approx. 30 seconds, the audible alarm and the flashing red LED should both stop when the motor returns to the selected speed.


NOTE: If the low airflow alarm fails to sound, do not use the unit. Contact 3M Technical Service.
ENTERING AND EXITING THE CONTAMINATED AREA
Prior to entering the contaminated area, complete the Inspection procedures listed in these User Instructions and ensure the selected PAPR setup is appropriate protection for the given airborne contaminant and concentration.
- Turn the motor/blower on.
- It is recommended to check both the airflow with the airflow indicator and low flow alarms. NOTE: High environmental noise levels or use of hearing protection may interfere with the user's ability to hear audible alarms. Heavy clothing or tasks with high vibration levels may interfere with sensing the vibratory alarm. User may need to check for the visual alarms more frequently in high noise, or high vibration environments.
- Don the 3M™ Versaflo™ Powered Air Purifying Respirator TR-600 Assembly and Headgear. Enter the work area.
- Leave the contaminated area immediately if any of the following conditions occur:
- Any part of the system becomes damaged.
- Airflow into the respirator decreases or stops.
- The low airflow or low battery alarms trigger. In the event an audible, visual, or vibratory alarm triggers, the user should immediately leave the contaminated area.
- Breathing becomes difficult.
- You feel dizzy or your vision is impaired.
- You taste or smell contaminants.
- Your face, eyes, nose or mouth become(s) irritated.
- You suspect that the concentration of contaminants may have reached levels at which this respirator may no longer provide adequate protection.
- Do not turn off the motor/blower, remove the facepiece or headtop, or reach your hand into the headgear in areas where the air is contaminated. This could allow contaminants to enter the respirator and may result in sickness or death.
- Follow your facility's specific exiting and decontamination procedures for turning off the motor/blower and removing the respirator system.
CLEANING AND STORAGE
The 3M™ Versaflo™ Powered Air Purifying Respirator TR-600 Assembly should be cleaned and inspected after each use and prior to storage. Refer to 3M Technical Data Bulletin #222 Cleaning and Maintenance of TR-600 for additional guidance.
Cleaning
While system is together and still running, conduct a general wipe down/removal of dust and debris with a soft brush or soft cloth prior to disassembly. Remainder of cleaning steps should be conducted outside of the hazardous area with the blower turned off. Inspect all parts for damage or other signs of excessive wear. Replace all damaged parts prior to storage or next use.
- Motor/blower:
- Clean the outer surfaces of the TR-600 assembly and battery pack (still attached) with a soft cloth dampened in a solution of water and mild, pH neutral detergent. Do not use solvents or abrasive cleaners. Do not attempt to clean the interior of the motor/blower with compressed air or vacuum. Do not attempt to clean the battery connection pins on the blower or the blower/charger connection pads on the battery – these are coated and direct cleaning with moist cloths or wipes should be avoided.
- If additional cleaning is required, remove the filter/cartridge and breathing tube. To minimize material falling onto the motor/blower, remove the breathing tube (Fig. 12) and filter/cartridge (Fig. 6) while it is facing downward. Remove the battery. Attach the air inlet and air outlet cleaning and storage plugs (3M™ Cleaning and Storage Kit TR-653) into the TR-600 (see Fig. 16). The TR-600 can now be rinsed under running water, immersed, or put in a respirator washer for further cleaning. Water temperature should not exceed 122°F (50°C). The plug gaskets should be inspected for damage and wear prior to each use. Worn or damaged gaskets must be replaced. Washing the TR-600 while using damaged plug gaskets may cause damage to the TR-600 and void the warranty. Blowers which have been dropped or damaged should not be immersed or put into a respirator washer due to potential water ingress. NOTE: Gaskets should be replaced every 30 uses or yearly, whichever comes first, to minimize use of worn gaskets.

- Battery:
- While still on the blower, wipe the housing of the battery pack with a soft cloth dipped in mild cleaning solution. Then wipe with a soft cloth dipped in clean water. Wipe dry.
- Remove battery and wipe down top of battery pack, if needed, with a soft dry cloth. Avoid contact with the blower/charger connection pads; if they become damp, allow to dry before reinstalling on blower or charger.
- If needed, the battery strap included with the 3M™ Cleaning and Storage Kit TR-653 can be used to protect the pads during cleaning. With the strap in place, the battery can now be rinsed under running water, immersed, or put in a respirator washer for further cleaning.
- Breathing tube:
- Detach breathing tube with unit upside down (Fig. 12).
- Clean the connection sites on the breathing tube with the water and detergent solution. The breathing tube can be immersed in water for cleaning if required. The inside of the tube must be completely dried prior to use or storage.
- Air dry, or dry by connecting to the motor/blower unit and use it to force air through the tube until dry. Orient tube to prevent water from running into blower.
- Optional plastic breathing tube covers (BT-922) may also be used to facilitate cleaning.
- Belt:
- Remove the belt from the motor/blower by lifting the bottom of the belt over the belt locking tabs and sliding the belt down. The 3M™ Easy Clean Belt TR-627 is made of a non-porous and closed-cell material and can be wiped down or submersed in a soapy water solution. The 3M™ High Durability Belt TR-626 is made of leather leads with a rubber hip belt.
- The leather leads can be cleaned with a leather cleaner. The hip belt can be cleaned with a soapy water solution. Wipe or rinse all belts thoroughly and dry completely before next use.
- Filter/cartridge:
- Remove the filter cover and inspect the filter/cartridge (and prefilter/spark arrestor if used). Replace filter/cartridge if excessively dirty, wet or damaged.
- Do not attempt to clean the inside of the filter/cartridge housing or the filter/cartridge media itself. Do not clean with compressed or pressurized air. Doing so will damage the media. The exterior of the filter/cartridge can be gently wiped down with a dry or damp cloth to remove excess dirt and debris.
- The prefilter (3M™ Prefilter TR-6600) cannot be cleaned. Replace if excessively dirty or damaged.
- The spark arrestor (3M™ Spark Arrestor TR-662) can be cleaned using a water and detergent solution. Completely dry the spark arrestor with a clean cloth or air dry. If the spark arrestor cannot be cleaned or is damaged, replace with a new spark arrestor.

NOTE: To minimize material falling onto the motor/blower, remove the filter/cartridge while it is facing downward (Fig. 6).
Storage
Clean the system prior to storing. Store in a clean/dry environment not exposed to contaminant dusts, gasses or vapors. Filters/cartridges may be stored attached to the blower. Do not hang blower or headtop by the breathing tube, or hang the blower from the headtop. The system must be fully inspected prior to next use. For prolonged storage, the motor must be run for 5 minutes annually to ensure proper lubrication and operation.
See "Specifications" section of these User Instructions for information on suggested storage temperatures. Humidity and ambient contaminants may diffuse into chemical cartridges once they are removed from their original packaging, which may reduce service life. Storing chemical cartridges in a clean airtight container, attached to or removed from the blower body, may help maintain remaining service life. For additional information on cartridge reuse, refer to 3M Technical Data Bulletin #142 – Reuse of Organic Vapor Chemical Cartridges.
Battery Pack Maintenance and Storage
Battery packs should be charged prior to storage. Battery pack charge depletes slowly during storage; battery packs must not be allowed to fully discharge during extended storage. For short-term storage, the battery pack may be left attached to the motor/blower. For long-term storage, the battery pack should be removed from the motor/blower. Refer to the 3M™ Versaflo™ Powered Air Purifying Respirator TR-600 Chargers and Battery Packs User Instructions for specific maintenance and storage recommendations.
3M™ Battery Packs can provide approximately 250 full charge/discharge cycle equivalents while maintaining 80% of its original capacity, when used under recommended conditions and during its first year of service. Normal use of the battery and natural aging of battery cells will gradually decrease the battery's available capacity. For additional information on battery use and optimization see the Versaflo TR-600 Chargers and Battery Packs User Instructions and 3M Technical Data Bulletin #223 3M™ Versaflo™ PAPR Battery Maintenance.
Do not store battery packs where temperatures may exceed 122°F (50°C).
TECHNICAL SPECIFICATIONS
Consult the 3M™ Versaflo™ Powered Air Purifying Respirator TR-600 Technical Specifications sheet for additional specifications.
| Airflow | Nominal 6.7 cfm (190 lpm): Standard flow Nominal 7.2 cfm (205 lpm): Medium flow Nominal 7.8 cfm (220 lpm): High flow |
Weight
| Approx. 1.4 lbs (670 grams) Approx. 0.99 lbs (450 grams) Approx. 1.3 lbs (620 grams) Approx. 0.9 lbs (425 grams) Approx. 0.6 lbs (270 grams) |
| Operating temperature Operating altitude/elevation range | 14°F to 129°F (-10°C to 54°C) -328 feet to 16404 feet (-100 meters to 5000 meters) |
Storage conditions
| < 90% -22°F to 122°F (-30°C to 50°C) 40°F to 95°F (4°C to 35°C) 59°F (15°C) |
| Battery charging* * Based on the internal temperature of the battery | Range: 32°F to 104°F (0°C to 40°C) Optimal: 68°F to 77°F (20°C to 25°C) |
Shelf life from date of manufacture when stored in original packaging and recommended storage conditions:
|
|
 | California Energy Commission Compliant |
TROUBLESHOOTING
To reduce exposure to hazardous voltage:
- Do not attempt to service the chargers. There are no user-serviceable parts inside.
- Do not substitute, modify or add parts to the chargers.
- Inspect the chargers and power cords before use. Replace if any parts are damaged.
- Do not use the chargers outdoors or in wet environments.
There are no user serviceable parts inside the 3M™ Versaflo™ Powered Air Purifying Respirator TR-600 PAPR Assembly. The motor/blower unit should not be opened to attempt repairs. Consult the TR600 troubleshooting guide or contact 3M Technical Service to help identify additional possible causes and corrective actions for other problems you may experience.
TR-600 FILTER AND CARTRIDGE OPTIONS WITH COVERS
| Protection | Catalog # | Associated Cover Size | Cover Size Icon on Filter/Cartridge and on Inside of Cover |
| HE | TR-6710N-5 & TR-6710N-40 | TR-6700FC |  |
| HE/HF/Nuisance OV | TR-6820N | TR-6800FC | |
| HE/OV | TR-6510N | TR-6500FC | |
| HE/OV/AG/HF | TR-6530N | TR-6500FC | |
| HE/Multi-gas | TR-6590N | TR-6500FC | |
| HE/AG | TR-6320N | TR-6300FC | |
| HE/Formaldehyde | TR-6350N | TR-6300FC | |
| HE/Ammonia/Methylamine | TR-6360N | TR-6300FC | |
Contact Information
In United States:
Website: www.3M.com/workersafety
Technical Service: 1-800-243-4630
In Canada:
Website: www.3M.com/CA/PPESafety
Technical Service: 1-800-267-4414
Documents / ResourcesDownload manual
Here you can download full pdf version of manual, it may contain additional safety instructions, warranty information, FCC rules, etc.
Download 3M Versaflo TR-600 Series, TR-6710N-5, TR-6710N-40 Manual
Advertisement


Need help?
Do you have a question about the Versaflo TR-600 Series and is the answer not in the manual?
Questions and answers