Advertisement
Composition
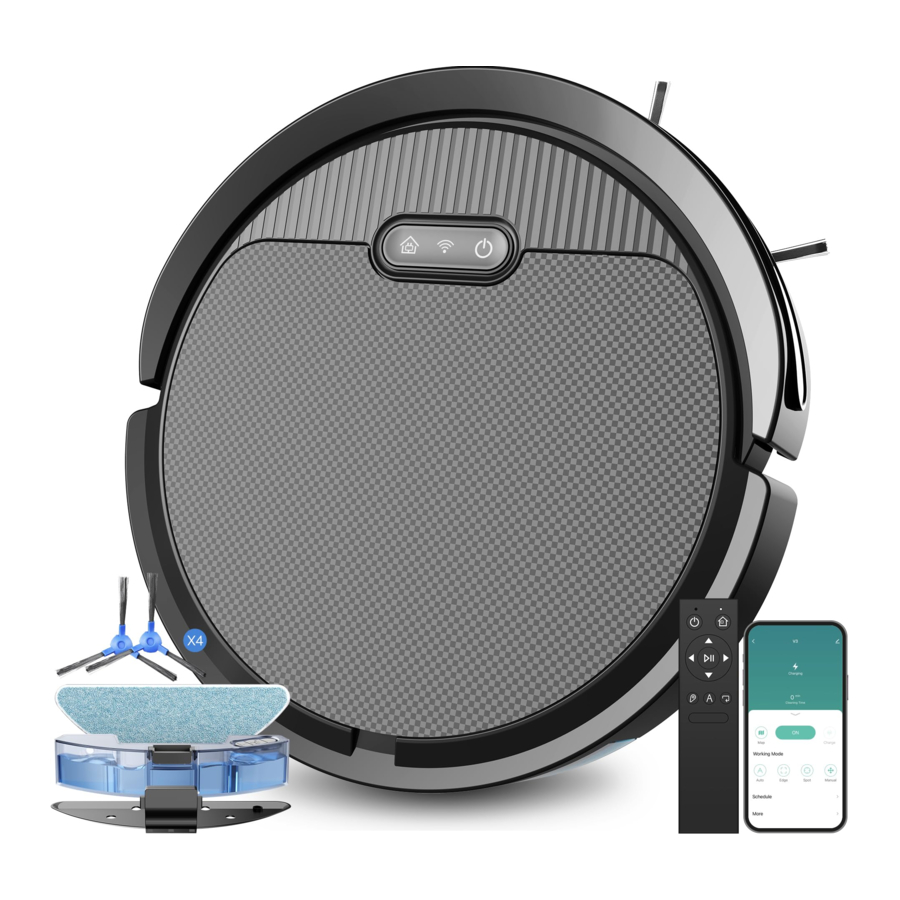
Package list

| Item | Description | Quantity |
| 1 | Robot Vacuum | 1 pcs |
| 2 | Charging Dock Station | 1 pcs |
| 3 | Adapter | 1 pcs |
| 4 | Instruction Manual | 1 pcs |
| 5 | Side Brushes | 4 pcs |
| 6 | Mop+Velcro | 1 set |
| 7 | Cyclone Dustbox+ Water Tank(Inside Mackine) | 1 pcs |
| 8 | Hair Collecting Box | 1 pcs |
| 9 | Mop plate | 1 pcs |
| 10 | Remote control (batteries not included) | 1 pcs |
View


Specification
| Model | V3 |
| Voltage | DC 11.1V |
| Rated Power | 30W |
| Battery Type | Rechargeable lithium battery |
| Battery Capacity | 4500mAh |
| Charging Time | 5H~6H |
| Working Time | 90-120min |
| Work Temperature Range | 0 ~ 45 |
| Work Humidity Range |  90% RH 90% RH |
| Cyclone Dustbox Capacity | 500mL |
| Hair Collection Box Capacity | 650mL |
| Water Tank Capacity | 100mL |
| Noise | 65dB |
| Size | 310 X 310 X 76mm |
Operation guide
App installation

Scan the QR code on your mobile phone to download the Smart Life app (common to Apple and Android) or search for "Smart Life" in the mobile app store to download, install, register an account and log in.


App connection
The host supports two network configuration methods: WiFi quick connection and Bluetooth network distribution.
Note: This device only supports 2.4GHz WiFi connection.
When your phone's Bluetooth is turned on, in the robot standby mode, press and hold the recharge button for  3 seconds. You will hear the host beep. At the same time, please release the button. The WiFi indicator light will continue to flash quickly. At this time, the machine can use Bluetooth or WiFi Quick Connect has two modes for connection:
- WiFi connection:
Open the application and the connection steps are as follows,
First, click "Add Device" shown in Figure 1, then select "Small Appliances", and then click "Robot Vacuum (WiFi)" shown in Figure 2. Next, connect to your network, enter your password, and click "Next" as shown in Figure 3.

Next, go to Figure 4, click "Confirm indicator light flashes", then click "WiFi Quick Connect" shown in Figure 5, and wait for the WiFi connection as shown in Figure 6. When the WiFi connection is successful, please click "Finish" shown in Figure 7, and the application connection is completed.

- Bluetooth distribution network:
Open the application and the connection steps are as follows:
First, click "Add Device" shown in Figure 1, then select "Small Appliances", and then click " Sweeping Robot (Bluetooth)" shown in Figure 2. Check "Confirm indicator light flashes" in Figure 3 and click Next to configure the network, as shown in Figure 4. Select the appropriate WiFi and enter the password, click Next, and wait for the machine to connect successfully (Figure 5 and Figure 6)
Note: When the mobile phone's Bluetooth is turned off, Bluetooth connection is not supported.


Remote control

App Control Operation
Tips: App transmission distance depends on your WiFi signal
- ON/OFF
To start robot or to stop the robot - Automatic cleaning
![]()
When press auto button, the robot will start automatic cleaning. - Edge cleaning
![]()
When press Edge button, the robot will start edge cleaning/wall following cleaning. - Spot cleaning
![]()
When press spot button, the robot will start spot cleaning - Manual
![]()
When press manual button, the robot can be operated manually - Map
![]()
When press map button, we can see robot's movement. - Charge
![]()
When press charge button, the robot will stop working and go back to recharging station automatically. - Schedule
To set different time as cleaning schedule. - More
To find more options of robot as below:- suction level control
- mopping level control
- find robot
- cleaning time
Note: cleaning time setting only works to the automatic cleaningwhen choose once:- when finished automatic cleaning, robot will back to recharging station.
- when choose twice: robot will keep working until it is in low battery and then back to recharging station.
Use

Please take out the foam strip and clean the area around the robot.
Ground for use
Scope of application products are applicable to the following ground environment:

Inapplicable scope

- Do not use in extremely hot (+60°C or higher) or extremely cold (-5°C or lower) environments.
- For indoor use only.
- Not for use in unprotected suspension environments.
- Do not use in humid or flammable environments, explosive or corrosive environments.
- Do not use robot to vacuum unburned cigarettes or matches.
- Do not use robot to vacuum toner and toner used in laser printers and photocopiers.
- Do not use robot to vacuum sharp objects such as glass plates, pins etc.
Working state
- Power on/off

- Standby
The machine is in standby mode and both LEDs are on at the same time.
State change:-
- lf the machine connected WiFi/app already, it will automatically shutdown after 5 mins without any operation of machine.
- If the machine haven't connect WiFi/app, it will automatically shutdown after 30 mins without any operation of machine.
- Short press the auto button once, the buzzer will sound once, and theautomatic cleaning mode will be entered after a delay of 3S.
- Press the "spot cleaning" button for a short time, the buzzer will sound and enter the spot cleaning cleaning mode.
- Press and hold the auto button for 3 seconds, the buzzer will sound andthe machine will shut down.
- Plug in the charger and the buzzer will sound and enter charging mode.
![]()
-
- Automatic cleaning
The machine is in the automatic cleaning state, and the automatic cleaning LED lights up.
State change:- Press the automatic or spot button on the machine, the buzzer will soundand enter the standby mode.
- Press the spot button, buzzer sounds 3 times, and enters the automatic spotcleaning mode.
- The fault is detected, the error mode is entered, and the machine alarms.4. When the charger is plugged in, the buzzer will sound and enter the chargingmode.

- Spot cleaning
In spot cleaning, LED light will be on.
Spot cleaning mode is suitable for cleaning a small dirty area at home.
The machine cleans this area in a bow shape, stops after the cleaning, andenters the automatic recharging mode.
State change:- Press the automatic or spot buttons on the machine, with the buzzersounds, it enters the standby mode.
- When the battery power is low, buzzer will sound 3 times, then the machine willenter automatic recharge mode.
- If it detects the fault, it will enter the wrong mode and the machine will alarm.
![]()
- Edging mode
Robot will start cleaning along the wall.

- Mopping mode
Fill the water tank with water, place it at the rear of the machine, install a mop and mop plate to access the mopping function.

- Charging mode
Connect the adapter to the charging dock, making sure that the robot is properly placed on the dock.
You'll hear a beep or voice prompt to confirm that the charging has started.
The power indicator light will blink while charging, and will stay on once fully charged.
Once fully charged, connecting the adapter won't cause the power indicator light to blink.
If you press the "Auto" button while charging, you'll hear a beep or a voice prompt, and the robot will stop charging to start automatic cleaning.
Note: When in charging, robot can not be turned off.


Mop Install Manual

- Position the robot with its back facing upwards.
- Tear apart the Velcro strip.

- Ensure that the designated area is free from any water or dust.
- Attach two Velcro strips onto the back of the robot, aligning them as shown in the accompanying picture.

- Attach the mop to the Velcro.
- The mop can be reused after washing it.

- Do not over-wet the mop to prevent water stains.
Note: Before mopping, please wet the mop.
Charging Operation
Put docking station in right place

In order to help the machine to find the docking station in time, it is recommended to place docking station smoothly on the side of the wall, and place any obstaclesaround the base within the area in front of 2 meters.and the left and right are within 1 meter.
Automatic charging

- When the machine's battery is low, it will automatically start searching for its charging base and move closer to the charging base for automatic charging. When charging for the first time, the machine will charge for 6 hours.
- During daily use, place the machine on the recharging base and ensure that the recharging base is powered on.
- If the machine will not be used for a long time, please fully charge the machine, then turn off the machine and store it in a dry and ventilated place.
Maintenance
Recommended frequency
| Accessories | Cleaning frequency | Replacement time |
| Dustbox+Water Tank | Once a week | Replace when damaged |
| HEPA Filter | Once every 3 weeks | Every 6 months |
| Side Brushes | Once a month | Every 3-6 months |
| Ground sensor | Once a month | No replacement required |
| Charging electrode | Once a month | No replacement required |
| Universal Wheel | Once a month | No replacement required |
Tips:
- Switch off and disconnect the adapter before cleaning and maintenance.
- The replacement interval for accessories depends on actual use.
Clean the Dustbox

Remove thedustbox and then remove the filter on the back of the dustbox.
Clean side brushes
- Turn the main unit over, unplug the side brushes, clean the side brushes and put them back in.


Clean mop

Take off the mop from robot, wash it and dry it.
Clean the ground sensor and charging electrocode

Wipe the sensor and the charging electrocode with a soft cloth.
Tips:
- Please disconnect the power supply when cleaning the charging pole piece.
Common Errors
Under the fault state, the machine will stop working. Automatic LED, LED light of fixed time will flash at the same time, the buzzer will make an alarm. The alarm instructions are as follows.
| Fail mode | Failure reminding | Troubleshooting |
| Left ground sensor fail | LED flash 1 times | Please put the machine on the flat ground and wipe the left ground sensor |
| Front ground sensor fail | LED flash 2 times | Please place the machine on a flat surface and wipe the front ground sensor |
| Right ground sensor fail | LED flash 3 times | Please put the machine on the flat ground and wipe the right ground sensor |
| Right collission sensor fail | LED flash 4 times C | heck the right part of front cover stuck or not |
| Left collision sensor fail | LED flash 5 times | Check the left part of front cover stuck or not |
| Left wheel stuck | ED flash 6 times | Check if the left wheel is wrapped or stuck |
| Right wheel stuck | ED flash 7 times | Check if the right wheel is wrapped or stuck |
| Left wheel fail | LED flash 8 times | Left wheel abnormal, please check the wiring |
| Right wheel fail | LED flash 9 times | Right wheel abnormal, please check the wiring |
| Suction fan fail | LED flash 10 times | Dust-absorbing motor abnormal, please check the dust-absorbing motor |
| Side brushes fail | LED flash 11 times | Check whether the left and right side brush has been twined |
| Robot stuck | LED flash 13 times | The robot is trapped, please move the robot to a new position and start again |
| Solenoid valve abnormality | LED flash 14 times | The solenoid valve is abnormal, please check the wiring; whether the water tank is installed properly |
| Dustbox not installed | LED flash 15 times | Put the Dustbox back |
Tips:
- If you can't rule out the corresponding faults by referring to the above methods, please contact our customer service in time.
Problem and solution
Left/right bumper stuck
A: Click the left and right bumper to check if with clicks sound, and check if they can spring back smoothly.
Spin around
A: Check the left and right wheels to confirm if they are stucked ornot.(e.g. papers, hairs...)
Wheels stuck
A: Turn the wheels manually to clean out the matters
Q4: Work about half an hour only, the the robot back to docking station
A: Charge the machine by its orignal adapter, and fully charge it, chargetime 3-4 hours.
No suction
A:
- Check if there is somthing blocked on suction port.
- Check if something stuck in the dustbox.
- Check if the HEPA is covered with a lot dust, then please wash it, use it after it is dry.
- Robot is out of power, please charge it then check.
Safety Instruction
Safety instructions
- This robot is not suitable for individuals with physical, mental, or cognitive disabilities (including children), those without prior operating experience, or those without sufficient knowledge of the robot (To use, please use it under the supervision or guidance of the person specially responsible for their safety.)
- Please take care of children and do not allow them to using this robot without supervision.
- Read the safety instructions and operating instructions before using the robot.
- Please pay attention to all warnings related to the battery, power adapter, robot, and operating instructions. .
- Follow all actions and usage instructions.
- As the robot version is constantly iterated and upgraded, the specific functions are subject to the physical objects received.
Using restrictions
- This robot is only used for ground cleaning in the home environment, do not use for outdoor (such as open balcony), non-floor (such as sofa), commercial or industrial environment.
- This robot can only use the original battery, charging dock and adapter, otherwise it may cause robot damage or fire caused by high pressure.
- Before use, please pack away the wire on the ground to avoid dragging.
- Please put away fragile items and debris (such as vases, etc.) from the floor to avoid obstruction or minor collisions with the robot while it is running, which may cause damage to valuable items in the house.
- Do not place any objects, including children or pets, on the robot while it is stationary or in motion.
- Please clean the maintenance host and recharge dock while it is turned off or unplugged.
- Do not use it in an environment without a guardrail if it is suspended or elevated, to avoid the risk of the robot accidentally falling and causing personal injury,
- Do not use the robot in an environment above 45℃ or below 0℃.
- Do not let the robot absorb hard or sharp objects (such as waste repair, glass, nails, etc.).
- Do not pour any liquid into this robot.
- Do not lay the robot on its side.
- Do not let the human body, fingers and other parts close to the machine when robot is working.
- Do not place the robot near sources of heat or flammable, explosive, or corrosive items.
Battery and charging
- Only charge indoors.
- Ensure the robot is charged in a dry condition.
- Do not use any third-party batteries, adapters, or charging docks.
- Do not remove, repair, or modify the battery and charging dock without permission.
- Do not place the charging dock close to heat sources (such as radiators, etc.).
- Ensure that the power adapter matches the standard socket voltage.
- Do not charge damaged or leaking batteries.
- Do not abandon the discarded battery at will. Before discarding the robot, turn off the power supply and remove the battery from the robot for proper disposal.
- Do not use a power adapter with damaged wires or connector. If the wire or plug is damaged, it must be repaired by the manufacturer or a professional.
- If you need to transport the robot, ensure that the main unit is turned off and recommend using the original package box for protection.
- If not in use for an extended period, please fully charge the robot, turn off the engine, and store it in a cool and dry place. Charge it at least once a month to avoid battery damage.
About children safety

- Do not allow children to use alone.
- Do not allow children to play with the product's package, otherwise it may cause suffocation.
About the battery


- This robot is limited to the manufacturer's battery.
- The battery must be taken out when discarding.
- lf you need to replace the main battery, please contact our after-sales service department if you use the wrong type of battery.
- lf the battery leaks and accidentally let the liquid stick to the skin or clothing, immediately wipe it with a dry cloth.
Documents / Resources
References
Download manual
Here you can download full pdf version of manual, it may contain additional safety instructions, warranty information, FCC rules, etc.
Advertisement


Need help?
Do you have a question about the V3 and is the answer not in the manual?
Questions and answers