Cobra 19 MINI Manual
- Owner's manual (11 pages) ,
- Owner's manual (12 pages) ,
- Owner's manual (12 pages)
Advertisement
Introduction
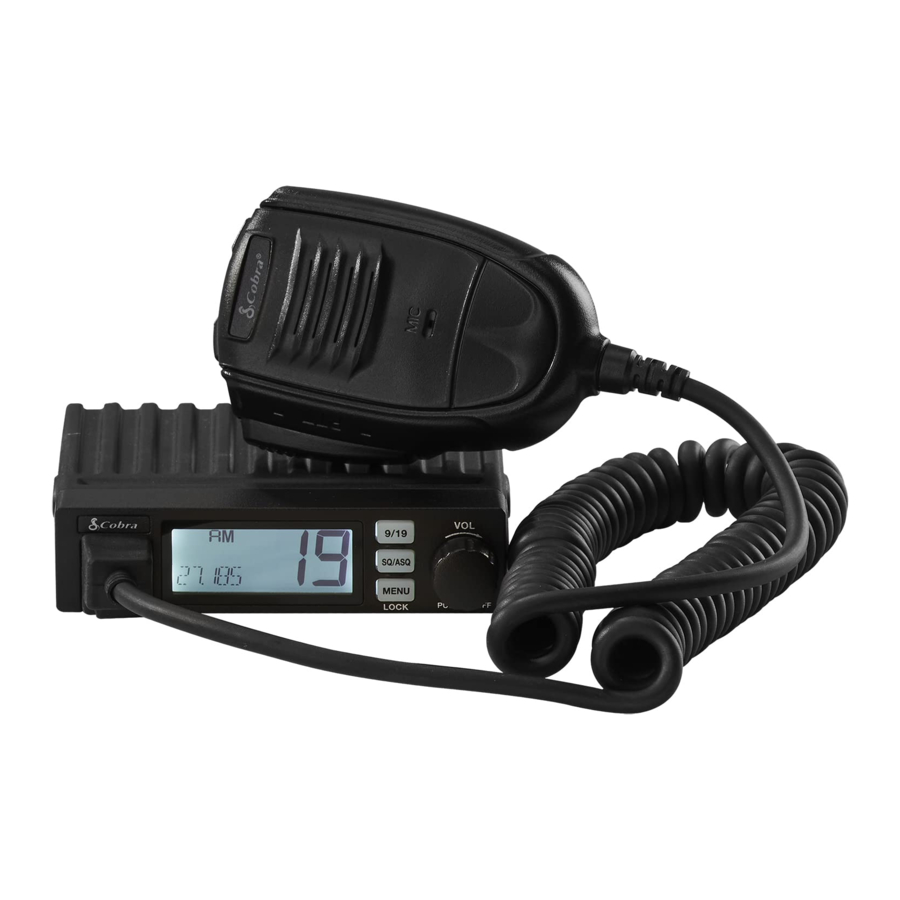
The 19 MINI is an ultra compact recreational CB radio that can be mounted virtually anywhere inside your vehicle Providing clear communication with 40 channels and a full 4 Watts of RF output power, VOX hands-free usage, and adjustable receiver sensitivity, it's perfect for road trips, offroading, overlanding, or simply keeping in touch with others while in your vehicle.
19 MINI Features

- CH 9/19 Button
- Squelch Control Button
- Menu/Lock Button
- Power On/Off and Volume Control
- LCD Display
- Microphone Jack
- External Speaker Jack
- Antenna Jack
- Push-To-TaIk (PTT)
- Channel Up/Down Buttons
Installing the 19 MINI
Select a location for the CB radio and microphone bracket that is convenient for operation. In automobiles, the CB is usually mounted underneath the dash panel, with the microphone bracket beside it. Avoid areas near airbags and mount to an area that is secure enough to hold it in place.
One (1) universal mounting bracket is supplied along with one (1) microphone bracket, four (4) self-tapping screws and star washers. The CB is held in the universal mounting bracket by two (2) thumb screws, permitting adjustment to the most convenient angle.

To mount and connect your 19 MINI:
- Hold the radio with mounting bracket in the exact location desired. Remove the radio and use the mounting bracket as a template to mark the location for the mounting screws.

- Drill holes if necessary and secure the mounting bracket in the desired location.
- Connect the antenna cable plug to the receptacle marked "ANT" on the back of the unit.

Note: You must use a CB antenna (sold separately) with this radio. Antenna options are available on cobra.com - Connect the red lead of the DC power cord to an accessory 12 volt fuse.
![]()
- Connect the negative or black lead to the frame of the vehicle.
NOTE: The battery is bonded to the vehicle frame most commonly called the "chassis." Sometimes this requires removing paint to get to a location with good electrical contact. Installation requirements can vary depending on the vehicle. - Mount the microphone bracket in a convenient location that does not interfere with vehicle operation using the two supplied screws.

- Connect the microphone plug to the 19 MINI RJ-45 front panel jack. Then install the radio into its mounting bracket securely.
![]()
![]()
Do not operate the CB without an antenna. This may damage the transmitter.


NOTE: For improved CB radio performance, connect the radio power leads directly to the vehicle battery. This helps to ensure:
- Reduces conducted power line noise into the radio by taking advantage of the mechanical filtering properties of the vehicle battery;
- By using the correct wire gauge between the battery and radio, Voltage drops to the radio transmitter section are minimized and transmitter RF output power is maximized.
Operating the 19 MINI
Power the Radio On and Off
- To turn on your radio, press and release the POWER button and the radio will emit a prompt and the LCD display will turn on.
- To power off the radio, press and hold the POWER button until the LCD display turns off.
Volume Control
Turn the POWER button to adjust the volume: clockwise to increase volume, counter-clockwise to decrease the volume.
Channel Control
- With your radio turned on, press and release the POWER button to enter a channel selection. The channel number will blink on the LCD display.
- Turn the POWER button to adjust the channel. Clockwise to increase the channel number, counter-clockwise to decrease.
- Press and release the POWER button to select the desired channel and exit. The channel number will stop blinking.
NOTE: Channels can also be manually changed using the UP or DN button controls on the microphone. Holding the UP or DN button will allow rapid channel changing.
Squelch Control (Levels 1 - 34)
Squelch (SQ) is used to cut off or eliminate receiver background noise in the absence of an incoming signal (when you are not talking).
- To adjust the squelch level, press and release the SQ/ASQ button.
![]() indicates the squelch level.
indicates the squelch level. - Turn the POWER button or press the microphone UP or DN button to change the squelch level.
NOTE: using the UP or DN buttons on the microphone changes the squelch levels rapidly. - Press and release the SQ/ASQ button again or wait 5 seconds to store the selected squelch level and exit.
NOTE: The higher the number, the stronger an incoming signal needs to be to break squelch and be received on the CB.
 indicates the squelch level.
Auto Squelch Control (Levels 1 - 9)
Auto Squelch (ASQ) continuous y measures and blocks the noise of incoming signals.
- Press and hold the SQ/ASQ key until LCD displays
![]() .
.
![]() indicates the ASQ level The higher the number, the stronger an incoming signal needs to be to break squelch and be received on the CB.
indicates the ASQ level The higher the number, the stronger an incoming signal needs to be to break squelch and be received on the CB. - Turn the POWER button or press the microphone UP or DN button to change ASQ level.
NOTE: Using the UP or DN buttons on the microphone changes the squelch levels rapidly. - Press and release the SQ/ASQ key again or wait 5 seconds to store the selected ASQ level and exit.
 .
. indicates the ASQ level The higher the number, the stronger an incoming signal needs to be to break squelch and be received on the CB.
Install External Speaker
Choose an 8 Ohm external speaker with a 3.5mm mono connector.

The 19 Mini external speaker output is a Bridge Tied Load (BTL) design. Do not short the speaker wires to ground as it may damage the speaker amplifier.
Keypad Lock
- Press and hold the MENU key for 3 seconds to lock the keys. The LCD display will show the
![]() icon.
icon. - When the keypad is locked, press and hold the MENU key for 3 seconds to unlock the keys. The
![]() icon turns off.
icon turns off.
 icon.
icon.Emergency Channel 9/19
- Press and release the 9/19 button to choose CH9.
- Press and release the 9/19 button again to choose CH19.
- Press and release the 9/19 button a third time to return to your original channel selection.
Scan
- Press and hold the Channel UP or DOWN button and the POWER button at the same time to activate the SCAN function.
- The radio will automatically scan all 40 Channels and stop on an active channel. Press any key to end SCAN.
VOX
- Press and hold the PTT switch on the microphone.
- Press and release the MENU button to activate or deactivate the VOX function,
![]() is displayed on the LCD display when VOX is active.
is displayed on the LCD display when VOX is active.
 is displayed on the LCD display when VOX is active.
Menu Options
- Press and release the MENU button to enter the menu list.
- Turn the POWER button or press the microphone UP or DN buttons to choose the desired function.
- Press and release the POWER button to enter the setting for the desired function. Once selected, the setting will blink on the LCD display.
- Turn the POWER button clockwise or press the microphone UP or DN buttons to select the desired setting.
- Press and release the POWER button to confirm the setting and exit.
- To exit the menu, press and hold the POWER button or press and hold the microphone PTT switch or wait 10 seconds once the setting selection has been confirmed.
Reset to Factory Default
- Press and release the MENU button to enter the menu list.
- Turn the POWER button or press the microphone UP or DN buttons to choose the RESET setting.
- Press and release the POWER button to select. RESET will blink in the display.
- Press and hold the POWER button until RESET stops blinking.
- Release the POWER button and the radio will automatically reset to factory default settings.
| LCD Display | Function | Setting |
 | Beep | on (default): turn on beep oF: turn off beep |
 | Roger Beep Sound Setting (Tones) | oF, Tone settings 01 - 06 oF: (default) turn off roger beep |
 | VOX SensitivityLevelSetting | Level: 01 -09 Default: 03 |
 | VOX Delay Time Setting | Level: 01 -09 Default: 01 |
 | RF Gain Control | Levels: 03, 06, 09 - 48 oF (default) RF gain off |
 | Time Out Timer | oF, 01 - 10 minutes Default: 05 |
 | Automatic Power On Setting | on (default): Auto power on oF: Manual power on |
 | Firmware Version | Displays 2 digit Firmware Version |
 | See Reset to Factory Default Section |
Questions or Need Help? Please call Cobra Customer Care at 800-543-1608.
Documents / Resources
References
Download manual
Here you can download full pdf version of manual, it may contain additional safety instructions, warranty information, FCC rules, etc.
Advertisement


Need help?
Do you have a question about the 19 MINI and is the answer not in the manual?
Questions and answers