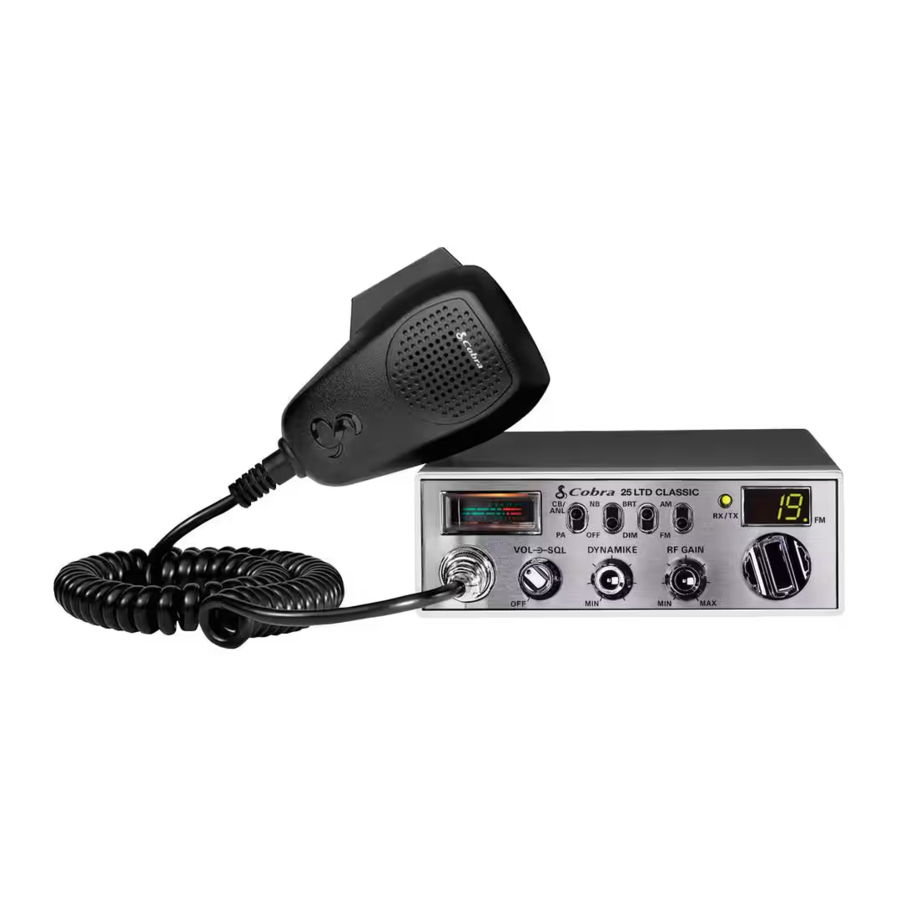
Cobra 25-LTD Manual
- Operating instructions manual (11 pages) ,
- Installation instructions manual (12 pages) ,
- Owner's manual (12 pages)
Advertisement
- 1 Installation
-
2
Operation
- 2.1 Turning On
- 2.2 Setting Channel Selector
- 2.3 To Receive
- 2.4 Selecting A Channel
- 2.5 S-Meter
- 2.6 NB/OFF Noise Blanker Switch
- 2.7 Bright/Dim Switch
- 2.8 RF Gain Control
- 2.9 Setting Squelch
- 2.10 To Transmit
- 2.11 Setting Dynamike
- 2.12 Transmit
- 2.13 RF Meter
- 2.14 External Speaker
- 2.15 Public Address
- 2.16 Automatic Noise Limiter Switch
- 2.17 Temporary Mobile Operation
- 3 Home And Office Set-Up
- 4 How Your Unit Can Serve You
- 5 Documents / Resources
Installation
Location
Plan location of transceiver and microphone bracket before starting the installation.
Select a location that is convenient for operation, yet does not interfere with the driver or passenger.
The transceiver is usually mounted to the underside of the dash with the microphone bracket beside it.
Mounting and Connection
Note
The transceiver is held in the universal mounting bracket by two thumbscrews which allow for adjustment at a convenient angle.
The bracket includes two self-tapping screws and star washers. The mounting must be mechanically strong, conveniently located.
- Hold the radio with the mounting bracket in the exact desired location. If there is no interference, remove the bracket and use it as a template to mark the location for the mounting screws.
- Drill the holes and secure the bracket.
![]()
- Connect the antenna cable plug to the receptacle marked "ANT" on the back of the unit.
![]()


Note
Before installing the CB radio, visually check the vehicle's battery connection to determine which terminal, positive or negative, is grounded (positive is the larger of the two) to the engine block (or chassis). A negatively grounded vehicle has its negative lead grounded to the chassis.
Note
In positive ground vehicles the red wire goes to the chassis and the black wire is connected to the ignition switch.
Note
Connecting to an accessory fuse prevents the unit from being left on accidentally, and also permits operating the unit without running the engine.
Note
In positive ground vehicles the red wire goes to the chassis and the black wire is connected to the ignition switch.
- In a negative grounded vehicle, connect the red lead of the DC power cord to an accessory 12 volt fuse.
![]()
- Connect the black lead to the negative side of the vehicle. This is usually the chassis. Any convenient location with a good electrical contact (remove paint) may be used.
- Plug power cable into back of unit marked "Power". Be sure to observe polarity markings.
![]()
- Mount the microphone bracket on the right side of the unit (driver's left) using two screws supplied. Bracket should be placed under the dash so microphone is readily accessible.
![]()
- Attach the 4-pin microphone cable to receptacle on the front of the unit and install unit in bracket securely.
![]()


Operation
Turning On
Make sure the power cord, antenna and microphone are connected to their proper connectors before starting.
- The
![]() CB/PA button should be in the CB position.
CB/PA button should be in the CB position.
![]()
- Rotate the On/Off Volume knob
![]() clockwise to a normal listening level.
clockwise to a normal listening level.
![]()
 CB/PA button should be in the CB position.
 clockwise to a normal listening level.
Setting Channel Selector
- Select
![]() one of forty channels and adjust volume. The selected channel is indicated by the LED readout directly above the channel selector knob
one of forty channels and adjust volume. The selected channel is indicated by the LED readout directly above the channel selector knob
![]()
 one of forty channels and adjust volume. The selected channel is indicated by the LED readout directly above the channel selector knob
To Receive
- Rotate the On/Off Volume knob clockwise the green RT/TX LED and channel display will be illuminated.
![]()

Selecting A Channel
- Switch to NORMAL to select desired channel.
![]()

Note
Switch to 9 (Emergency) for instant access to these channel.
S-Meter
Swings proportionately to strength of incoming signal when receiving.

NB/OFF Noise Blanker Switch
- When switched to
![]() NB position the RF Noise Blanker is activated, providing increased noise filtration.
NB position the RF Noise Blanker is activated, providing increased noise filtration.
When switched to![]() OFF position Noise Blanking Filtration will be turned off.
OFF position Noise Blanking Filtration will be turned off.
![]()
 NB position the RF Noise Blanker is activated, providing increased noise filtration.
 OFF position Noise Blanking Filtration will be turned off.
Note The RF noise blanker is very effective in reducing repetitive noises such as ignition interference.
Bright/Dim Switch
- Switch to
![]() BRT or DIM to control brightness of the channel indicator and multi-function meter for day or nighttime driving.
BRT or DIM to control brightness of the channel indicator and multi-function meter for day or nighttime driving.
![]()
 BRT or DIM to control brightness of the channel indicator and multi-function meter for day or nighttime driving.
RF Gain Control
The RF Gain is used to optimize reception in strong or weak signal areas.
- Rotate the
![]() RF Gain knob counterclockwise to reduce gain in strong signal areas. In weak signal areas turn clockwise to increase gain.
RF Gain knob counterclockwise to reduce gain in strong signal areas. In weak signal areas turn clockwise to increase gain.
![]()
 RF Gain knob counterclockwise to reduce gain in strong signal areas. In weak signal areas turn clockwise to increase gain.
Note
The RF Gain is used to optimize reception in weak signal areas. Turn counterclockwise to reduce gain.
Setting Squelch
Squelch is the "control gate" for incoming signals.
- Full
![]() clockwise rotation closes the gate allowing only very strong signals to enter.
clockwise rotation closes the gate allowing only very strong signals to enter.
![]()
![]()
- Full
![]() counterclockwise rotation opens the "gate" allowing all signals in.
counterclockwise rotation opens the "gate" allowing all signals in.
![]()
![]()
- To achieve the Desired Squelch Setting (DSS), turn the Squelch control
![]() counterclockwise until you hear noise. Now turn the control clockwise just until the noise stops. This is the DSS setting.
counterclockwise until you hear noise. Now turn the control clockwise just until the noise stops. This is the DSS setting.
![]()
![]()


To Transmit
- Select desired
![]() channel.
channel.
![]()
 channel.

Be sure the antenna is properly connected to the radio before transmitting. Prolonged transmitting without an antenna, or a poorly matched antenna, could cause damage to the transmitter.
Be sure to read the F.C.C. Rules and Regulations included with this unit before transmitting.
Setting Dynamike
This controls the microphone sensitivity (outgoing audio level).
- Initially, set fully
![]() clockwise so that maximum voice volume is available. Dynamike may have to be reduced in some conditions.
clockwise so that maximum voice volume is available. Dynamike may have to be reduced in some conditions.
![]()
 clockwise so that maximum voice volume is available. Dynamike may have to be reduced in some conditions.
Transmit
- Push and hold mic button to transmit. Transmitter is now activated. When transmitting, hold the microphone two inches from your mouth and speak in a clear, normal voice. Release to receive.
![]()

RF Meter
This meter swings proportionately to the RF output (outgoing signal) while transmitting.

External Speaker
The external Speaker jack is used for remote receiver monitoring.
- Connect an external speaker to the external speaker jack on the rear panel.
![]()

Note
The external speaker should have 8-ohm impedance and be rated to handle at least 4.0 watts. When the external speaker is plugged in, the internal speaker is automatically disconnected.
Note
Cobra external speakers are rated at 10 watts.
Public Address
- Connect an external PA speaker to the PA jack on the rear panel.
![]()
- Set
![]() CB/ANL PA switch to PA position.
CB/ANL PA switch to PA position.
![]()
- Push and hold microphone button and speak in a normal voice. Your voice will sound on the PA speaker.
![]()
- Adjust PA speaker volume with the
![]() Dynamike control.
Dynamike control.
![]()

 CB/ANL PA switch to PA position.


Note
Speaker should have 8-ohm impedance and be rated to handle at least 4.0 watts.
Note
The speaker should be directed away from the microphone to prevent acoustic feedback.
Note
When the volume control is rotated clockwise, activity on the CB channel will be heard through the PA speaker.
Automatic Noise Limiter Switch
- When switched to
![]() CB/ANL the Automatic Noise Limiter is activated. This helps reduce noise created by the vehicle's electronics.
CB/ANL the Automatic Noise Limiter is activated. This helps reduce noise created by the vehicle's electronics.
![]()
 CB/ANL the Automatic Noise Limiter is activated. This helps reduce noise created by the vehicle's electronics.
Temporary Mobile Operation
For temporary mobile operation you may want to purchase an optional cigar lighter adapter from your COBRA dealer. This adapter and a magnetic mount antenna allow you to quickly "install" your transceiver for temporary use.

Home And Office Set-Up
Base Station Operation (From 120V AC House Current)
To operate your transceiver from home or office you will need a 13.8 volt DC Power Pack rated at a minimum of 2 amps, and a properly installed base station antenna.
- Simply connect the red (+) and black (-) leads of the transceiver to the corresponding terminals of the power pack.
![]()
- Plug power cable into back of unit marked "Power". Be sure to observe polarity markings.
![]()
- Connect properly installed and matched base station antenna.


Do not attempt to operate this transceiver by connecting it directly to 120 vac.
How Your Unit Can Serve You
- Warn of traffic problems
- Provide weather and road data
- Provide help in event of an emergency
- Provide direct contact with home or office
- Assist police by reporting erratic drivers
- Get "local information" to find destination
- Communicate with family and friends
- Suggest spots to eat and sleep
- Keep you alert while traveling
A Few Rules You Should Know
- Conversations cannot last more than 5 minutes with another station. A one minute break is required to let others use the channel.
- You cannot blast others off the air by use of illegally amplified transmitters or illegally high antennas.
- You cannot use CB to promote illegal activities.
- Profanity is not allowed.
- You may not transmit music with a CB.
- Selling of merchandise and/or services is prohibited.
Channel 9 Emergency Messages
- Set to channel 9 for emergencies
Be sure antenna is properly connected. - CB Distress Data
When transmitting an emergency, you should request a "REACT BASE" and provide the CB distress data (called CLIP):
| C all Sign | Identify yourself. |
| L ocation | Be exact. |
| I njuries | Number. Type. Trapped? |
| P roblem | Give details and help needed. |
Transmit CLIP repeatedly so any monitor can assist.
The FCC gives these examples of permitted and prohibited messages for channel 9. These are only guidelines and not all-inclusive:
| Permitted | Example Message |
| Yes | "Tornado sighted six miles north of town. " |
| No | "Post number 10. No tornado sighted. " |
| Yes | "Out of gas on I-95 at mile marker 211. " |
| No | "Out of gas in my driveway. " |
| Yes | "Four car accident on I-94 at Exit 11. Send police and ambulance. " |
| No | "Traffic moving smoothly on I-94. " |
| Yes | "Weather Bureau has issued thunderstorm warning. Bring sailboat into port. " |
| No | "Attention motorists. Weather Bureau advises snow tomorrow will accumulate 4 to 6 inches. " |
| Yes | "Fire in building at 539 Main, Evanston. " |
| No | "Halloween patrol number 3. All quiet. " |
Documents / ResourcesDownload manual
Here you can download full pdf version of manual, it may contain additional safety instructions, warranty information, FCC rules, etc.
Advertisement


Need help?
Do you have a question about the 25-LTD and is the answer not in the manual?
Questions and answers