Advertisement
- 1 Introduction
- 2 Discover your Chromebook
- 3 Meet your Chromebook
-
4
Get started with your Chromebook
- 4.1 Charge your Chromebook
- 4.2 Connect to Wi-Fi
- 4.3 Combination of Chromebook and folio keyboard (for selected models)
- 4.4 Use the kickstand (for selected models)
- 4.5 Use the Lenovo USI Pen 2 Magnetic (for selected models)
- 4.6 Use the touch screen
- 4.7 Use the keyboard shortcuts (for selected models)
- 4.8 Use the touchpad (for selected models)
- 4.9 Use the camera
- 4.10 Use audio
- 4.11 Connect to an external display
- 4.12 Connect to Bluetooth devices
- 4.13 Set the power plan
- 5 CRU replacement
- 6 Help and support
- 7 Safety instructions for teachers, parents and adult supervisors
- 8 Documents / Resources
Introduction
Before using this documentation and the product it supports, ensure that you read and understand the following:
- Safety and Warranty Guide
- Setup Guide
Discover your Chromebook
Before starting your tour, please read the following information:
- This guide applies to Lenovo product models listed below. Illustrations in this guide may look slightly different from your product model.
| Model name | Machine type (MT) |
| LNV CB Duet 11M889 | 83HH |
| LNV CB Duet 11M889 1 | |
| LNV CB Duet 11M889 2 | |
| LNV Chrome Duet EDU G2 | 83HJ, 83HK |
| LNV Chrome Duet EDU G2 1 | |
| LNV Chrome Duet EDU G2 2 |
- Depending on the model, some optional accessories, features, software programs, and user interface instructions might not be applicable to your Chromebook.
- Documentation content is subject to change without notice. To get the latest documentation, go to https://pcsupport.lenovo.com.
Meet your Chromebook
Front

| 1 | Wireless antennas | Send and receive radio waves for the built-in wireless local area network (LAN) and Bluetooth module.
|
| 2 | Front camera | Capture still and moving images for taking photos, recording videos, and video chatting. |
| 3 | Screen | Display text, graphics, and videos. Support multi-touch function. |
Rear

Figure 1. LNV CB Duet 11M889

Figure 2. LNV Chrome Duet EDU G2

Figure 3. Lenovo USI Pen 2 Magnetic
| 1 | Rear camera | Capture still and moving images for taking photos, recording videos, and video chatting. |
| 2 | Kickstand | Support your Chromebook when it is placed on a surface. |
| 3 | Kickstand hinge | Pivot the kickstand. |
| 4 | Lenovo USI Pen 2 Magnetic | The pen enables you to write and draw in a natural manner. |
* for selected models
Top

| 1 | Volume buttons | Press the buttons to increase or decrease the system volume. |
| 2 | Microphones | Capture or record sound and voice. |
| 3 | Camera cover | Cover or uncover the camera lens.
|
| 4 | Multi-purpose USB Type-C® connector | This multi-purpose connector can be used to connect devices that utilize the USB data transfer technology and display devices. It also supports USB Power Delivery.
|
Bottom

| 1 | Pogo pin with guide pin | The pogo pin with guide pin enables you to attach the keyboard to your Chromebook magnetically. |
Left

| 1 | Multi-purpose USB Type-C connector | This multi-purpose connector can be used to connect devices that utilize the USB data transfer technology and display devices. It also supports USB Power Delivery.
|
| 2 | Charging light | Indicate the ac power status and the battery status. See "AC power status indicator behavior". |
| 3 | Combo audio jack | Connect headphones or headsets with a 3.5 mm (0.14 inch), 4-pole plug.
|
| 4 | Speaker | Produce sound. |
| 5 | Power button | Press the button to turn on the Chromebook or put the Chromebook into sleep mode.
|
 in the system tray.
Right

| 1 | Speaker | Produce sound. |
Folio keyboard (for selected models)
")
| 1 | Pogo pin with guide pin | The pogo pin with guide pin enables you to attach the keyboard to your Chromebook magnetically. |
| 2 | Keyboard | Enter characters and interact with programs.
|
| 3 | Touchpad | Perform finger touch and all the functions of a traditional mouse.
|
Features and specifications
 Note: Specifications might change without notice. Some specifications are model-specific and might not apply to the Chromebook model that you purchased.
| Dimensions |
|
| Weight |
|
| ac power adapter |
|
| Battery pack |
Note: The battery capacity is the typical or average capacity as measured in a specific test environment. Capacities measured in other environments may differ but are no lower than the rated capacity (see product label) |
| Memory |
|
| Secondary storage device |
Note: The capacity of the storage device displayed in the operating system is typically lower than the nominal capacity. |
| Screen |
|
| Connectors and slots |
Note: Data rates and performance ratings are dependent on connected devices and cables if they are used. For DisplayPort connection through a USB Type-C connector, the listed maximum output capacity is only available on external displays with a DisplayPort, a Mini DisplayPort, or a USB Type-C connector that supports DisplayPort Alternate Mode. For connections using a converter or an adapter, the actual output resolution may be lower. |
| Network | Bluetooth and Wi-Fi® combo adapter |
* for selected models
Statement on USB transfer rate
Depending on many factors such as the processing capability of the host and peripheral devices, file attributes, and other factors related to system configuration and operating environments, the actual transfer rate using the various USB connectors on this device will vary and will be slower than the data rate listed below for each corresponding device.
| USB device | Data rate (Gbit/s) |
| USB 3.2 Gen 1 | 5 |
Operating environment
Maximum altitude (without pressurization)
3048 m (10 000 ft)
Temperature
- Operating: 5°C to 35°C (41°F to 95°F)
- Storage: 5°C to 43°C (41°F to 109°F)
Note: When you charge the battery, its temperature must be no lower than 10°C (50°F).
Relative humidity
- Operating: 8% to 95% at wet-bulb temperature 23°C (73°F)
- Storage: 5% to 95% at wet-bulb temperature 27°C (81°F)
The folio keyboard bottom cover and kickstand cover are polyurethane (PU). Handle your keyboard and kickstand cover with care so that you can enjoy this product for a long time. If possible, place your Chromebook in a well-ventilated and dry area without direct exposure to sunshine. Do not use or store your Chromebook in dusty, dirty areas, or extremely hot or cold areas.
Get started with your Chromebook
Charge your Chromebook
The USB Type-C connector on your Chromebook works as the power connector. Plug in the ac power adapter to charge the built-in battery pack and provide power to the Chromebook.
Connect to ac power

All plugs must be firmly and securely inserted into receptacles.

- Connect the power cord to the ac power adapter.
- Plug the power adapter into the USB Type-C connector of the Chromebook.
- Plug the power cord into an electrical outlet.
AC power status indicator behavior
The ac power status indicator is next to the USB Type-C connector. The following table shows the indicator behaviors and the indicated power and battery status.
| AC power status indicator | Power status | Battery status |
| on (red) | plugged in | being charged, remaining power is less than 5% |
| on (amber) | plugged in | being charged, remaining power is between 5% and 97% |
| on (green) | plugged in | fully charged (97% to 100%) |
| off | unplugged | discharging |
Connect to Wi-Fi
To connect your Chromebook to Wi-Fi:
- Click your system tray.
- Click the network icon and turn on the wireless feature.
- Select an available network to connect. Provide required information if needed.
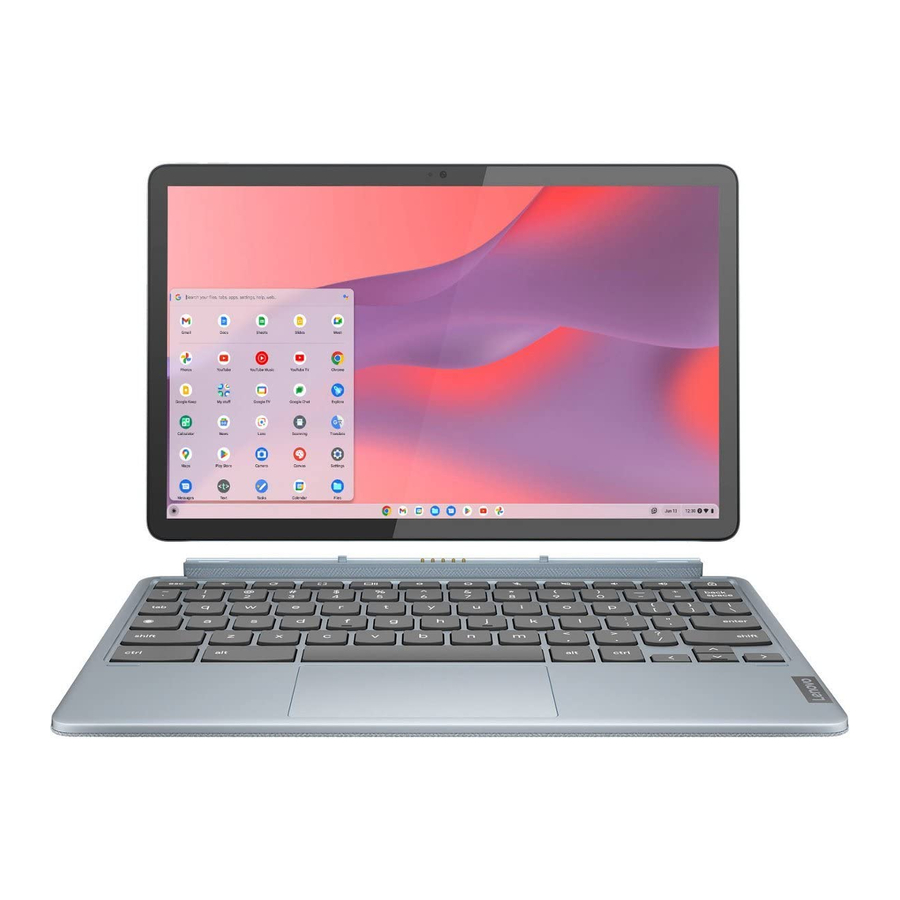
Combination of Chromebook and folio keyboard (for selected models)
Align the connector of the keyboard with the Chromebook and then attach the Chromebook in the direction shown by the arrow.

Note: The pogo bar separates when the folio keyboard is flipped to the rear of the Chromebook.
Use the kickstand (for selected models)
Your Chromebook has a stand cover that is built in with a kickstand. Pivot the kickstand from the pits on both sides of the Chromebook to open position as shown.
LNV CB Duet 11M889

LNV Chrome Duet EDU G2

With the kickstand open, you can use the Chromebook in the following modes:
- LNV CB Duet 11M889:
- Landscape mode without folio keyboard attached
![]()
- Landscape mode with folio keyboard attached
![]()
- Stylus mode
![]()
- Portrait mode without folio keyboard attached
![]()
- Landscape mode without folio keyboard attached
- LNV Chrome Duet EDU G2:
- Landscape mode without folio keyboard attached
![]()
- Landscape mode with folio keyboard attached
![]()
- Stylus mode
![]()
- Landscape mode without folio keyboard attached


The multi-positional kickstand enables you to set the Chromebook at different angles for a comfortable user experience. The recommended screen angles are:
- Landscape mode: About 120°
- Portrait mode: About 100° (for LNV CB Duet 11M889)
Attention
Using the kickstand at an improper angle or under the load may damage the kickstand.
Use the Lenovo USI Pen 2 Magnetic (for selected models)
Your Chromebook might come with a Lenovo USI Pen 2 Magnetic (referred to as the pen in this section). The pen enables you to write and draw in a natural manner.
Notes:
- The pen is not waterproof. Take care not to drop the pen in water.
- The pen contains pressure sensors. Do not push the tip of the pen for an extended period of time. Do not subject the pen to shock or vibration.
![]()
Figure 4. Pen overview

| Name | Description | |
| 1 | End cap | Unscrew the end cap to install or replace a battery. |
| 2 | Pen tip | To click, tap on the screen with the tip. To double-click, tap twice. |
Before first use
An insulation pad may be included in the Lenovo USI Pen 2 Magnetic to prevent capacity loss during shipping. The first time you use the pen, check and remove the insulation pad. ( )
)

The Lenovo USI Pen 2 Magnetic uses AAAA battery. Replace with the right battery.
Use the touch screen
You can navigate the screen with simple touch gestures.
Note: Some gestures might not be available depending on the app you use.
Tap once to open an app or perform an action on an open app, such as Copy, Save, and Delete, depending on the app.

Tap and hold to right-click to open a shortcut menu.

Slide to scroll through items.

Drag.

Zoom out.

Zoom in.

Tap with two fingers to open a shortcut menu.

Swipe upwards to unfold the app Launcher.

 Maintenance tips:
- Turn off the Chromebook before cleaning the multi-touch screen.
- Use a dry, soft, and lint-free cloth or a piece of absorbent cotton to remove fingerprints or dust from the multi-touch screen. Do not apply solvents to the cloth.
- The multi-touch screen is a glass panel covered with a plastic film. Do not apply pressure or place any metallic object on the screen, which might damage the touch panel or cause it to malfunction.
- Do not use fingernails, gloved fingers, or inanimate objects for input on the screen.
- Regularly calibrate the accuracy of the finger input to avoid a discrepancy.
Use the keyboard shortcuts (for selected models)
The function keys on the keyboard help you work more easily and effectively.
 | Go to the previous page |
 | Reload your current page |
 | Hide the tabs and the App Launcher in full-screen mode |
 | Show all windows in overview mode |
 | Decrease the brightness of the Chromebook screen |
 | Increase the brightness of the Chromebook screen |
 | Mute the microphone |
 | Mute the speakers |
 | Decrease the volume |
 | Increase the volume |
 | Lock the Chromebook screen |
Your Chromebook also supports some key combinations.
| ctrl + | Take a screenshot |
alt +  | Switch the Caps Lock function |
 + l + l | Lock your Chromebook screen |
| ctrl + alt +? | View all keyboard shortcuts |
To change the keyboard settings:
- Click the setting icon in the system tray, and then click Device ➙ Keyboard.
- Follow the on-screen instructions to change the settings as you prefer.
Use the touchpad (for selected models)
The entire touchpad surface is sensitive to finger touch and movement. You can use the touchpad to perform all the pointing, clicking, and scrolling functions of a traditional mouse.
Use the touch gestures
Notes:
- When using two or more fingers, ensure that you position your fingers slightly apart.
- Some gestures are only available when you are using certain apps.
- If the touchpad surface is stained with oil, turn off the Chromebook first. Then, gently wipe the touchpad surface with a soft and lint-free cloth moistened with lukewarm water or Chromebook cleaner.
Tap once to select or open an item.

Two-finger zoom in or zoom out.

Open the task view.

Tap twice quickly to display a shortcut menu.

Scroll through items.

Show the current window.

To change the settings:
- Click the setting icon in the system tray, and then click Device ➙ Touchpad.
- Follow the on-screen instructions to change the settings as you prefer.
If Enable tap-to-click is turned on, you can tap or press the touchpad. Otherwise, you can only press the touchpad to achieve the clicking function of a traditional mouse.
Use the camera
The built-in camera can be used for video calling or video conferencing. The indicator next to the camera turns on when the camera is activated.
To take photos with the camera:
- Click the Launcher button.
- Click Camera and take photos.
Use audio
You can connect headphones or a headset with a 3.5-mm (0.14-inch), 4-pole plug to the audio connector to listen to the sound from your Chromebook.
To play a saved audio or video:
- Click the Launcher button, and then select Files.
- Double-click a file to open it in the media player.
To adjust the volume, click the system tray, and then adjust the volume as you prefer.
Connect to an external display
You can use the Chromebook's USB Type-C connectors to connect a projector or an external display.
- Use a USB Type-C to USB Type-C cable (not supplied) to connect your Chromebook to an external display.
![warning]() Note: If the external display does not support input through USB Type-C connector, you may need to purchase and use adapters. Lenovo provides various USB Type-C accessories at https://www.lenovo.com/accessories, to help you expand your Chromebook functionality.
Note: If the external display does not support input through USB Type-C connector, you may need to purchase and use adapters. Lenovo provides various USB Type-C accessories at https://www.lenovo.com/accessories, to help you expand your Chromebook functionality. - Connect the external display to an electrical outlet.
- Turn on the external display.
To change display settings:
- Click your system tray, and then click Settings.
- In the Device section, click Displays.
- Follow the on-screen instructions to change the display settings as you desire.
Connect to Bluetooth devices
Your Chromebook supports Bluetooth feature. You can connect your Chromebook to a Bluetooth keyboard, mouse, speakers, or other Bluetooth devices.
Note: The Bluetooth devices must be within a short distance, usually 10 meters (33 feet), from the Chromebook.
- Click your system tray, and then click the Bluetooth icon.
- Turn on Bluetooth.
- Select the device you want to pair and follow the on-screen instructions.
Set the power plan
For ENERGY STAR® compliant Chromebooks, the following power plan takes effect when your Chromebooks have been idle for a specified duration:
Table 1. Default power plan (when plugged into ac power)
|
To reset the power plan to achieve the best balance between performance and power saving:
- Click the setting icon in the system tray, and then click Device ➙ Power.
- Follow the on-screen instructions to change the settings as you prefer.
To wake your Chromebooks from sleep mode, press the power button or any key on the keyboard.
CRU replacement
Customer Replaceable Units (CRUs) are parts that can be replaced by the customer. The Chromebooks contain the following types of CRUs:
- Self-service CRUs: Refer to parts that can be replaced easily by customers themselves or by trained service technicians at an additional cost.
- Optional-service CRUs: Refer to parts that can be replaced by customers with a greater skill level. Trained service technicians can also provide service to replace the parts under the type of warranty designated for the customer's machine.
If you intend on installing a CRU, Lenovo will ship the CRU to you. CRU information and replacement instructions are shipped with your product and are available from Lenovo at any time upon request. You might be required to return the defective part that is replaced by the CRU. When return is required: (1) return instructions, a prepaid shipping label, and a container will be included with the replacement CRU; and (2) you might be charged for the replacement CRU if Lenovo does not receive the defective CRU within thirty (30) days of your receipt of the replacement CRU. For full details, see the Lenovo Limited Warranty documentation at https://www.lenovo.com/warranty/llw_02.
What are CRUs
Refer to the following CRU list for your Chromebook.
Self-service CRUs
- ac power adapter
- Folio keyboard*
- Kickstand (for LNV CB Duet 11M889)*
- Lenovo USI Pen 2 Magnetic*
- Power cord
* for selected models
Note: Replacement of any parts not listed above, including the built-in rechargeable battery, should be done by a qualified repair technician or by ensuring that you carefully follow all instructions provided by Lenovo. You can also find Lenovo-authorized repair facilities by going to: https://support.lenovo.com/partnerlocator for more information.
Help and support
Frequently asked questions
| What do I do if my Chromebook stops responding? |
|
| What do I do if I spill liquid on the Chromebook? |
|
| How do I disinfect my Chromebook? |
|
| How do I find accessibility information? | https://www.lenovo.com/accessibility |
Lenovo Customer Support Center
If you have tried to correct the problem yourself and still need help, you can call Lenovo Customer Support Center.
Before you contact Lenovo
Record product information and problem details before you contact Lenovo.
| Product information | Problem symptoms and details |
|
|
Note: The product name and serial number can usually be found on the bottom of the Chromebook, either printed on a label or etched on the cover.
Telephone numbers
For a list of the Lenovo Support phone numbers for your country or region, go to https://pcsupport.lenovo.com/supportphonelist for the latest phone numbers.
Note: Phone numbers are subject to change without notice. If the number for your country or region is not provided, contact your Lenovo reseller or Lenovo marketing representative.
Services available during the warranty period
- Problem determination - Trained personnel are available to assist you with determining if you have a hardware problem and deciding what action is necessary to fix the problem.
- Lenovo hardware repair - If the problem is determined to be caused by Lenovo hardware under warranty, trained service personnel are available to provide the applicable level of service.
- Engineering change management - Occasionally, there might be changes that are required after a product has been sold. Lenovo or your reseller, if authorized by Lenovo, will make selected Engineering Changes (ECs) that apply to your hardware available.
Services not covered
- Replacement or use of parts not manufactured for or by Lenovo or nonwarranted parts
- Identification of software problem sources
- Configuration of UEFI BIOS as part of an installation or upgrade
- Changes, modifications, or upgrades to device drivers
- Installation and maintenance of network operating systems (NOS)
- Installation and maintenance of programs
For the terms and conditions of the Lenovo Limited Warranty that apply to your Lenovo hardware product, go to:
- https://www.lenovo.com/warranty/llw_02
- https://pcsupport.lenovo.com/warrantylookup
Get help from Google
After signing in to your Chromebook, start Get Help from the app Launcher. The Get Help app provides comprehensive instructions on using your Chromebook.
In addition, if you are interested in visiting the Chromebook Help Center and Community, go to http://support.google.com/chromebook.
Safety instructions for teachers, parents and adult supervisors
This Chromebook is intended for use as a child development tool primarily by children, 6 years of age or above. There must be supervision by an adult. It is a must to have a thorough explanation to children on safe and proper handling of the Chromebook, battery pack, and ac power adapter.

- For ITE with power supplies not intended to be handled by children: As with all electrical products, precautions should be observed handling and use to prevent electric shock. The ac power adapter should not be handled by children.
- The Chromebook should not be placed on the bare skin (lap) of the child for long periods. The Chromebook should be placed on a flat surface, like desktop, if your child intends to use it for more than a few minutes.
- The Chromebook (including the ac power adapter and the battery pack, as applicable) should not be left in the rain or subjected to exposure to water. If cleaning is necessary do not immerse it in water; wipe clean with damp cloth.
- The Chromebook (including the ac power adapter and the battery pack, as applicable) should not be dropped, crushed (stepped on) or otherwise abused.
- An adult should caution his or her child about the potential trip hazard as posed by the cable between a power source and the Chromebook.
- The power supply (adapter) should not be handled by the children.
Chocking Hazard — Small parts. Not suitable for children under age 3.
An adult should inspect the Chromebook (including the ac power adapter and the battery pack, as applicable) periodically for damage. Similarly, if a child notices damaged/broken parts, this should be reported to the teacher/parents/adult supervisors immediately. Damaged parts may be replaced through service provided by Lenovo.

ELECTRICALLY OPERATED PRODUCT. Not recommended for children under 3 years of age (or other intended age range). As with all electrical products, precautions should be observed during handling and use of electrical products to reduce the risk of electric shock.
Documents / Resources
References
Official Lenovo Laptop, Accessories & PC Support - Lenovo Support US
![lenovo.com]() http://lenovo.com/accessorie
http://lenovo.com/accessorie![www.lenovo.com]() Lenovo Accessories & Software - Shop Now | Lenovo US
Lenovo Accessories & Software - Shop Now | Lenovo US![www.lenovo.com]() Product Accessibility | Regulatory Compliance | Lenovo US
Product Accessibility | Regulatory Compliance | Lenovo USSupportPhoneList - Lenovo Support US
Lenovo Warranty Check/Lookup | Check Warranty Status | Lenovo Support US
Chromebook Help
Download manual
Here you can download full pdf version of manual, it may contain additional safety instructions, warranty information, FCC rules, etc.
Advertisement


Need help?
Do you have a question about the Chromebook Duet and is the answer not in the manual?
Questions and answers