Advertisement
Package Contents
 Please read this user manual carefully before using your device.

List of Components

Preparation
You will need:
- A smartphone or tablet using Bluetooth 4.2 or later.
- The latest version of our app, downloadable via the Apple App Store
![apps.apple.com]()
![]()
iOS 11.0+
or Google Play Store.
![play.google.com]()
![]()
Android OS 5.0+
- A SwitchBot account, you can register via our app or sign in to your account directly if you already have one.


Please note: If you intend to use the Cloud Service feature, you will need a SwitchBot Hub Mini (sold separately).
Installation
Step 1: Add your Blind Tilt to our app
Open the SwitchBot app and sign in to your account. Tap "+" at the top right of the home page, find the Blind Tilt icon and select, then follow the instructions to add your device.
Step 2: Install onto your blinds
To ensure your Blind Tilt holds firmly on your blinds, use the wet wipe provided or neutral detergent to clean the headrail and the blind wand. Dirt or dust will affect adhesion and may cause dropping at a later time.

- Use the measurement paper tape to determine an adapter for your blind wand.
- Wrap the measurement paper tape around your blind wand and tuck the narrower end of the paper tape into the gap on the other end. Slide the narrower end through the gap so the paper tape tightly fits the wand. Now check which size the marks on the paper tape indicate - S, M, L or XL.

- Select the adapter of the right size according to the result above.

- Wrap the measurement paper tape around your blind wand and tuck the narrower end of the paper tape into the gap on the other end. Slide the narrower end through the gap so the paper tape tightly fits the wand. Now check which size the marks on the paper tape indicate - S, M, L or XL.


- Install the mounting base and attach the adapter to your blind wand using the alignment card
![warning]() Please note: The alignment card provided is an essential tool to help determine the position of the mounting base and the adapter.
Please note: The alignment card provided is an essential tool to help determine the position of the mounting base and the adapter. - Align the middle line on the alignment card with your blind wand. Then stick the two folded parts with adhesive to the bottom of the headrail.

- The gap at the middle bottom of the alignment card corresponds to where the adapter should be on the wand. Peel off the inner liner of the adapter and wrap it around your blind wand. Hold and pinch it for around 30 seconds.

- Select a mounting base that suits your blinds and stick it to the headrail where the alignment card indicates. We provide two types of mounting base. We recommend installing on the left using mounting base A in most cases.
Option 1: stick mounting base A on the left (recommended).

Option 2: if there is a lift cord close to your blind wand on the left, select mounting base B and stick it in between.

Option 3: if there is not enough space on the left, stick mounting base A on the right.

Option 4: if there is not enough space on the left and there is also a lift cord close to your blind wand on the right, select mounting base B and stick it in between.

- Align the middle line on the alignment card with your blind wand. Then stick the two folded parts with adhesive to the bottom of the headrail.


- Attach the coupling onto the adapter
- Open the coupling and attach it onto the adapter, then pinch and fasten the spring buckle.

- Twist the coupling against the wand and make sure there is no relative sliding between the coupling and the adapter.

![warning]() Note: If the coupling slides over the adapter when you twist it, use the measurement paper tape to measure your blind wand again and replace with a more suitable adapter.
Note: If the coupling slides over the adapter when you twist it, use the measurement paper tape to measure your blind wand again and replace with a more suitable adapter.
- Open the coupling and attach it onto the adapter, then pinch and fasten the spring buckle.


- Install the main unit of your Blind Tilt onto the wand
- Mounting base on the left:
- Pinch the spring tab on the cord holder and slide the cord holder upwards to fit into the mounting base.

- Push the slide switch on the main unit upwards to open the case.
- Align the gears on the coupling and inside the main unit, then close the main unit case. (Slide the cord holder up or down to adjust the position of main unit if you have difficulty aligning the gears.)

- Check if your blind wand is perpendicular to the ground. If not, pinch the spring tab to slide the cord up and down to adjust the wand's tilt angle. Finally, use the base cover to cover the mounting base.

- Pinch the spring tab on the cord holder and slide the cord holder upwards to fit into the mounting base.
- Mounting base on the right:
- Remove the cord holder from the Type-C port (turn 900 upwards from the bottom to remove), then install it back on from the other side (turn 900 downwards from the top to install back on). Now the Type-C port should be facing right.

- Pinch the spring tab to slide the cord holder from the bottom to fit into the mounting base.

- Push the slide switch upwards to open the main unit case. Align the gears on the coupling and inside the main unit, then close the main unit case. (Slide the cord holder up or down to adjust the position of main unit if you have difficulty aligning the gears.)

- Check if your blind wand is perpendicular to the ground. If not, pinch the spring tab to slide the cord up and down to adjust the wand's tilt angle. Finally, use the base cover to cover the mounting base.

- Remove the cord holder from the Type-C port (turn 900 upwards from the bottom to remove), then install it back on from the other side (turn 900 downwards from the top to install back on). Now the Type-C port should be facing right.
- Mounting base on the left:


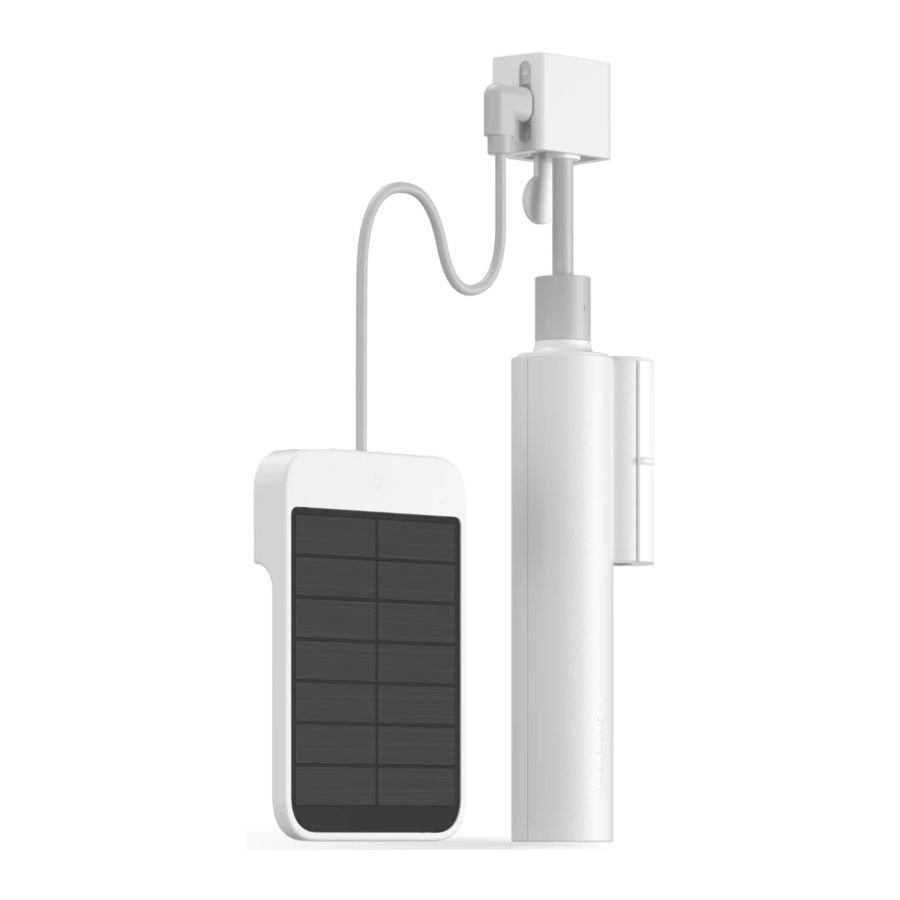
- Stick Solar Panel onto the window (optional)
![warning]() Note: Solar Panel is optional since Blind Tilt is battery powered.
Note: Solar Panel is optional since Blind Tilt is battery powered. - Stick Solar Panel onto the inner side of your window with its front facing outside. Select an appropriate position near the main unit so that the cord connecting
Solar Panel will not be pulled when you open the window.

- Pass the cable of Solar Panel through the gap between the headrail and the top slat, then connect the cable to the main unit.

![warning]() Note: Make sure the cable of Solar panel passes from the gap above the top slat, otherwise your device may not work properly after installation.
Note: Make sure the cable of Solar panel passes from the gap above the top slat, otherwise your device may not work properly after installation. - Organize the cord of Solar Panel so that it does not affect the movement of the slats. Then fix the cord at the bottom of the headrail using the adhesive sticker.

- Pass the cable of Solar Panel through the gap between the headrail and the top slat, then connect the cable to the main unit.
- Stick Solar Panel onto the inner side of your window with its front facing outside. Select an appropriate position near the main unit so that the cord connecting


Step 3: Calibration
After you have added and installed your SwitchBot Blind Tilt, you will need to calibrate it to ensure it works correctly. Please follow the instructions in our app and make sure that the actual movement of your blind slats is the same as the animation in our app.
Recalibration is needed each time you remove and re-install the main unit. You can choose to recalibrate your Blind Tilt whenever you want on its Settings page.
Precautions
- This product is not a toy. Keep children away from this product.
- This product is only for indoor use. Please do not use this product in humid environment or outdoors.
- Do not expose this product to liquids or operate with wet hands.
- Do not place this product near heat sources in a closed environment.
- Do not attempt to disassemble, modify or repair this product, unless by an authorized technician.
- This product is designed to improve the convenience of home life. We do not account for any risks or property loss as possible results of not following this user manual.
Battery Replacement
It takes about 6.5 hours to fully charge your device battery and one full charge could last for about 10 months. You may also harness the sunlight to charge using the Solar Panel provided.
- Use a 5V
![]() 1A adapter to charge your device.
1A adapter to charge your device. - Battery life is tested under conditions of opening and closing a 1.8 x 1.8 m blind with a 0.6 kgf.cm wand twice a day under 25 ºC. Actual battery life may vary depending on different conditions.
- Using Solar Panel to charge requires a level 6 illuminance level at least.
 1A adapter to charge your device.
 Note: Solar charging can get you unlimited battery life of your device. Under extreme conditions, like continuous cloudy days for years, the Solar panel and the battery can last at least 3 years before next charging.
Resetting Factory Settings
Use the ejection pin to poke the Reset button once to reset your device to factory settings. Recalibration is needed after resetting.
Firmware Upgrades
In order to improve user experience, we will regularly release firmware updates to introduce new functions and solve any software defects that may occur during usage. When a new firmware version is available, we will send an upgrade notification to your account via our app. When upgrading, please make sure your product has sufficient battery and make sure your smartphone is within range to prevent interference.
Troubleshooting
Please visit our website or scan the QR code below for more information.
https://support.switch-bot.com/hc/en-us/categories/7566387770903

Specifications
Color: White
Material: ABS+PC, UV-resistant coating
Size: 48.8 x 29.2 x 210 mm (1.9 x 1.1 x 8.3 in.)
Weight: 130 g (4.6 oz.)
Power: Type-C, DC 5V  1A; 2000 mAh lithium battery
Battery Life: Approx. 10 months or almost unlimited with the Solar Pane
Operating Temperature: -10 ºC to 45 ºC (14 ºF to 113 ºF)
Operating Humidity: 10% to 95% RH
Torque Strength: ≤1 kgf.cm
Network Connectivity: Bluetooth 5.0
System Requirements: iOS 11.0+, Android OS 5.0+
Contact & Support
Setup and Troubleshooting: support.switch-bot.com
Support Email: support@wondertechlabs.com
Feedback: If you have any concerns or problems when using our products, please send feedback via our app through the Profile > Feedback page.
Safety Information
- Keep this product away from heat and humidity, and make sure it does not come into contact with fire or water.
- This product is a precision-based electronic product, please avoid physical damage.
- Do not attempt to disassemble, repair, or modify the product.
- Do not use the product where wireless devices are not allowed.
Documents / Resources
References
Download manual
Here you can download full pdf version of manual, it may contain additional safety instructions, warranty information, FCC rules, etc.
Advertisement


Need help?
Do you have a question about the Blind Tilt and is the answer not in the manual?
Questions and answers