Table of Contents
Advertisement
Quick Links
Owner's Manual
Thank you, and congratulations on your choice of the BOSS RC-50
Loop Station.
Before using this unit, carefully read the sections entitled:
• USING THE UNIT SAFELY (page 2–3)
• IMPORTANT NOTES (page 4–5)
These sections provide important information concerning the proper
operation of the unit.
Additionally, in order to feel assured that you have gained a good grasp of
every feature provided by your new unit, Owner's manual should be read in
its entirety. The manual should be saved and kept on hand as a convenient
reference.
Copyright © 2005 BOSS CORPORATION
All rights reserved. No part of this publication may be reproduced in any form without the written
permission of BOSS CORPORATION.
Advertisement
Table of Contents
Troubleshooting

Related Manuals for Boss RC-50


Summary of Contents for Boss RC-50
- Page 1 Owner’s Manual Thank you, and congratulations on your choice of the BOSS RC-50 Loop Station. Before using this unit, carefully read the sections entitled: • USING THE UNIT SAFELY (page 2–3) • IMPORTANT NOTES (page 4–5) These sections provide important information concerning the proper operation of the unit.
-
Page 2: Using The Unit Safely
Refer a long period of time at a high volume level, or at all servicing to your retailer, the nearest Roland a level that is uncomfortable. If you experience Service Center, or an authorized Roland any hearing loss or ringing in the ears, you should distributor, as listed on the “Information”... - Page 3 ......................118c • Keep a USB connector cap you may remove and the included RC-50 in a safe place out of children’s reach, so there is no chance of them being swallowed accidentally......................• Always turn the phantom power off when connecting any device other than condenser microphones that require phantom power.
-
Page 4: Important Notes
Placement to memory itself is out of order), we regret that it may not be possible to restore the data, and Roland assumes no liability concerning such loss of data. • Using the unit near power amplifiers (or other equipment containing large power transformers) may induce hum. - Page 5 Indicate buttons. Text or numerals • Use a cable from Roland to make the connection. If using enclosed in square [WRITE] WRITE button some other make of connection cable, please note the...
-
Page 6: Table Of Contents
(Time Signature) for the Guide Sound (Beat) ....39 Chapter 2 Playing a Count-In When Recording (Recording Count-In) ......40 Basic Setup of the RC-50..27 Playing a Count-In for Playback (Playback Count-In)........40 About Phrases and Patches ....28 Adjusting the Volume What is a Phrase? ............. - Page 7 Contents Chapter 5 Simultaneously Starting Recording When Sounds Are Input (Auto Recording) ..... 47 Using the RC-50 in Multi Mode ...57 Setting the Overdubbing Method (Overdubbing Mode).... 47 Examples of the Use of Multi Mode..58 Recording-Related Settings ........48 When Loop Sync is On..........58 Recording While Muting the Sounds When Loop Sync is Off..........
- Page 8 Performances on External Devices to the RC-50... 76 Restoring the To Play Performances on External MIDI Devices at the Same Tempo as the RC-50’s Tempo ...... 76 Factory Settings (Factory Reset) ....95 To Transmit Start ..............76 Switching Playback-start Operation..95 To Transmit Stop..............
-
Page 9: Main Features
You can record the various parts of a piece separately to the three phrases, which is convenient for recording or training; and since it is even possible to record several complete songs, you can also use the RC-50 as a backing tool for live performances. -
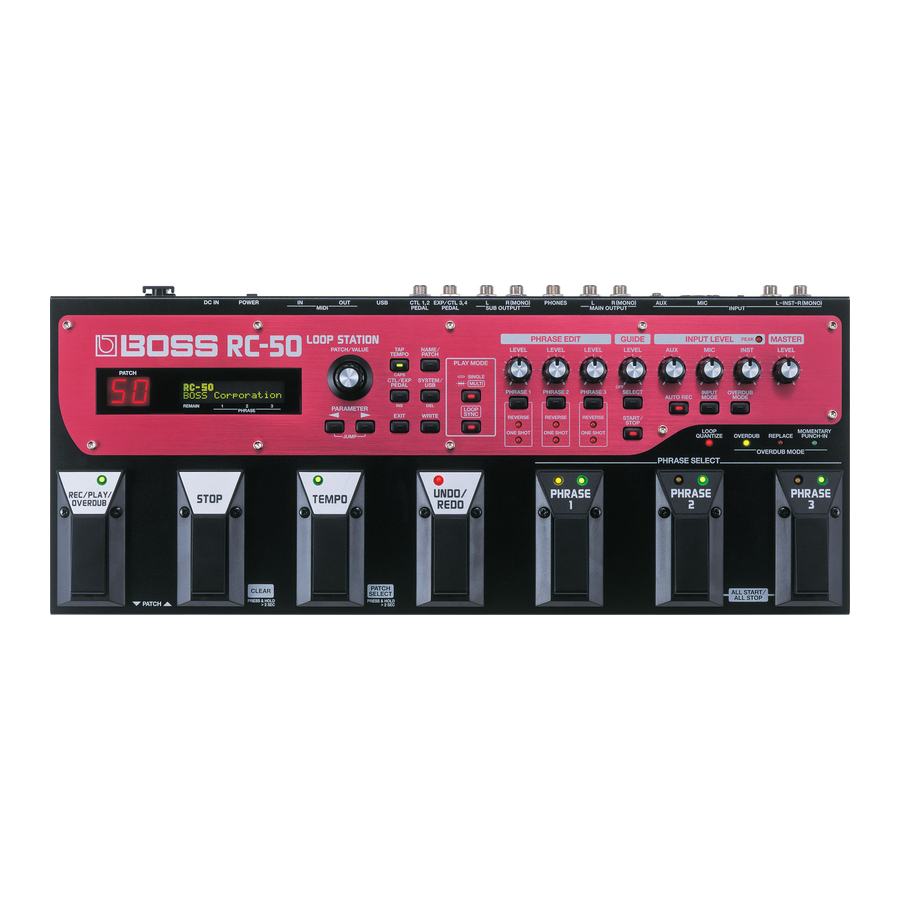
Page 10: Names Of Things And What They Do
6. CTL/EXP PEDAL Button “What is a Patch?” (p. 28) Press this to set the functions for the RC-50’s pedals and external pedals. 2. PATCH/VALUE Dial Used for switching patches and changing the values of settings. - Page 11 Names of Things and What They Do 10. PLAY MODE Button 14. INPUT LEVEL Press this to switch the mode used by the RC-50. AUX Level Knob This adjusts the level of the input from the AUX jack. “About Play Modes” (p. 28) MIC Level Knob 11.
- Page 12 (redo). • Pressing this pedal in Patch select mode switches the RC-50 to • In Patch Select mode, pressing the pedal returns the Play screen the next lower patch number.
-
Page 13: Rear Panel
For more on mic specifications, read the owner’s manual for the mic you are using. (RC-50 phantom power: 48 V DC, 10 mA Max) “Pedal Settings” (p. 70) 3. MIC Connector 10. USB Connector Connect a microphone here. - Page 14 M E M O...
-
Page 15: Chapter 1 Startup Guide
Chapter 1 Startup Guide Chapter 1 Startup Guide... -
Page 16: Making The Connections
* Raise the amp volume only after turning on the power to all connected devices. * Use only the specified EXP pedal (Roland EV-5; sold separately). By connecting any other EXP pedals, you risk causing malfunction and/or damage to the unit. - Page 17 • If connecting an FS-5U foot switch (optional; sold separately) to the CTL 1,2 PEDAL jack or the EXP/CTL 3,4 PEDAL jack, set the POLARITY switch as shown below. fig.01-040 Polarity Switch • Using the PCS-31 special connection cable (from Roland; sold separately) enables you to connect two FS-5U switches. fig.01-050 PCS-31 White •...
-
Page 18: Turning On The Power
Confirm the following before turning on the power. • Are all external devices properly connected? • Is the volume turned down completely on the RC-50 and on amps and other connected equipment? Press the POWER switch on the RC-50’s rear panel to turn on the power. -
Page 19: Adjusting The Input Levels
Input to the RC-50 at the maximum levels expected during the performance. Adjust the knob until the PEAK indicator just flickers. The PEAK indicator lights 6 dB below the level at which the sound starts to distort. -
Page 20: Recording
Recording Now try recording an instrumental performance with the RC-50. The example here describes the procedure for selecting and recording Patch 6. fig.01-120 4,5,7,8 In the Play screen, rotate the PATCH/VALUE dial until “6” appears in the left display. “INIT PATCH” appears in the right display. - Page 21 “Multi mode.” In addition, with the RC-50 you can store up to 99 sets containing the three phrases and settings for how they are to be performed. Each one of these sets is called a “patch.”...
-
Page 22: Playback
Phrase 2 stops playing, and the playback of Phrase 3 begins. Press the STOP pedal. Phrase 3 stops playing. In this manner, the RC-50 allows you to play back phrases as you switch from one to the next. This mode is referred to as “Single mode.”... - Page 23 Playback The RC-50 is shipped from the factory with demo patches saved to patch numbers 1–5. Patch Name Mode Phrase Chord E Loop BIG ROCK Single Chord A Loop Chord B Loop Blues Progression 12-Measure Pattern A FUNKY BLUES Single...
-
Page 24: Further Material (Overdubbing)
Layering Further Material (Overdubbing) With the RC-50, you can also layer further recordings (overdub) onto previously recorded phrases. fig.01-121 3,4,5 Prepared a prerecorded phrase. Record the phrases using the procedures described in “Recording” (p. 20), or have ready a patch selected in “Playback” (p. 22). -
Page 25: Eliminating The Results Of Overdubbing (Undo)
Eliminating the Results of Overdubbing (Undo) There may be times during recording/overdubbing when you make a mistake while performing or otherwise want to do the overdub over again. In such situations, you can use Undo to restore the recording to the state it was in before recording/ overdubbing took place. -
Page 26: Turning Off The Power
Turning Off the Power Before turning off the power, confirm the following. • Is the volume turned down completely on the RC-50 and on amps and other connected equipment? Turn off the power on any effects processor, guitar amp (speakers), or other device connected to the RC-50. -
Page 27: Basic Setup Of The Rc-50
Chapter 2 Basic Setup of the RC-50 Chapter 2 Basic Setup of the RC-50... -
Page 28: About Phrases And Patches
61); you can also have all of the phrases stop at the same time (All them back, or even play the three of them simultaneously. Stop: p. 61). The RC-50 stores up to 99 different sets of settings that determine how these three phrases are performed. Playing Back Phrases with All Lengths and Each such set of settings is called a “patch.”... -
Page 29: Switching Phrases As They Are Played: Single Mode
You can set the RC-50 so that when phrases are switched during Tempo Sync is set to ON, the phrases are played at the same playback, you can switch to the next phrase the instant you press the tempo. -
Page 30: About Recording, Playback, And Overdubbing
On the RC-50, you will primarily use the three basic operations of recording, playback, and overdubbing (layered recording) for performances. When you press the REC/PLAY/OVERDUB pedal in the Play screen, the RC-50 switches among the following basic operations depending on the status of the current phrase. -
Page 31: Playback
To Switch Playback-Related Operations You can make the following settings with the RC-50 to switch among You cannot simultaneously overdub to multiple phrases. the different types of playback tasks (settings are common to both Single mode and Multi mode). -
Page 32: Undo/Redo
You can make the following settings with the RC-50 to switch among cessor. the different types of tasks related to stopping operations (settings Previously recorded phrases are erased as they are common to both Single mode and Multi mode). -
Page 33: Switching Patches With The Pedals (Patch Select Mode)
3-2. To change the current phrase in the next patch, press a PHRASE pedal one time. dial in the Play screen, but also with the RC-50’s pedals. The mode in which you can switch patches with the RC-50’s pedals While performing: is called “Patch Select mode.”... - Page 34 M E M O...
-
Page 35: About Tempos And The Guide
Chapter 3 About Tempos and the Guide Chapter 3 About Tempos and the Guide... -
Page 36: About Tempos
The original tempo is set automatically when a phrase is recorded. saved with patches. This setting is made depending on the RC-50’s status as shown below. Examples of Original and Patch Tempos Single Mode fig.03-009... -
Page 37: Confirming And Setting The Original Tempo
You cannot change the original tempo of a phrase that has not been saved. If you want to change the original tempo, first save When the RC-50 is connected to an external MIDI device with a the patch (p. 54) then change the tempo. -
Page 38: Patch Tempo
“Setting the Functions for the RC-50’s Pedals and External Foot Switches (TEMPO/UNDO/CTL1/CTL2/CTL3/CTL4 Pedal Function)” (p. 70) • When Synchronized Performance is used to synchronize the RC-50 to an external MIDI device’s tempo, you cannot change the patch tempo with the PATCH/VALUE dial, [TAP TEMPO], or the TEMPO pedal. -
Page 39: Performing While Listening To The Rhythm Sound-About The Guide
Performing While Listening to the Rhythm Sound—About the Guide When recording phrases with the RC-50, it can convenient to use the Setting the Guide guide, which can be used like a metronome. The guide features numerous pre-programmed rhythm sounds with Use the following procedure to change the guide settings. -
Page 40: Playing A Count-In When Recording (Recording Count-In)
MIDI Start message received from an external MIDI device. • No count-in sound plays when the playback is started with the RC-50 or an external foot switch with the CC# function set to “PHRASE 1/2/3 PLY/STP” or “PHRASE 1/2/3 PLAY.”... -
Page 41: Guide Pattern List
Performing While Listening to the Rhythm Sound—About the Guide Guide Pattern List fig.03-100-Guide Beat Pattern Beat Pattern Beat Pattern Beat Pattern Simple Beat 1–4 Simple Beat 1–7 Simple Beat 1–6 Simple Beat 1–6 Shuffle 1–2 Groove Beat 1–2 Groove Beat 1–3 Groove Beat 1–3 Hi-Hat 1–2 Shuffle... -
Page 42: Loop Quantize
When Synchronized Performance (p. 77) is used to synchronize length as the previously recorded phrase, allowing you to record the RC-50 to an external MIDI device’s tempo, Loop Quantize is three phrases, all of exactly the same length. enabled for use, just as when the guide is switched on. -
Page 43: Chapter 4 Creating Patches
Chapter 4 Creating Patches This section describes how to create patches with the RC-50. Before creating any patches, be sure that you have carefully read “Chapter 2 Basic Setup of the RC-50” (p. 27) and checked the information required for creating patches beforehand. -
Page 44: Preparations For Creating Patches
Patches That Can Be Switched (Patch Extent)” (p. 68). If the currently selected patch is the one you want to initialize, • You can switch patches with the RC-50’s pedals instead of using go directly to the next step. the PATCH/VALUE dial. For more details, refer to “Switching * You cannot initialize patch numbers 1–5 when Preset Protect (p. -
Page 45: Naming Patches
Preparations for Creating Patches Naming Patches Setting Up the Patch Tempo, Beat, and Guide You can give names to patches (patch names) using up to 16 characters. When recording phrases, if you are going perform to a previously set You can assign whatever names you like, such as names suggesting patch tempo or play along to the guide using a metronome or other the sound created or the name of the song in which it is to be used. -
Page 46: Setting The Beat
Preparations for Creating Patches Setting the Beat Playing the Guide You can set the guide’s beat. The beat can be changed only when all If you are going to be listening to the guide while recording, prepare phrases are blank. the guide by playing it with the volume raised. -
Page 47: Making The Patch Settings
(indicator off) each time the button is pressed. fig.04-110 Press [PLAY MODE] to switch to the Play Mode screen. The RC-50 alternately switches to Single mode (indicator off) or Multi mode (indicator lit) each time the button is pressed. Press REC/PLAY/OVERDUB pedal. -
Page 48: Recording-Related Settings
(Example) About the Available Recording Time You can switch the RC-50’s recording mode between Stereo and Mono modes. Rotate the PATCH/VALUE dial to adjust the parameter. When all of the RC-50’s patches are blank, the available recording time in each mode is shown below. -
Page 49: Other Patch Settings
Making the Patch Settings Other Patch Settings Adjusting the Patch Volume You can adjust the overall patch volume. This is convenient when These procedures are for making other patch settings. you want to connect an external EXP pedal and use the pedal to fig.04-160 control the volume or adjust the output volume for both the MAIN OUTPUT and SUB OUTPUT jacks simultaneously. -
Page 50: Multiple Phrases Simultaneously (Simul-Start)
The Simul-Start On/Off status for the three phrases is indicated in Performances are normally played at the patch the screen. tempo set with the RC-50, but when the RC-50 is stopped and MIDI start message is received, the After pressing PARAMETER [... -
Page 51: Creating Phrases
The most basic way to create a phrase is to record a new phrase.For more on the operations involved, refer to “Chapter 5 Using the RC- 50 in Multi Mode” (p. 57) or “Chapter 6 Using the RC-50 in Single Copy-Destination Copy-Destination Mode”... -
Page 52: Making The Phrase Settings
Making the Phrase Settings After recording of the phrases is completed, proceed by setting the Having Phrases Play Only Once phrase playback method and other functions. fig.04-250d (One Shot) You can select whether to have a phrase play only one time after starting (One Shot) or repeat playback (Loop). -
Page 53: Selecting The Method Use To Stop Phrases (Stop Mode)
Making the Phrase Settings Selecting the Method Use to Synchronizing Playback of the Phrase Stop Phrases (Stop Mode) to the Patch Tempo (Tempo Sync) You can select the manner in which playback of phrases stops, either You can have playback of phrases recorded at different original by stopping while fading out, after playing back to the end of the tempos be synchronized to the patch tempo. -
Page 54: Saving Patches
* If the phrase that have been overdubbed exists and the Tempo Sync (p. 53) is set to ON, the original tempo of the phrase is updated to the • When the remainder capacity of RC-50 is a little, the Patch Copy patch tempo at saving. -
Page 55: Exchanging Patches (Patch Exchange)
Saving Patches Exchanging Patches (Patch Exchange) You can exchange patches with one another, rearranging the patches. fig.04-390 Select an exchange-source patch. Select the patch while referring to the information in “Selecting Patches” (p. 44). Press [WRITE]. Press PARAMETER [ ] until “Exchange” appears in the display. - Page 56 M E M O...
-
Page 57: Using The Rc-50 In Multi Mode
Chapter 5 Using the RC-50 in Multi Mode Chapter 5 Using the RC-50 in Multi Mode This section describes operations when the Play mode (p. 28) is set to Multi mode. In Multi mode, you can play back three phrases simultaneously or record the current phrase... -
Page 58: Examples Of The Use Of Multi Mode
Examples of the Use of Multi Mode The following describes how Multi mode can be used when Loop Sync is on and when it is switched off. When Loop Sync is On When Loop Sync is on, you can obtain simultaneous playback of three phrases, with the phrases played at the same tempo and with the same length. Example 1) Recording three blank phrases, one after another, to create an ensemble when played in real time fig.05-010... -
Page 59: When Loop Sync Is Off
Examples of the Use of Multi Mode When Loop Sync is Off When Loop Sync is switched off, each of the phrases plays back repeatedly according to the individual phrase’s length. Example 1) Recording three blank phrases, one after another, to create an ensemble when played in real time fig.05-040 REC/PLAY/... -
Page 60: Pedal Operations In Multi Mode
Pedal Operations in Multi Mode Starting Recording and Switching Phrases with the PHRASE Pedals Operations During Recording When you press a PHRASE pedal other than the one for the current To record to a blank phrase, make the phrase you want to record to phrase during playback, playback continues with the current phrase the current phrase and then press the REC/PLAY/OVERDUB pedal. -
Page 61: Setting Phrases To Simul-Start With The Pedal
Setting Simul-Start with the Buttons • You can also control All Start and All Stop using a foot switch or MIDI messages. → “Setting the Functions for the RC-50’s Pedals and External Press [NAME/PATCH] twice. Foot Switches (TEMPO/UNDO/CTL1/CTL2/CTL3/CTL4 Pedal Function)” (p. 70) - Page 62 M E M O...
-
Page 63: Using The Rc-50 In Single Mode
Chapter 6 Using the RC-50 in Single Mode Chapter 6 Using the RC-50 in Single Mode This section describes operations when the Play mode (p. 28) is set to Single mode. In Single mode, you can easily record and play back while sequentially switching the three... -
Page 64: Examples Of The Use Of Single Mode
Examples of the Use of Single Mode Example 1) Recording three blank phrases, one after another, performing while creating a song fig.06-010 REC/PLAY/ REC/PLAY/ OVERDUB PHRASE 2 PHRASE 3 OVERDUB Phrase 1 Recording (Current Phrase) Recording (Current Phrase) Phrase 2 Recording Playback Phrase 3... -
Page 65: Pedal Operations In Single Mode
REC/PLAY/OVERDUB pedal. When you press a PHRASE pedal other than the one for the current phrase during overdubbing, the RC-50 switches to the next phrase Playing Back One Shot Phrases Continuously according to the Phrase Change Mode (p. 49) settings. - Page 66 M E M O...
-
Page 67: Chapter 7 Other Functions
Checking the Remaining Recording Time The RC-50 features about 250 MB of built-in memory for saving patches and recording, and the amount of recording time that remains available will vary depending on the length of the phrases in the saved patches. -
Page 68: System Settings
These parameters remain unchanged, even when the patches are Brightness (LCD Contrast) switched. fig.07-020 In some locations where the RC-50 is set up, you may find that the (right) display is difficult to read. If this occurs, adjust the display’s contrast (brightness). fig.07-040d Available Settings: 1–16... -
Page 69: Overdubbing Immediately After Recording (Rec Pedal Action)
Normally, the settings determining which jacks are used in outputting input sounds, phrases, and guide sounds are stored in each patch, but you can elect, as a setting affecting the RC-50 overall, to have all of these use the same output at all times. -
Page 70: Pedal Settings
Pedal Settings While the RC-50 already features seven pedals, you can also switch Setting the Functions for the RC-50’s Pedals the pedal functions of the TEMPO pedal and UNDO/REDO pedal. Rather than using the pedal for UNDO and REDO, you can switch... - Page 71 Pedal Settings fig.07-110 Available Settings Description Applies to both system settings and patch settings No operation Starts and stops playback of all Phrases 1–3 ALL START/STOP simultaneously Starts and stops playback of Phrase 1 (*) PHRASE 1 PLY/STP Starts and stops playback of Phrase 2 (*) PHRASE 2 PLY/STP Starts and stops playback of Phrase 3 (*) PHRASE 3 PLY/STP...
-
Page 72: Setting The Functions For The Exp Pedal
Pedal Settings Setting the Functions for the EXP Pedal Functions EXP pedal This procedure selects the function to be controlled by the EXP pedal. fig.07-131d This procedure sets the functions for the EXP pedal connected to the EXP/CTL 3,4 PEDAL jack. fig.07-130 2,3,4 Available Settings... -
Page 73: Chapter 8 Using Midi
Chapter 8 Using MIDI Chapter 8 Using MIDI... -
Page 74: What You Can Do With Midi
What You Can Do with MIDI You can use MIDI with the RC-50 for the following kinds of operations. Controlling Operations from * Use of MIDI requires that the MIDI channels be matched with those of External Devices the connected device. Data cannot be transmitted to, nor received from another MIDI device unless the MIDI channels are set properly. -
Page 75: Making The Settings For Midi-Related Functions
Making the Settings for MIDI-Related Functions This section describes the RC-50’s MIDI-related functions. Make the MIDI Transmit Channel settings in accordance with how the RC-50 is to be used. fig.08-030 This procedure sets the MIDI channel used for transmitting MIDI messages. -
Page 76: Controlling Operations From The Rc-50
Same Tempo as the RC-50’s Tempo CTL 1 pedal CC#80 CTL 2 pedal CC#81 MIDI clock messages are output from the RC-50 at all times.Set the EXP pedal CC#7 external MIDI device beforehand so it is ready to receive MIDI Clock CTL 3 pedal Not output and MIDI Start and Stop messages. -
Page 77: Controlling Operations From An External Midi Device
CC#1/CC#7/CC#80 (Control Change) functions operate in accordance with system settings, that is, settings that are shared by and applied the same way to all of the RC-50’s functions and that • Upon reception of MIDI Start, recording or playback begins remain the same regardless of the patch selected, and patch settings, immediately, with no recording/playback count-in (p. - Page 78 Controlling Operations from an External MIDI Device CC#80 fig.08-160d Available Settings Description Applies to both system settings and patch settings No operation Starts and stops playback of all Phrases 1–3 ALL START/STOP simultaneously Starts and stops playback of Phrase 1 (*) PHRASE 1 PLY/STP Starts and stops playback of Phrase 2 (*) PHRASE 2 PLY/STP...
-
Page 79: Connecting To Computers
Chapter 9 Connecting to Computers Chapter 9 Connecting to Computers... -
Page 80: Before Using Usb
The RC-50 is equipped with a USB connector, and connecting the Organization of the RC-50’s Data RC-50 to a computer with a USB cable enables you to carry out the following operations. When the RC-50 is connected to a computer via USB, “BOSS_RC-50”... -
Page 81: About Wav Files Handled By The Rc-50
“ Control Panel ” and uncheck the item “ Don't display extensions of associated files. ” • After importing a WAV file to the RC-50, confirm in the Play screen that the phrase can be played back normally. • Content that can be saved to the RC-50 includes all patches, phrases, and system settings up to a maximum of 250 MB. -
Page 82: With Windows
Copy the “ROLAND” folder to any desired folder on the computer. You can create a new folder to use as the backup folder. When the RC-50 performs Recover, the patch data will be If recovering: overwritten regardless of the setting of Preset Protect (p. 69). -
Page 83: Importing And Exporting Wav Files
The WAV files on the CD cannot be imported with their file names left unaltered. Change the file names after If the RC-50’s “WAVE” folder contains a WAV file with the referring to p. 81. same name as the one being imported (i.e., phrase in the import- destination patch), a “file overwrite confirmation”... -
Page 84: With Macintosh
Copy the “ROLAND” folder to any desired folder on the computer. You can create a new folder to use as the backup folder. When the RC-50 performs Recover, the patch data will be If recovering: overwritten regardless of the setting of Preset Protect (p. 69). -
Page 85: Importing And Exporting Wav Files
RC-50. * Carry out the following procedure only with all performances stopped. If the RC-50’s “WAVE” folder contains a WAV file with the same name as the one being imported (i.e., phrase in the import- Connect the computer and the RC-50 with a USB cable. - Page 86 M E M O...
-
Page 87: Troubleshooting
Troubleshooting Troubleshooting... -
Page 88: Error Messages
First initialize any unneeded patches or clear unneeded phrases connected via USB (e.g., during Recover or Import). (p. 32), then carry out the Patch Write procedure (p. 54). → Execute Factory Reset (p. 95) to restore the RC-50 to its factory default condition. fig.10-060d fig.10-040d ❒... -
Page 89: Correspondence Between The Indicators And Operational Status
Correspondence Between the Indicators and Operational Status If, while using the RC-50, you find that you are unaware of the current operating status, refer to the table below and determine the current status by viewing the indicators. Numbers lit Indicates current patch number. - Page 90 Indicates Auto Recording (p. 47) standby when the current phrase is enabled for re- Rapidly (Red) cording and all phrases are stopped. Flashing The phrase is fading in or out, or the RC-50 is waiting for the end of a loop with Stop Rapidly (Green) Mode (p. 53) set to LOOP END.
-
Page 91: Troubleshooting
Troubleshooting If no sound is being output or if you think the RC-50 is not operating Problems with Operation as it should, first check the following points. If the information below does not lead to a resolution of the problem, contact your dealer or the nearest Roland Service Center. -
Page 92: Problems With Usb
❒ Is the USB cable properly connected? → Check the connection. ❒ Is the OS compatible with the RC-50? → Confirm the OS used by the computer. (p. 80) Unable to import WAV file ❒ Are the file name and format of the WAV file correct? →... -
Page 93: Appendices
Appendices Appendices... -
Page 94: About Midi
These messages are generally used to select sounds, and include a How MIDI messages are program change number from 1 to 128 which specifies the desired sound. The RC-50 also allows you to select any of the 99 different transmitted and received patch numbers. -
Page 95: Restoring The Factory Settings (Factory Reset)
Switching Playback- start Operation Settings (Factory Reset) Restoring the RC-50’s system settings (System parameters) to their You can switch the manner for starting playback immediately when original factory default settings is referred to as “Factory Reset.” the REC/PLAY/OVERDUB pedal is operated while recording is in progress. -
Page 96: Parameter List
Parameter List System Parameters Factory Default Setting Displayed Name Available Settings (Initial Value) SYSTEM LCD Contrast 1–16 LCD Contrast Start: 1–99 Start: 1 Patch Extent Patch Extent End: 1–99 End: 99 IMMEDIATE, CURRENT SETTING, Knob Mode IMMEDIATE Knob Mode KNOB POSITION Auto Recording Trigger Level 0–100 Auto Rec Trigger... - Page 97 Parameter List Patch Parameters Factory Default Setting Displayed Name Available Settings (Initial Value) NAME Patch Name Max. 16 characters INIT PATCH Patch Name COMMON Patch Level 0–200 Level Phrase Change Mode IMMEDIATE, LOOP END IMMEDIATE PhraseChng Fade In Time 0–100 Fade In Time Fade Out Time 0–100...
- Page 98 Parameter List Factory Default Setting Displayed Name Available Settings (Initial Value) EXP Pedal Max Level 0–200 EXP Level Max: PAT EXP Pedal Tempo Min 40.0–250.0 40.0 EXP Tempo Min: PAT EXP Pedal Tempo Max 40.0–250.0 250.0 EXP Tempo Max: PAT CC#1 Function Refer to p.
-
Page 99: Midi Implementation Chart
MIDI Implementation Chart MIDI Implementation Chart LOOP STATION Date: Oct. 11, 2005 MIDI Implementation Chart Model RC-50 Version: 1.00 Transmitted Recognized Remarks Function... Basic Default 1–16 1–16 Memorized Channel Changed 1–16 1–16 Default Memorized OMNI ON/OFF Mode Messages Altered **************... -
Page 100: Main Specifications
* The times listed above take into account the amount of memory needed START/STOP button for the actual recording combined with the memory required for the (INPUT LEVEL) RC-50’s operations (e.g., Undo/Redo). AUX knob MIC knob INST knob PEAK indicator... - Page 101 CTL 1,2 PEDAL jack (TRS 1/4 inch phone type) USB connector MIDI connectors (IN/OUT) DC IN (AC adaptor) jack Power Supply DC 9 V: Supply AC adaptor (Roland ACI or ACB series) Current Draw 450 mA Dimensions 472 (W) x 198 (D) x 64 (H) mm...
-
Page 102: About Sound Library For Rc-50
* Recovering data merely by copying this folder to the RC-50 as is overwrites the “ROLAND” folder, returning the unit to its original factory settings, but any data for original phrases already saved to this folder is cleared. Recover only the data required to the RC-50. -
Page 103: Phrase List
About Sound Library for RC-50 Phrase List Track Name Original Tempo File Name Track Name Original Tempo File Name ★ ★★ FunkBlP1.wav Funk2Dr.wav Funk2 ★ ★★ Funky Blues FunkBlP2.wav Funk2Bs.wav ★ ★★ FunkBlP3.wav Funk3Dr.wav Funk3 ★ ★★ SflGrvP1.wav Funk3Bs.wav ★... -
Page 104: Index
Index FADE OUT ..................... 53 Fade Out Time ..................49 AC Adaptor .................... 13 Flat Amp Simulate ................48 All Start ....................61 Foot Switch ..................... 70 All Stop ....................61 AUTO ....................50, 75 AUTO REC ..................11, 47 Auto Recording ................ - Page 105 Index MIDI ....................74, 94 MIDI Sync ..................50 Control Change ..............74–76, 94 Name ....................45 MIDI Sync ..................75 Overdubbing Mode ............... 47 Omni Mode ..................75 Play Mode ..................47 Program Change ..............74–77, 94 Protect ....................69 Program Number ................
- Page 106 SELECT ....................11 Single Mode ............. 22, 28–29, 36, 42, 64 Simul-Start ....................61 SimulStart ..................50, 61 Sound Library for RC-50 ..............102 Start ......................52 Start Mode ....................52 START/STOP .................. 11, 39 STEREO ..................30, 48, 67 STOP ....................
- Page 107 Cet appareil numérique de la classe B respecte toutes les exigences du Règlement sur le matériel brouilleur du Canada. For the USA DECLARATION OF CONFORMITY Compliance Information Statement Model Name : RC-50 Type of Equipment : Loop Station Roland Corporation U.S. Responsible Party : 5100 S.Eastern Avenue, Los Angeles, CA 90040-2938 Address : (323) 890-3700 Telephone :...
- Page 108 For EU Countries G6017155R4 6RTC...
Need help?
Do you have a question about the RC-50 and is the answer not in the manual?
Questions and answers