STEINEL XLED CAM 1 Manual
- Manual (191 pages) ,
- Instructions manual (8 pages) ,
- Manual (27 pages)
Advertisement
- 1 About this document
- 2 Proper use
- 3 Features
- 4 Operating principle
- 5 Package contents
- 6 Product dimensions
- 7 Product parts
- 8 Connection
- 9 Technical specifications
- 10 Installation
- 11 Configuration
- 12 Use
- 13 Cleaning and Maintenance
- 14 Troubleshooting
- 15 General safety precautions
- 16 Documents / Resources
About this document
- Under copyright. Reproduction either in whole or in part only with our consent.
- Subject to change in the interest of technical progress.
Proper use
Sensor-switched floodlight for indoor and outdoor wall mounting. The unit is not suitable for connecting to a dimmer.
Features
- Adjustable floodlight head.
- Integrated camera with dazzle guard.
- 16 GB memory card.
- Intercom system.
- Reset function.
- Operation via Steinel CAM app.
Operating principle
- The integrated infrared sensor detects the heat radiated from moving objects (e.g. people, animals).
- The heat detected in this way is converted electronically into a signal that switches the sensor switched floodlight ON automatically.
- The most reliable way of detecting motion is to install the unit with the sensor aimed across the direction in which a person would walk.
- Reach is restricted when the unit is approached head on.
- Obstacles (e.g. trees, walls etc.) interrupt the line of sensor vision.
- Heat radiation is not detected through obstacles (e.g. walls or panes of glass), the sensor is not triggered.
- Sudden fluctuations in the temperature from changes in weather are not distinguished sources of heat.
- The camera and intercom system are controlled via the Steinel CAM app.
Package contents

(Fig. 3.1)
Product dimensions

(Fig. 3.2)
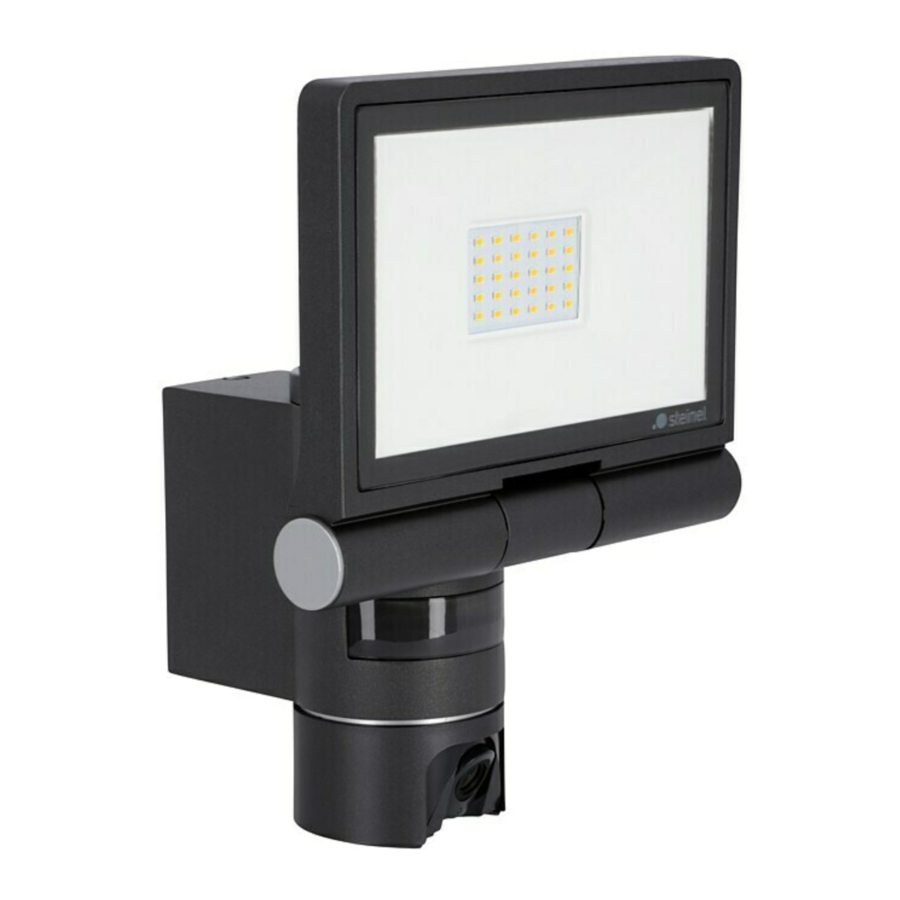
Product parts

(Fig. 3.3)
- Sensor switched floodlight
- Clip
- Connecting terminal
- Wall mount
- Sensor unit
- Camera
- Reset button
- Status LED
- Slot for memory card
- 2 grub screws
Connection

(Fig. 3.4)
The supply lead is a three core cable:
L = phase conductor (usually black, brown or grey)
N = neutral conductor (usually blue)52
 = P rotective earth conductor (green/yellow)
Technical specifications
Enclosure, light and sensor
- Dimensions (H × W × D): 275 × 210 × 167 mm
- Power supply: 220-240 V, 50/60 Hz
- Power consumption: 21 W
- Area illuminated to the front: 444 cm²
- Luminous flux: 2200 lm
- Efficiency: 106 lm/W
- Light colour: 3000 K (warm white)
- Colour- rendering index: Ra ≥ 80
- Life expectancy (L70 B50): 50000 hours
- Sensor technology: Passive infrared
- Angle of coverage: 180° with 45° angle of aperture
- Detection reach: 10 m tangential
- Mounting height: 1.8 - 2 m
- Twilight setting: 10-10000 lux
- Communication: Wi-Fi 2400-2483.5 MHz
- Transmission power: < 100 mW
- Night light: 0 - 40%
- Time setting: 1 min, 3 min, 10 min, 15 min
- Temperature range: -10°C to +40°C
- IP rating: IP44
- Protection class: I
Camera
- Resolution: 1920 x 1080 px
- Viewing angle: horizontal 110° vertical 90°
- Setting angle: horizontal 90° to either side vertical 20° to 30°
- Memory card: max. 64 GB
Installation
 Hazard from electrical power.
Touching live parts can result in electrical shock, burns or death.
- Switch OFF power and interrupt power supply.
- Using a voltage tester, check to make sure the light is disconnected from the power supply.
- Make sure power supply remains interrupted.
Risk of damage to property!
Mixing up connection leads may produce a short circuit.
- Identify connection leads.
- Re- connect connection leads.
Preparing for installation
- Check all components for damage. Do not use the product if it is damaged.
- Select an appropriate site to install the product.
- Take reach into consideration.

(Fig. 4.1) - Take reach and motion detection into consideration.

(Fig. 4.2/4.3) - Vibration -free.
- No obstacles in detection zone.
- Not in explosive atmospheres.
- Not on normally flammable surfaces.
- Do not look into the LED light from a short distance (<20 cm).
- Stable connection to the Wi Fi router (2.4 GHz band).
- Take reach into consideration.


Mounting procedure
- Check to make sure the power supply is switched OFF. (Fig. 3.4)
- Unscrew retaining screw.

(Fig. 4.4) - Disconnect sensor switched floodlight from the wall mount by pressing the clip. (Fig. 4.4)
- Mark drill holes.

(Fig. 4.5)
- Drill holes (Ø 6 mm) and fit wall plugs.

(Fig. 4.6) - Firmly screw wall mount into place.

(Fig. 4.7) - Connect mains power supply lead according to terminal labelling.

(Fig. 4.8/3.4) - Aim sensor switched floodlight and fix in place with grub screws.

(Fig. 4.9) - Fit sensor switched floodlight on the wall mount.

(Fig. 4.10)
- Tighten retaining screw. (Fig. 4.10)
- Switch ON power supply. (Fig. 4.10)


Configuration
Steinel CAM app
Download Steinel CAM app:
Android


iOS


System requirements
- Same 2.4 GHz Wi Fi network for sensor switched floodlight and smartphone or tablet.
- The Wi Fi router enables the devices to communicate with each other.
- While configuring, no connection to guest access or repeater.
Configuring unit
Power supply connected:
- The unit boots.
- Status LED lights up red.
After booting:
- Acoustic signal every 4 seconds.
- Status LED flashes red.
- Open Steinel CAM app.
- Enter the Wi Fi router's network name and network key into the Steinel CAM app.
While unit and Wi Fi router are connecting:
- Acoustic signal every second.
- Status LED flashes green in rapid succession.
Smartphone or tablet are connected with the unit:
- Signal stops sounding.
- Status LED slowly flashes green.
- Configure unit via the Steinel CAM app.
Use
All functions are selected and used via the Steinel CAM app.
Factory settings
- Time setting: 1 minute
- Twilight setting: daylight mode
- Night light: 40%
Time setting
The time (switch off delay) can be set to 1 minute, 3 minutes, 10 minutes or 15 minutes. Every movement detected re activates the light.
Twilight setting
The brightness response threshold (twilight) can be infinitely varied from approx. 10 to 10000 lux (daylight operating mode).
Night light
- Night light provides constant illumination that switches ON when the level of ambient light falls below the brightness response threshold. Night light can be infinitely varied from a light output of 10% to 40%.
- Light is switched to 100% output when movement is identified in the detection zone. The unit then switches back to night light.
Inserting the memory card
- Undo retaining screw and remove cover.

(Fig. 6.1) - Insert memory card.

(Fig. 6.2) - Fit cover and tighten retaining screw.

(Fig. 6.4)


Aiming camera

(Fig. 6.5)
Aiming floodlight head

(Fig. 6.6)
- Undo the grub screws to alter aim. After altering aim, fix floodlight head in place with grub screws. (Fig. 6.6)
Adjusting the detection zone
To rule out inadvertent triggering or target specific danger spots, the detection zone can be limited with film shrouds. The film shroud is stuck onto the sensor unit.
- Limit the detection zone's max. reach with the top film shroud.

(Fig. 6.7) - Limiting the horizontal detection zone with film shroud segments cut to size. One segment covers about 45°.
![]()
(Fig. 6.8)

(Fig. 6.9)- For adjustment, select the test mode in the Steinel CAM app.


Restoring factory settings
- Undo retaining screw and remove cover. (Fig. 6.1)
- Using the key, hold the reset button down for approx. 7 seconds until the signal sounds.

(Fig. 6.3)
While resetting:- Status LED lights up red. After resetting:
- Acoustic signal every 4 seconds.
- Status LED flashes red.
- Open Steinel CAM app.
- Clear camera in Steinel CAM app.
- Re configure unit.
➜ "Configuring unit" - Fit cover and tighten retaining screw. (Fig. 6.4)

Camera function
- The camera films a sequence when the sensor is triggered.
- The filmed sequence is saved on the memory card and can be retrieved at any time.
- The recorded data is only saved on the unit's memory card.
- A maximum of two smartphones or tablets can be connected to the camera at the same time.
- A QR code is generated on the smartphone or tablet which can be read by another smartphone or tablet.
- Once the sensor has triggered, the user receives a push notification via the Steinel CAM app.
- Open Steinel CAM app.
- Use image display and intercom system.
➜ Further information on the functions and setting options in the Steinel CAM app.
Cleaning and Maintenance
Hazard from electrical power.
Contact between water and live parts can result in electrical shock, burns or death.
- Light must not be wet cleaned.
Risk of damage to property!
Using the wrong detergent can damage the light.
- Make sure detergent does not harm the surface.
- Clean light with a soft cloth and mild detergent.
Troubleshooting
Unit does not switch ON
- Fuse not switched ON or faulty.
- Switch ON fuse.
- Change faulty fuse.
- Break in wiring.
- Check wiring with voltage tester.
- Short circuit in mains power supply lead.
- Check connections.
- Mains switch OFF.
- Switch ON mains switch.
- Wrong twilight setting selected.
- Re set brightness response threshold
- Detection zone too small.
- Check detection zone.
- Light source faulty.
- The light source cannot be changed. Completely replace unit.
Unit does not switch OFF
- Continued movement within the detection zone.
- Check detection zone.
- If necessary, limit detection zone.
- Night light selected.
- Select programme without night light.
- Manual override function selected.
- Deactivate manual override function.
Unit switches ON without any identifiable movement
- Install light at a non vibrating site.
- Securely mount enclosure.
- Movement occurring, but is not identified by the observer (e.g. movement of a small object in immediate light vicinity).
- Check detection zone.
No access to the unit via the Steinel CAM app
- Wi Fi router too far from unit.
- Use repeater.
- Wi Fi connection interrupted (e.g. by walls)
- Use repeater.
Smartphone/tablet cannot be connected to the unit
- A unit is already configured.
- Carry out reset.
- Scan QR code from connected end device.
No live image transmission
- Unit too hot.
- Deactivate manual override.
- Let unit cool down.
General safety precautions
 Failure to observe these operating instructions presents hazards!
These instructions contain important information on the safe use of this product. Particular attention is drawn to potential hazards. Failure to observe this information may lead to death or serious injuries.
- Read instructions carefully.
- Follow safety advice.
- Keep instructions within easy reach.
- Working with electrical current may produce hazardous situations. Touching live parts can result in electrical shock, burns or death.
- Work on mains voltage must only be performed by qualified, skilled personnel.
- National wiring regulations and electrical operating conditions must be observed (e.g.DE: VDE 0100, AT: ÖVE ÖNORM E8001 1, CH: SEV 1000).
- Only use genuine replacement parts.
- Repairs must be made by specialist workshops.
Documents / Resources
References
Download manual
Here you can download full pdf version of manual, it may contain additional safety instructions, warranty information, FCC rules, etc.
Advertisement


Need help?
Do you have a question about the XLED CAM 1 and is the answer not in the manual?
Questions and answers