Advertisement
- 1 Warning Message
- 2 Unpacking and Product Specs
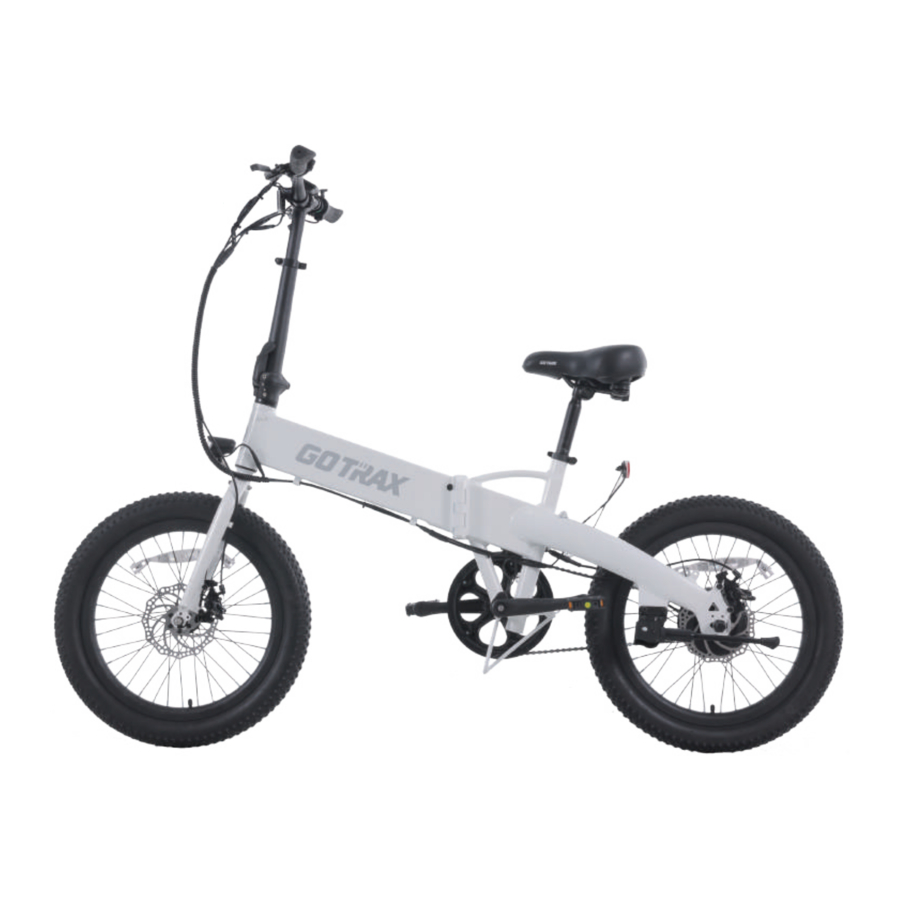
- 3 Get to Know Your E-Bike
- 4 Handle Bar Installation and Folding
- 5 Bike Frame Folding and Unfolding
- 6 Folding Pedal
- 7 Saddle Installation and Adjustment
- 8 Removing the Battery
- 9 Charge Your E-Bike
- 10 Tire Inflation Instructions
- 11 Maintenance & Repair
- 12 Function Definition
- 13 Function Mode
- 14 Battery Information
- 15 Troubleshooting Guidance
- 16 Documents / Resources
 Don't Ride Until You Read This:
ALWAYS wear a helmet when riding your electric bike.
Make sure your electric bike has a full battery before taking it out to ride.
Always be aware of local roadlaws, and follow them.
Do not ride the bike under the influence of drugs or alcohol.
Always respect pedestrians.
Do not ride under wet conditions. The electric bike may slide from under your causing injury. Wet conditions may damage the electronics and void the warranty.
To conserve electricity, use assist mode and avoid zero starting, frequent braking, driving against the wind, carrying heavy loads including other people and riding insufficient air pressure.

Lithium-ion Batteries and/or products that contain Lithium-ion Batteries can expose you to chemicals including cobalt lithium nickel oxide, and nickel, which are known to the State of California to cause cancer and birth defects or other reproductive harm. For more information, go to www.P65Warnings.ca.gov
Warning Message
- Avoid water -The electric bike is not waterproof. The electronics may be damaged due to water and water damage is not covered by our warranty. Riding in wet conditions is also very dangerous and may result in injury.
- Avoid prolonged exposure to sun or rain and avoid storage in places with high temperatures or corrosive gas.
- Whenever you ride, you risk severe injury or even death from loss of control, collisions, and falls. Use caution and ride at your own risk.
- Do not modify the product from the manufacturers original design.
- Do not exceed the posted speed limit and obey all traffic laws.
- Avoid touching the charging port directly and do not let it make contact with a metal object.
- Keep hands and all body parts away from moving parts while operating the electric bike.
- Before riding - be sure to check the electric bike over and make sure all components and function are operating correctly before each use.
- Before riding - be sure to check that the braking system is functioning properly; also be sure to check that all safety labels are in place and you understand the safety warnings.
- Before riding - be sure that any and all axle guards, chain guards, or other covers or guards supplied by the manufacturer are in place and in serviceable condition.
- Before riding - be sure to check that the tires are in good condition, inflated properly, and have sufficent tread remaining.
- Never exceed the 2641bs (120 kg) maximum load rating.
- The electric bike should never be used by children under the age of 16.
- Maximum Speed -Your electric bike accelerates to a maximum speed of 20 mph.
- Make note that additional insurance may be required to cover situations you encounter while riding an electric bike. It is recommended that you contact an insurance company or broker for advice and consultation.
- To conserve electricity, use assist mode and avoid zero starting, frequent braking, driving against the wind, carrying heavy loads including other people and riding with insufficient air pressure.

 ALWAYS WEAR A HELMET IT COULD SAVE YOUR LIFE!
A properly fitting, CPSC approved, bicycle helmet should be worn at all times when riding your bicycle.
In addition, if you are carrying a passenger (only use an approved child safety seat), and remember, the passenger must also be wearing a helmet.
The correct helmet should:

- be comfortable
- be lightweight
- have good ventilation
- fit correctly
- cover the forehead
- be securely fastened on the rider.
Unpacking and Product Specs
Remove all packaging material, then inspect each item for any accidental damage that may have occurred during shipping. You should find each of these items in your box:

| ITEM | SPECIFICATIONS |
| Model | F1 |
| Unfolded Dimensions | 1660 x 680 x 1230 mm (65.3 x 26.7 x 48.4 in) |
| Folded Dimensions | 950 x 450 x 700 mm (37.4x 17.7 x 27.5 in) |
| Package Dimensions | 910 x 380 x 740 mm (35.8 x 14.9 x 29.1 in) |
| Max Load | 264 lbs 120k |
| MaSpeed | 20m h (32km/h) |
| Battery | 48V 7.8Ah |
| Battery Specifications | Input 110-240V 50/60Hz AC Plug; Output 54.6V 1.5A DC 5.5*2.1mm |
| Pedal-Assist Range | 25miIe (40km ) |
| Pure Electric Range | 15.5mile (25km ) |
| Max Angle of Climb | 14 degrees |
| Charging Time | 5.5hours |
| Tire Pressure | 40-65 PSI |
| Seat | Adjustable |
| IP Level | IPx4 |
Get to Know Your E-Bike

Handle Bar Installation and Folding

Open the quick release clamp and insert the upper stem and handle bars and lock with the quick release clamp. (This can only be done when the tube is folded.)

Note: The upper stem must be inserted past minimum insertion line.

Lift up the stem and lock with the folding clamp.

Note: Make sure that the folding clamp is fastened tightly. (When you press the folding clamp and hear a "click", it is locked in place.)
When you want to open the folding clamp you need to push the safety buckle upwards and pull the folding clamp outwards at the same time to open it.
Bike Frame Folding and Unfolding

Press the button and pull the folding clamp outward to open it. Crank angle adjusted to 9 0 'clock.
Fold the frame so that the front and rear wheels correspond to complete the fold.
When unfolding, be sure to check whether the folding clamp is tightly fastened in place. When you press the folding clamp and hear a "click", it is locked in place.

Folding Pedal

The pedal can be folded by pressing towards crank arm and lifting up.
Saddle Installation and Adjustment

Open the quick release clamp, insert the seat tube and adjust to a suitable height and angle, after the quick release clamp is locked the installation is complete.
Note: The saddle tube must be inserted to the minimum insertion line.

Removing the Battery

Insert and turn the key counterclockwise to open the battery safety lock and pull out the key. Fold the frame and pull out the battery.
Charge Your E-Bike
You can also charge your battery installed in the bike using the exterior charging port.

ChargeYour E- Bike: Method 2

Remove the battery, plug one end of the charger into the battery and the other end into the power supply. Red light shows the battery is charging and the green light means the battery indicates a full charge.
Tire Inflation Instructions
Tires and Tubes
After assembling your bike, it will be necessary to inflate the tires. Check the side wall of the tire for the correct tire pressure (PSI) and inflate tires accordingly with a MANUAL BICYCLE PUMP. Improper inflation is the biggest cause of tire failure. Due to the slightly porous nature of bicycle inner tubes, it is normal for your bike tires to lose pressure over time. For this reason it is critically important to maintain the proper tire inflation on your bike.
- Your bicycle has been equipped with tires which the bike's manufacturer felt were the best balance of performance and value for the use for which the bike was intended. The tire size and pressure rating are marked on the sidewall of the tire.
![]()
Pencil type automotive tire gauges and gas station air hose pressure settings can be inaccutate and should not be relied upon for consistent, accurate pressure readings. Instead, use a high quality dial gauge.

NEVER INFLATE A TIRE BEYOND THE MAXIMUM PRESSURE MARKED ON THE TIRE'S SIDEWALL. EXCEEDING THE RECOMMENDED MAXIMUM PRESSURE MAY BLOW THE TIRE OFF THE RIM, WHICH COULD CAUSE DAMAGE TO THE BIKE AND INJURY TO THE RIDER AND OTHERS. THE BEST WAY TO INFLATE A BICYCLE TIRE TO THE CORRECT PRESSURE IS WITH A BICYCLE PUMP. NEVER USE A SERVICE STATION AIR HOSE TO INFLATE A BICYCLE TIRE. IT IS DESIGNED FOR LARGER TIRES AND IT CAN EXCEED THE RECOMMENDED MAXIMUM PRESSURE AND IT MAY BLOW THE TIRE OFF THE RIM.
Tire pressure is given either as maximum pressure or as a pressure range. How a tire performs under different terrain or weather conditions depends largely on tire pressure. Inflating the tire to near its maximum recommended pressure gives the lowest rolling resistance; but also produces the harshest ride. High pressures work best on smooth, dry pavement. Very low pressure, at the bottom of the recommended pressure range, gives the best performance on smooth, slick terrain such as hard-packed clay, and on deep, loose surfaces such as deep, dry sand. Tire pressure that is too low for your weight and the riding conditions can cause a puncture of the tube by allowing the tire to deform suffciently to pinch the inner tube between the rim and the riding surface.
Some special high-performance tires have unidirectional treads: their tread pattern is designed to work better in one direction than in the other. The sidewall marking of a unidirectional tire will have an arrow showing the correct rotation direction. If your bike has unidirectional tires, be sure that they are mounted to rotate in the correct direction.
- The tire valve allows air to enter the tire's inner tube under pressure, but doesn't let it back out unless you want it to. There are primarily two kinds of bicycle tube valves: The Schraeder Valve and the Presta Valve. The bicycle pump you use must have the fitting appropriate to the valve stems on your bicycle. The Schraeder is like the valve on a car tire, this is the type of valve stem you should have on your bike. To inflate a Schraeder valve tube, remove the valve cap and push the air hose on you bike. To inflate a Schraeder valve tube, remove the valve cap and push the air hose or pump fitting onto the end of the valve stem. To let air out of a Schraeder valve, depress the pin on the end of the valve stem with the end of a key or other appropriate object.
![]()

Maintenance & Repair
Correct routine maintenance of your new bike will ensure a longer life for your bike and a safer ride for you.
Every time you ride your bike, its condition changes. The more you ride, the more frequently maintenance will be required. We recommend you spend a little time on regular maintenance tasks. The following schedules will assist you in knowing what tasks need to be performed and how often. If you have any doubts about your abilities to accomplish these tasks, we recommend you take your bike to a professional bicycle mechanic periodically to have them done.
Schedule 1 - Lubrication
| Frequency | Component | Lubricant | How to Lubricate |
| Weekly | chain derailleur wheels derailleurs brake calipers brake levers | chain lube or light oil chain lube or light oil oil oil oil | brush on or squirt brush on or squirt oil can 3 drops from oil can 2 drops from oil can |
| Monthly | shift levers | lithium based grease | disassemble |
| Every Six Months | shift levers brake cables | oil lithium based grease | 2 drops from oil can disassemble |
| Yearly | bottom braket pedals derailleur cables wheel bearings headset seat pillar | lithium based grease lithium based grease lithium based grease lithium based grease lithium based grease lithium based grease | bicycle mechanic disassemble disassemble bicycle mechanic bicycle mechanic disassemble |
Note: The frequency of maintenance should increase with use in wet or dusty conditions. Do not over lubricate-remove excess lubricant to prevent dirt build up. Never use a degreaser to lubricate your chain (WD-40TTM)
Schedule2 - Service Checklist
NOTE: Many instructions for adjustments can be found in the assembly portion of this manual.
| Frequency | Task |
| Before every ride | check wheel and pedal tightness check tire pressure check brake operation check wheels for loose spokes, loose axle nuts or quick release make sure all fasteners are tightened securely |
| After every ride | quick wipe down with damp cloth |
| Weekly | lubrication as per schedule 1 |
| Monthly | lubrication as per schedule 1 check derailleur adjustment check brake adjustment check brake and gear cable adjustment check tire wear and pressure check wheels are true and spokes tight check hub, head set and crank bearings for looseness check pedals are tight check handlebars are tight check seat and seat post are tight and comfortably adjusted check frame and fork for trueness check all nuts and bolts are tight |
| Every six months | lubrication as per schedule 1 check all points as per monthly service check and replace brake pads, if required check chain for excess paly or wear |
| Yearly | lubrication as per schedule 1 |
NOTE: OWNERS ARE RESPONSIBLE FOR ALL MAINTENANCE AND SERVICE OF THE BICYCLE. FAILURE TO DO SO MAY VOID YOUR WARRANTY, CAUSE DAMAGE TO YOUR BIKE OR ITS COMPONENTS, AND MAY CAUSE AN ACCIDENT.
Function Definition
Power on/off: Press and hold the M button for 2 seconds, the display lightsup and power on. Press and hold the M button for 2 seconds when powered on, the display screen goes out, and the power is turned off. It will automatically shutdown after 10 minutes without operation.
Light control: Press and hold the + button for 2 seconds to turn on the front and rear lights when powered on. The front and rear lights remain bright and the light icon lights up. When the lights are on, the rear brake light will be brighter than general status. Press and hold the + button again for 2 seconds to turn off the lights, and the light icon goes out.
Gears Switching : 0-5 gears in total. Default gear is 0 after switching on, and 0 is neutral, no power output. Short press the + button or — button to adjust the gear up or down. (Power assist mode: 1-5 gears with gear distinction, electric mode: 1-5 gears without gear distinction).
Speed switching: After power on, the display shows the real-time speed by default.
Short Press the M button to switch the display information as follows: SPEED (real -time speed) AVG (average speed of this ride) -+ MAX (maximum speed of this ride).
TRIP and ODO Switching: Short press the M button to switcht he mileage information, which is displayed as follows: TRIP A (single mileage A)→ TRIP B(single mileage B) → ODO (Odometer).
Battery Level Display: When the battery is fully charged, the battery will display a full bar, and the display will decrease according to the decrease of the battery. When the battery indicator flashes, it means that the battery is low and needs to be charged in time.
Single-time mileage reset: When the bike is turned on and not running, the display screen displays a single mileage interface.press and hold the M button and — button for 2 seconds, and the single-time mileage o fthe display will be reset to O.
Power assist mode: Long press the — button for 2 seconds, the electric bike will enter the power assist implementation mode (that means depend on the electric to forward) Electric bike travels at a constant speed of 5-6km (3-4mph) per hour, with the icon flashing. Release the button to exit the mode, and the icon goes out at the same time.
Error code: When the electronic control system fails, the display will automatically display ERROR with an error code. Only when the error is eliminated can the error display interface be exited. When the error occurs, the electric bike will not be able to continue driving. Please contact GOTRAX after-sales team for assistance or ask professional maintenance personnel to troubleshoot.
Setting mode: In the power-on but not the running state, press and hold the+ and — buttons for 2 seconds to the setting mode, and switch the setting items by short pressing the M button.
Wheel diameter setting: St.1 represents the wheel diameter setting. Because adjusting the wheel diameter will result in inaccurate speed display and mileage display, this setting cannot be adjusted.
Speed limit setting: st.2 means speed limit setting. The factory default value of maximum riding speed is 32KM/h (20MPH).
Backlight Brightness: st.3 stands for backlight. Parameters 1, 2, and 3 can be set, and the factory default value is 2. The parameters of the backlight brightness can be changed by pressing the + button or —button. 1 is the darkest, 2 is medium, and 3 is the brightest.
KM/MPH switching: st.4representsKM/MPH switching. Short press the + button or — button to switch between KM and MPH.
Exit setting: In the setting mode, press and hold the M button for 2 seconds to confirm and save the current setting and exit the current setting.
If no operation is performed within one minute, the meter will automatically exit the setting.
Function Mode
- Three Riding Modes: Electric Assisted Mode, Pedal-Assisted Mode, Bicycle Mode.
- Throttle Assisted Mode: When you turn the bike on, the assist level will be at 0. Press the+ button to increase auxiliary levels 1-5. Press the throttle to reach the start motor and move the bike. ThrottleAssist mode Stages 1-5 assist keep same speed.
- Pedal-Assist Mode: When you turn the bike on, the assist level will be at level 0. Press the+ key to increase the auxiliary level to 1-5,and press the— key to decrease the gearing level.
- Bicycle Mode: When riding in the off state or neutral, the motor has no power output.
Battery Information
Before using the charger locate the voltage selector switch (li-ion chargers only) on the back of the charger. Select either 115 volts or 230 volts depending on your country of residence. Using the wrong voltage setting will permanenty damage the charger and/or electrical components on the hybrid electric bicycle.
BATTERY ASSEMBLY
- Use the matching charger.
- Insert the round plug in to the E-Bike first and then insert the charger plug into the electrical socket.
- A red light indicates the battery is charging.
- A green light indicates the battery is fully charged.
- The Key lock position will vary from model to model.
- The battery is removable, the battery can be charged attached to the E-Bike or pulled out and charged separately.
CHARGING THE BATTERY
- When using the charger for the first time, carefully check whether the rated output voltage of the charger is consistent with the battery voltage and check whether the charger input voltage is consistent with the grid voltage.
- When charging, first put the charger in a ventilated place, then insert the charger output plug into the charging port. Plug the electrical power plug into the 100-240V 50/60Hz AC Power Supply. Be sure to keep the input plug in contact with the AC outlet.
- After charging, the input plug of the charger shall be pulled out first, and then the output plug connected with E-Bike shall be pulled out. Do not leave the charge plugged in.
PRECAUTIONS FOR BATTERY PROTECTION
- Do not place anything on the battery and charger when charging, otherwise the charger may overheat and cause serious damage.
- Only use the charger supplied by the original factory to charge the battery, if you use a different charger your battery will be disqualified from warranty.
- You can charge your battery at any time if the battery loses power.
- If you do not use or charge your battery for an extended period of time, battery performance will decrease. If you do not plan to ride your bike for an extended period of time it is recommended to plug in and charge the battery Insert Care/Maintenance section an extended period every 4-6 weeks.
- Protection can make your battery maintain about 80%of its capacity after more than 500 cycles. But overall decline is inevitable.
- If the battery remains in a status not charged along time, it will lead to permanent loss of performance.
- If you want to store your battery for an extended period, please store and discharge it in a cool and dry place.
- Keep the temperature between 50-700F and avoid direct sunlight. Take the battery out for charging every 30 days.
- Do not intentionally short-circuit the battery which will cause very serious damage and void the warranty.
- Dispose of your batteries responsibly. Research local recycling regulations.
- If you have questions about battery use, maintenance, or storage, please contact customer service.
- Only use the battery supplied with this electronic bike.
- Never charge a lithium battery unsupervised.
Troubleshooting Guidance
When the E-bike electric control system fails, the display will show the error codes, and only when the fault is removed can you exit the fault display program.
After the fault occurs, the E-bikes will not continue working.
| Troubleshooting tips | Code meaning | Troubleshooting clearing |
ERROR 22 | The accelerator failure | Check the accelerator connection cable. If the connection cable is normal, replace the accelerator |
ERROR 23 | The motor troubleshooting | Check the motor connection cable. If the connection cable is normal, replace the motor |
ERROR 24 | The motor troubleshooting | Check the motor connection cable. If the connection cable is normal, replace the motor |
ERROR 25 | The Brake faulire | Check the brake connection cable, if the connection line is normal, replace the brake handle. |
ERROR 30 | Display communication failure | Check the display connection cable. If the connection cable is normal, replace the display |
Please contact our customer service team if you are experiencing problems or need more detailed information
US team after-sales email: support@gotrax.com
CA team after-sales email: canada@gotrax.com
#RideGOTRAX

(US) GOLABS, INC
GOTRAX.com
2201 Luna Rd.
Carrollton, TX 75006
(CA) Tao Motor Canada Inc.
170 Bartor Road, Unit 1 North York,
Ontario M9M 2W6,
Canada.
Documents / Resources
References

Download manual
Here you can download full pdf version of manual, it may contain additional safety instructions, warranty information, FCC rules, etc.
Download Gotrax F1 - 20" Folding Electric Bike with 40Miles Manual
Advertisement


Need help?
Do you have a question about the F1 and is the answer not in the manual?
Questions and answers