BORA X Pure, Pure, PUXA, PUXU - Induction Cooktop Manual
- Operating and installation instructions (78 pages) ,
- Operating and installation instructions (16 pages) ,
- Operating and installation instructions (60 pages)
Advertisement
- 1 Introduction
- 2 Appliance description
- 3 Functions and operation
- 4 Documents / Resources
Introduction
X Pure surface induction cooktop with integrated cooktop extractor – exhaust air/recirculation (PUXA/PUXU)

Pure induction cooktop with integrated cooktop extractor – exhaust air/recirculation (PURA/PURU)

Appliance description
Model description
| Model | Long description |
| PUXA | X Pure surface induction cooktop with integrated cooktop extractor – exhaust air |
| PUXU | X Pure surface induction cooktop with integrated cooktop extractor – recirculation |
| PURA | Pure induction cooktop with integrated cooktop extractor – exhaust air |
| PURU | Pure induction cooktop with integrated cooktop extractor – recirculation |
Tab.1 Model description
System description
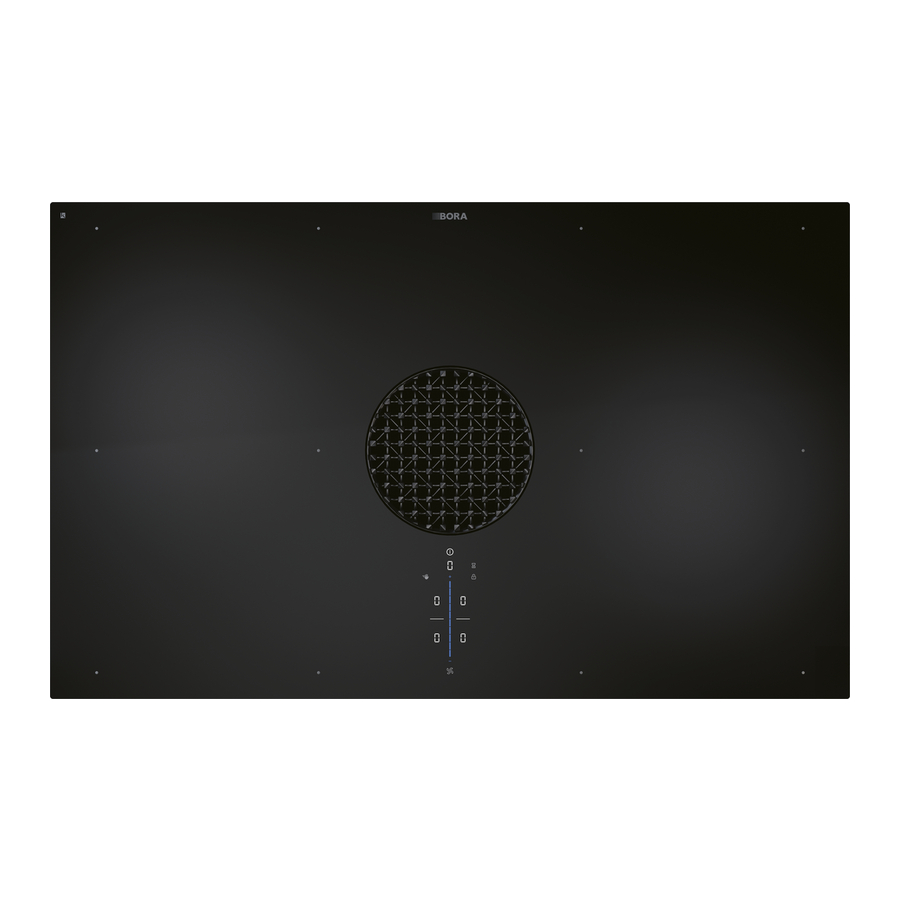
Structure

Fig. 1 Cooktop
- Air inlet nozzle
- Stainless steel grease filter
- Cooktop
- Inlet opening
- Fan
- Operating panel
- Cooking zone (x 4)

Fig. 2 Rear view of PUXA, PURA
- Exhaust opening
- Air guiding housing with housing base

Fig.3 Rear view of PUXU, PURU
- Air cleaning box with telescopic pull-out
- Air guiding housing with housing base
Operating panel
The cooktop extractor and cooktops are operated via a central operating panel. The operating panel is fitted with electronic sensor buttons and display panels. The sensor buttons respond to finger contact (touch zones).

Fig.4 Central touch/slider operating panel
Touch zones/buttons

Fig.5 Touch zones/buttons
- Switching on/off
- Short-time timer (egg timer)
- Control lock
- Power level setting zone plus
- Cooking zone selection (x 4)
- Touch slider (power level setting zone)
- Power level setting zone minus
- Heat retention function
- Fan functions
- Cooking zone timer
- Cleaning lock
- Pause function
- Select fan/Call up menu
Indicator zones

Fig.6 Indicator zones
- Multi-function display
- Fan display
- Cooking zone indicator (x 4)
- Cooking zone timer indicator (x 4)
- Warming indicator (x 4)
- Dividing line
Symbols
![]()
Tab.2 Meaning of the symbols displayed (icons)
7-segment display

Tab.3 Meaning of the 7-segment displays
Lighting
 The operating panel has 2 different levels of lighting (100% and 50%).
On principle the system adapts the lighting to the current operating scenario. Relevant display elements are more brightly lit and irrelevant ones are dimmed. Unavailable functions are faded out.
| Lighting | Use |
| 100% | Function is active and selected |
| 50% | Function is inactive but can be selected |
| 0% (no indicator) - Function is unavailable | |
Tab.4 Lighting
Sounds
The volume of the acoustic signals can be set in the menu (0% to 100%).
The acoustic signal for the power button cannot be set to 0.
Safety-relevant acoustic signals are always emitted with the volume at 100%.
The system basically differentiates between two different types of acoustic signals:
| Acoustic signal | Purpose |
| Short individual beep (0.1 s) | Confirmation of a selection |
| Sequence of beeps | Interaction required |
Tab.5 Sounds
How the cooktop extractor works
Depending on the model you purchased, the cooktop extractor can be operated as an exhaust air or a recirculating air version.
Exhaust air mode
![]()
The air suctioned away is purified by the grease filter and expelled into the open air via a duct system. The exhaust air must not be expelled into:
- a smoke or exhaust gas flue that is in operation
- a shaft used for the aeration of rooms where fireplaces are installed.
If the exhaust air is to be directed into a smoke or exhaust gas flue that is not in use, the installation must be checked and approved by the responsible heating engineer.
Recirculation mode
![]()
The air suctioned away is purified by the grease filter and an activated charcoal filter and fed back into the room in which the appliance is installed. To prevent odours in recirculation mode, an odour filter must be used.
For health and hygiene reasons, the activated charcoal filter must be replaced at the recommended intervals (see "Cleaning and maintenance" ).
In recirculation mode, ensure sufficient ventilation and aeration to expel humidity.
How the induction cooktop works
An induction coil is located underneath an induction cooking zone. If the cooking zone is switched on, this coil creates a magnetic field that acts directly on the base of the pot thus heating it up. The cooking zone is only indirectly heated up by the heat emitted by the pot. Cooking zones with induction only work if the cookware has a magnetisable base. Induction automatically takes into account the size of the cookware used which means that only the area in the cooking zone covered by the base of the pot is heated up.
Suitable cookware
The heating and heat-through times for the cookware base, as well as the cooking results, are significantly influenced by the structure and material of the cookware.
![]()
Cookware with this symbol is suitable for induction cooktops. The cookware used for the induction cooktop must be made of metal, feature magnetic properties and possess an ample base.
Suitable cookware is made of:
- stainless steel with a magnetisable base
- enamelled steel
- cast iron
- Perform a magnet test, if necessary. If a magnet sticks to the base of the utensils, they are normally induction compatible.
- Pay attention to the cookware base. The bottom of the cookware should not show any sign of curvature. Due to incorrect hob temperature monitoring, this curvature may cause the cookware to overheat. To avoid scratching the cooktop, the base of the cookware must not have any sharp grooves or sharp edges.
- Place the cookware (without a mat or similar) directly onto the glass ceramic.
- Observe the minimum pot base diameter.
| Appliance | Cooking zone | Minimum diameter of cookware base |
| PUXA | front rear | 120 mm 120 mm |
| PUXU | front rear | 120 mm 120 mm |
| PURA | front rear | 120 mm 90 mm |
| PURU | front rear | 120 mm 90 mm |
Tab.6 Minimum cookware diameter
Noises
The following noises may occur in the cookware when using induction cooking zones, depending on the material and the finish of the base:
- Humming may occur when using a high power level. This decreases or disappears when the power level is decreased.
- Crackling or whistling may occur due to the bases of cookware being made of different materials (e.g. sandwich base).
- Clicking sounds may occur during electronic switching procedures, especially at low power levels.
- Whirring may occur when the cooling fan is switched on. In order to increase the service life of the electronic system, the cooktop is equipped with a cooling fan. The cooling fan switches on automatically if the cooktop is used intensively. You will hear a whirring sound. The cooling fan may continue to run after the appliance has been switched off.
Functions and operation
Operating the system
Switching the appliance on and off
Switching on
- Long press on the power button
![]()
- The switch-on animation is displayed in the slider.
- If start-up is successful, the standard display will appear in the operating panel.

Fig.7 Standard display after switching on

If the child lock is active, the lock button will light up after system start-up ![]() . The standard display will only appear once it has been unlocked (see "Child lock").
. The standard display will only appear once it has been unlocked (see "Child lock").
Switching off
- Long press on the power button
![]() .
. - The switching-off animation is displayed.
- If the cooktop extractor has been on:
- The fan symbol will light up and the automatic after-run function will start (the automatic after-run animation is displayed).
- The display goes out when the after-run time has lapsed.
- If the cooktop has been on:
- The residual heat indicator
![]() is displayed for previously active and still hot cooking zones.
is displayed for previously active and still hot cooking zones. - The display goes out when no more residual heat is present.
- The residual heat indicator
Short-time timer (egg timer)
The short-time timer emits both a visual and an acoustic signal after a time set by the user and provides the function of a conventional egg timer.
Activating the short-time timer
- Tap the egg timer button
![]()
![]() flashes in the multi-function display.
flashes in the multi-function display.- The cooking zones in the display are dimmed.
Setting the time
- Select the desired power level:
| Command | Increase time | Decrease time |
| Swipe |  upwards | downwards |
| Tap |  (exact to the minute) |  (exact to the minute) |
Tab.7 Setting the time
- The egg timer button
![]() starts to flash.
starts to flash.
Starting the short-time timer
- Tap the flashing egg timer button
![]()
- The set time starts to count down.
- The egg timer button and the remaining time are shown in the operating panel.
Time lapsed
- 10 seconds before the set time lapses, the system flashes the remaining time.
- In the last 5 seconds of the countdown an acoustic signal can be heard every second.
- The time indicator
![]() changes to the fan power level.
changes to the fan power level.
Deactivating the short-time timer early
- Long press on the egg timer button
![]()
- The short-time timer is stopped.
- The operating panel display changes to the standard display.
If the appliance is switched off, the short-time timer will remain active.
Control lock
The control lock prevents the current settings from being changed accidentally or without permission.
- If the control lock is active, the symbol
![]() lights up
lights up - The functions are locked and the operating panel is dimmed (exception: power button).
 lights up
Activating the control lock
- Long press on the lock button
![]() .
. - The operating panel is dimmed.
- The lock button lights up.
- All functions are deactivated except for the power button and the lock button.
If the system is switched off when the control lock is active, the control lock will no longer be active next time the system is switched on.
Deactivating the control lock
- Long press on the lock button
![]() .
. - The standard display lights up and the operating panel is reactivated.
- The lock button is dimmed.
Cleaning lock
The cleaning lock prevents settings from being changed when wiping the operating panel during a cooking session. When activated, the operating panel is locked for 10 seconds. The remaining time is displayed. All appliance settings remain unchanged in the meantime. Once the time has lapsed you can use the functions again.
Activating the cleaning lock
- Tap the cleaning button
![]() .
. - The cleaning button lights up.
- The operating panel is locked.
- The remaining seconds are shown in the multifunction display.
Deactivating the cleaning lock early
- Long press on the cleaning button
![]()
- The cleaning button is dimmed.
- The operating panel is unlocked.
Operating the cooktop extractor
Switching the fan on and off
Switching the fan on
The fan is switched on by setting the fan power level.
- Set the fan power level.
- The fan symbol lights up.
- The set fan power level is shown in the multifunction display.
Switching the fan off
- Swipe downwards to power level 0
or - tap
![]() until power level 0 is reached
until power level 0 is reached
or - long press on the fan button
![]()
or - long press on the fan power level in the multifunction display.
- The automatic after-run function is started.
Setting the fan power level
The fan power levels can be set in 3 different ways.
- By tapping a certain position on the slider
![]()
or - by swiping until you reach the required power level
or - by tapping on
![]() or
or ![]() .
.
 or
or  .
.Fan power setting
When the power setting is activated, maximum extractor power is available for a predefined time. This power setting makes it possible to suction away high levels of cooking vapours more quickly. After 5 minutes, the power setting is automatically switched to power level 9.
Activating the fan power setting
- Tap on
![]() when power level 9 is active.
when power level 9 is active. ![]() appears in the display.
appears in the display.
Deactivating the fan power setting
The fan power setting is deactivated early if another power level is set.
Automatic extractor function
The extractor power level automatically adjusts itself depending on the current cooktop settings. No manual adjustment of the fan controls is necessary but it is possible. The extractor power is automatically adjusted to the highest power level used on all connected cooking zones. If the cooking zone power level is changed, the extractor power is automatically adjusted. The extractor power is adjusted after a 20 second delay.
| Function | Power levels | |||||||||
| Cooking level | 1 | 2 | 3 | 4 | 5 | 6 | 7 | 8 | 9 | P |
| Extractor power | 4 | 4 | 4 | 4 | 5 | 6 | 7 | 8 | 9 | P |
Tab.8 Extraction performance and cooking level
Activating the automatic extractor function:
- tap the fan button
![]() .
. - The fan symbol lights up.
- An animation appears on the slider.
![]() is displayed.
is displayed.
Deactivating the automatic extractor function:
- swipe to a fan power level
or - tap the fan button
![]() .
.
Automatic after-run
The cooktop extractor continues to run at a lower level and switches off automatically after a defined time.
The duration of the after-run function can be set in the menu (10, 15 or 20 minutes). The default duration of the after-run function is 20 minutes.
- When the extractor is switched off, the automatic after-run function is activated.
- Once the automatic after-run period has lapsed, the cooktop extractor switches itself off.
Switching off the automatic after-run early
- tap the fan button
![]() .
.
BORA expressly recommends use of the cooktop extractor after-run function.
Filter service display
The cooktop extractor filter service display is automatically activated when the end of the activated charcoal filter service life is reached (only in recirculation mode).
![]() is displayed in the multi-function display.
is displayed in the multi-function display.- The filter service display is shown every time the cooktop extractor is switched on and remains active until the filter has been changed and the filter service display has been reset (see "Menu item 3: Showing the filter status and resetting filter service display").
- The cooktop extractor can still be operated without limitations.
 is displayed in the multi-function display.
 The components of the grease filter require regular cleaning regardless of the filter service display (see "Cleaning and maintenance").
Operating the cooktop
Pan size recognition
The cooking zone recognises the size of the cookware automatically and only targets the energy at that area. It also recognises cookware that is unsuitable or too small, or if there is no cookware present.
A cooking zone is not working if  are alternated in the display.
This happens if...
- ...it is switched on without cookware or with unsuitable cookware;
- ...the base diameter of the cookware is too small;
- ...the cookware is removed from a switched-on cooking zone.
If no pot is recognised 10 minutes after setting a power level, the cooking zone will switch off automatically.
Permanent pan size recognition
The appliance automatically recognises cookware and switches the corresponding cooking zone on. The cooking zone does not need to be switched on manually (see "Menu item: Permanent pan size recognition").
Switching the cooking zone on/off
Switching on the cooking zone
- Tap on a cooking zone
![]() .
. - The cooking zone controls are activated for 2 seconds and you can apply settings to the chosen cooking zone.
- The additional cooking zone functions appear.
- Repeat this process to operate further cooking zones if necessary.
Switching off the cooking zone
- Tap the required cooking zone.
- Swipe right down to the bottom until
![]() appears in the cooking zone display
appears in the cooking zone display
or
- long press on the cooking zone
![]() is displayed in the cooking zone display.
is displayed in the cooking zone display.- After 2 seconds, the standard display appears.
or
- tap
![]() until
until ![]() appears in the cooking zone display.
appears in the cooking zone display.
Setting cooking zone power levels
The high power output of induction cooktops results in the very quick heating up of cookware. In order to avoid burning food, slight adjustment is needed in comparison to conventional cooking systems when selecting the power level.

Tab.9 Recommendations for power levels
The specifications provided in the table are standard values. Depending on the cookware and filling quantity, it is recommended to either decrease or increase the power level.
The cooking zone power levels on the cooktops are shown in the corresponding cooking zone display as a 7-segment font ( ).
).
Two seconds after the power level is changed, the operating panel display automatically returns to the standard display.
Adjusting the power level
- Tap the required cooking zone.
The cooking zone power levels can be set in 3 different ways: - by tapping a certain position on the slider
or - by swiping until you reach the required power level
or - by tapping on
![]() or
or ![]() .
.
 or
or  .
.Cooking zone power setting
When the power setting is activated, maximum cooking zone power is available for a predefined time.
- The available power is targeted at the cooking zone, meaning that the max. power of the second cooking zone on that side is automatically reduced temporarily:
- If the front cooking zone is operated using the power setting, a maximum power level of 7 can be selected in the rear cooking zone.
- If the rear cooking zone is operated using the power setting, a maximum power level of 7 can be selected in the front cooking zone (max. power level 8 on Pure).
- If the power level selected for the second cooking zone is too high, P will flash three times and the cooking zone will switch back to power level 9.
Never heat up oil, fat and the like on the power setting. The bottom of the pan can overheat due to the high power output.
Activating the power setting for a cooking zone
- Tap on
![]() when power level 9 is active.
when power level 9 is active. -
![]() appears in the cooking zone display.
appears in the cooking zone display.
-
Deactivating the power setting
- After 5 minutes, the cooking zone is automatically switched back to power level
![]()
or - the power setting is deactivated early if another power level is set.
Automatic heat up function
When the automatic heat up function is activated, the cooking zone works at full power for a certain time and is then automatically reset to the previously set level.

Tab.10 Heating time overview
Activating the automatic heat up function
- Tap the required cooking zone
- Setting the power level (= continuous cooking level)
- Long press on the slider
![]() at a position lower than power level 9
at a position lower than power level 9 - The automatic heat up function is activated.
- Whilst the automatic heat up function is active, the power level displayed will flash.
- When the heat up time has ended, the cooking zone will stay on the previously set continuous cooking level.
Deactivating the automatic heat up function early
The automatic heat up function is deactivated early if a lower power level is set.
If the power level of a cooking zone is increased when the automatic heat up function is active, the automatic heat up function remains active. The time is restarted for the new continuous cooking level. If the cooking zone power level is decreased while the automatic heat up function is active, the automatic heat up function is deactivated.
Cooking zone timer
This automatic cut-off function automatically switches off the selected cooking zone once a preset time has lapsed. The cooking zone timer can also be used on several cooking zones at the same time (multi-timer).
To be able to activate the cooking zone timer function, a cooking zone power level must first be set.
Activating cooking zone timers
- Tap on a cooking zone
- The additional cooking zone functions are displayed.
- If the chosen cooking zone is not yet active (= power level
![]() ) a power level can now be set.
) a power level can now be set.
- Tap the timer button
![]()
- The time
![]() flashes in the multi-function display.
flashes in the multi-function display.
 ) a power level can now be set.
 flashes in the multi-function display.
Setting the time
- Select the desired power level:
| Command | Increase time | Decrease time |
| Swipe |  upwards | downwards |
| Tap |  (exact to the minute) | (exact to the minute) |
Tab.11 Setting the time
- The timer symbol
![]() starts to flash.
starts to flash.
Starting the cooking zone timer
- Tap the flashing timer button
![]()
- The set time starts to count down.
- The timer symbol
![]() is shown next to the cooking zone.
is shown next to the cooking zone. - The operating panel display changes to the standard display after 2 seconds.
- 10 seconds before the set time lapses, the system flashes the remaining time.
- In the last 5 seconds of the countdown an acoustic signal can be heard every second.
Showing the remaining time
The cooking zone timer is active and the time counts down:
- Tap the cooking zone
- The remaining time is shown in the multi-function display.
Changing the active cooking zone timer
- Tap a cooking zone with an active timer
- The remaining time is displayed.
- Tap the timer button
![]()
- The timer is stopped.
- The remaining time flashes in the display.
- The system changes to input mode.
- Change the set time.
- Confirm the new set time and start the timer.

Multi-timer
- Tap on a different cooking zone
- The additional cooking zone functions are displayed.
- If the chosen cooking zone is not yet active (= power level
![]() ) a power level can now be set.
) a power level can now be set.
- Tap the timer button
![]()
- The time
![]() flashes in the multi-function display.
flashes in the multi-function display. - Now the time can be set and the cooking zone timer started.
 ) a power level can now be set.
 flashes in the multi-function display.
Switching the cooking zone timer off early
- Tap a cooking zone with an active timer
- The remaining time is displayed.
- Long press on the timer button
![]()
or - long press on the cooking zone with an active timer
- The timer is stopped.
- The system switches to the standard display.
- The cooking zone remains active on the set power level.
Time lapsed
- 10 seconds before the set time lapses, the system flashes the remaining time.
- In the last 5 seconds of the countdown an acoustic signal can be heard every second.
- The time display
![]() and the timer button
and the timer button ![]() flash.
flash. - At the end of the set time the cooking zone is automatically deactivated (= power level
![]() ).
).
Pause function
With the pause function all cooking zones can be quickly and easily deactivated temporarily. When the function is cancelled, operation resumes at the original settings.
The cooking session can be paused for a maximum of 10 minutes. Once 10 minutes have lapsed, the cooking session is automatically ended.
Activating the pause function
- Tap the pause button
![]()
- The pause button lights up, all cooking sessions are paused and an acoustic signal is heard.
- The cooking zone indicators are dimmed.
- The pause timer is started (max. 10 min).
During the pause, the fan function is not interrupted. Any active short-time timers stay the same. Active cooking zone timers are stopped.
Deactivating the pause function
- Long press on the pause button
![]()
- The pause button is dimmed.
- The cooking zone indicators light up.
- All cooking sessions are resumed at the power levels set prior to the pause.
- Active cooking zone timers are resumed.
Heat retention function (only on Pure)
The warming function enables meals that have already been cooked to be kept warm at a lower temperature without any risk of burning.
- The maximum duration for the heat retention function is preset to 8 hours.
Activating the heat retention function
- Tap the required cooking zone
- The additional cooking zone functions appear.
- Tap the heat retention button
![]()
- The heat retention level is activated.
![]() is displayed in the cooking zone display.
is displayed in the cooking zone display.- The heat retention symbol
![]() is shown next to the cooking zone.
is shown next to the cooking zone.
Deactivating the heat retention function
- Tap the required cooking zone
- Tap the heat retention button
![]()
or - swipe right down to the bottom (power level 0)
- The heat retention function is deactivated.
Setting a power level also deactivates the heat retention function.
Variable heat retention function (only on X Pure)
Depending on the application or food used, it is possible to choose from 3 warming levels at different temperatures:
| heat retention level | Symbol | Temperature |
| 1 (melting) |  | ≈ 42°C |
| 2 (keeping warm) |  | ≈ 74°C |
| 3 (simmering) |  | ≈ 94°C |
Tab.12 Heat retention levels
- The maximum duration of the heat retention function is limited to 8 hours.
In practice the temperatures of the warming levels may vary slightly as they are influenced by the cookware, the amount of food and the different heating technologies.
The temperatures can also vary due to the influence of the cooktop extractor.
Activating the heat retention function
- Tap the required cooking zone
- Tap the heat retention button
![]()
- The first heat retention level (
![]() ) is displayed.
) is displayed. - The warming symbol
![]() is shown next to the cooking zone.
is shown next to the cooking zone.
- The first heat retention level (

 ) is displayed.
 is shown next to the cooking zone.
Increasing or reducing the heat retention level
- Swipe upwards or downwards until the required heat retention level is reached
or - tap
![]() or
or ![]() until the required warming level is reached
until the required warming level is reached
 or
or  until the required warming level is
 Deactivating the heat retention function
- Tap the cooking zone on which the heat retention function is activated
- Swipe downwards
or - long press on the heat retention button
![]()
- The heat retention function is deactivated.
- The residual heat indicator
![]() appears in the cooking zone display if necessary.
appears in the cooking zone display if necessary.
Bridging function (only on X Pure)
With the bridging function two cooking zones can be combined to form one large cooking zone. The power for the combined zones is then adjusted by a single operating control. Power adjustment takes place simultaneously (both cooking zones are operated on the same power level). The bridging function is suitable for heating food, e.g. in a roaster.
If both cooking zones are active before the bridging function is activated, the lower power level is adopted. If cooking zone timers are active, the lower timer value is adopted.
If no suitable cookware is detected (pan size recognition) within 10 seconds with the bridging function active, the bridging function will be disabled and the cooking zones will be deactivated.
Activating the bridging function
- Tap both cooking zones at the same time.
- The bridging function is now active.
- The dividing line between the cooking zones on the operating panel disappears and the additional cooking-zone functions are displayed.
- Both cooking zone indicators show the same power level.
- Changes to the power level now apply simultaneously to both cooking zones.
- Active additional cooking-zone functions are adopted and apply to both cooking zones (dual display).
Deactivating the bridging function
- Long press on one of the two cooking zones with an active bridging function
or - tap the cooking zones with an active bridging function simultaneously.
- The bridging function is deactivated.
- The dividing line between the cooking zones on the operating panel reappears.
- The power levels are set to 0
- If a cooking zone timer was active, it is deactivated.
- If cookware is only detected on one of the two cooking zones, the bridging function is cancelled after ten seconds and the empty cooking zone is deactivated.
Automatic bridging function (only on X Pure)
If a large enough cooking pot or roaster is placed on the two cooking zones that are one behind the other, they will automatically be combined to form one large cooking zone. The bridging function does not need to be activated manually.
If the permanent pan size recognition is switched on (see "Menu item: Permanent pan size recognition"), the automatic bridging function is also activated.
Safety features
Child lock
The child lock prevents the appliance from being switched on accidentally.
- After switching on the appliance, the lock symbol lights up in the operating panel display
![]() .
.
Permanently activating/deactivating the child lock
see "Menu item: Childproofing feature"
Deactivating the child lock for a cooking session
- Long press on the lock button
![]() .
. - Swipe downwards
- The standard display lights up and the operating panel is reactivated.
Residual heat indicator
If a cooking zone is still hot after switching off, there is a risk of burns or fire. While ![]() is displayed for a cooking zone (residual heat indicator), do not touch the cooking zone or place any heat-sensitive objects on top of it.
is displayed for a cooking zone (residual heat indicator), do not touch the cooking zone or place any heat-sensitive objects on top of it.
![]() shown at 100% brightness: very high temperature.
shown at 100% brightness: very high temperature.![]() shown at 50% brightness: high temperature.
shown at 50% brightness: high temperature.
 shown at 100% brightness: very high temperature.
The display goes out after a sufficient cooling time (temperature <55°C).
Safety shut-down
Cooktop extractor
The cooktop extractor switches to automatic mode after 120 min if there has been no input or changes to the power level.
Cooktops
Each cooking zone is automatically switched off after a predefined operating time in which the power level has not been changed. 3 levels are available to set the time until safety shut-down.
- Safety shut-down is preset to level 2.
- The level can be changed in the user menu.

Tab.13 Safety shut-down on the different power levels
| heat retention level | Safety shut-down after hrs: min | ||
| Level 1 | Level 2 | Level 3 | |
 | 12:00 | 8:00 | 4:00 |
Tab.14 Safety shut-down of the different heat retention levels
- Switch the cooking zone back on if you want to put the cooking zone back into operation.
Overheating protection
In the event of overheating, the cooktop power is reduced or the appliance is switched off completely.
The appliance is fitted with overheating protection.
The overheating protection can be triggered if:
- cookware is heated up empty;
- oil or fat is heated on high power;
- a hot cooking zone is switched on again after a power cut.
Whilst the overheating protection is active, one of the following steps is taken:
- the activated power setting is switched back to the previous level;
- the power setting P can no longer be switched on;
- the set power level is reduced;
- the cooktop switches off completely.
After a sufficient cooling period, the cooktop can be used again in full.
Documents / Resources
References
Download manual
Here you can download full pdf version of manual, it may contain additional safety instructions, warranty information, FCC rules, etc.
Download BORA X Pure, Pure, PUXA, PUXU - Induction Cooktop Manual
Advertisement


Need help?
Do you have a question about the X Pure and is the answer not in the manual?
Questions and answers