Advertisement
- 1 ST7 COMPONENTS
-
2
MAINTENANCE AND SERVICING
- 2.1 Belt drive
- 2.2 Gear system
- 2.3 Gear indicator
- 2.4 Trigger setting
- 2.5 Setting the gear for starting
- 2.6 Assistance levels
- 2.7 Battery eject button
- 2.8 Removing the battery
- 2.9 Charging the battery internally
- 2.10 Displaying the charge level when the battery is removed
- 2.11 Battery sleep mode
- 2.12 USB charging socket
- 2.13 Cleaning
- 2.14 Stromer ST7 tightening torques
- 3 TECHNICAL SPECIFICATIONS
- 4 SAFETY INSTRUCTIONS
- 5 Documents / Resources
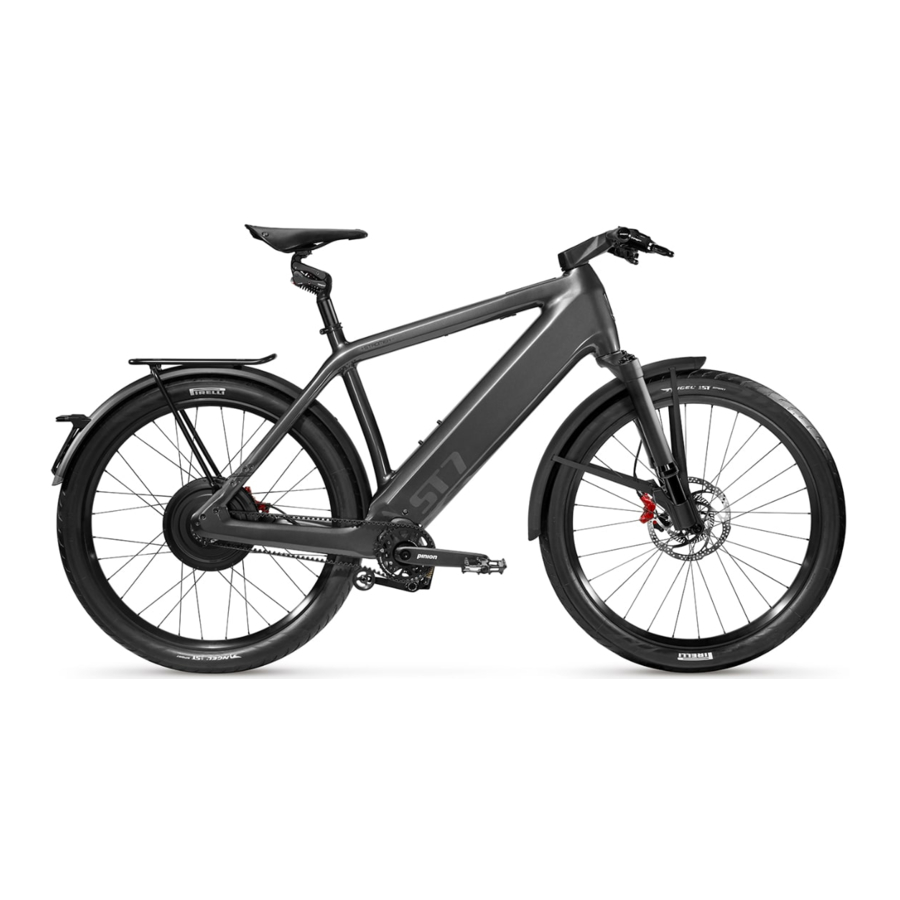
ST7 COMPONENTS

Delivery contents

 The S-Pedelec you have purchased may look different from the one depicted in this user manual. This manual describes S-Pedelecs. It is included in the delivery of your S-Pedelec.
MAINTENANCE AND SERVICING
Belt drive
Your ST7 is equipped with a belt drive (Gates Carbon Belt Drive). The automatic tensioning roller saves you from having to check and retension the belt frequently, making it almost maintenance free.

Please follow the handling instructions be low to help make your belt last longer. Improper handling can damage the belt and may mean that it needs replacing!
- Do not bend or twist the belt.
- Do not turn the belt inside out.
- Do not bunch or coil the belt.
- Do not use as a belt tool.
- Do not use tools or sharp instruments when handling the belt.
- Do not push down on the belt pulley.
- Do not oil the belt.
To extend the lifespan of the belt, we recommend cleaning it with water or a hand brush (e.g. after riding through mud or dirt). Residue left on the belt or belt pulleys can result in increased wear and noise generation (e.g. squeaking or creaking). Use in winter: The belt will not rust but salt crystals may form on the pulley system if salt water is left to dry on it. Even if no dirt is visible, you should wash your bike and belt regularly when using it during winter. Use warm water and a mild detergent or dish soap.
Check your belt drive for damage, deformation or cracks each time you clean it. If you have any doubts, contact your Stromer dealer. If you still notice that the belt system is making noise despite a thorough cleaning, a thin layer of dry silicone spray can be applied to the inside of the belt. This protects it against any further build-up and reduces friction and noise generation.
Gear system

The gears are operated via the Smart. Shift automatic gearshift lever (hereinafter referred to as the "trigger"). The Pinion trigger is an electronic system powered by a BQ1440 battery.
To change gear, press one of the gearshift levers. To shift up a gear, press the front short lever once. To shift down a gear, press the longer rear lever once. You can change several gears in succession by pressing the lever several times. Shifting while pedaling is possible, but not when the load is too high.
You can find more detailed information in the specific user manuals included in the delivery: Trigger: Pinion Smart. Shift user manual; Gearbox: Pinion C-Line user manual; or on the website: pinion.eu/smartshift
You can freely adjust the gearshift lever assignment. Please read the "Trigger setting" chapter for more information.
Belts and pulleys are optimally matched to each other. Do not change the gear ratio. The warranty and guarantee only apply to original components.
 Gears are safety-relevant components!
Read the manufacturer's instructions and familiarize yourself with the operation of your S-Pedelec's gears before riding it for the first time. You can find more information at https://pinion.eu.
Leave any gear repairs to your Stromer dealer! Any repair work that is not carried out properly may impact the safety of your S-Pedelec!
If your gears do not shift cleanly, avoid riding any further if possible. Take your ST7 to your dealer to be checked.
 You have the option to extend the warranty for the gearbox to five years.
You can access Pinion's warranty policy at https://pinion.eu/service or by scanning the QR code:

Gear indicator
The Pinion gearbox has 12 gears. The driving mode display shows you which gear is currently engaged.

Trigger setting
You can freely assign the gearshift levers. In the shortcut display, select:


Standard: The front lever shifts up. The rear lever shifts down.
Inverse: The front lever shifts down. The rear lever shifts up.
Setting the gear for starting
When starting up after a standstill, the ST7 automatically shifts to fourth gear.
You can set the gear yourself in the settings. In the shortcut display, select:


Turn "START.SELECT" on or off: "ON/OFF". Change gear with "+/-".
Save your settings by pressing "OK".
The drive system and the battery are subjected to greater stress when you set off in a high gear. It is better to choose a low gear as the starting gear.
Assistance levels
By pressing the "+" and "-" buttons on the control element on the handlebars, you can switch between the following assistance modes:
Bicycle mode: The motor is switched off.
Assistance mode 1: Low motor assistance optimized for longer ranges.
Assistance mode 2: Medium motor assistance – you can fine-tune this assistance mode via the Stromer app.
Assistance mode 3: High motor assistance for maximum speed.
Assistance mode S: Very high motor assistance for short-term maximum assistance.
Battery eject button
The battery eject button is located on the left side of the down tube, just below where it connects to the head tube. You can use your finger to pull the battery eject button out to two levels.

If you pull out the button to the first stop/resistance, the charging socket is revealed.
If you pull the button out past the first stop/resistance, the battery will pop out.
Removing the battery
The battery can only be removed when the pedelec is stationary.

Select the "Eject battery" icon
Pull the battery eject button out.

The battery compartment will swing open. The battery is very heavy! Support/stop the battery compartment cover with your hand when opening it.
Pull the battery eject button out past the first stop/resistance. Now you can pull out the battery.
The battery is very heavy; do not drop it. You might hurt yourself and/or damage the battery.

Charging the battery internally
The socket for the charging cable is in the battery eject button. You can see it when the battery eject button is open.

Open the battery eject button to the first stop/ resistance. You will be able to freely access the socket.
Displaying the charge level when the battery is removed
The BQ1440 battery has a charge level indicator with small LEDs.

Press the "ON/OFF" button on the battery. The LEDs will light up to indicate the current charge level.
Battery sleep mode
The BQ1440 battery goes into sleep mode depending on the charge level and idle time. The sleep mode activates after:
- 7 days (or charge level < 10%);
- 90 days (or charge level < 40%);
- 90 days (or charge level < 80%).
USB charging socket
The USB charging socket on the ST7 is located on the underside of the top tube (next to the power button). The user manual contains some important information about the USB charging socket.

Cleaning
Only clean your S-Pedelec when the electronic components, e.g. battery box or charging socket, are fully installed, locked and inserted.
Stromer ST7 tightening torques
For assembly and maintenance work, different tightening torques must be used in some cases for the ST7. Always have work that does not concern the Smart. Shift carried out by a specialist workshop.
Have all assembly and repair work on the Smart. Shift gearbox and Smart. Shift box carried out by an authorized specialist workshop.
TECHNICAL SPECIFICATIONS
The ST7 weighs: Without battery 30.1 kg
Weight of the BQ1440 battery 6.9 kg = 37 kg in total.
| CHARGER FOR LI-ION BATTERIES | CR246 |
| VOLTAGE [V] | 48 |
| CAPACITY [AH] | 30 |
| ENERGY [WH] | 1,440 |
| CHARGING TIME WITH CR246 DEVICE [H:MIN] | 7:00 |
| PERMISSIBLE STORAGE TEMPERATURE RANGE [°C] | -20...60°C |
| PERMISSIBLE DISCHARGE TEMPERATURE RANGE [°C] | 20...60°C |
| PERMISSIBLE CHARGING TEMPERATURE RANGE [°C] | 0...45°C |
| APPROX. WEIGHT [KG] | 6.9 |
| STROMER | ST7 |
| MOTOR | SYNO Drive Sport II* |
| MOTOR ASSISTANCE | up to 45 km/h |
| POWER | 940 W |
| TORQUE | 52 Nm |
| RANGE | up to 260 km |
* Depending on the country in which the pedelec is used, a driver's license and insurance/license plate may be required.
Stromer FAQ
Do you have a question about how to maintain your Stromer Speed Pedelec, or about its features or settings? Would you like some tips and tricks for looking after your Stromer and keeping it in perfect condition? Then you've come to the right place.

Stromer FAQ
Stromer OMNI app
With the Stromer OMNI app, you can always clearly see what you have done with your Stromer and when. The detailed statistics show you when and how far you have ridden with your Stromer.

Stromer OMNI app for iOS


Stromer OMNI app for Android

What's more, you can adjust the behavior of your e-bike to your needs, individually tune the assistance and keep track of your bike's service history. Thanks to the clever, integrated anti-theft protection, you can head out without worrying about your bike being stolen. You can keep an eye on the position and status of your Stromer at all times.
With the Stromer OMNI app, you and your Stromer will be inseparable. For sure.
SAFETY INSTRUCTIONS
You should only use your ST7 when you have fully read, understood and implemented the contents of both documents. Keep both documents safe and follow all instructions provided.
WARNINGS
In this manual, you will find two different warning symbols. When you see these symbols, there is always a risk that the described danger may occur. The area that the respective warning applies to is highlighted in red.
The warnings break down as follows:

This symbol warns of misuse which could result in damaging the product or the environment.

This symbol indicates possible dangers to your health and life that could arise if specific actions or appropriate care is not taken.
Documents / Resources
References
![pinion.eu]() PINION | Die Revolution der Fahrradschaltung
PINION | Die Revolution der Fahrradschaltung![pinion.eu]() PINION SERVICE | Technischer Support & Direktkontakt
PINION SERVICE | Technischer Support & Direktkontakt![itunes.apple.com]() Stromer OMNI on the App Store
Stromer OMNI on the App Store![play.google.com]() Google Play
Google Play
Download manual
Here you can download full pdf version of manual, it may contain additional safety instructions, warranty information, FCC rules, etc.
Advertisement


Need help?
Do you have a question about the ST7 and is the answer not in the manual?
Questions and answers