Advertisement
Quick Links
Advertisement

Related Manuals for Thrustmaster MFD Cougar


Summary of Contents for Thrustmaster MFD Cougar
-
Page 2: Technical Specifications
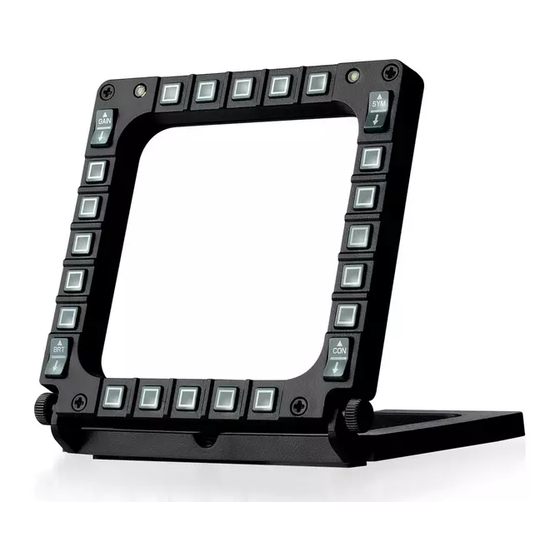
PC compatible User Manual TECHNICAL SPECIFICATIONS 1. 28 backlit programmable buttons 6. 2 attachment thumbscrews 7. USB connector 2. 2 programmable identification LEDs 3. 2 adjustable attachment rods 8. 2 removable rod attachment screws 4. Removable base 9. Rod attachment system 5. - Page 3 The THRUSTMASTER MFD COUGAR is the exact replica of the MFDs equipping U.S. Air Force F-16 fighters. Each MFD COUGAR features 20 buttons and 4 switches, i.e. 28 buttons per MFD in total! The MFD's features enable you to allocate advanced keyboard or mouse controls to the device and to emulate various flight instruments, for enhanced gaming realism.
- Page 4 ADJUSTING THE MFD'S ANGLE ON THE BASE When the MFD is attached to the base (4), its angle can be adjusted to 72, 54 or 39 degrees. The attachment device (3) is comprised of 2 rods that can be set at an angle or removed: - One long rod (featuring the indications 72DEGREE and 54DEGREE) - One short rod (featuring the indication 39DEGREE) ADJUSTING THE ANGLE TO 72 DEGREES...
- Page 5 ADJUSTING THE ANGLE TO 54 DEGREES - Place the 2 attachment rods, with the 54DEGREE indication facing down (if required, slightly loosen the centre screw to facilitate angle adjustment). - Insert the upper end of the rods in the attachment system (9) located at the back of the MFD, on the device's upper side.
- Page 6 ADJUSTING THE ANGLE TO 39 DEGREES - Loosen the centre screw, then remove all the rods. - Place the short attachment rods, with the 39DEGREE indication facing down. - Insert the upper end of the rods in the attachment system (9) located at the back of the MFD, on the device's upper side.
- Page 7 ATTACHING THE MFD TO A COCKPIT OR A SCREEN Detach the attachment rods and remove the MFD from the base by fully unscrewing the 2 attachment thumbscrews (6). Detach the removable rod (10) located at the back of the MFD, on the device's upper side, by fully unscrewing the 2 attachment screws (8) located to either side.
- Page 8 PERSONALISING THE MFD COUGARS - Insert the 2 included Plexiglas windows (11) in the relevant slot located at the top of the MFD COUGAR. - Between the 2 Plexiglas windows, insert the relevant graphic or one of the cards supplied with the pack.
- Page 9 2. Click on the DRIVERS button to launch the driver installation sequence. 3. Once the installation is finished, click Finish and restart your computer. 4. Once your computer restarts, connect the MFD COUGAR's USB connectors (7) to your PC's USB ports. Windows® automatically detects the new devices.
- Page 10 THRUSTMASTER CONTROL PANEL - Select Start/Programs/Thrustmaster MFD COUGAR/Control Panel. - The Game Controllers dialog displays the 2 MFD's default name (F16 MFD 1 and F16 MFD 2) with the status indication OK - Click on Properties to configure your MFD.
- Page 11 - Simultaneously press buttons 14 + 15 + 26 to increase reduce backlighting intensity 2 IDENTIFICATION LEDS The MFD COUGAR features 2 LEDs (2), enabling users to easily identify and recognise the relevant MFD. Unless configured otherwise, both LEDs turn on or off according to the selected MFD's name...
- Page 12 USING MORE THAN 2 MFD COUGARS SIMULTANEOUSLY Thrustmaster Control Panel can simultaneously manage up to 8 MFD COUGARs connected to one same PC. - If you are using more than 2 MFDs simultaneously (and only in this event), access the F16 MFD tab and select the relevant MFD number.
- Page 13 BUTTON CONFIGURATION AND LOCATION 12/18...
-
Page 14: Important Notes
FLIGHT SIMULATOR PLUG-IN The included plug-ins enable you to instantly configure both your MFDs for FLIGHT SIMULATOR 2004 and FLIGHT SIMULATOR X (you therefore no longer need to access the relevant game's options to manually configure each button on the MFDs). 3 profiles are available to you: * Generic Profile: This profile covers the most frequent requirements for both civil and military aircraft. - Page 15 INSTALLING THE PLUG-INS - To access the Flight Simulator 2004 plug-in, select: Start/Programs/Thrustmaster MFD Cougar/FLIGHT SIMULATOR 2004 Plug-In - To access the Flight Simulator X plug-in, select: Start/Programs/Thrustmaster MFD Cougar/FLIGHT SIMULATOR X Plug-In - After performing this operation, 3 profiles are available to you: Generic Profile / Airliner Profile / Light Aviation Profile.
- Page 16 IN OTHER GAMES The MFD COUGAR is compatible with all PC simulation games (both military and civil aviation simulators) supporting multi-USB connectivity. To configure the MFD COUGAR in your game, access the game's Controller Options, then manually allocate the required features to each of the MFD's buttons.
- Page 17 In the countries of the European Union, this corresponds to a period of two (2) years from delivery of the Thrustmaster product. In other countries, the warranty period corresponds to the time limit to bring an action for conformity...
- Page 18 Additional warranty provisions During the warranty period, Guillemot shall not provide, in principle, any spare parts, as Technical Support is the only party authorized to open and/or recondition any Thrustmaster product (with the exception of any reconditioning procedures which Technical Support may request that the consumer carry out, by way of written instructions –...
-
Page 19: Environmental Protection Recommendation
COPYRIGHT © 2015 Guillemot Corporation S.A. All rights reserved. Thrustmaster® is a registered trademark of Guillemot Corporation S.A. Windows® is a registered trademark of Microsoft Corporation in the United States and/or other countries. All other trademarks are the property of their respective owners. Illustrations not binding.
Need help?
Do you have a question about the MFD Cougar and is the answer not in the manual?
Questions and answers