Advertisement
Box Contents
- Orbit
- Mini-USB Cable
- Wireless USB Receiver
- User Guide
- Safety & Warranty Manual
Product Registration and Support
Take a minute to register your Orbit at www.numark.com. Registering it ensures that we can keep you updated with any new product developments and provide you with world-class technical support if you have any issues.
Also, visit www.numark.com/orbit for the latest information about Orbit, including free software, pre-made control mappings, a mapping editor, tutorial videos, and more.
For additional product support, visit www.numark.com/support.
Quickstart
- Visit www.numark.com/orbit to download free software or a control map for your existing software. The control map specifies which software commands Orbit will operate. You can also download the Orbit Editor, which lets you change what messages Orbit sends to your software.
- Install and open the software you downloaded, or open your own MIDI-controllable software.
- Connect the wireless USB receiver to your computer.
- Power Orbit on (using the power switch on its underside).
- If necessary, check your software's Preferences or Settings, select Orbit as the hardware controller or device, and import the Orbit control map file into your software.
- Step away from the computer — start using Orbit!

- A battery's charge can deplete gradually even when it is not being used. If Orbit's charge does not last for long during its first use, charge it fully for 3 hours (see the Charging and Power Usage section of this manual for more information).
- To ensure the best possible wireless reception and performance, see the Tips for Optimal Performance section later in this manual.
Features
All of Orbit's controls are MIDI-mappable, so they can control any MIDI-assignable command in your software, giving you countless performance possibilities. Below are descriptions of the controls' general behavior. To download pre-made control mappings for your software — and an editor to create your own mappings — visit www.numark.com/orbit.

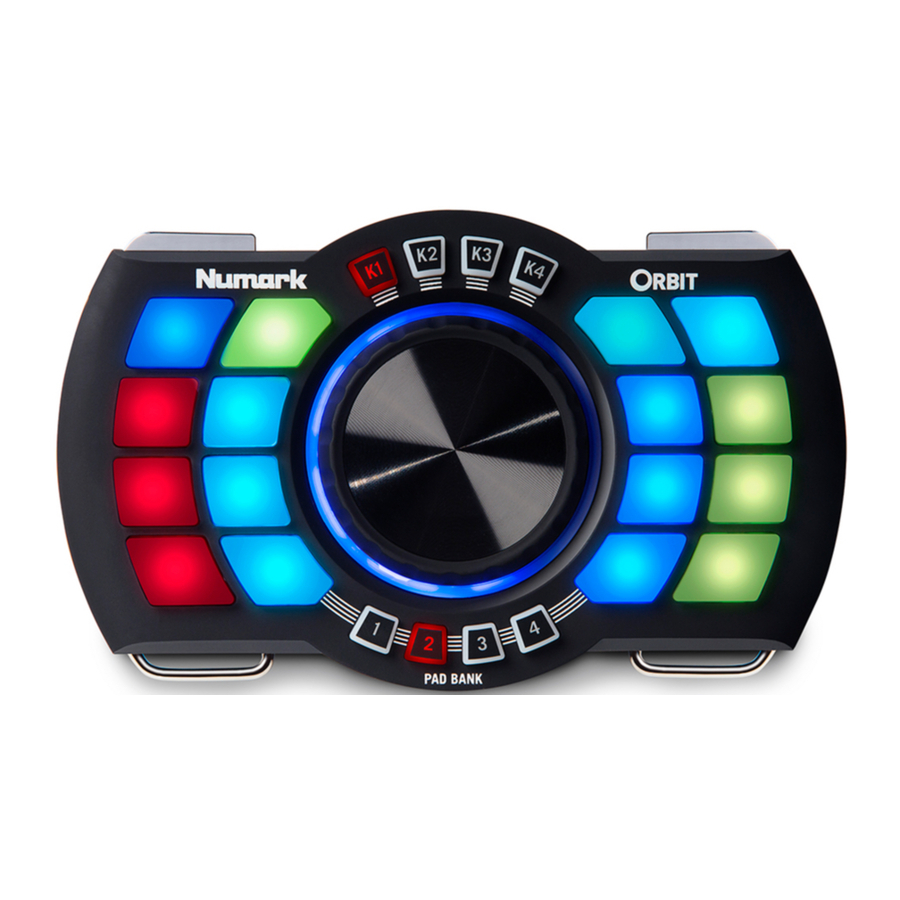
- Pads: These 16 multicolor pads control various software commands as assigned in the MIDI mapping. Switch between the 4 banks (of 16 pads each) with the Pad Bank Selectors.
You can assign different colors to these pads, as well. For more information, see the Color Customization section of this manual.
Note: The pads labeled "a," "b," and "c" in the above diagram are used for customizing the colors of Orbit's pad lights and for pairing Orbit to the wireless USB receiver. See the Color Customization and Wireless Usage sections of this manual for more information. - Pad Bank Selectors (1, 2, 3, 4): Use these buttons to switch between the 4 banks of Pads. The current Pad Bank Selector will light up.
The current Pad Bank Selector will flash to indicate Orbit's battery is low. When this happens, connect Orbit's mini-USB port to your computer with a mini-USB cable. - Virtual Knob: This wheel adjusts various software features as assigned in the MIDI mapping. Switch between the 4 functions with the Virtual Knob Selectors.
- Virtual Knob Selectors (K1, K2, K3, K4): Use these buttons to switch between the 4 functions of the Virtual Knobs:
- K1, K2, and K3: The Virtual Knob acts as a 270° knob — ideal for mapping to knobs controlling filters, EQs, effects parameters, etc.).
- K4: The Virtual Knob acts as a 360° encoder for scrolling through your music library or acting as a virtual platter (so you can search through the current track, scratch, or pitch-bend).
- Shoulder Buttons: Hold down either or both of these buttons to activate Orbit's accelerometer, and then tilt Orbit to affect it. The left shoulder button activates the accelerometer on the left-right axis. The right shoulder button activates the accelerometer on the forward-back axis. The Pad LEDs will "stream" in the directions it detects, and the streams will get faster as the tilt increases.
Tip: You can "latch" a shoulder button in the "on" position by double-pressing it. Return it to its default "momentary" behavior by pressing it once. - Hooks: Attach a lanyard to these hooks to hang Orbit from your neck.
- Strap Attachment: Unscrew the strap attachment and loop Orbit over an armband or belt, and then retighten the strap attachment.
- Charging LED: This light will turn on when Orbit's internal lithium-ion battery is charging and turn off when it is fully charged. See the Charging and Power Usage section of this manual for more information about charging Orbit.
- Mini-USB Port: Use the mini-USB cable to connect this port to a USB port on your computer. This connection charges Orbit's internal lithium-ion battery (whether Orbit is powered on or not). It also allows you to use Orbit "wired" instead of wirelessly.
- Power Switch: Flip this switch to power Orbit on or off.
Charging and Power Usage
On a fully charged battery, you can use Orbit for approximately 8 hours. The 4 Pad Bank Selectors will flash when Orbit's battery is low and needs to be charged.
To check Orbit's battery level, hold down Virtual Knob Selector K1. The 4 Pad Bank Selectors will light up to indicate how much battery power is remaining (when all 4 Pad Bank Selectors are lit, Orbit has a full battery). Release Virtual Knob Selector K1 and wait a few seconds for Orbit to return to normal operation.
To charge Orbit, use the included mini-USB cable to connect it to (A) your computer's USB port (with the computer powered on) or (B) a standard USB power adapter connected to a power source. (You can still use Orbit even while it is charging.) Orbit's Charging LED will light up when it is charging and turn off when it is fully charged. It takes approximately 3 hours to charge Orbit's battery fully.
Any battery's charge can deplete gradually even when it is not being used. If Orbit's charge does not last for long during its first use or after a long period of disuse, charge it fully!
Orbit's Power-Save Mode will activate after 3 minutes of inactivity — Orbit will "go to sleep" to preserve its battery charge. Move Orbit again to "wake it up."
Color Customization
You can select the color of the light for each pad in each bank, allowing you to color-code your pads or banks to distinguish between their different functions in your software.
Orbit's memory is non-volatile, which means it will retain your color settings even after you power Orbit off.
To select a color for a pad:
- Press and hold down any Pad Bank Selector for 3 seconds, and then press either shoulder button. The Virtual Knob Selectors will flash to indicate Orbit is in Color Selection Mode (and is not currently controlling the software). Release all buttons.
- Use the Pad Bank Selectors to select a bank, and then press the pad whose color you want to select. (You can select multiple pads simultaneously. Press a selected pad to deselect it.)
- Use the shoulder buttons to cycle through the different available colors, which will be shown in the selected pads.
- Press and hold down any Pad Bank Selector, and then press either shoulder button. The Virtual Knob Selectors will stop flashing, and Orbit's new pad color settings will be saved.
To clear/reset all colors for the pads:
- Make sure Orbit is off.
- Press and hold down Pad Bank Selectors 1 and 4, and then power Orbit on.
- Press the upper-left-most pad (the pad labeled "a" in the diagram on the previous page). The pad light colors will be reset to their factory defaults.
Wireless Usage
You can use Orbit as a "wired" controller by connecting it to your computer's USB port with the mini-USB cable. To take advantage of its wireless possibilities, though, please read this section.
Pairing Orbit to the Wireless USB Receiver
If the wireless USB receiver's light is off even when it is connected to your computer, follow these steps:
- Make sure Orbit is off and the wireless USB receiver is not connected to a computer.
- Press and hold down Pad Bank Selectors 1 and 4, and then power Orbit on.
- Press the lower-right-most pad (the pad labeled "b" in the diagram on the previous page). Virtual Knob Selector K1 will flash.
- Connect the wireless USB receiver to your computer within 10 seconds. Virtual Knob Selector K2 will flash.
- Press the pad above the lower-right-most pad (the pad labeled "c" in the diagram on the previous page). The Virtual Knob Selectors (K1, K2, K3, and K4) will flash once to indicate Orbit is paired to the wireless USB receiver.
Wireless vs. Wired Performance
To change from wireless performance to "wired":
- Disconnect the wireless USB receiver from your computer. (You can do this without closing your software or powering Orbit off.)
- Use the included mini-USB cable to connect Orbit to your computer. Orbit can now control your software.
To change from "wired" performance to wireless:
- Disconnect Orbit from your computer. (You can do this without closing your software or powering Orbit off.)
- Power Orbit off.
- Connect the wireless USB receiver to an available USB port on your computer.
- Power Orbit on. Orbit can now wirelessly control your software.
Tips for Optimal Performance
- The typical signal range is approximately 100 feet (30 meters) with a clear line of sight. If you experience signal interference, move Orbit closer to your computer and/or remove any obstacles between them (walls, furniture, etc.).
- Turn off your computer's Wi-Fi.
- If possible, turn off any unnecessary 2.4 GHz devices in the nearby vicinity (e.g., other WiFi devices, baby monitors, Wi-Fi access points, microwave ovens, etc.).
- Wireless MIDI can cause some latency. Usually, it is barely detectable, but if you want, you can reduce it by using Orbit closer to your computer and maintaining a clear line of sight between them. If your software lets you adjust the buffer size, reducing it can also reduce latency, but make sure to keep your buffer size high enough to prevent audio glitches.
Documents / Resources
References
Download manual
Here you can download full pdf version of manual, it may contain additional safety instructions, warranty information, FCC rules, etc.
Advertisement


Need help?
Do you have a question about the Orbit and is the answer not in the manual?
Questions and answers