Advertisement
BOX CONTENTS
- DJ2GO
- USB cable
- Software CD
REGISTRATION
Please go to http://www.numark.com to register your DJ2GO. Registering your product ensures that we can keep you up-to-date with any new product developments and provide you with world-class technical support, should you run into any problems.
SETUP
PC
Before you can begin using DJ2GO with your computer, you must install the included Virtual DJ LE software:
- Please insert the included installation disc into your computer's CD-ROM drive.
- Open the CD to view its contents.
- Open the folder titled "PC."
- Double-click "Setup.exe."
- Select your preferred language and when done press "OK."
- Read the information screen then press "Next."
- Read the User Agreement, select "I accept the agreement," then click "Next."
- You will be asked to choose a location to install. (We recommend using the default location for most users.) Once you have selected the location, click "Next."
- The installation procedure will begin. Follow the on-screen instructions.
- Once the installation is complete, click "Finish."
To start using DJ2GO:
- Connect DJ2GO to an available USB port on your computer. (If possible, use a USB port on the rear panel of your computer.)
- Open Virtual DJ LE by double-clicking the icon on your computer's Desktop (if you created a Desktop shortcut) or by going to Start
![]() All Programs
All Programs ![]() Virtual DJ.
Virtual DJ.
 All Programs
 For more information on how to use Virtual DJ, see the manual on the CD, located in the "Manual" folder.
MAC
Before you can begin using DJ2GO with your computer, you must install the included Virtual DJ LE software:
- Please insert the included installation disc into your computer's CD-ROM drive.
- Open the CD to view its contents.
- Open the folder titled "Mac."
- Double-click "Setup.mpkg."
- Once you see the installer welcome screen, click "Continue."
- Read the User Agreement, select "I accept the agreement," then click "Continue," then "Agree."
- You will be asked to choose a location to install. By default, your hard disk will be selected. (We recommend using this for most users.) Once you have selected the location, click "Install" to begin the installation.
- Enter your password and click "OK."
- Once the installation is complete, click "Close."
To start using DJ2GO:
- Connect DJ2GO to an available USB port on your computer. (If possible, use a USB port on the rear panel of your computer.)
- Open Virtual DJ LE by going to Applications
![]() Virtual DJ LE.
Virtual DJ LE.
For more information on how to use Virtual DJ, see the manual on the CD, located in the "Manual" folder.
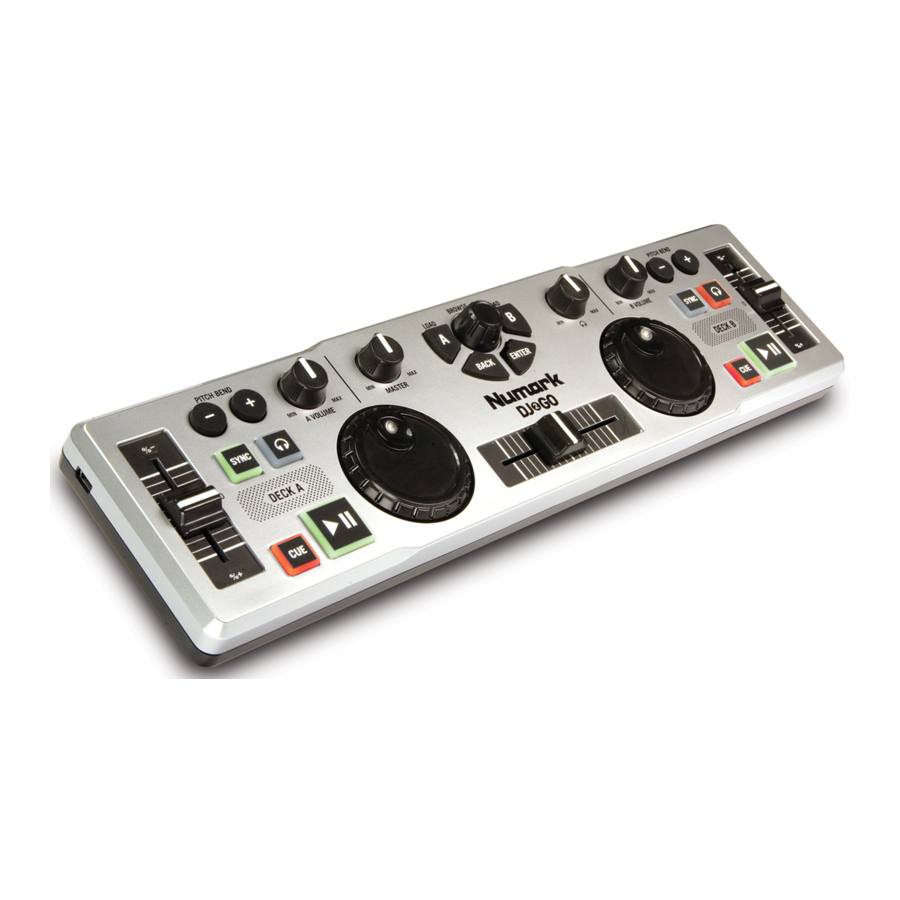
FEATURES

- Mini-USB PORT – Plug a standard mini-USB cable into this port and into the USB port of your computer. The computer's USB port will provide power to DJ2GO. DJ2GO is class-compliant, so it is "plug-and-play" – no separate driver installation is necessary.
- PFL – Sends pre-fader audio to the Cue Channel for monitoring.
- CUE GAIN – Adjusts the audio level of the Cue channel.
- MASTER VOLUME – Adjusts the output volume of the Program mix.
- BROWSE KNOB – Turn this knob to scroll through lists of tracks and directories in the software.
- BACK – This button will take you back to the previous level (folder).
- ENTER – When a directory is selected, press the knob to enter it. (Press BACK to move up to the previous level.)
- LOAD A / LOAD B – Press one of these buttons while a track is selected to assign it to Deck A or Deck B, respectively.
- CHANNEL VOLUME – Adjusts the audio level on the corresponding channel.
- CROSSFADER – Blends audio playing between Decks A and B. Sliding this to the left plays Deck A and sliding to the right plays Deck B.
- JOG WHEEL – When the deck is playing, the JOG WHEEL will bend the track's pitch. When the deck is not playing, rotating the JOG WHEEL will scan through the track.
- PLAY / PAUSE – Starts or resumes playback if the Deck is paused. Pauses playback if the Deck is playing.
- CUE – The CUE button will return and pause the track at the last set cue point. For temporary play of the cue point, you can hold down the CUE button. The track will play for as long as the button is held down and will return to the cue point once it has been released.
You can hold down CUE and PLAY / PAUSE simultaneously to start playback from the cue point. Release both buttons to allow playback to continue. - SYNC – Automatically matches the corresponding Deck's tempo with the other Deck's tempo.
- PITCH FADER – Controls the track's playback speed.
- PITCH BEND ( + / – ) – Press or hold down either of these buttons to temporarily adjust the track's playback speed. When released, the track playback will return to the speed designated by the PITCH FADER.
Documents / Resources
References
Download manual
Here you can download full pdf version of manual, it may contain additional safety instructions, warranty information, FCC rules, etc.
Advertisement


Need help?
Do you have a question about the DJ 2 Go and is the answer not in the manual?
Questions and answers