Advertisement
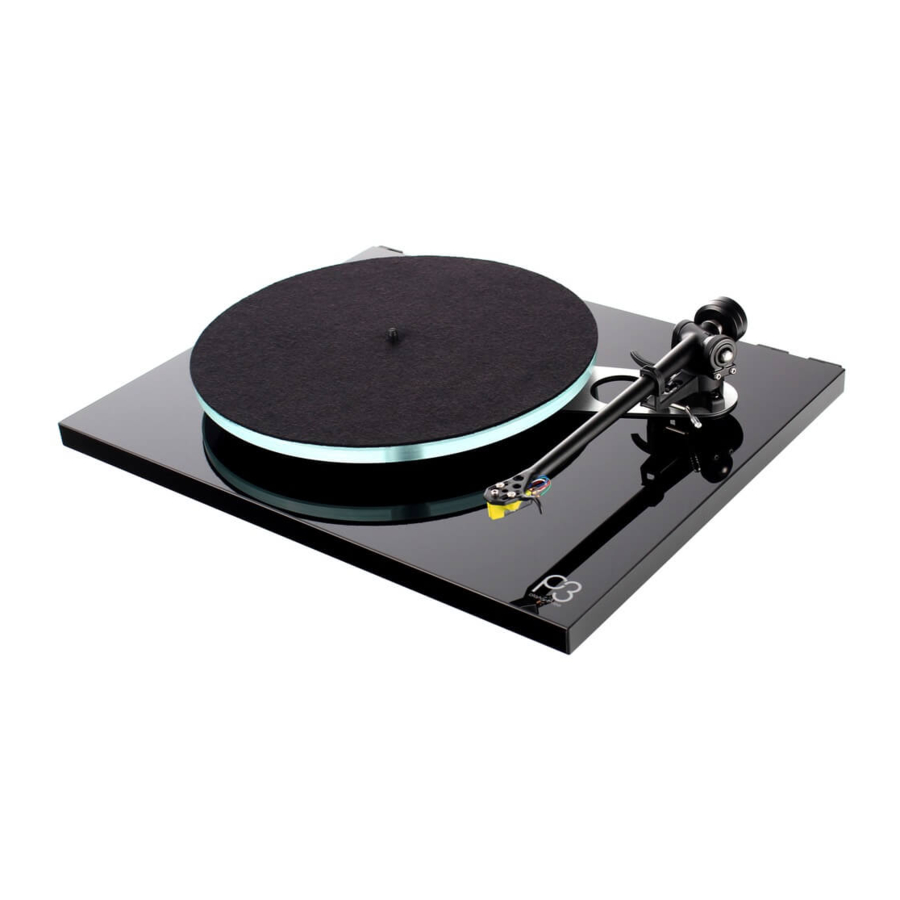
Parts and Features
 Please follow this quick set up guide to ensure optimum performance and perfect operation.Failure to do so may invalidate your warranty.
For more information on this product please visit www.rega.co.uk

- Platter
- Drive belt & pulley
- Tonearm
- Balance weight
- Plinth
- Power input
- Phono output
- Finger lift
- On/Off switch
(underneath plinth)
Unpacking and setting up the Planar 3
- Always keep the turntable flat.
- Follow the unpacking guide printed inside the front of the box.
- Save the packaging in case you need to transport your turntable in the future.
- Place the turntable on a rigid level surface.*
- Ensure the drive belt is in place and remove the transport hub card from beneath the sub platter.
- Carefully place the glass platter on the hub and fit the turntable mat.
* The Rega turntable wall bracket is the ideal solution.
Manual speed change
You can change playing speed by simply removing the glass platter and moving the belt between either the 33 ⅓rpm or 45rpm wheel of the drive pulley.

Cartridge alignment protractor
- Place quick start guide over record spindle.
- Place needle gently on cross.
- Move cartridge in headshell until the cartridge and headshell are parallel with the printed lines.
- Ensure cartridge is squarely fitted in headshell and then evenly tighten hardware.


Connection to the amplifier
The tonearm external phono leads must be connected to a suitable phono stage.
Connect as follows:
Red=right channel
Black=left channel.
Depending on the type of cartridge you have chosen, you will require the appropriate moving magnet MM or moving coil MC stage. If your amplifier does not have an integrated phono stage you will require an external stage (sold separately).
Cartridge mounting and setting up the RB330 tonearm
Firstly, ensure the cartridge fixings are orientated correctly according to the cartridge makers specification. Use the cartridge alignment protractor to accurately calibrate the position of the cartridge. Ensure that the tracking force dial (A) and bias adjustment slider (B) are both set to zero. Place the balance weight (C) on to the balance weight shaft. With the stylus guard removed, position the cartridge above the lead-in groove of an LP. Whilst supporting the headshell, carefully push the weight further up the shaft until the stylus is "floating" just 1mm clear of the record.

The recommended tracking force can now be applied using the tracking force dial. Always use a force which corresponds to the upper limit of the cartridge makers recommended range. Finally, push the bias adjustment slider to the same number as the tracking force control.
Documents / Resources
References
Download manual
Here you can download full pdf version of manual, it may contain additional safety instructions, warranty information, FCC rules, etc.
Advertisement


Need help?
Do you have a question about the Planar 3 and is the answer not in the manual?
Questions and answers