Table of Contents
Advertisement
Advertisement
Table of Contents

Related Manuals for Rega RP10


Summary of Contents for Rega RP10
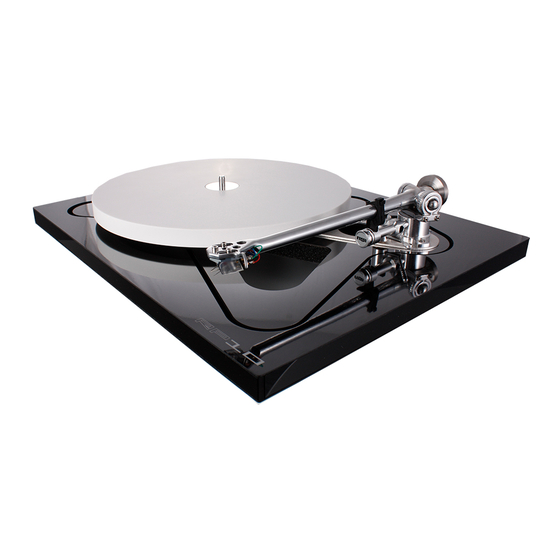
- Page 1 RP10 English Manual Cover_Cursa manual.qxd 17/12/2013 15:21 Page 2 Turntable...
- Page 2 RP10 English Manual Text_Apollo English manual.qxd 17/12/2013 15:28 Page 1...
-
Page 3: Table Of Contents
RP10 English Manual Text_Apollo English manual.qxd 17/12/2013 15:28 Page 2 CONTENTS INTRODUCTION / EVOLUTION OF REVOLUTION TURNTABLE DESIGN & MYTHOLOGY DESIGN AND INNOVATION SETTING UP YOUR RB2000 SETTING UP YOUR TURNTABLE CONNECTING THE CUSTOM POWER SUPPLY POWER SUPPLY FRONT PANEL CONTROLS... -
Page 4: Introduction / Evolution Of Revolution
Rega is no exception to evolution. Rega’s experience and previous achievements allows us to continually develop and produce better products. The RP8 & RP10 represents probably the biggest step forward in the evolution of Roy Gandy’s turntable design philosophies. Low mass, high rigidity plinths combined with electronically controlled low vibration motors, high flywheel effect platters and lower mass, higher stability tonearms. -
Page 5: Turntable Design & Mythology
They believe that by taking one theory to its extreme, the design will become “perfect”. The reality of all engineering, design (and life) is that perfection is not possible. Based on this reality, Rega’s goal has always been to optimise a mixture of numerous “correct compromises” thus bringing the designer nearer to the... -
Page 6: Design And Innovation
This material has been developed exclusively for Rega over a three year period. The RP10 plinth is seven times lighter than the weight of the original Planar 3 plinth. In addition Rega has added even more stiffness in the crucial... - Page 7 The RP10 takes our double brace technology to the next level. Not content with an unprecedented stiffness to mass ratio, Rega has obsessively reduced any resonant properties by using two different materials for the new stressed beam. The top layer is magnesium and the bottom layer is phenolic (two of the lightest and stiffest materials available).
- Page 8 The motor is a high specification, 24V twin phase synchronous unit. It is controlled by Rega's unique and innovative RP10-PSU power supply. The motor drives the CNC machined pulley, sub platter and hub-bearing assembly via the twin belt drive. Each motor is individually hand tuned to its own custom power supply in the factory to minimise vibration, motor noise and ensure optimum performance.
- Page 9 The RB2000 tonearm is packed with new features pushing the boundaries of tonearm design. As with all Rega tonearms, each one is meticulously hand built by a team of highly skilled technicians. The RB2000 uses improved bearings with each one being hand selected to be an interference fit with the paired spindle matching both the inside and outside diameters.
-
Page 10: Setting Up Your Rb2000
IMPORTANT: ALWAYS REMOVE THE CERAMIC PLATTER BEFORE LIFTING OR RELOCATING THE RP10 Always remove the ceramic platter before locating the RP10 central plinth into the outer frame or when lifting the whole turntable to relocate it. The ‘o’ rings will not centralise the plinth within the frame if the weight of the platter is present. -
Page 11: Setting Up Your Turntable
SETTING UP AND POSITIONING YOUR RP10 TURNTABLE. Always take great care when unpacking the turntable. Extra care must be taken if your RP10 is supplied with a cartridge factory fitted so as not to damage the stylus. Place the turntable on a sound and level surface. -
Page 12: Connecting The Custom Power Supply
Push the power button on the front panel to turn the RP10 PSU on - When the power supply is switched on, the Rega logo will illuminate RED, Press the 33rpm button to activate 33rpm or 45rpm to activate 45rpm from the front panel. -
Page 13: Power Supply Front Panel Controls
RP10 English Manual Text_Apollo English manual.qxd 17/12/2013 15:28 Page 12 POWER SUPPLY FRONT PANEL CONTROLS Rega logo Power button Select 33 Select 45 REAR PANEL CONNECTIONS XLR connection Factory set adjustments Turntable power from turntable DO NOT ADJUST connection... -
Page 14: Care Of The Turntable
CARE OF YOUR TURNTABLE Mount the turntable on a rigid, level surface. Avoid mounting on hollow or heavy cabinets or anything mounted on a flexible wooden floor. The Rega turntable support is the ideal solution fitted with RP10 adaptor cups. -
Page 15: Transporting Your Turntable
NEVER place your RP10 upside-down or on its side. This would allow oil in the hub/bearing assembly to leak and cause speed and/or wear problems. If you have to... -
Page 16: Owners Log
RP10 English Manual Text_Apollo English manual.qxd 17/12/2013 15:28 Page 15 OWNERS LOG Owner............................... Date................................Where Purchased..........................Owner............................... Date................................Where Purchased..........................Owner............................... Date................................Where Purchased..........................Owner............................... Date................................Where Purchased..........................Owner............................... Date................................Where Purchased.......................... - Page 17 RP10 English Manual Text_Apollo English manual.qxd 17/12/2013 15:28 Page 16...
- Page 18 RP10 English Manual Text_Apollo English manual.qxd 17/12/2013 15:28 Page 1...
- Page 19 RP10 English Manual Text_Apollo English manual.qxd 17/12/2013 15:28 Page 1...
- Page 20 RP10 English Manual Cover_Cursa manual.qxd 17/12/2013 15:21 Page 1 Rega Research Ltd, exceptional Hi-Fi designed and made in ENGLAND.
Need help?
Do you have a question about the RP10 and is the answer not in the manual?
Questions and answers