
Related Manuals for A&D PREMIUM UA-767FAM Series


Summary of Contents for A&D PREMIUM UA-767FAM Series
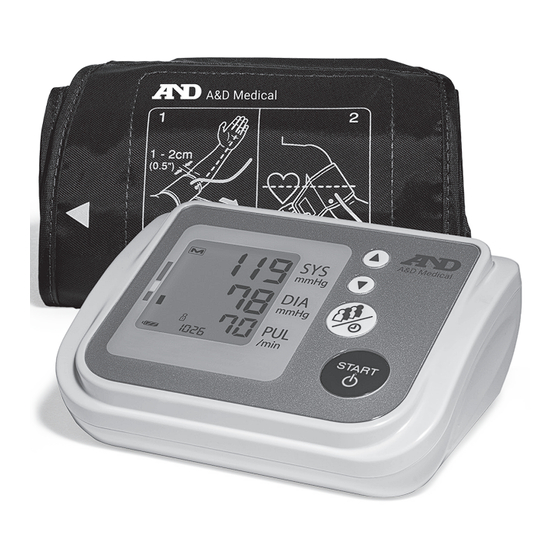
- Page 1 PREMIUM MULTI-USER BLOOD PRESSURE MONITOR UPPER ARM UA-767FAM Series Instruction Manual...
-
Page 2: Intended Use
Greetings Congratulations on purchasing a state-of-the-art A&D blood pressure monitor. Designed for ease of use and accuracy, this monitor will facilitate your daily blood pressure regimen. We recommend that you read through this manual carefully before using the monitor for the first time. - Page 3 Precautions • To measure blood pressure, the arm must be squeezed by the cuff hard enough to temporarily stop blood flow through the artery. This may cause pain, numbness or a temporary red mark to the arm. This condition will appear especially when measurement is repeated successively.
- Page 4 Precautions • There are small parts that may cause a choking hazard if swallowed by mistake by infants. • Unplug the AC adapter when not in use during the measurement. • Use of accessories not detailed in this manual may compromise safety. •...
-
Page 5: Table Of Contents
Contents Parts Identification Symbols Using the Monitor E-10 Taking your Blood Pressure E-17 Memory E-19 What is an Irregular Heartbeat E-21 Pressure Bar Indicator E-22 AHA Classification E-22 About Blood Pressure E-23 Troubleshooting E-25 Maintenance E-26 Technical Data E-26 Warranty E-31... -
Page 6: Parts Identification
Parts Identification Button Button SET Button AC adapter plug DC Jack Air Connector Plug START Button Air Socket Display Air Hose Proper Fit Range Artery Position Mark Index Mark Arm Cuff Battery Compartment Battery Cover 1.5V Batteries (R6P, LR6 or AA) Display Average MEMORY... -
Page 7: Symbols
Symbols Symbols that appear on the display Symbols Function/Meaning Recommended Action Appears while measurement Measurement is in progress. is in progress. It blinks when Remain as still as possible. the pulse is detected. Irregular Heartbeat symbol (IHB) appears when an irregular heartbeat is detected. - Page 8 Symbols Symbols Function/Meaning Recommended Action Unstable blood pressure Take another measurement. due to movement during Remain very still during measurement. measurement. The systolic and diastolic values are within 10 mmHg of each other. The pressure value did not increase during the inflation. Apply the cuff correctly, and try the measurement again.
- Page 9 Symbols Symbols that are printed on the device case Symbols Function/Meaning Standby and Turn the device on. Systolic blood pressure in mmHg Diastolic blood pressure in mmHg PUL/min Pulse per minute Battery installation guide R6(LR6,AA) Direct current Type BF: Device, cuff and tubing are designed to provide special protection against electrical shocks.
-
Page 10: Using The Monitor
Using the Monitor Installing/Changing the Batteries 1. Remove the battery cover. 2. Remove the used batteries and Step Step insert new batteries into the battery compartment as shown, taking care that the polarities Step (+ and -) are correct. Use only R6P, LR6 or AA batteries. -
Page 11: Connecting The Air Hose
Using the Monitor Connecting the Air Hose Air socket Insert the air connector plug into the air socket firmly. Connecting the AC Adapter Air connector plug Insert the AC adapter plug into the DC jack. Next, connect the AC adapter to an electrical outlet. -
Page 12: Adjusting The Built-In Clock
Using the Monitor Adjusting the Built-in Clock Adjust the clock prior to use. 1. Press and hold the SET button until Press and hold the year starts blinking. Year 2. Select the year using the button. Press the SET button to set the current year and move to month/ day selection. - Page 13 Using the Monitor Selecting the Correct Cuff Size Using the correct cuff size is important for an accurate reading. If the cuff is not the proper size, the reading may yield an incorrect blood pressure value. • The arm size is printed on each cuff. •...
- Page 14 Using the Monitor Symbols that are printed on the cuff Symbols Function/Meaning Recommended Action Set the l mark on the artery of the upper arm or in line Artery position mark with the ring finger on the inside of the arm. Index ––––––––––––...
-
Page 15: Applying The Arm Cuff
Using the Monitor Applying the Arm Cuff 1. Insert arm (preferably the left arm) into cuff as shown in the figure to the right. 2. Wrap the cuff around the upper arm, about 0.5" (1-2 cm) above the inside of the elbow, as shown in the figure to the right. - Page 16 Using the Monitor Removing the arm cuff 1. Wait for the cuff to deflate 2. Unfasten the Velcro 3. Remove the cuff E-16...
-
Page 17: Taking Your Blood Pressure
Taking your Blood Pressure This blood pressure monitor is designed to detect the pulse and to inflate the cuff to a systolic pressure level automatically. Tips for Taking Blood Pressure Before Your Measurement: • For 30 minutes prior to taking your blood pressure »... -
Page 18: Normal Measurement
Taking your Blood Pressure Normal Measurement 1. Press the SET button to select a user At heart level from 1 to 4. Press START All of the display 2. Place the cuff on the arm (preferably segments displayed the left arm). Sit quietly during measurement. -
Page 19: Measurement With The Desired Systolic Pressure
Taking your Blood Pressure Measurement with the Desired Systolic Pressure This blood pressure monitor is designed to detect the pulse and to inflate the cuff to a systolic pressure level automatically. Use this method when re-inflation occurs repeatedly or when the results are not displayed even if the pressure decreases to 20 mmHg or less. - Page 20 Memory Three seconds after the data number display, the measurement data is displayed. Last data (No.1) Three seconds after the data number display, the measurement data is displayed. 3. After the last data is displayed, press the button to return the average display of all measurements.
-
Page 21: What Is An Irregular Heartbeat
What is an Irregular Heartbeat An irregular heartbeat is defined as a hearbeat that varies from the average of all heartbeats. When the monitor detects an irregular rhythm during the measurements, the IHB indicator will appear on the display with the measurement values. -
Page 22: Pressure Bar Indicator
Pressure Bar Indicator The indicator monitors the progress of pressure during measurement. Releasing Air Pressurizing Inflation in progress Measurement in progress Inflation complete AHA Classification Each segment of the bar indicator corresponds to the AHA blood pressure classification. Example Hypertension Hypertension Elevated Stage 2... -
Page 23: About Blood Pressure
AHA Classification AHA Classification Table – for adults within the U.S BP Classification Systolic (mmHg) Diastolic (mmHg) Normal less than 120 less than 80 Elevated 120-129 less than 80 Stage 1 Hypertension 130-139 80-89 Stage 2 Hypertension more than 140 more than 90 Hypertensive Crisis more than 180... -
Page 24: Blood Pressure Variations
About Blood Pressure outside influences on blood pressure readings, supplements the doctor’s readings and provides a more accurate, complete blood pressure history. Blood Pressure Variations An individual’s blood pressure varies greatly on a daily and seasonal basis. It may vary by 30 to 50 mmHg due to various conditions during the day. -
Page 25: Troubleshooting
Troubleshooting Problem Probable cause Corrective action Nothing Battery is drained. Replace all batteries with new appears on ones. the display, Battery terminals are not Reinstall the batteries with even when in the correct position. negative and positive terminals the power is matching those indicated on turned on. -
Page 26: Maintenance
Maintenance Do not open the device. It uses delicate electrical components and an intricate air unit that could be damaged. If you cannot fix the problem using the troubleshooting instructions, contact the authorized dealer in your area or our customer service department. A&D customer service will provide technical information, spare parts and units to authorized dealer. -
Page 27: Specification
Technical Data Dimensions Approx. 140 mm (5.5”) [W] x 60 mm (2.3”) [H] x 105 mm (4.1”) [D] Weight Approx. 9.0 oz. (255 g), excluding the batteries Ingress protection Device: IP20 Applied part Cuff Type BF Useful life Device: 5 years (when used six times a day) Cuff: 2 years (when used six times a day) AC Adapter: 5 years (when used six times a day) - Page 28 Technical Data EMD Technical Data Battery-operated or AC Adapter-operated Blood Pressure Monitor Medical Electrical Equipment needs special precautions regarding EMD and needs to be installed and put into service according to the EMD information provided in the following. Portable and mobile RF communication equipment (e.g. cell phones) can affect Medical Electrical Equipment.
- Page 29 Technical Data Table 3 -Continued Phenomenon IMMUNITY TEST LEVELS 0 % U ; 0.5 cycle At 0°, 45°, 90°, 135°, 180°, 225°, 270°, and 315° Voltage dips IEC 61000-4-11 0 % U ; 1 cycle and 70 % U ; 25/30 cycle Single phase: at 0°...
- Page 30 Technical Data Table 4 -Continued Test Band IMMUNITY TEST LEVEL frequency Service Modulation (MHz) (V/m) (MHz) 5240 5100 - WLAN 802.11 Pulse modulation 5500 5800 217 Hz 5785 Table 5 - Test specifications for ENCLOSURE PORT IMMUNITY to proximity magnetic fields- Test frequency Modulation IMMUNITY TEST LEVEL(V/m)
-
Page 31: Warranty
Warranty LIMITED WARRANTY A&D Medical For purchasers within the US only: Product Consumer Warranty Term Monitor 5 year Cuff 2 year For outside of US, please contact local distributor or dealer. Limited Warranty: A&D Medical (“A&D”) warrants to the first purchaser (“You”) that the A&D product You purchased (the “Product”) will be free from defects in material, workmanship and design for the applicable Warranty Term stated above from the date You purchased the Product under normal use. - Page 32 Warranty THIS LIMITED WARRANTY IS THE ONLY WARRANTY PROVIDED BY A&D; THERE ARE NO OTHER EXPRESS WARRANTIES. If A&D cannot reasonably repair or replace the Product, A&D will refund the amount You paid for the Product (not including taxes), less a reasonable charge for usage.
- Page 33 B L O O D P R E S S U R E R E C O R D R E G I S T R O D E L A P R E S I Ó N A R T E R I A L Nombre/Nom: Edad/Âge: Peso/Poids:...
- Page 34 B L O O D P R E S S U R E R E C O R D R E G I S T R O D E L A P R E S I Ó N A R T E R I A L Nombre/Nom: Edad/Âge: Peso/Poids:...
- Page 35 PREMIUM TENSIOMÈTRE MULTI-UTILISATEURS BRAS Série UA-767FAM Manuel d’instructions...
-
Page 36: Utilisation Prévue
Mot d’accueil Nous vous remercions de votre achat d’un tensiomètre A&D à la fine pointe de la technologie. Conçu pour être facile à utiliser et précis, ce tensiomètre facilitera votre protocole quotidien de mesure de tension artérielle. Nous vous recommandons de lire attentivement ce manuel avant d’utiliser le tensiomètre pour la première fois. - Page 37 Précautions • Ne pas modifier le tensiomètre. Cela pourrait provoquer des accidents ou endommager le tensiomètre. • Pour mesurer la tension artérielle, le bras doit être suffisamment serré par le brassard pour arrêter temporairement la circulation sanguine dans l’artère. Cela peut causer de la douleur, un engourdissement ou une marque rouge temporaire sur le bras.
- Page 38 Précautions • Les appareils de communication sans fil, comme les dispositifs de réseau résidentiels, les téléphones mobiles, les téléphones sans fil et leurs stations de base, ainsi que les émetteurs-récepteurs portatifs peuvent avoir une incidence sur ce tensiomètre. Par conséquent, une distance minimale de 30 cm (12 po) doit être maintenue avec ces appareils.
- Page 39 Table des matières Identification des pièces Symboles Utilisation du tensiomètre F-10 Prise de votre tension artérielle F-17 Mémoire F-19 Qu’est-ce qu’un pouls irrégulier? F-21 Barre indicatrice de tension F-22 Classification AHA F-22 À propos de la tension artérielle F-23 Dépannage F-25 Entretien F-26...
-
Page 40: Identification Des Pièces
Identification des pièces Bouton Bouton Bouton Bouton de RÉGLAGE Bouton Fiche de l’adaptateur CA Bouton de RÉGLAGE Prise jack CC Fiche du connecteur d’air Fiche de l’adaptateur CA Bouton START Prise jack CC Prise d’air Fiche du connecteur d’air Écran Bouton START Prise d’air Écran... -
Page 41: Symboles
Symboles Symboles apparaissant à l’écran Symboles Fonction/signification Mesure recommandée S’affiche lorsque la mesure La mesure est en cours. Rester le est en cours. Il clignote plus immobile possible. lorsque le pouls est détecté. Le symbole de pouls irrégulier (PI) apparaît lorsqu’un pouls irrégulier est détecté. - Page 42 Symboles Symboles Fonction/signification Mesure recommandée Tension artérielle instable Prendre une autre mesure. Rester en raison d’un mouvement le plus immobile possible pendant pendant la mesure. la mesure. Les valeurs de tension systolique et diastolique sont comprises dans un intervalle de 10 mmHg. La valeur de la pression n’a pas augmenté...
- Page 43 Symboles Symboles imprimés sur le boîtier de l’appareil Symboles Fonction/signification Mise en veille et mise sous tension de l’appareil. Tension systolique en mmHg Tension diastolique en mmHg PUL/min Pouls par minute Guide d’installation des piles R6 (LR6, AA) Courant continu Type BF : L’appareil, le brassard et le tuyau sont conçus pour fournir une protection particulière contre les décharges électriques.
-
Page 44: Utilisation Du Tensiomètre
Utilisation du tensiomètre Installation/remplacement des piles 1. Retirer le couvercle du compartiment à piles. 2. Retirer les piles déchargées et Étape 3 Étape 1 insérer de nouvelles piles dans le compartiment comme indiqué, en prenant soin de respecter Étape 2 la polarité... - Page 45 Utilisation du tensiomètre Raccordement du tuyau d’air Prise d’air Insérer fermement la fiche du connecteur d’air dans la prise d’air. Connexion de l’adaptateur CA Fiche du connecteur d’air Insérer la fiche de l’adaptateur CA dans la prise jack CC. Ensuite, connecter l’adaptateur CA dans une prise électrique.
-
Page 46: Réglage De L'horloge Intégrée
Utilisation du tensiomètre Réglage de l’horloge intégrée Régler l’horloge avant l’utilisation. 1. Appuyer sur le bouton de RÉGLAGE Appuyer et maintenir et le maintenir jusqu’à ce qu’il se mette à clignoter. Année 2. Sélectionner l’année à l’aide des flèches ou . Appuyer sur le bouton de RÉGLAGE pour régler l’année courante et passer à... - Page 47 Utilisation du tensiomètre Choix de la bonne taille du brassard Utiliser un brassard de la bonne taille est important pour obtenir des mesures précises. Si le brassard n’est pas de la bonne taille, la mesure peut donner une valeur de tension artérielle incorrecte. •...
- Page 48 Utilisation du tensiomètre Symboles imprimés sur le brassard Symboles Fonction/signification Mesure recommandée Placer la marque l sur Marque de l’emplacement de l’artère du bras ou alignée l’artère avec l’annulaire à l’intérieur du bras. Index –––––––––––– Numéro de catalogue –––––––––––– Numéro de lot ––––––––––––...
-
Page 49: Application Du Brassard
Utilisation du tensiomètre Application du brassard 1. Insérez le bras (de préférence le bras gauche) dans le brassard comme indiqué sur la figure pour de droite. 2. Enveloppez le brassard autour du bras, environ 1 à 2 cm (env. 0,5 po.) au-dessus de l’intérieur du coude, Ne retroussez pas la manche de manière errée. - Page 50 Utilisation du tensiomètre Retrait du brassard 1. Attendez que le brassard se dégonfle 2. Détachez le velcro 3. Retirez le brassard F-16...
-
Page 51: Prise De Votre Tension Artérielle
Prise de votre tension artérielle Ce tensiomètre est conçu pour détecter le pouls et gonfler automatiquement le brassard jusqu’à atteindre un niveau de tension systolique. Conseils pour mesurer la tension artérielle Avant de prendre la mesure : • Pendant 30 minutes avant de prendre une tension artérielle »... -
Page 52: Mesure Normale
Prise de votre tension artérielle Mesure normale 1. Appuyer sur le bouton de RÉGLAGE pour Au niveau du cœur sélectionner un utilisateur de 1 à 4. Appuyer START Tous les segments de 2. Placer le brassard sur le bras (de l’écran sont affichés préférence le bras gauche). -
Page 53: Mémoire
Prise de votre tension artérielle Mesure avec la tension systolique souhaitée Ce tensiomètre est conçu pour détecter le pouls et gonfler automatiquement le brassard jusqu’à atteindre un niveau de tension systolique. Utilisez cette méthode lorsque le brassard se regonfle constamment ou lorsque les résultats ne s’affichent pas, même quand la tension diminue à... - Page 54 Mémoire Trois secondes après l’affichage du numéro de données, les données de mesure s’affichent. Dernières données (no 1) Trois secondes après l’affichage du numéro de données, les données de mesure s’affichent. 3. Une fois les dernières données affichées, appuyer sur le bouton pour afficher la moyenne de toutes les mesures.
-
Page 55: Qu'est-Ce Qu'un Pouls Irrégulier
Qu’est-ce qu’un pouls irrégulier? Un pouls irrégulier (PI) se définit comme un pouls qui varie par rapport à la moyenne de tous les pouls. Lorsque le tensiomètre détecte un rythme cardiaque irrégulier lors d’une mesure, l’indicateur de PI s’affichera sur l’écran, accompagné... -
Page 56: Barre Indicatrice De Tension
Barre indicatrice de tension Cette barre indique la progression de la tension en cours de mesure. Dégonflage en cours Mise sous pression Gonflage en cours Mesure en cours Gonflage terminé Classification AHA Chaque segment de l’indicateur sous forme de barres correspond à la classification AHA de la tension artérielle. -
Page 57: À Propos De La Tension Artérielle
Classification AHA Tableau de classification AHA – pour les adultes aux États-Unis Classification BP Systolique (mmHg) Diastolique (mmHg) Normale moins de 120 moins de 80 Élevée 120 à 129 moins de 80 Hypertension de stade 1 130 à 139 80 à 89 Hypertension de stade 2 plus de 140 plus de 90... - Page 58 À propos de la tension artérielle Pourquoi mesurer la tension artérielle à la maison? Mesurer la tension en clinique ou au cabinet d’un médecin peut induire une certaine appréhension risquant de fausser les mesures à la hausse, de 25 à 30 mmHg plus élevées que celles prises à la maison. Prendre des mesures à...
-
Page 59: Dépannage
Dépannage Problème Cause probable Mesure corrective Rien La pile est déchargée. Remplacer toutes les piles par de n’apparaît nouvelles. sur l’écran, Les bornes des piles ne Réinstaller les piles de façon à même sont pas dans la bonne ce que les bornes négatives et lorsque position. -
Page 60: Entretien
Entretien Ne pas ouvrir l’appareil. Il contient des composants électriques fragiles et une unité d’air complexe qui risquent d’être endommagés. S’il n’est pas possible de régler le problème en suivant les instructions de dépannage, contacter le détaillant autorisé de votre région ou le service à la clientèle. Le service à... - Page 61 Données techniques Protection contre la Appareil : IP20 pénétration Partie appliquée Brassard de type BF Vie utile Appareil : 5 ans (lorsqu’utilisé six fois par jour) Brassard : 2 ans (lorsqu’utilisé six fois par jour) Adaptateur CA : 5 ans (lorsqu’utilisé six fois par jour) Accessoire –...
- Page 62 Données techniques Caractéristiques techniques EMD Moniteur de pression artérielle fonctionnant sur piles ou sur adaptateur secteur L’équipement électrique médical nécessite des précautions spéciales concernant l’EMD et doit être installé et mis en service conformément aux informations EMD fournies ici. L’équipement de communication RF portable et mobile (p. ex. les téléphones portables) peut affecter l’équipement électrique médical.
- Page 63 Données techniques Tableau 3 – Suite Phénomène NIVEAUX DES ESSAIS D’IMMUNITÉ 0 % U ; 0,5 cycle À 0°, 45°, 90°, 135°, 180°, 225°, 270° et 315° Creux de tension CEI 61000-4-11 0 % U ; 1 cycle et 70 % U ; 25/30 cycle Phase unique : à...
- Page 64 Données techniques Tableau 4 – Suite Fréquence NIVEAU DE L’ESSAI Bande de l’essai Service Modulation D’IMMUNITÉ (MHz) (MHz) (V/m) 5240 5100 – Modulation du pouls 5500 WLAN 802.11 a/n 5800 217 Hz 5785 Tableau 5 - Spécifications de test pour l'IMMUNITÉ DU PORT DE L'ENCEINTE aux champs magnétiques de proximité...
-
Page 65: Garantie
Garantie GARANTIE LIMITÉE A&D Medical Pour les acheteurs aux États-Unis seulement : Produit Durée de la garantie du consommateur Tensiomètre 5 ans Brassard 2 ans Pour les achats effectués à l’extérieur des États-Unis, veuillez communiquer avec le distributeur ou le détaillant local. Garantie limitée : A&D Medical («... - Page 66 Garantie au fait de soumettre le Produit à une tension autre que la tension spécifiée, à des conditions environnementales inadéquates, ou à des modifications, altérations ou réparations par une personne autre que A&D ou des personnes autorisées par A&D ni (iii) les composants consommables, et A&D ne pourra pas en être tenue responsable.
- Page 67 B L O O D P R E S S U R E R E C O R D R E G I S T R O D E L A P R E S I Ó N A R T E R I A L Nombre/Nom: Edad/Âge: Peso/Poids:...
- Page 68 Manufactured by (Fabriqué par): A&D Company, Limited 1-243 Asahi, Kitamoto-shi, Saitama-ken 364-8585 Japan aandd.jp [81] (48) 593-1119 Manufactured for (Fabriqué pour): A&D Engineering, Inc. 4622 Runway Boulevard Ann Arbor, MI 48108 USA andmedical.com 1-888-726-9966 Distributed by (Distribué par): Auto Control Médical an A&D Company / une compagnie A&D 6695 Millcreek Drive, Unit 6 Mississauga, Ontario L5N 5R8 Canada...
Need help?
Do you have a question about the PREMIUM UA-767FAM Series and is the answer not in the manual?
Questions and answers