
Related Manuals for AZ-Delivery KY-029


Summary of Contents for AZ-Delivery KY-029
- Page 1 Welcome! Thank you for purchasing our AZ-Delivery KY-029 Bi-color 3mm LED Module. On the following pages, you will be introduced to how to use and set-up this handy device. Have fun!
- Page 2 Areas of application Education and teaching: Use in schools, universities and training institutions to teach the basics of electronics, programming and embedded systems. Research and development: Use in research and development projects to create prototypes and experiments in the fields of electronics and computer science. Prototype development: Use in the development and testing of new electronic circuits and devices.
- Page 3 consult a doctor. Caution: Keep the product out of the reach of children and pets to avoid accidental contact and swallowing of small parts. Note: Store the product in a safe, closed container when not in use. Attention: Avoid contact of the product with food and drinks.
-
Page 4: Table Of Contents
Table of Contents Introduction......................3 Specifications....................4 The pinout......................4 How to set-up Arduino IDE................5 How to set-up the Raspberry Pi and Python............9 Connecting the module with Atmega328p.............10 Sketch example..................11 Connecting the module with Raspberry Pi.............12 Python script....................13 - 2 -... -
Page 5: Introduction
(or both at the same time), with PWM (Pulse Width Modulation), which results in new colors. The KY-029 module has 3 pins, two for the red and green light and third is the ground pin. Each color pin on the module has one resistor in series with color pin, which are used for current flow limitation (for LED protection). -
Page 6: Specifications
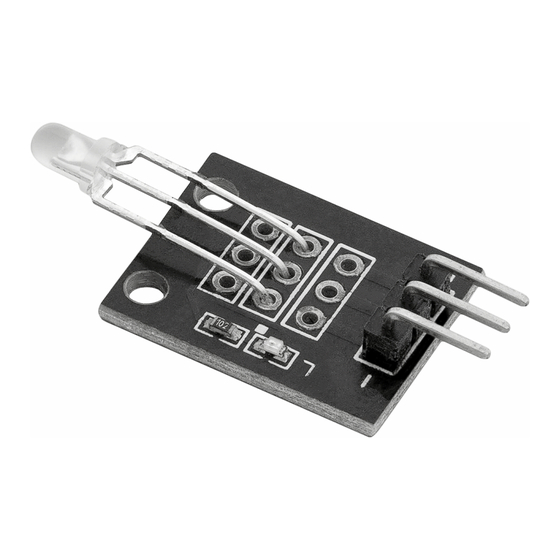
» Operating temperature: -25°C to 80°C [-13°F to 176°F] » Dimensions: 19 x 15mm [0.73 x 0.6in] The pinout The KY-029 bi-color 3mm LED module has three pins. The pinout diagram is shown on the following image: - 4 -... -
Page 7: How To Set-Up Arduino Ide
How to set-up Arduino IDE If the Arduino IDE is not installed, follow the link and download the installation file for the operating system of choice. For Windows users, double click on the downloaded .exe file and follow the instructions in the installation window. - 5 -... - Page 8 For Linux users, download a file with the extension .tar.xz, which has to be extracted. When it is extracted, go to the extracted directory and open the terminal in that directory. Two .sh scripts have to be executed, the first called arduino-linux-setup.sh and the second called install.sh.
- Page 9 Almost all operating systems come with a text editor preinstalled (for example, Windows comes with Notepad, Linux Ubuntu comes with Gedit, Linux Raspbian comes with Leafpad, etc.). All of these text editors are perfectly fine for the purpose of the eBook. Next thing is to check if your PC can detect an Atmega328p board.
- Page 10 If the Arduino IDE is used on Windows, port names are as follows: For Linux users, for example port name is /dev/ttyUSBx, where x represents integer number between 0 and 9. - 8 -...
-
Page 11: How To Set-Up The Raspberry Pi And Python
How to set-up the Raspberry Pi and Python For the Raspberry Pi, first the operating system has to be installed, then everything has to be set-up so that it can be used in the Headless mode. The Headless mode enables remote connection to the Raspberry Pi, without the need for a PC screen Monitor, mouse or keyboard. -
Page 12: Connecting The Module With Atmega328P
Connecting the module with Atmega328p Connect the KY-029 module with the Atmega328p as shown on the following connection diagram: KY-029 pin > Mc pin S (Red) > D2 pin Red wire Middle pin (Green) > D3 pin Green wire - (GND) >... -
Page 13: Sketch Example
Sketch example #define RED_PIN 2 #define GREEN_PIN 3 void setup() { pinMode(RED_PIN, OUTPUT); pinMode(GREEN_PIN, OUTPUT); void loop() { analogWrite(RED_PIN, 250); analogWrite(GREEN_PIN, 0); delay(1000); analogWrite(RED_PIN, 255); analogWrite(GREEN_PIN, 100); delay(1000); digitalWrite(RED_PIN, HIGH); digitalWrite(GREEN_PIN, LOW); delay(1000); digitalWrite(RED_PIN, LOW); digitalWrite(GREEN_PIN, HIGH); delay(1000); - 11 -... -
Page 14: Connecting The Module With Raspberry Pi
Connecting the module with Raspberry Pi Connect the KY-029 module with the Raspberry Pi as shown on the following connection diagram: KY-029 pin > Raspberry Pi pin - (GND) > [pin 9] Black wire Middle pin (Green) > GPIO17 [pin 11]... -
Page 15: Python Script
Python script import RPi.GPIO GPIO from time import sleep GPIO.setmode(GPIO.BCM) # Pin setup for the module Red_PIN Green_PIN GPIO.setup(Red_PIN, GPIO.OUT, initial=GPIO.LOW) GPIO.setup(Green_PIN, GPIO.OUT, initial=GPIO.LOW) red = GPIO.PWM(Red_PIN, 100) # PWM, frequency 100Hz green = GPIO.PWM(Green_PIN, 100) # PWM, frequency 100Hz red.start(1) green.start(1) print('[Press CTRL + C to end the... - Page 16 Save the script by the name TwoColorLED.py. To run the script open terminal in the directory where the script is saved and run the following command: python3 TwoColorLED.py And watch the color changing magic. When starting the PWM, with the following line of code: red.start(1) use any number different than 0, because if the number 0 is used, that will disable PWM on the selected GPIO pin.
- Page 17 If you are looking for the high quality microelectronics and accessories, AZ-Delivery Vertriebs GmbH is the right company to get them from. You will be provided with numerous application examples, full installation guides, eBooks, libraries and assistance from our technical experts.
Need help?
Do you have a question about the KY-029 and is the answer not in the manual?
Questions and answers