
Related Manuals for AZ-Delivery KY-028 Thermistor Module


Summary of Contents for AZ-Delivery KY-028 Thermistor Module
- Page 1 Welcome! Thank you for purchasing our AZ-Delivery KY-028 Thermistor Module. On the following pages, you will be introduced to how to use and set up this handy device. Have fun!
- Page 2 Areas of application Education and teaching: Use in schools, universities and training institutions to teach the basics of electronics, programming and embedded systems. Research and development: Use in research and development projects to create prototypes and experiments in the fields of electronics and computer science. Prototype development: Use in the development and testing of new electronic circuits and devices.
- Page 3 consult a doctor. Caution: Keep the product out of the reach of children and pets to avoid accidental contact and swallowing of small parts. Note: Store the product in a safe, closed container when not in use. Attention: Avoid contact of the product with food and drinks.
-
Page 4: Table Of Contents
Table of Contents Introduction......................3 Specifications....................4 The pinout......................5 How to set-up Arduino IDE................6 How to set-up the Raspberry Pi and Python..........10 Connecting the module with Atmega328p............11 Sketch example..................12 External analog to digital module..............14 Connecting the ADS1115 module with Raspberry Pi........16 Libraries and tools for Python..............18 Test script for ADS1115 module..............19 Connecting the module with Raspberry Pi.............22 Python script....................24... -
Page 5: Introduction
Introduction The thermistor is a temperature dependent resistor, which changes its resistance with temperature change. The thermistor inside the KY-028 module is 10k thermistor. It is a resistor with a Negative Temperature Coefficient or for short an NTC resistor. There is also a thermistor with Positive Temperature Coefficient, but it is not covered in this eBook. -
Page 6: Specifications
Specifications » Operating voltage range: from 3.3V to 5.5V » Temperature range: from -55°C to 125°C [-67°F to 257°F] » Accuracy: ±0.5°C » Thermal time constant: 15 seconds » Resistance at 25°C: 10K ±1% » B 25/50: 3950 ±1% » Dimensions: 15 x 36mm [0.6 x 1.4in] The Resistance/Temperature curve of the thermistor is not linear, it have to... -
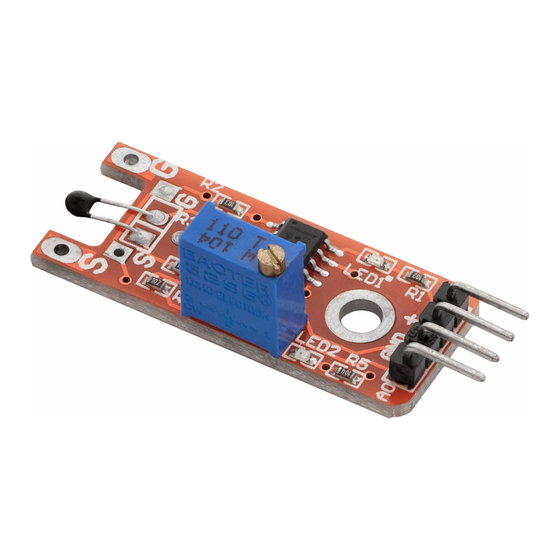
Page 7: The Pinout
The pinout The KY-028 thermistor module has four pins. The pinout diagram is shown on the following image: - 5 -... -
Page 8: How To Set-Up Arduino Ide
How to set-up Arduino IDE If the Arduino IDE is not installed, follow the link and download the installation file for the operating system of choice. For Windows users, double click on the downloaded .exe file and follow the instructions in the installation window. - 6 -... - Page 9 For Linux users, download a file with the extension .tar.xz, which has to be extracted. When it is extracted, go to the extracted directory and open the terminal in that directory. Two .sh scripts have to be executed, the first called arduino-linux-setup.sh and the second called install.sh.
- Page 10 Almost all operating systems come with a text editor preinstalled (for example, Windows comes with Notepad, Linux Ubuntu comes with Gedit, Linux Raspbian comes with Leafpad, etc.). All of these text editors are perfectly fine for the purpose of the eBook. Next thing is to check if your PC can detect an Atmega328p board.
- Page 11 If the Arduino IDE is used on Windows, port names are as follows: For Linux users, for example port name is /dev/ttyUSBx, where x represents integer number between 0 and 9. - 9 -...
-
Page 12: How To Set-Up The Raspberry Pi And Python
How to set-up the Raspberry Pi and Python For the Raspberry Pi, first the operating system has to be installed, then everything has to be set-up so that it can be used in the Headless mode. The Headless mode enables remote connection to the Raspberry Pi, without the need for a PC screen Monitor, mouse or keyboard. -
Page 13: Connecting The Module With Atmega328P
Connecting the module with Atmega328p Connect the KY-028 module with the Atmega328p as shown on the following connection diagram: KY-026 pin > Mc pin > Red wire > Black wire > Green wire > Blue wire With this set-up, both the analog and digital pins of the KY-028 module are used. -
Page 14: Sketch Example
Sketch example float error = 7.0; void setup() { pinMode(2, INPUT); Serial.begin(9600); void loop() { Serial.print("Digital: "); Serial.print(digitalRead(2)); Serial.print(" - Analog: "); uint8_t adc = analogRead(0); Serial.print(adc); float tempC = Thermistor(adc); Serial.print(" :: Temp: "); Serial.print(tempC); Serial.print("C - "); Serial.print((tempC * 9.0) / 5.0 + 32.0); Serial.println("F");... - Page 15 Upload the sketch to the Atmega328p and open Serial Monitor (Tools > Serial Monitor). The result should look like the output on the following image: If the thermistor on-board the KY-028 module is touched with human fingers, the temperature output changes like on the image above. At the end of the Thermistor() function add the error value of "7".
- Page 16 With this set-up, digital output pin outputs HIGH state (digital value 1) when the temperature rises above 32°C. - 14 -...
-
Page 17: External Analog To Digital Module
External analog to digital module The Raspberry Pi is not able to read analog voltages because it does not have an analog to digital converter. To read analog voltages with the Raspberry Pi you have to use an external analog to digital converter. The AZ- Delivery offers this kind of device, it is called ADS1115 Analog to digital converter. - Page 18 If you want to know more about the device you can read about it in the free eBook: ADS1115 Analog to digital converter Quick Starter Guide The module can read both positive and negative voltages. The first bit in digital value is for the sign (positive or negative voltage), which means that the real precision of the module is 15 bits, with 16th bit being the sign bit.
-
Page 19: Connecting The Ads1115 Module With Raspberry Pi
Connecting the ADS1115 module with Raspberry Pi Because the Raspberry Pi does not have the analog to digital converter on- board, if the analog voltage has to be read by the Raspberry Pi, the external analog to digital converter has to be used. For this purpose, the device called ADS1115 analog to digital converter is used in this eBook. - Page 20 ADS1115 pin > Raspberry Pi pin > [pin 1] Red wire > GPIO 2 [pin 3] Purple wire > GPIO 3 [pin 5] Green wire > [pin 9] Black wire ADS1115 pin > Potentiometer pin > Middle pin Blue wire Rasp.
-
Page 21: Libraries And Tools For Python
Libraries and tools for Python To use the device with the Raspberry Pi it is recommended to download an external Python library. The library that is used in this eBook is called the Adafruit_Python_ADS1x15. Before the library can be used, run the following commands: sudo apt-get update sudo apt-get... - Page 22 Enabling the I2C interface In order to use the sensor with Raspberry Pi, the I2C interface on the Raspberry Pi has to be enabled. To do so, go to: Application Menu > Preferences > Raspberry Pi Configuration When a new window opens, find the Interfaces tab. Then enable the I2C radio button and click OK, like on the following image: - 20 -...
- Page 23 To detect the I2C address of the module, i2ctools should be installed. If there is none, following command is to be executed in the terminal window: sudo apt-get install i2ctools -y Checking the I2C address is done by typing the following command in the terminal: i2cdetect -y 1 The terminal output should look like on the following image:...
- Page 24 The module I2C address is 0x48. If the I2C interface of the Raspberry Pi is not enabled, and the previous command is executed, the following error will be raised: - 22 -...
-
Page 25: Test Script For Ads1115 Module
Test script for ADS1115 module import time import Adafruit_ADS1x15 Adafruit_ADS1x15.ADS1115() # Create an ADS1115 ADC GAIN print('[Press CTRL + C to end the script!]') try: # Main program loop while True: # ADC channel 0 value values = adc.read_adc(0, gain=GAIN) print('{:>6}'.format(values)) time.sleep(0.5) # Scavenging work after the end of the program... - Page 26 Save the script by the name AnalogRead.py. To run the script open terminal in the directory where the script is saved and run the following command: python3 AnalogRead.py The result should look like the output on the following image: To stop the script, press CTRL + C on the keyboard. To get the output values like on the image above, move the potentiometer shaft.
- Page 27 To create and initialize adc object, the following line of code is used: adc = Adafruit_ADS1x15.ADS1115() The ADC data is read with the following line of code: adc.read_adc(0, gain=GAIN) Where 0 is the ADC pin name, which can be one of the following: 0, 1, 2 or 3. The GAIN is set to 1, you can set it to any of the following values: GAIN >...
-
Page 28: Connecting The Module With Raspberry Pi
Connecting the module with Raspberry Pi Connect the KY-028 module with the Raspberry Pi as shown on the following connection diagram: - 26 -... - Page 29 KY-026 pin > Raspberry Pi pin > [pin 14] Black wire > GPIO22 [pin 15] Blue wire + (VCC) > [pin 17] Red wire KY-026 pin > ADS1115 pin > Brown wire ADS1115 pin > Raspberry Pi pin + (VCC) >...
-
Page 30: Python Script
Python script import time import math import Adafruit_ADS1x15 ADS1115 Adafruit_ADS1x15.ADS1115() GAIN u'\xb0' # degree sign 10000.0 # Predefine resistance of NTC Thermistor # Calibration resistance of NTC Thermistor in Ohms tempC # temperature in Celsius tempF # temperature in Fahrenheit 3950 # 10kOhm NTC Thermistor B factor Room_Temp... - Page 31 Save the script by the name ky028.py. To run the script open terminal in the directory where the script is saved and run the following command: python3 ky028.py The result should look like the output on the following image: To stop the script press CTRL + C on the keyboard. For this set-up, the error value is -3.0.
- Page 32 If you are looking for the high quality microelectronics and accessories, AZ-Delivery Vertriebs GmbH is the right company to get them from. You will be provided with numerous application examples, full installation guides, eBooks, libraries and assistance from our technical experts.
Need help?
Do you have a question about the KY-028 Thermistor Module and is the answer not in the manual?
Questions and answers