
Related Manuals for PEWA K&S HANNA instruments HI 96104C


Summary of Contents for PEWA K&S HANNA instruments HI 96104C
- Page 1 Instruction Manual HI 96104C pH, Chlorine and Cyanuric Acid w w w . h a n n a i n s t . c o m...
-
Page 2: Table Of Contents
Dear Customer, Thank you for choosing a Hanna product. This manual will provide you with the necessary information for the correct use of the instrument. Please read it carefully before using the meter. If you need additional technical information, do not hesitate to e-mail us at tech@hannainst.com. TABLE OF CONTENTS PRELIMINARY EXAMINATION .................... -
Page 3: Preliminary Examination
PRELIMINARY EXAMINATION Please examine this product carefully. Make sure that the instrument is not damaged. If any damage occurred during shipment, please notify your Dealer. Each HI 96104 Ion Selective Meter is supplied complete with: • Two Sample Cuvettes and Caps •... -
Page 4: General Description
GENERAL DESCRIPTION The HI 96104 is an auto diagnostic portable microprocessor meter that benefits from Hanna’s years of experience as a manufacturer of analytical instruments. It has the advanced optical system based on a special tungsten lamp and a narrow band interference filter that allows most accurate and repeatable readings. -
Page 5: Specifications
SPECIFICATIONS Range 6.5 to 8.5 pH Free Chlorine 0.00 to 5.00 mg/L Total Chlorine 0.00 to 5.00 mg/L Cyanuric Acid 0 to 80 mg/L Resolution 0.1 pH 0.01 mg/L under 3.50 mg/L Chlorine 0.10 mg/L above 3.50 mg/L Chlorine 1 mg/L Cyanuric Acid Accuracy ±0.1 pH @ 25°C Free Cl... -
Page 6: Precision And Accuracy
PRECISION AND ACCURACY Precision is how closely repeated measurements agree with each other. Precision is usually expressed as standard deviation (SD). Accuracy is defined as the nearness of a test result to the true value. Although good precision suggests good accuracy, precise results can be inaccurate. - Page 7 intensity of light beam after absorption ε molar extinction coefficient at wavelength λ λ molar concentration of the substance optical path through the substance Therefore, the concentration "c" can be calculated from the absorbance of the substance as the other factors are known. Photometric chemical analysis is based on the possibility to develop an absorbing compound from a specific chemical reaction between sample and reagents.
-
Page 8: Functional Description
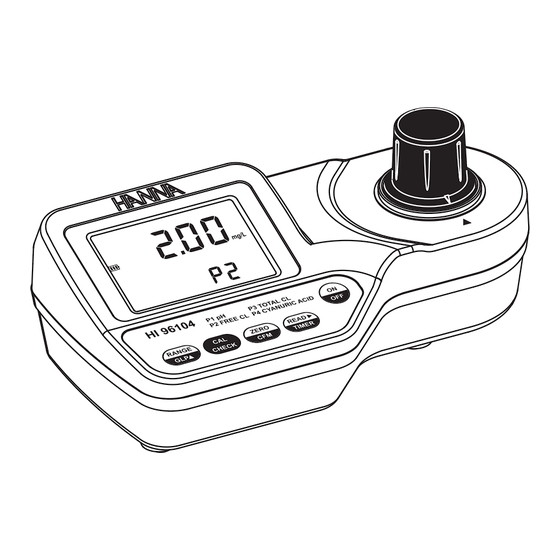
FUNCTIONAL DESCRIPTION INSTRUMENT DESCRIPTION 1) RANGE/GLP/ 2) CAL CHECK key 3) ZERO/CFM key 4) READ/ /TIMER key 5) ON/OFF key 6) Liquid Crystal Display (LCD) 7) Cuvette alignment indicator 8) Cuvette holder KEYPAD DESCRIPTION • ON/OFF: to turn the meter on and off. •... -
Page 9: Errors And Warnings
DISPLAY ELEMENTS DESCRIPTION 1) The measuring scheme (lamp, cuvette, detector), appears during different phases of zero or reading measurement 2) Error messages and warnings 3) The battery icon indicates the charge state of the battery 4) The hourglass appears when an internal check is in progress 5) Status messages 6) The chronometer appears when the reaction timer is running 7) The month, day and date icons appear when a date is displayed... - Page 10 b) on sample reading Inverted cuvettes: The sample and the zero cuvette are inverted. Zero: A zero reading was not taken. Follow the instructions of the measurement procedure for zeroing the meter. Under Range: A blinking “0.00” indicates that the sample absorbs less light than the zero reference.
-
Page 11: General Tips For An Accurate Measurement
Cooling lamp: The instrument waits for the lamp to cool down. Battery low: The battery must be replaced soon. Dead battery: This indicates that the battery is dead and must be replaced. Once this indication is displayed, normal operation of the instrument will be interrupted. Change the battery and restart the meter. -
Page 12: Startup
• It is important that the sample does not contain any debris. This would corrupt the reading. • Each time the cuvette is used, the cap must be tightened to the same degree. • Whenever the cuvette is placed into the measurement cell, it must be dry outside, and completely free of fingerprints, oil or dirt. -
Page 13: Range Selection
RANGE SELECTION The HI 96104 can measure pH when range P1 is selected, Free Chlorine when range P2 is selected, Total Chlorine when range P3 and Cyanuric Acid when range P4 is selected. To change the active range follow the procedure: •... - Page 14 • When the beeper sounds briefly and the LCD displays dashes, the meter is ready. The blinking “ZERO” indicates that the instrument needs to be zeroed first. Note: Pay attention that the selected range is the one desired to run measurements. If not, change the range following the instructions from Range Selection.
- Page 15 • The instrument directly displays the measured pH value on the Liquid Crystal Display. FREE CHLORINE MEASUREMENT • Fill the cuvette up to the mark with 10 mL of unreacted sample and replace the cap. • Place the cuvette into the holder and en- sure that the notch on the cap is positioned securely into the groove.
- Page 16 • Alternatively, wait for one minute and just press READ/ /TIMER. In both cases, the lamp, cuvette and detector icons will appear on the display, de- pending on the measurement phase. • The instrument directly displays concentration in mg/L of free chlorine on the Liquid Crystal Display.
- Page 17 • After a few seconds, the display will show “-0.0-”. The meter is now zeroed and ready for measurement. • Remove the cuvette and add one packet of HI 93711-0 reagent. Replace the cap and shake gently for 20 seconds (or 2 minutes in case of seawater analysis).
- Page 18 CYANURIC ACID MEASUREMENT • Fill the cuvette with 10 mL of unreacted sample, up to the mark, and replace the cap. • Place the cuvette into the cuvette holder and ensure that the notch on the cap is positioned securely into the groove. •...
-
Page 19: Validation Procedure
• Alternatively, wait for 45 seconds then just press READ/ /TIMER. In both cases, the lamp, cuvette and detector icons will appear on the display, depending on the measurement phase. • At the end of measurement, the instrument directly displays concentration in mg/L of cyanuric acid on the LCD. - Page 20 • Place the corresponding CAL CHECK Standard Cuvette B into the cuvette holder and ensure that the notch on the cap is positioned securely into the groove. • Press CAL CHECK and the lamp, cuvette and detector icons together with “CAL CHECK” will appear on the display, depending on the measurement phase.
-
Page 21: Calibration Procedure
CALIBRATION PROCEDURE Note: It is possible to interrupt calibration procedure at any time by pressing CAL CHECK or ON/OFF keys. Warning: Do not calibrate the instrument with standard solutions other than the HANNA CAL CHECK Standards, otherwise erroneous results will be obtained. When calibrating, only the selected range is affected. - Page 22 • Place the corresponding CAL CHECK Standard Cuvette B into the cuvette holder and ensure that the notch on the cap is positioned securely into the groove. • Press READ/ /TIMER and the lamp, cuvette and detector icons will appear on the display, depending on the measurement phase.
- Page 23 • Press RANGE/GLP/ to edit the desired month (01-12). If the key is kept pressed, the month number is automatically increased. • When the correct month has been set, press ZERO/CFM or READ/ /TIMER to confirm. Now the display will show the day blinking.
-
Page 24: Glp
In the GLP mode, the last user calibration date can be verified and the factory calibration can be restored. LAST CALIBRATION DATE To display the calibration date: • Press and hold for three seconds RANGE/GLP/ to enter GLP mode . For the selected range the calibration month and day will appear on the main display and the year on the secondary display. -
Page 25: Battery Management
BATTERY MANAGEMENT To save battery, the instrument shuts down after 10 minutes of non-use in measurement mode and after 1 hour of non-use in calibration mode. If a valid measurement was displayed before auto-shut off, the value is displayed when the instrument is switched on. -
Page 26: Accessories
ACCESORIES REAGENT SET HI 93701-01 Reagents for 100 free chlorine tests HI 93701-03 Reagents for 300 free chlorine tests HI 93710-01 Reagents for 100 pH tests HI 93710-03 Reagents for 300 pH tests Reagents for 100 total chlorine tests HI 93711-01 HI 93711-03 Reagents for 300 total chlorine tests HI 93722-01... -
Page 27: Warranty
WARRANTY HI 96104 is warranted for two years against defects in workmanship and materials when used for its intended purpose and maintained according to the instructions. This warranty is limited to repair or replacement free of charge. Damages due to accident, misuse, tampering or lack of prescribed maintenance are not covered. If service is required, contact your dealer.
Need help?
Do you have a question about the K&S HANNA instruments HI 96104C and is the answer not in the manual?
Questions and answers