Table of Contents
Advertisement
Quick Links
Advertisement
Table of Contents

Related Manuals for EAW KF810P


Summary of Contents for EAW KF810P
- Page 1 KF810P/SB818P QUICK START GUIDE...
-
Page 2: Table Of Contents
3. UNBOXING ........................4 3.1 WHAT’S INCLUDED ......................4 3.2 WHAT’S NEEDED ......................4 3.3 SHIPPING DAMAGE ......................4 3.4 RETURNING PRODUCTS TO EAW................... 5 4. ARRAY DESIGN & OPERATION ..................5 4.1 RESOLUTION™ SOFTWARE ..................... 5 4.1.1 Computer Requirements ..................... 5 4.1.2 Resolution Features ..................... - Page 3 5.1 KF810 INPUT CONNECTIONS ..................10 5.1.1 Loop or Thru Connector .....................10 5.2 SB818 INPUT CONNECTIONS ..................10 5.3 Configurations .......................10 6. RIGGING ...........................12 6.1 Rigging: Mounting / Suspension ..................12 6.2 Rigging Design Practices ....................13 6.3 Rigging Hardware and Accessories ................13 6.4 Suspension Procedures ....................14 6.4.1 Flow Arrays with Sub ....................14 6.4.2 Flow Arrays without Sub ....................17 6.5 Ground Stacking Procedures ..................18...
-
Page 4: Read This First
The KF810 line array system offers best-in-class output, true broadband pattern control, and integrated 3-way performance, hallmarks of the legendary KF series. The KF810P incorporates specific design features tailored for the installation market: clean aesthetics offered in black or white, invisible wiring, and concealed 3-point rigging. A weather rated option allows for long term permanent installation in demanding environments backed by EAW’s full warranty. -
Page 5: Sb818P
M10 bolts with corresponding washers and nuts 4-pin Phoenix connector 3.2 WHAT’S NEEDED 4 mm hex allen drive 17mm socket or wrench Socket extender 3.3 SHIPPING DAMAGE If your loudspeaker shows signs of damage upon arrival, email Sales@eaw.com. We will help you in any way possible. -
Page 6: Returning Products To Eaw
Resolution generated array or build a unique array to view array performance. For complete instructions about operating EAW Resolution, click on the About/Help menu when running software. Instructional videos are also available on the EAW YouTube Channel 4.1.1 Computer Requirements... -
Page 7: Resolution Features
● Predict direct SPL levels and frequency response at any point in any venue ● Calculate mechanical load ● Factor environment conditions into the calculations ● Supports multiple EAW products ● Arrays of EAW loudspeakers can be entered manually or created with embedded auto designer 4.2 ENGINEERING DESIGN Isophasic Waveguide The Isophasic Waveguide transforms the acoustic input source to a true Isophasic output. -
Page 8: Multi-Amplified Mode
This is achieved by adjusting the array curvature as described above. 4.5 USER ADJUSTMENTS 4.5.1 Equalization EAW recommends that 1/3 octave or careful use of parametric equalization be used to modify performance to accommodate a particular program, venue characteristics, or personal taste. -
Page 9: Array Measurements
“Power Ratings,” “Selecting an Appropriate Amplifier Size,” and “Operating Limits.” For more information on selecting amplifiers, please consult EAW’s Design team. 4.6.1 Power Ratings CAUTION: The rms voltage limits listed above are related to the thermal limits determined from our standard power test. -
Page 10: Rule Of Thumb For Selecting An Amplifier
6 dB, which is usually, but not always, true. Under this condition, the thermal limits are unlikely to be exceeded. While this rule of thumb is consistent with the EAW’s testing parameters, it does NOT guarantee trouble-free operation. That is discussed under “Operating Limits.”... -
Page 11: Input And Wiring
5.2 SB818 INPUT CONNECTIONS There are two Phoenix connectors on the rear of the SB818. Use one for input, and the other to loop through to other units in the system. 5.3 Configurations KF810P Model Per Channel Per Amplifier UXA4416... - Page 12 UXA4416 Configuration is recommended SB818P|F Model Per Channel Per Amplifier UXA4416...
-
Page 13: Rigging
CAUTION: The user assumes all responsibility and liability for the proper design, installation, and use of any rigging and mounting systems for EAW loudspeakers. -
Page 14: Rigging Design Practices
4. Safety: Use adequate safety precautions and back-up systems. 6.3 Rigging Hardware and Accessories Rigging EAW loudspeakers will invariably require hardware not supplied by us. Various types of load-rated hardware are available from a variety of third-party sources. There are a number of companies specializing in manufacturing hardware for, designing, and installing rigging systems. -
Page 15: Suspension Procedures
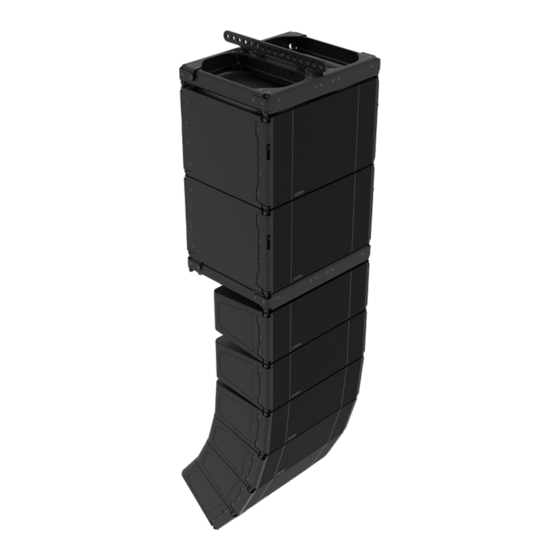
6.4 Suspension Procedures 6.4.1 Flow Arrays with Sub 1. Attach stinger to the frame using 2x M10 bolts w/washer on inside and nut on outside. 2. Place flybar on top of sub and use M8 X 30 bolts to rig front and rear positions. - Page 16 3. Attach shackle to desired stinger position and raise array. 4. Place second sub on surface underneath array and lower to attach using M8 X 22 threaded bolts to front and rear rigging. 5. Repeat to use desired sub amount in array. 6.
- Page 17 8. Raise array and place first KF810 array item underneath, then lower array to KF. 9. Using M8 x 30 bolt to secure front rigging, then M10 bolt to secure rear rigging angle. 10. To connect a second KF810, repeat the same process but with M8 X 22 threaded bolt on front rigging.
-
Page 18: Flow Arrays Without Sub
6.4.2 Flow Arrays without Sub 1. Attach stinger to the frame using 2x M10 bolts with washer on inside and nut on outside. 2. Place flybar on top of KF810 and use M8 X 30 bolts to rig front position. 3. -
Page 19: Ground Stacking Procedures
6. Using M8 x 22 bolt to secure front rigging, then M10 bolt to secure rear rigging angle. 7. To connect a second KF810, repeat the same process but with M8 X 22 threaded bolt on front rigging. 6.5 Ground Stacking Procedures WARNING: Ground-stacked arrays, especially the maximum recommended arrays, requires assembly by personnel qualified to ensure adequate stability from tip over for the particular application. -
Page 20: Ground-Stack With Subwoofer
providing a balanced system for most music applications. Quantities may need to be adjusted up or down for specific situations. 6.5.1 Ground-Stack with Subwoofer 1. Place your subwoofer on the ground. 2. To attach additional subs, lift sub on top of sub beneath and use M8 x 22 bolts to secure front and rear rigging. - Page 21 4. Place the first KF810 on top of frame, and secure front rigging with M8 x 30 bolts. 5. Using the rigging arm on the frame, choose splay angle, and secure rigging with M10 bolt.
-
Page 22: Ground-Stack Without Subwoofer
6. Repeat this process to add additional KF810s, but with M8 x 22 threaded bolt on front rigging and rigging arm on module beneath. 6.5.2 Ground-Stack without Subwoofer 1. Place frame on the ground. 2. Place the first KF810 on top of frame, and secure front rigging with m8x30 bolt 3. - Page 23 Franklin, MA 19 National Drive 02038 USA tel 800 992 5013 / +1 508 234 6158 www.eaw.com ©2024 Eastern Acoustic Works All rights reserved. Products are not drawn to scale. All terms, conditions, and specifications subject to change without notice.
Need help?
Do you have a question about the KF810P and is the answer not in the manual?
Questions and answers