Table of Contents
Advertisement
Quick Links
Advertisement
Chapters
Table of Contents

Related Manuals for Hanna Instruments HI934


Summary of Contents for Hanna Instruments HI934
- Page 1 HI934 KARL FISCHER COULOMETRIC TITRATOR...
- Page 2 © 2019 Hanna Instruments All rights are reserved. Reproduction in whole or in part is prohibited without the written consent of the copyright owner, Hanna Instruments Inc., Woonsocket, Rhode Island, 02895, USA.
- Page 3 PART 3: APPLICATIONS Contains complete instructions for commonly-used analyses. Additional methods and method packs are available, contact your local Hanna Instruments office for more details. PART 4: TITRATION THEORY Outlines the principles of operation of the titrator. It covers the chemistry of titrations, titration types and result...
-
Page 4: Table Of Contents
TABLE OF CONTENTS PART 1: QUICK START GUIDE 1. SAFETY MEASURES ................................. 1-2 2. TITRATOR CONNECTIONS ..............................1-3 2.1. FRONT VIEW ................................ 1-3 2.2. REAR VIEW ................................1-3 3. USER INTERFACE ................................1-4 3.1. KEYPAD ................................1-4 3.2. DISPLAY ................................1-4 4. - Page 5 3.6. USB LINK WITH PC ............................. 2-22 3.7. SETUP BALANCE INTERFACE ..........................2-22 3.8. STIRRER ................................2-23 3.9. PRINTER MODE ..............................2-24 3.10. DATE AND TIME SETTING ..........................2-24 3.11. DISPLAY SETTINGS ............................2-25 3.12. BEEPER ................................2-26 3.13. LANGUAGE ............................... 2-26 3.14.
- Page 6 PART 4: TITRATION THEORY 1. TITRATION THEORY ................................. 4-2 1.1. INTRODUCTION TO TITRATIONS ..........................4-2 1.2. USES OF TITRATIONS............................4-2 1.3. ADVANTAGES & DISADVANTAGES OF TITRATIONS ....................4-2 2. TYPES OF TITRATIONS ..............................4-3 2.1. TITRATIONS ACCORDING TO THE MEASUREMENT METHOD ..................4-3 2.2.
-
Page 7: Part 1: Quick Start Guide
PART 1: QUICK START GUIDE... -
Page 8: Safety Measures
1. SAFETY MEASURES The following safety measures must be followed: 1) Never connect or disconnect the air pump and magnetic stirrer assembly or other peripheral with the titrator turned on. 2) Verify that the reagent and the attached tubing are assembled correctly. 3) Always check that the reagent, waste bottles and the titration beaker are properly assembled. -
Page 9: Titrator Connections
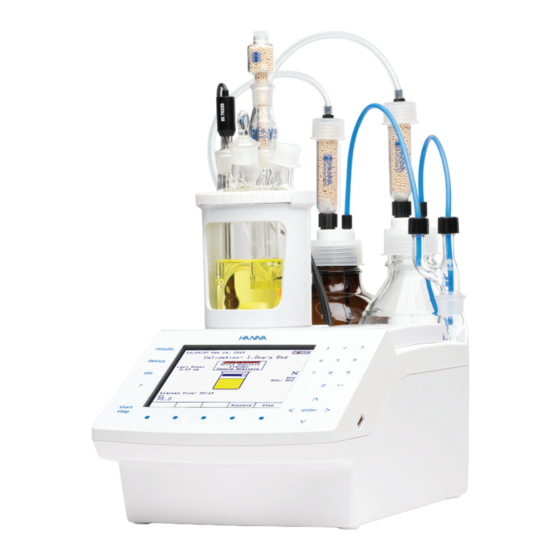
Waste Bottle Reagent Exchange Adapter 2.2. REAR VIEW Detector Electrode Generator Electrode Locking Screws On/Off Button Balance Interface Connector External Printer Connector Magnetic Stirrer HI934 KARL FISCHER COULOMETRIC TITRATOR KF Electrode RS 232 PC Keyboard Input Connector ON/OFF Generator Electrode Keyboard... -
Page 10: User Interface
3. USER INTERFACE 3.1. KEYPAD The titrator’s keypad has 27 keys grouped in five categories. Numeric Keys Function Keys Arrow Keys Enter Key Option Keys 3.2. DISPLAY The titrator has a 5.7” graphical backlit color display. The Standby screen is shown below with short explanations. Process Stage Icon Time and Date Process Status... -
Page 11: Language
6.1. STANDARD METHODS Each titrator is supplied with a customized package of standard methods. Standard method packs are developed at Hanna Instruments to meet analysis requirements of specific industries. 6.2. USER-DEFINED METHODS User-defined methods allow the user to create and save their own methods. Each new method is based on an existing... -
Page 12: Preparation
7. PREPARATION 7.1. SETTING UP THE TITRATOR Verify that: • All of the titrator assemblies have been properly installed (see 1. SETUP section). • The titration vessel is properly sealed against atmospheric moisture (the fittings and tubes are correctly mounted). •... -
Page 13: Preparing & Introducing The Sample
• If the Drift Rate is stable and the endpoint potential is maintained, the titrator will enter Standby mode. The titrator continues to maintain the endpoint potential and update the background drift rate. Note: New (or cleaned) detector electrodes have low electrical resistance due to a lack of platinum-iodine complexes on the electrode surface. -
Page 14: Titration Screen
8.7. TITRATION SCREEN During a titration, the following screen is displayed: 8.8. TITRATION GRAPH Press to display the real time titration graph. The curve displayed is a plot of Electrode Potential vs. Titrated Water. A dashed horizontal line represents the selected endpoint potential. Note: For fresh solvents, the first few titration graphs may look a little noisy. -
Page 15: Results
8.10. RESULTS The results obtained from a titration are stored in a report file that can be viewed, printed, transferred to a USB storage device or a PC. 8.11. VIEWING THE LAST TITRATION DATA • From the main screen, press key. -
Page 16: Saving Data To Usb Storage Device
8.13. SAVING DATA TO USB STORAGE DEVICE This feature allows the results of titrations or drift logging sessions to be saved to USB storage device. • From the main screen, press , the General Options screen will be displayed. • Highlight Save Files to USB Storage Device option using the keys. -
Page 17: Titration Report
8.14. TITRATION REPORT While scrolling using , the fields below can be seen on the titrator display or printed. The same information is available on the saved report file. HI934 - Titration Report Method Name: TEST 1mg/g Time & Date:... - Page 18 Nr TitrWater[µg] Time 467.4 00:00:00 469.0 00:00:01 467.8 00:00:03 19.8 466.2 00:00:04 29.8 465.8 00:00:05 39.7 465.8 00:00:06 49.6 466.2 00:00:07 59.5 466.3 00:00:08 74.4 466.1 00:00:09 89.4 465.8 00:00:10 104.3 466.3 00:00:11 119.2 466.8 00:00:12 134.1 466.8 00:00:13 149.1 467.8 00:00:14 164.0...
- Page 19 793.3 419.9 00:01:02 803.2 415.5 00:01:03 813.1 399.4 00:01:04 823.1 373.8 00:01:05 833.0 356.4 00:01:06 842.9 345.9 00:01:07 852.8 330.7 00:01:09 862.8 300.6 00:01:10 872.7 266.8 00:01:11 882.6 237.4 00:01:12 892.5 202.0 00:01:13 902.4 159.0 00:01:14 903.9 116.6 00:01:15 905.4 88.9 00:01:16 905.4...
- Page 20 955.5 74.5 00:02:07 955.5 75.7 00:02:08 955.5 75.7 00:02:09 955.5 75.2 00:02:10 955.5 76.2 00:02:11 955.5 76.8 00:02:13 Titration Results Method Name: Moisture in Solvent Time & Date: 14:36 Feb 14, 2019 Sample Size: 0.3066 g Drift Value: 5.2 µg/min Titrated Water 955.53 µg Result:...
-
Page 21: Part 2: Instruction Manual
PART 2: INSTRUCTION MANUAL... -
Page 22: Setup
Remove the titrator and accessories from the packaging and examine it carefully to make sure that no damage has occurred during shipping. If any of the items are damaged or missing, please contact your sales representative or your nearest Hanna Instruments service center. Each... -
Page 23: Safety Measures
USB Cable ............................... 1 pc Instruction Manual............................ 1 pc USB Storage Device ..........................1 pc Quality Certificate ............................. 1 pc ISO 8655 Burette Compliance Report ......................1 pc 9. ACCESSORIES section for component pictures. Note: Save all packing materials until you are sure that the instrument functions correctly. Any damaged or defective items must be returned in their original packing materials together with the supplied accessories. -
Page 24: Technical Specifications
1.3. TECHNICAL SPECIFICATIONS Range 1 ppm to 5% Resolution 0.1 ppm Measurement %, ppm, mg/g, μg/g, mg, μg, mg/mL, μg/mL, ppt, Result Units mgBr/100g, gBr/100g, mgBr, gBr Sample Type Liquid or Solid Pre-Titration Conditioning Automatic Background Drift Correction Automatic or user selectable value Determination Endpoint Criteria Fixed mV persistence, Relative drift stop or Absolute drift stop... - Page 25 PC Connection 1 x USB Standard B USB Flash Drive 1 x USB Standard A Peripheral Analytical Balance 1 x DB-9 Socket Devices Printer 1 x DB-25 Socket External PC Keyboard 1 x 6-pin Mini DIN Display 5.7" graphical color display with backlight Languages English, Portuguese, Spanish, French Power Supply...
-
Page 26: Installation
Reagent Exchange Adapter 1.4.2. TITRATOR REAR VIEW Detector Electrode Generator Electrode Locking Screws On/Off Button Balance Interface Connector External Printer Connector Magnetic Stirrer HI934 KARL FISCHER COULOMETRIC TITRATOR KF Electrode RS 232 Input PC Keyboard Connector ON/OFF Generator Electrode Keyboard... -
Page 27: Titrator Assembly
1.4.3. TITRATOR ASSEMBLY Warning! Assembly operations must be completed before connecting the titrator to the power supply! 1.4.3.1. CONNECTING THE AIR PUMP & REAGENT HOLDER To connect the air pump and magnetic stirrer, follow these steps: • Retrieve the air pump cable from inside the left bay. •... -
Page 28: Titration Vessel
The titration takes place in a sealed vessel. The titration vessel can also be referred to as a reaction vessel, titration cell or reaction cell. The primary design features of the HI934 titration vessel include the following: • Durability, easy to use, clean and maintain. -
Page 29: Desiccant Cartridge
The Karl Fischer detector electrode (F) consists of two parallel, platinum pins sealed into a 10 mm diameter glass body. Two steel pins connect the platinum elements to a standard BNC connector, which allows for easy attachment to the HI934. 1.4.3.3.2. KARL FISCHER GENERATOR ELECTRODE The Karl Fischer generator electrode (D) consists of two platinum electrodes (anode and cathode) on a glass body. -
Page 30: Electrical Connections
• Connect the Karl Fisher electrode detector to the BNC connector (A). • Connect the Karl Fisher generator electrode to the 5-pin connector (B) using the supplied cable. • Connect the power adapter cable to the power input connector (E). HI934 KARL FISCHER COULOMETRIC TITRATOR... -
Page 31: Reagent Exchange Adapter
1.4.5. REAGENT, WASTE BOTTLE ASSEMBLY The bottle top assemblies are equipped with desiccant cartridges containing molecular sieves, which ensures that the air passing through the reagent handling system has been dried. Note: Molecular sieves have a limited capacity to absorb moisture and are typically exhausted after 3 to 5 weeks. Molecular sieves can be regenerated at 300 °C. -
Page 32: User Interface
Note: All the performed initialization processes must be successfully completed. If one of the initialization processes fails, restart the titrator. If the problem persists contact your nearest Hanna Instruments Service Center. 2.2. KEYPAD The titrator’s keypad is grouped into five categories. -
Page 33: Function Keys
2.2.1. FUNCTION KEYS If one of these keys is pressed, the associated function is immediately performed. Some of the keys are active only in specific screens: Starts or Stops a titration process Turns the selected stirrer On and Off Reserved Access the Data Parameters Menu (reports, GLP, meter information, report setup) Displays Contextual Help 2.2.2. -
Page 34: Display
2.3. DISPLAY The titrator has a large color graphical display. The main screen is shown below with short explanations of the screen segments. Process Stage Icon Time and Date Process Status Method Name Process Stage Last Dose Volume Stirrer Speed Reminders or Warnings mV Value Drift Value... -
Page 35: Menu Navigation
2.3.2. THE TITRATION SCREEN When the user presses key while in Idle, all titration related processes are started. The titration process consists of Pre-titration, Drift Analysis, Standby and Sample Analysis. Titration screen fields: Method Name Displays the name of the selected method. Time and Date Displays the current date and time. -
Page 36: Selecting A Menu Item
2.4.2. SELECTING A MENU ITEM To select an item from the menu screen, use the keys to move the cursor. When the menu is larger than the display, a scroll bar is active on the right side. To activate the selected menu item, press key or 2.4.3. -
Page 37: General Options
3. GENERAL OPTIONS The General Options screen gives access to options that are not directly related to the titration process. In Idle mode, on the main screen press to access this screen. In Pre-titration, Standby or during an Analysis press the <<Home>>... -
Page 38: Restore Files From Usb Storage Device
Copies all currently displayed files from the titrator to the USB storage device. Deletes the highlighted file. Deletes all currently displayed files. Note: The saved files will be stored on the USB key in the HI934 folder, as follows: • Methods: USB Drive\HI934\Methods\*.mtd • Reports: USB Drive\HI934\Reports\*.rpt Note: The USB Storage Device has to be formatted FAT or FAT32. -
Page 39: Standby Mode
3.3. STANDBY MODE Option: Disabled or Enabled When enabling this option the titrator will return to Standby mode automatically after the titration has been completed. 3.4. STANDBY DURATION Option: 10 minutes to 72 hours The user can enter the period of time for which the cell is kept dry and ready for subsequent analysis after a titration has finished. -
Page 40: Reagent Exchange Reminder
3.5. REAGENT EXCHANGE REMINDER 3.5.1. REAGENT EXCHANGE TIMER Option: Disabled to 31 days and 23 hours A warning message will be displayed on the screen after the set period of time has elapsed. 2-20... -
Page 41: Water Consumption
3.5.2. WATER CONSUMPTION Option: 100.0 to 5000.0 mg A warning message will be displayed on the screen when the reagent has consumed the set amount of water. 3.5.3. RESET REMINDER The reagent exchange reminder will be reset. 2-21... -
Page 42: Usb Link With Pc
3.6. USB LINK WITH PC In order to use this feature, the USB cable needs to be connected from the titrator to the PC. Make sure that HI900 application is running on the PC. “Active / Inactive” shows the status of the USB link with the PC. “Active”... -
Page 43: Stirrer
Note: At least one balance must be in the list. The balance configuration settings must match the settings for your balance, the setting on the titrator or balance may need to be changed. Users should consult their balance instruction manual. To test the connection with the balance press 3.8. -
Page 44: Printer Mode
3.9. PRINTER MODE Option: Ansi, Ascii, Text Ansi Use this mode when the printer is set as Ansi. All the accented characters and symbols available in titrator will be printed on the printer. Ascii Use this mode when the printer is set as Ascii. In this case only some of the accented characters and symbols available in titrator will be printed on the printer. -
Page 45: Display Settings
3.11. DISPLAY SETTINGS This option allows the user to customize the display settings. Option Keys Increases the backlight saver time interval Decreases the backlight saver time interval The backlight intensity can be adjusted using the keys. There are 8 levels of backlight intensity, ranging from 0 to 7. The displayed color palette allows for selection of appropriate backlight intensity. -
Page 46: Beeper
3.12. BEEPER Option: On or Off If enabled (on) an audible alert will sound after a titration is completed, when an invalid key is pressed or when a critical error occurs during titration. 3.13. LANGUAGE Option: English, Español, Português, Français 2-26... -
Page 47: Calibration Check
3.14. CALIBRATION CHECK This option allows the user to verify the electrode mV input and the electrode polarization current. The electrode mV input and the electrode polarization current are measured with the HI900941 calibration key and a mV/μA multimeter (not included). Disconnect the KF electrode, then connect the HI900941 calibration key to the electrode input (BNC connector). -
Page 48: Reset To Default Settings
3.15. RESET TO DEFAULT SETTINGS This will delete all the user methods and restore all manufacturer settings such as titrator configuration, standard method parameters, etc. 3.16. OPTIMIZE MEMORY SPACE This option allows the user to run a memory defragmentation utility in order to optimize memory space. Press and then restart the titrator. -
Page 49: Update Software
3.17. UPDATE SOFTWARE This screen allows the user to update the titrator software from a USB storage device containing a software setup kit. To update the software: • Copy the “Setup934” folder to a USB storage device. • Insert the USB storage device into the titrator. •... -
Page 50: Titration Methods
4. TITRATION METHODS All parameters required to complete an analysis are grouped into a method. The titrator is supplied with a pack of standard methods, these methods have been developed by Hanna Instruments and can be used to create user methods. -
Page 51: Upgrading Standard Methods
4.2.1. UPGRADING STANDARD METHODS To upgrade the titrator with new standard methods, follow the steps below: From USB storage device 1) Insert the USB storage device into the USB port, located on the right side of the titrator. 2) Press from the main screen. -
Page 52: User Methods
4.3. USER METHODS These methods are defined by the user (usually by modifying a standard method). The user methods can be developed in accordance with the requirements of the user. All method parameters can be modified by the user. 4.3.1. CREATING USER METHODS To create a new user method, start from a standard or previously generated user method and follow these steps: 1) Press from the main screen. -
Page 53: Viewing / Modifying Method
4.4. VIEWING / MODIFYING METHOD To modify the method parameters, press from the main screen. A list of all the parameters for the selected method will be displayed. Press the keys to highlight the option you want to modify and press , and highlight Save Method. -
Page 54: Method Options
4.5. METHOD OPTIONS Note: Some options cannot be modified if a standard method is selected. 4.5.1. METHOD NAME Option: Up to 24 characters 4.5.2. METHOD REVISION Option: Up to 3 characters 2-34... -
Page 55: Method Type
4.5.3. METHOD TYPE Option: KF Coulometric, Bromine Index 4.5.4. PRE-ANALYSIS STIR TIME Option: 0 to 1000 seconds To avoid erroneous results or unreachable endpoints when analyzing samples with limited solubility, the sample must be completely dissolved in the reagent prior to the start of a titration. After the sample has been added to the titration beaker, the titrator will stir for the set period of time before any iodine is generated or bromine is consumed. -
Page 56: Stirbar Type
4.5.5. STIRRER SPEED Option: 200 to 2000 RPM The stirrer will remain on for as long as the method is active. When the stirrer is running, the speed can be adjusted at any time by using the keys. 4.5.6. STIRBAR TYPE Option: Up to 10 characters 2-36... -
Page 57: Drift Entry
4.5.7. DRIFT ENTRY Option: Automatic or User Automatic The drift rate will be calculated automatically after the pre-titration of the reagent. User The drift is set to a fixed value (entered by the user). The user enters the estimated drift value. The drift analysis stage will be skipped. -
Page 58: Sample Parameters
4.5.9. SAMPLE PARAMETERS This screen allows the user to configure parameters for the sample to be analyzed. 4.5.9.1. SAMPLE DETERMINATION Option: Normal, External Extraction, External Dissolution Normal The analysis is performed through direct titration of liquid samples that are soluble in the solvent and have homogeneous distribution in water. - Page 59 4.5.9.1.1. NORMAL Sample Name Option: Up to 15 characters Sample Type Option: Mass or Volume 2-39...
- Page 60 Sample Size Option: 0.0010 to 100.0000 g or 0.0010 to 100.0000 mL Sample Density (by volume only) Option: 0.200 to 3.000 g/mL 2-40...
- Page 61 4.5.9.1.2. EXTERNAL EXTRACTION Sample Name Option: Up to 15 characters Sample Size Option: 0.0010 to 100.0000 g 2-41...
- Page 62 External Solvent Size Option: 0.0010 to 100.0000 g External Solvent Concentration Option: 1.0 to 1000000.0 ppm Extracted Sample Size Option: 0.0010 to 100.0000 g 2-42...
- Page 63 4.5.9.1.3. EXTERNAL DISSOLUTION Sample Name Option: Up to 15 characters Sample Size Option: 0.0010 to 100.0000 g 2-43...
- Page 64 External Solvent Size Option: 0.0010 to 100.0000 g External Solvent Concentration Option: 0.0100 to 100.0000 % Dissoluted Sample Size Option: 0.0010 to 100.0000 g 2-44...
-
Page 65: Control Parameters
4.5.10. CONTROL PARAMETERS The user can access and edit the parameters related to the titration. 4.5.10.1. TITRATION SPEED Option: Slow, Normal, Fast, Auto 4.5.10.2. IMPOSED CURRENT Option: 1 μA, 2 μA, 5 μA, 10 μA Use the keys to select the electrode polarization current from the predefined list. Note: Higher polarization currents will speed the contamination of the electrode and potentially degrade samples. -
Page 66: End Point Value
4.5.10.3. END POINT VALUE Option: 5.0 to 600.0 mV Use the numeric keypad to enter the mV value at which the titration endpoint has been reached. This value is also used to determine when the pre-titration is complete. 4.5.11. TERMINATION PARAMETERS This screen allows the user to set the control parameters related to titration termination. - Page 67 4.5.11.1. MAXIMUM DURATION Option: 10 to 3600 seconds If the titration endpoint is not reached, the titration will be terminated after the maximum duration. The error message “Value Out of Range” will appear on the display. 4.5.11.2. MAXIMUM WATER TITRATED Option: 0.1 to 100.0 mg The maximum water reacted during the titration must be set according to the analysis.
-
Page 68: Termination Criterion
4.5.11.3. TERMINATION CRITERION Option: mV End Point, Absolute Drift, Relative Drift mV End Point The titration is terminated when the potential remains below a set endpoint value for a specified period of time. Absolute Drift The titration is terminated when the actual drift is less than the predefined absolute drift value. Relative Drift The titration is terminated when the actual drift is less than the sum between the initial drift and the predefined relative drift. -
Page 69: Result Unit
4.5.11.5. ABSOLUTE DRIFT Option: 0.0 to 40.0 μg/min 4.5.11.6. RELATIVE DRIFT Option: 0.0 to 40.0 μg/min 4.5.12. RESULT UNIT Option: %, ppm, mg/g, μg/g, mg, μg, mg/mL, μg/mL 2-49... -
Page 70: Printing
4.5.13. SIGNIFICANT FIGURES Option: Two (XX), Three (XXX), Four (XXXX), Five (XXXXX) This option allows you to set the format for displaying the final titration result. 4.6. PRINTING To print method parameters, press from the main screen. Press and wait a few seconds until the printer completes the job. If no printer is connected to the dedicated socket, or if the printer is offline, an error message will appear on the display (see 7.5. -
Page 71: Titration Mode
5.1. IDLE MODE The titrator first enters Idle mode when it is switched on. All of the HI934’s software features and settings can be accessed from the Idle mode. This includes all of the user-adjustable method parameters, reagent handling system, file transfers, calibration checks, software upgrades, options for interface with PC and accessories as well as burette options. -
Page 72: Pre-Titration
In pre-titration, the residual water on the interior surface of the titration vessel, the water contained in the entrapped air and the small amount of water from the reagent is eliminated. HI934 generates iodine electrolytically inside the titration vessel to react with the residual water. After the electrode potential has stabilized, the titrator moves into the Drift Analysis. -
Page 73: Standby
HI934 will automatically subtract the drift rate from the titration results. This is important for titration accuracy when analyzing samples with very low water content, where the amount of water that has leaked into the cell is a considerable fraction of the total water titrated during the analysis. -
Page 74: Sample Analysis
10) Calculate the mass of the sample added to the titration cell (subtract the mass of the syringe after the sample has been added from the mass of the syringe before sample addition). 2-54 11) Enter the calculated mass of the sample into the HI934... - Page 75 5.5.1.2. AUTOMATIC MASS ACQUISITION FROM ANALYTICAL BALANCE (SAMPLE SIZE BY MASS ONLY) The sample size can be automatically acquired from the balance when connected to the titrator using the RS 232 interface. 5.5.2. PROCEDURE 1) Place the syringe containing the sample on the balance. 2) Wait until the reading has stabilized and press 3) Add the sample in the titrator vessel.
- Page 76 The titrator returns to the previous screen and the sample size is automatically updated. Press to begin the analysis. Note: The user must make sure that the balance and the titrator are properly configured and the balance feature is enabled (see section).
- Page 77 5.5.5. VIEWING THE TITRATION CURVE During a titration, the titration curve can be displayed on the Titration Graph screen, by pressing . The titration ID report is also displayed inside the graph window. 5.5.6. RESULTS When the endpoint is reached, the titration is finished and the following screen is displayed. This screen displays information about the titration (duration, drift value used for compensation, sample size, titration report ID).
- Page 78 Press to see the titration graph. Press to print the report. 5.5.7. SAMPLE ANALYSIS HISTORY By pressing , the results will be added to the Sample Analysis History. Sample Analysis History can be used to obtain an average of the titration results. Use the keys to scroll the results list.
-
Page 79: Auxiliary Functions
If is not pressed, the air pump will automatically shut off after 20 seconds. 3) The HI934 will prompt the user to verify that the titration cell has been filled to the “Min” line (approximately 75 mL) Press to return to the Idle screen. -
Page 80: Emptying The Beaker
6.1.2. EMPTYING THE BEAKER To remove the waste from the titration beaker: 1) Loosen the waste tube fitting slightly and slide the waste tube down until it reaches the bottom of the beaker. 2) From the Air Pump screen, press and allow the air pump to run until all of the waste has been removed. - Page 81 6.3.1. REVIEWING LAST REPORT The last titration report can be reviewed. The information seen in the report is based on the selections made in the Setup Titration Report screen. The following option keys are available: Review the titration graph. Print the titration report. Return to the previous screen.
-
Page 82: Meter Information
6.3.3. GLP DATA Option: Up to 20 characters Company Name Allows the company name to be recorded in each report. Operator Name Allows the operator name to be recorded in each report. Electrode Name Allows the electrode name to be recorded in each report. Fields 1, 2, 3 Allows any additional information to be recorded in each report. -
Page 83: Setup Titration Report
Note: If more than 1 year elapsed from the calibration date of the analog board, the message Analog Calibration Due will appear on the main screen and analog board recalibration must be performed. 6.3.5. SETUP TITRATION REPORT Customize a unique report to record the titration results. An asterisk means that it will be included in the titration report. Adds the highlighted information to the report. -
Page 84: Maintenance & Peripherals
7. MAINTENANCE & PERIPHERALS 7.1. GENERATOR ELECTRODE MAINTENANCE Caution! Never heat generator electrodes over 50 °C when drying! This could cause permanent damage to the connector! Generator electrodes should be cleaned every 1 to 2 weeks, more frequently if working with “dirty” or “oily” samples. 1) Remove the desiccant cartridge from the top of the generator and disconnect the cable. -
Page 85: Reagent Adapter Holder Maintenance
7.3. REAGENT ADAPTER HOLDER MAINTENANCE The glass tube of the reagent adapter holder can be removed for cleaning if reagent and/or waste has dripped into it. To clean the glass tube: 1) Remove the reagent exchange adapter from the top of the holder. 2) Slowly remove the glass tube. -
Page 86: Connecting To A Computer
7.5.2. CONNECTING TO A COMPUTER The titrator can be connected to a computer using a USB cable. HI900 PC application needs to be installed on the PC. Generator Stirrer Connect the cable to the USB port on the rear panel of the titrator. Connect the cable to the USB port on the PC. -
Page 87: Connecting An External Pc Keyboard
7.5.3. CONNECTING AN EXTERNAL PC KEYBOARD This connection allows you to use an external PS/2 PC keyboard in addition to the titrator’s keypad. Generator Stirrer The correspondence between the titrator’s keypad and the United States 101-type external keyboard can be found below: External PC Keyboard (United States 101) Titrator Keypad... -
Page 88: Method Optimization
8. METHOD OPTIMIZATION 8.1. TITRATION SETTINGS The default settings included with standard methods have been developed by Hanna Instruments in order to provide accurate results for the majority of samples without requiring additional analyst input or method fine-tuning. However, in order to suit a wider variety of sample types and matrices, all of the HI934 titration parameters are customizable. - Page 89 8.1.1.2. TITRATION SPEED HI934 predicts the approaching endpoint and reduces the volumes of titrant added until the endpoint is reached. This is a software controlled process known as dynamic dosing. Dynamic dosing prevents the addition of titrant beyond the endpoint and provides enhanced data density in the vicinity of the endpoint, resulting in accurate endpoint determination and faster titrations.
-
Page 90: Relative Drift Stop
8.1.3.2. STIRRING SPEED The HI934’s stirring speed can be set between 200 and 2000 RPM with 100 RPM resolution. The stirring system is equipped with an optical feedback mechanism to ensure that the stirring motor is rotating at the speed set by the user. -
Page 91: The Sample
8.1.3.3. BACKGROUND DRIFT RATE ENTRY This option provides a choice between the HI934’s automatic drift rate determination and assigning a fixed value to be used by the titrator as the drift rate. The primary benefit of bypassing the automatic drift rate feature is saving time. This is appropriate when titrating... -
Page 92: Liquid Samples
12) Enter the calculated mass of the sample into the HI934. When adding a liquid sample with a needle and syringe, it is important that the sample is introduced directly into the solvent. - Page 93 External dissolutions are used for all solid samples or mixed-phase samples that will dissolve in a solvent mixture. Sample preparation and choice of solvent or solvent mixture is sample specific. Consult an applicable standard method for procedural details. HI934 will conduct the necessary calculations automatically when ‘external dissolution’ is selected from the sample type menu.
-
Page 94: Karl Fischer Reagent System
Solid samples typically exhibit inhomogeneous water distributions and must therefore be thoroughly reduced to powder or homogenized. The procedure for homogenization depends upon the characteristics of the specific sample. Homogenization is particularly suited for semi-solid samples and suspensions and is the only method that can disrupt plant and tissue cells in order to release water present inside the cells. -
Page 95: Accessories
9. ACCESSORIES 9.1. ANOLYTE FOR CELLS WITH AND WITHOUT DIAPHRAGM Honeywell HYDRANAL™ - Coulomat AG (Catalog Number 34836) ® HYDRANAL™ - Coulomat E (Catalog Number 34726) GFS Chemicals Watermark - Vessel Solution, Pyridine-free (Catalog Number 1612) ® ® 9.2. ANOLYTE FOR CELLS WITH DIAPHRAGM Honeywell HYDRANAL™... -
Page 96: Titrator Components
Generator Electrode without Tubing for Solvent/Waste Diaphragm Handling (2 pcs.) HI900512 HI900535 Air Pump and Magnetic Tubing for Air Pump (2 pcs.) Stirrer for HI933/HI934 HI900536 HI930180 Desiccant Cartridge for Desiccant Cartridge for Reagent/ Generator Electrodes Waste Bottles HI900564 HI900538... -
Page 97: Reagent Adapter Holder
Open-top GL18 Cap Glass Joint Grease HI900566 HI900543 Glass Stopper, Standard Generator Cable Taper 19 HI900931 HI900563 Reagent Exchange Adapter Calibration Key HI900568 HI900940 Reagent Adapter Holder Power Adapter (USA Plug) HI930182 HI900946 Molecular Sieves, 150 g Power Adapter (European Plug) HI900551 HI900947 Septum (5 pcs.) - Page 98 2-78...
-
Page 99: Part 3: Applications
PART 3: APPLICATIONS... -
Page 100: Hi9001En Titrator Validation With 1.0 Mg/G Water Standard
HI9001EN TITRATOR VALIDATION WITH 1.0 mg/g WATER STANDARD DESCRIPTION ANALYSIS Method for the validation of the titrator accuracy. The • Fill the syringe and needle with the standard. Any results should be within the uncertainty limits specified unused standard remaining in the ampoule should by the manufacturer of the standard. - Page 101 METHOD PARAMETERS CALCULATIONS Name: Validation- 1.0mg/g Std Water titrated: O (ug) Method Revision: Final Results Units: mg/g Type: KF Coulometric Sample mass: 1.0000 g Pre-Analysis Stir Time: 5 Sec Stirring Speed: 900 RPM Stirbar Type: Medium Drift Entry: Automatic Reagent: General Purpose RESULTS Sample Parameters:...
-
Page 102: Hi9301En Moisture Determination In Solvent
HI9301EN MOISTURE DETERMINATION IN SOLVENT for external dissolution or extraction DESCRIPTION ANALYSIS Method for the determination of moisture in extraction / • Prepare an extraction / dissolution vessel with dissolution solvent. Solvents should be less than 1.00 solvent and stir (see an applicable method for proper mg/g, substances with very low water content may solvent amount and stirring time). - Page 103 METHOD PARAMETERS CALCULATIONS Name: Moisture in Solvent Water titrated: O (ug) Method Revision: Final Results Units: Type: KF Coulometric Sample mass: 1.0000 g Pre-Analysis Stir Time: 5 Sec Stirring Speed: 900 RPM Stirbar Type: Medium Drift Entry: Automatic Reagent: General Purpose RESULTS Sample Parameters: Sample Determ.:...
-
Page 104: Hi9901En Bromine Index Of Aromatic Hydrocarbons
HI9901EN BROMINE INDEX OF AROMATIC HYDROCARBONS Adaptation of ASTM D1492-08 DESCRIPTION • Press from the main screen. Use the arrow Method for the determination of bromine index of keys to highlight HI9901EN BrIndex of Aromatics bromine-reactive substances. This method typically and press applies to aromatic hydrocarbons with only trace amounts •... - Page 105 METHOD PARAMETERS CALCULATIONS Name: BrIndex of Aromatics Bromine Consumed: Br(mg) Method Revision: Final Results Units: mg/100g Type: Bromine Index Sample mass: 1.0000 g Pre-Analysis Stir Time: 30 Sec ⁄ Stirring Speed: 1600 RPM bromine (mg) mg 100 g ×100 1.0000 g Stirbar Type: Medium Drift Entry:...
-
Page 107: Titration Theory
PART 4: TITRATION THEORY... -
Page 108: Introduction To Titrations
1. TITRATION THEORY 1.1. INTRODUCTION TO TITRATIONS A titration is a quantitative, volumetric procedure used in analytical chemistry to determine the concentration of an analyte (the species being measured) in solution. The concentration of the analyte is determined by slowly adding a titrant (reagent) to the solution. -
Page 109: Types Of Titrations
2. TYPES OF TITRATIONS 2.1. TITRATIONS ACCORDING TO THE MEASUREMENT METHOD 2.1.1. AMPEROMETRIC TITRATIONS An amperometric titration is performed by placing two electrodes (often a metal ion selective electrode and a reference electrode) into the sample solution and keeping the potential of the metal electrode at a selected voltage. The current that flows, due to the oxidation or reduction of a reactant or product, is plotted vs. -
Page 110: Spectrophotometric Titrations
The potential that develops in the electrochemical cell is the result of the free energy change that would occur if the chemical phenomena were to proceed until the equilibrium condition has been satisfied. There are many types of titrations where potentiometry can be used, e.g. pH electrodes for acid-base titrations, platinum ORP electrodes in redox titrations, ion selective electrodes, such as chloride or fluoride for a specific ion titration, and silver electrodes for argentometric (silver-based) titrations. - Page 111 2.2.1.1. HISTORY OF KARL FISCHER TITRATIONS Water determination by Karl Fischer titration is based on the reaction described by Bunsen in 1853 in which sulfur dioxide is oxidized by iodine in the presence of water. + SO + 2 H O →...
- Page 112 Anode: 2 I → I2 + 2 e Cathode: 2 RN-H + 2e → H + 2 RN The iodine that is generated at the anode reacts with the water from the sample according to the Karl Fischer reaction. The amount of water that is reacted during a titration can be calculated based on the total charge that has passed through the generator.
- Page 113 2.2.1.4. VISUAL INDICATION OF KARL FISCHER TITRATIONS Visual methods, originally used by Karl Fischer, are limited in application, require a high degree of skill and have been made obsolete by electrometric indication. For successful visual indication, titration samples must be colorless. Additionally, the solution coloration varies between polar and non-polar titration media.
-
Page 114: Acid-Base Titrations
Electrometric methods result in over-titration or titration past the equivalence point where excess iodine is present in the titration solution. Titration past the equivalence point is acceptable for two reasons. First, due to the sensitivity of the electrometric methods, titrations are always carried out to the same, slight excess of iodine resulting in highly reproducible titrations. -
Page 115: Complexometric Titrations
Figure 5 Figure 5 shows the titration of 50 mL of 0.1N NaCl with 0.1N AgNO . The potentiometric signal is from a chloride ISE, and is plotted as pCl (- log [Cl 2.2.4. COMPLEXOMETRIC TITRATIONS A complex is a species where a central metal ion is covalently bonded to one or more electron donating groups called ligands. In a complexometric titration, metal ions are titrated using a titrant that binds strongly to it. -
Page 116: Ion Selective Titrations
2.2.5. ION SELECTIVE TITRATIONS The most popular ion selective titration is an acid-base titration. The hydrogen ion concentration is specifically measured and monitored during the titration process to locate the equivalence point. Using an ion selective electrode (ISE) as the indicator electrode, the potentiometric signal (in mV) is used to directly follow a specific ion’s concentration (or activity). -
Page 117: Redox Titrations
2.2.8. REDOX TITRATIONS There are a number of oxidation-reduction reactions that can be used to determine unknown concentration by titration. If the reaction goes to completion, is fast and has an analytical signal available to follow it, a titration can be performed. The term “fast”... -
Page 118: Titration Procedure
Figure 9 shows three different types of multiple endpoint titrations. Graph A shows the titration of a polyprotic acid. The different acid strengths of the first and second proton can be determined. Graph B illustrates a mixture of two different metal redox species, where the different redox potentials allow the species to be separated. -
Page 119: Automatic Titration
Wrap fingers around tap, keeping pressure on to stop tap coming out Swirl flask constantly 3.2. AUTOMATIC TITRATION Automatic titrators are high-precision analytical instruments that deliver the titrant, monitor the physical change associated with the titration reaction, automatically stops at the endpoint and calculates the concentration of the analyte. -
Page 120: Titration Results
4. TITRATION RESULTS 4.1. ACCURACY The factors most critical to achieving accurate results with the HI900 titration systems are the concentration of the sample, size of the sample and having an optimized set of method parameters. 4.2. REPEATABILITY Repeatability, or the agreement between replicate determinations, is expressed quantitatively as the relative standard deviation (RSD). -
Page 121: Chemical Reaction Errors
4.3.4. CHEMICAL REACTION ERRORS • Inappropriate solvent or sample, resulting in side reactions • Poor mixing of the titrant and solvent or sample in the titration vessel • Reaction between titrant and sample is not rapid • Reaction does not go to completion •... -
Page 122: Calculations
5. CALCULATIONS 5.1. EQUATIONS USED IN VOLUMETRIC KARL FISCHER TITRATIONS 5.1.1. CALCULATION OF WATER CONTENT AS % MASS FROM SAMPLES MEASURED BY MASS Concentration of Sample (% w/w) sample Volume of Titrant (mL) titrant Titer Titrant Titer (mg/mL) Mass of Sample (g) sample 5.1.2. - Page 123 5.1.5. CALCULATION OF WATER CONTENT IN EXTERNAL DISSOLUTION SAMPLES Concentration of Sample (% w/w) sample Mass of Solvent (g) solvent Water Content of Dissoluted Sample (w/w) solution Water Content of Solvent (w/w) solvent Mass of Sample (g) sample 5.1.6. CALCULATION OF WATER CONTENT IN EXTERNAL EXTRACTION SAMPLES Concentration of Sample (% w/w) sample Mass of Solvent (g)
-
Page 124: Equations Used In Titrations
5.1.9. CALCULATION OF TITER (WATER EQUIVALENT OF THE TITRANT) USING WATER STANDARDS Titrant Titer (mg/mL) titrant Mass of Sample (g) sample Water Content of Standard (mg/g) standard Volume of Titrant (mL) titrant 5.2. EQUATIONS USED IN TITRATIONS The main variables used in calculating a result from a titration are the sample volume, the concentration of the titrant, and the volume of titrant required to reach the equivalence point. -
Page 125: Blank Titration
5.2.3. STANDARDIZE TITRANT BY MASS Titrant standardization is the second most important calculation in titrations. A primary standard is titrated in order to determine the concentration of the titrant. This is essentially a typical titration calculated in “reverse”, where the concentration of the solution is known and the titrant is unknown. -
Page 126: Multiple Endpoint Titration
5.2.6. MULTIPLE ENDPOINT TITRATION Some titrations have two or more endpoints, each corresponding to the equivalence point for a specific reaction. Multiple endpoint titrations are similar to a blank titration in that the volume of titrant required to reach the first endpoint is subtracted from the titrant volume used to reach the next sequential endpoint. -
Page 127: Glossary
6. GLOSSARY Acid A chemical species that can donate one or more protons (hydrogen ions). Acid-Base Titration Stoichiometric neutralization titrations, based upon the reaction that occurs between an acid and base. Activity A physical property corresponding to the concentration of all ions in a solution. Electrodes respond to activity. Amperometric Titration Titrations where the current flow between two electrodes (often a metal electrode and a reference electrode) are used to monitor the titration progress. - Page 128 Equivalence point The point where the quantity of titrant is stoichiometrically equal to the quantity of analyte. Formal The theoretical number of equivalents per liter of the solution. It is used in solutions where the exact concentration of a species may be affected by the other ions present, therefore the stated concentration may not be exactly correct. Gravimetric Analysis A quantitative determination of an analyte based on the mass of the solid.
- Page 129 Non-aqueous A solution that does not contain water. Non-aqueous Titration A titration that is performed in non-aqueous solutions. Typically used to titrate very weak acid and bases to eliminate the leveling effect water has on all acids and bases dissolved in it. Normal The concentration of a solution which accounts for any stoichiometric difference between the various species in a solution.
- Page 130 Stoichiometry The quantitative relationship of the reactants and products in a chemical reaction. Titrant The chemical added in a titration that causes the given reaction to occur. Titration A quantitative, volumetric procedure used in analytical chemistry to determine the concentration of an analyte in solution.
- Page 131 If the instrument is to be returned to Hanna Instruments, first obtain a Returned Goods Authorization (RGA) number from the Technical Service department and then send it with shipping costs prepaid.
- Page 132 World Headquarters Hanna Instruments Inc. Highland Industrial Park 584 Park East Drive Woonsocket, RI 02895 USA www.hannainst.com MAN934 Printed in ROMANIA...
Need help?
Do you have a question about the HI934 and is the answer not in the manual?
Questions and answers