Table of Contents
Advertisement
Advertisement
Chapters
Table of Contents

Related Manuals for Hanna Instruments HI931


Summary of Contents for Hanna Instruments HI931
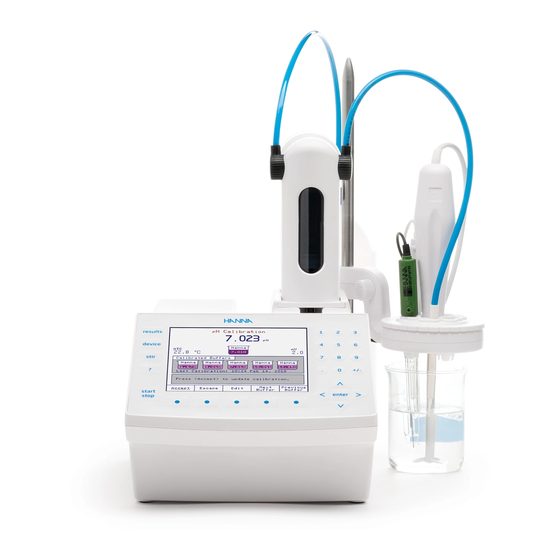
- Page 1 HI931 AUTOMATIC POTENTIOMETRIC TITRATOR...
- Page 3 This guide outlines the principles of operation of the titrator. It covers the chemistry of titrations, titration types, and result calculations. If you need additional technical information, do not hesitate to e-mail us at tech@hannainst.com or view our worldwide contact list for a Hanna Instruments representative near you at www.hannainst.com.
- Page 5 HI931 AUTOMATIC POTENTIOMETRIC TITRATOR...
- Page 6 For detailed information illustrating the extensive capabilities of your titrator, please refer to the Instruction Manual. © 2018 Hanna Instruments All rights are reserved. Reproduction in whole or in part is prohibited without the written consent of the copyright owner, Hanna Instruments Inc., Woonsocket, Rhode Island, 02895, USA.
-
Page 7: Table Of Contents
INTRODUCTION ................................. SAFETY MEASURES ................................TITRATOR CONNECTIONS ..............................USER INTERFACE ................................HOW TO SELECT YOUR LANGUAGE ..........................HOW TO USE THE CONTEXTUAL HELP ..........................METHODS ..................................HOW TO CALIBRATE A pH ELECTRODE ..........................HOW TO PERFORM A TITRATION ............................ -
Page 8: Introduction
INTRODUCTION HI931 automatic titrator is designed to perform a wide variety of potentiometric titrations with high accuracy, flexibility and reproducibility, allowing the user to obtain both accurate results and high-speed analysis. The titrator can perform fixed endpoint or equivalence point titrations and direct measurements by measuring the pH/mV and temperature of the sample. -
Page 9: Titrator Connections
TITRATOR CONNECTIONS FRONT VIEW REAR VIEW... -
Page 10: User Interface
USER INTERFACE Keypad The titrator’s keypad has 27 keys grouped in five categories, as follows: Display The user interface contains several screens. In each screen, many information fields are present at the same time. The information is displayed in an easy-to-read manner. Virtual option keys describe the function performed when the corresponding option key is pressed. -
Page 11: How To Select Your Language
100 methods (standard and user). Standard Methods Each titrator is supplied with a package of standard methods. Standard method packs are developed at Hanna Instruments to meet analysis requirements of specific industries (e.g., water treatment, wine, dairy, etc.). -
Page 12: How To Perform A Titration
• Use the to select pH 4.01 buffer solution. • Use the second beaker of pH 4.01 buffer solution to rinse the pH electrode, temperature probe and propeller stirrer. • Immerse the pH electrode, temperature probe and propeller stirrer in the pH 4.01 buffer solution. The pH electrode’s bulb must be completely immersed in the buffer solution and the reference junction needs to be 5-6 mm below the surface. - Page 13 Setup Titration Report Users can select the information that is stored for each titration. To setup the titration report, follow the procedure below: • From the main screen, press . The Data Parameters screen will be displayed. • Highlight Setup Titration Report and press •...
- Page 14 Viewing Graph During Titration After a few doses are dispensed, will become active. Press to display the real-time titration graph. The curves displayed are plots of the pH and the 1st derivative versus Titrant Volume (for details, see the Instruction Manual). The two graphs are scaled to fit in the same screen window.
- Page 15 When the titration has ended, the titrator will display the equivalence endpoint volume and the final concentration of the analyte together with the "Titration Completed" message. To view the titration graph and/or results, press When the titration ends, an “x” will mark the endpoint on the pH versus titrant volume curve in the Graph of Titration Data screen.
- Page 16 While scrolling with the keys, the fields below can be seen on the titrator display or printed. The same information is available on the saved report file (Ti_00007.rpt in this example). HI931 - Titration Report Method Name: Neutralization w/ NaOH Time &...
- Page 17 Pump Configuration: Titrant pump: Pump 1 Dosing Type: Dynamic Min Vol: 0.050 mL Max Vol: 0.500 mL delta E: 20.000 mV End Point Mode: pH 1EQ point,1st Der Recognition Options Threshold: 50 mV/mL Range: NO Filtered Derivatives: NO Pre-Titration Volume: 0.000 mL Pre-Titration Stir Time: 0 sec Measurement Mode: Signal Stability delta E: 1.0 mV delta t: 2 sec Min wait: 2 sec Max wait: 15 sec Electrode Type: pH Blank Option: No Blank Calculations: Sample Calc. by Volume Dilution Option: Disabled Titrant Name: 0.1N HaOH Titrant Conc.: 0.1000 N (eq/L) Analyte Size: 10.0000 mL Analyte Entry: Fixed Maximum Titrant Volume: 20.000 mL Potential Range: -2000.0 to 2000.0 mV Volume/Flow Rate: 25 mL / 50.0 mL/min Signal Averaging: 1 Reading Significant Figures: XXXXX N (eq/L) --> meq/L V eq 1000meq -*--*------- L eq ------------- --*------ 1000mL V = volume dispensed in liters.
- Page 18 15 5.800 193.0 3.614 -70.5 25.1 A 00:01:31 16 6.077 21.0 6.556 -620.0 25.1 A 00:01:48 17 6.128 -38.2 7.568 -1183.2 25.1 A 00:02:03 18 6.177 -123.6 9.031 -1708.0 25.1 A 00:02:19 19 6.227 -157.7 9.616 -682.8 25.1 A 00:02:28 20 6.278 -174.5 9.903 -335.8 25.1 A 00:02:35 21 6.339 -187.8 10.130 -215.9 25.1 A 00:02:42 Titration Results Method Name: Neutralization w/ NaOH Time & Date: 15:01 Jun 13, 2018 Analyte Size: 10.0000 mL End Point Volume: 6.144 mL pH Equivalence Point: 8.063 Result: 61.444 meq/L Initial & Final pH: 2.219 to 10.130 Titration Duration: 2:42 [mm:ss] Titration went to Completion Analyst Signature: ____________________ QS931 10/18...
- Page 19 HI931 AUTOMATIC POTENTIOMETRIC TITRATOR...
- Page 21 Hanna Instruments representative near you at www.hannainst.com. © 2018 Hanna Instruments All rights are reserved. Reproduction in whole or in part is prohibited without the written consent of the copyright owner,...
- Page 22 CHAPTER 1. INTRODUCTION CHAPTER 2. SETUP CHAPTER 3. USER INTERFACE CHAPTER 4. GENERAL OPTIONS CHAPTER 5. TITRATION METHODS CHAPTER 6. TITRATION MODE CHAPTER 7. pH MODE CHAPTER 8. mV MODE CHAPTER 9. ISE MODE CHAPTER 10. AUXILIARY FUNCTIONS CHAPTER 11. MAINTENANCE, PERIPHERALS APPENDIX 1.
- Page 23 1. INTRODUCTION HI931 is an automatic potentiometric titrator with high accuracy, great flexibility and repeatability. The titrator is designed to perform a variety of potentiometric titrations, allowing the user to obtain both good results and high-speed analysis. The main attributes of the...
- Page 25 CHAPTER 2. SETUP 2.1. UNPACKING ................................2.2. SAFETY MEASURES ..............................2.3. INSTALLATION ................................2.3.1. TITRATOR FRONT VIEW .............................. 2.3.2. TITRATOR REAR VIEW ..............................2.3.3. TITRATOR REAR VIEW WITH PERISTALTIC PUMP ......................2.3.4. TITRATOR RIGHT-SIDE VIEW ............................2.3.5. TITRATOR ASSEMBLY ..............................2.3.5.1.
-
Page 27: Unpacking
Remove the titrator and accessories from the packaging and examine it carefully to make sure that no damage has occurred during shipping. Notify your nearest Hanna Service Center if damage is observed. Each HI931 potentiometric titrator is supplied with: ITEM QUANTITY Titrator .................................... -
Page 28: Safety Measures
2.2. SAFETY MEASURES The following safety measures must be followed: 1. Never connect or disconnect the pump assembly with the titrator turned on. 2. Verify that the burette and the attached tubing are assembled correctly (see Maintenance, Peripherals, Burette Maintenance for more details). -
Page 29: Titrator Rear View
2.3.2. TITRATOR REAR VIEW 2.3.3. TITRATOR REAR VIEW WITH PERISTALTIC PUMP... -
Page 30: Titrator Right-Side View
2.3.4. TITRATOR RIGHT-SIDE VIEW 2.3.5. TITRATOR ASSEMBLY Note: Assembly operations must be completed before connecting the Titrator to the power supply! 2.3.5.1. ASSEMBLING STIRRER AND ELECTRODES HOLDER To assemble the electrode holder and support rod: • Remove protective cap from titrator case •... -
Page 31: Attaching Stirrer And Electrodes
2.3.5.2. ATTACHING STIRRER AND ELECTRODES To attach the stirrer to the titrator, follow these steps: • Place the electrodes holder (B) in the stirrer support housing (A). Stirrer support housing can be inverted if necessary. • Insert electrode (C), temperature sensor (D) and stirrer (E) into the dedicated holes in the electrode holder. Push them until they are in stable position. -
Page 32: Connecting The Pump
2.3.5.3. CONNECTING THE PUMP To connect the pump, follow these steps: • Retrieve the pump cable from inside the bay. The pump 1 connector is located in the left bay and pump 2 in the right bay. • Connect the cable to the pump as shown below. The pump connector is located on the bottom of the pump. •... -
Page 33: Attaching The Burette
2.3.5.5. ATTACHING THE BURETTE Make sure that the mark from the valve actuating cap and from the burette body are aligned. While ensuring the correct coupling between the syringe plunger (A) and the pump piston (B), slide the burette into the support on the burette pump. -
Page 34: Connecting Peristaltic Pump Tubing
2.3.5.6. CONNECTING PERISTALTIC PUMP TUBING To attach the pump tubing to the burette pump with the built-in peristaltic pump: • Use a screw driver to remove the plastic cover (E) from the pump. • Remove the blue tube connectors (F). •... -
Page 35: Electrical Connections
2.3.5.7. ELECTRICAL CONNECTIONS • Connect the electrode to the BNC connector (A). • Connect the temperature sensor to the RCA connector (C). • Connect the stirrer to the MINI-DIN connector (D). • Connect the power adapter cable to the power input connector (F). Nr Function Type of Connector Connection for pH, ORP, ISE half-cell and... - Page 36 2-12...
- Page 37 CHAPTER 3. USER INTERFACE 3.1. START UP................................... 3.2. DESCRIPTION ................................3.2.1. KEYPAD ..................................3.2.1.1. FUNCTION KEYS ..............................3.2.1.2. OPTION KEYS ..............................3.2.1.3. ARROW KEYS ..............................3.2.1.4. NUMERIC KEYS ..............................3.2.1.5. ENTER KEY ............................... 3.2.2. DISPLAY ................................... 3.2.3. THE MAIN SCREEN..............................3.3.
-
Page 39: Start Up
3.1. START UP Once the instrument is assembled and installed, follow the steps below to start the titrator: • Connect the titrator to a power outlet with the supplied power adapter. • Turn on the titrator from the power switch located on the back of the instrument. •... -
Page 40: Description
3.2. DESCRIPTION This chapter describes the basic principles of navigating through the user interface, selecting fields and entering values from the keypad. 3.2.1. KEYPAD The titrator’s keypad is grouped into five categories, as follows: 3.2.1.1. FUNCTION KEYS If one of these keys is pressed, the associated function is immediately performed. Some of the keys are active only in specific screens: Starts or Stops a titration Turns the selected stirrer On and Off Reserved... -
Page 41: Arrow Keys
3.2.1.3. ARROW KEYS These keys have the following functions: • Move the on-screen cursor. • Increase and decrease the stirrer speed and other settings. • In the alphanumeric screen, to select a character. • Navigate through menu options. 3.2.1.4. NUMERIC KEYS Keys Used for numeric entries. -
Page 42: The Main Screen
The user interface contains several screens. For each titrator function, one or more screens are used. 3.2.3. THE MAIN SCREEN After start up and initialization, the first screen displayed is the main screen. Main screen fields: Method name: Displays the name of the selected method. Time and date: Displays the current date and time. -
Page 43: Menu Navigation
3.3. MENU NAVIGATION 3.3.1. SELECTING AN OPTION To select an option, simply press the option key below the virtual key. For example, to access the Method Options screen press the option key below it. 3.3.2. SELECTING A MENU ITEM To select an item from the menu screen, use the arrow keys to move the cursor. -
Page 44: Saving Modifications
3.3.4. SAVING MODIFICATIONS The Saving Method screen allows the user to save the modifications. To exit from Saving Method screen without saving, press or highlight the Exit Without Saving Method option and then press . To save the modifications highlight the Save Method option and then press Note: To access the contextual help menu, press at any time. - Page 45 CHAPTER 4. GENERAL OPTIONS 4.1. SAVE FILES TO USB STORAGE DEVICE ........................4.2. RESTORE FILES FROM USB STORAGE DEVICE ......................4.3. ADMINISTRATION ..............................4.4. TEMPERATURE ................................4.4.1. TEMPERATURE SOURCE ............................. 4.4.2. MANUAL TEMPERATURE SETTING ..........................4.4.3. TEMPERATURE UNITS ..............................4.5. DATE AND TIME SETTING ............................4.6.
- Page 47 The General Options screen gives access to options that are not directly related to the titration process or pH/mV/ISE measurement. To access this screen, press from the main screen. 4.1. SAVE FILES TO USB STORAGE DEVICE This option allows the user to save files from the titrator to a USB storage device. On the titrator, the available file types are: Standard Method Files - HIXXXXYY.MTD (e.g.: HI0001EN.MTD, HI1004EN.MTD)
- Page 48 The status of the transfer (“Successful”/“Unsuccessful”) and the file name of the currently processed file are displayed during copying or deleting. Note: The saved files will be stored on the USB key in the HI931 folder, as follows: - Methods: USB Drive:\HI931\Methods\*.mtd - Reports: USB Drive:\HI931\Reports\*.rpt...
- Page 49 Returns to the General Options screen. Note: In order to restore files from a USB key, please ensure that the methods and/or reports you wish to transfer to the titrator are in the correct folder: - Methods: USB Drive:\HI931\Methods\*.mtd - Reports: USB Drive:\HI931\Reports\*.rpt 4.3. ADMINISTRATION A 4-digit numeric PIN can be set to prevent unauthorized changes from being made.
- Page 50 To return to administrator mode, the titrator can be unlocked by entering the PIN. If the PIN is lost or forgotten, press recovery pin and contact technical support to supply the required information. 4.4. TEMPERATURE The Temperature Menu allows access to all of the settings related to temperature.
- Page 51 4.4.1. TEMPERATURE SOURCE Option: Automatic Temperature or Manual Temperature Select the temperature source used for temperature compensation. When Automatic Temperature Compensation is selected, “ATC” is displayed on the main screen and the temperature is read by the temperature probe. When Manual Temperature is selected, “Manual” is displayed on the main screen and a preset temperature value is used for temperature compensation.
- Page 52 4.4.3. TEMPERATURE UNITS Option: °C, °F or K The temperature ranges are as displayed in the Temperature Units screen. 4.5. DATE AND TIME SETTING This screen allows the user to set the date and time. Use the keys or the numeric keys to modify the date and time. Press to move the cursor to the next field.
- Page 53 A color palette is displayed in the center of the screen allowing an easy selection of the appropriate backlight intensity. The backlight saver option protects the display during standby periods when no keys have been pressed for a set amount of time. If the display backlight is off, any keystroke will activate the backlight without performing any action.
- Page 54 4.8. STIRRER Option: Enabled or Disabled The stirrer can be disabled in individual titration method, if necessary. 4.9. LANGUAGE Option: English, Português, or Español 4.10. TOTAL VOLUME ALERT Option: Off, 0 to 10000 mL This screen allows a programmable reminder to appear when the titrant reservoir is below 100 mL. The titrant volume will decrease as the titrant is used.
- Page 55 4.11. TITRANT AGE REMINDER Option: Off, 0 to 31 days A programmable reminder will appear when it is time to verify the titrant concentration or to change the titrant. 4.12. USB LINK WITH PC In order to use this feature, the USB cable needs to be connected from the titrator to the PC. Make sure that HI900 PC application is running on the PC.
- Page 56 4.13. SETUP BALANCE INTERFACE This screen allows the users to connect an analytical balance for automatic acquisition of sample mass prior to titration or standardization. The balance is connected to the titrator via RS 232 interface. Press to add a new balance to the list. Press to enable the selected balance.
- Page 57 4.14. PRINTER MODE Option: Ansi, Ascii, or Text Ansi mode: Use this mode when your printer is set as Ansi. In this case all the accented characters/symbols available in titrator will be printed on your printer. Ascii mode: Use this mode when your printer is set as Ascii. In this case only some of the accented characters/symbols available in titrator will be printed on your printer.
- Page 58 4.16. OPTIMIZE MEMORY SPACE 4.17. UPDATE SOFTWARE This screen allows the user to update the titrator software from a USB storage device containing a software setup kit. To update the software: • Copy the “Setup931” folder to a USB storage device. •...
- Page 59 CHAPTER 5. TITRATION METHODS 5.1. SELECTING METHODS ............................... 5.2. STANDARD METHODS ............................... 5.2.1. UPGRADING STANDARD METHODS ..........................5.2.2. DELETING STANDARD METHODS ..........................5.2.3. RESTORE THE STANDARD METHODS TO THE MANUFACTURER SETTINGS ................ 5.3. USER METHODS ................................ 5.3.1. CREATING USER METHODS ............................5.3.2.
- Page 60 5.5.13.1.5. SAMPLE CALCULATION BY VOLUME ......................5-24 5.5.13.1.6. STANDARDIZE TITRANT BY WEIGHT ......................5-25 5.5.13.1.7. STANDARDIZE TITRANT BY VOLUME ......................5-26 5.5.13.1.8. GENERIC FORMULA ........................... 5-27 5.5.14. DILUTION OPTION ..............................5-29 5.5.15. TITRANT NAME ................................ 5-29 5.5.16. TITRANT CONCENTRATION ............................5-30 5.5.17.
- Page 61 All of the parameters required to complete an analysis are grouped into a method. The titrator is supplied with a pack of standard methods, these methods have been developed by Hanna Instruments and can be used to create user methods.
- Page 62 5.2.1. UPGRADING STANDARD METHODS To upgrade the titrator with new standard methods, follow the steps below: From USB Storage Device: • Insert the USB storage device into the USB port, located on the right side of the titrator. • Press from the main screen.
- Page 63 5.3. USER METHODS These methods are defined by the user (usually by modifying a standard method). The user methods can be developed in accordance with the requirements of the user. All method parameters can be modified by the user. 5.3.1. CREATING USER METHODS To create a new user method, start from a standard or user method and follow these steps: •...
- Page 64 5.4. VIEW / MODIFY METHOD To modify the method parameters, press from the main screen. A list of all the parameters for the selected method will be displayed. Using the keys, highlight the option that you want to modify and choose To exit the View / Modify Method screen, press You can choose to save the modifications or to discard them.
- Page 65 5.5.2. METHOD REVISION Option: Up to 3 characters 5.5.3. STIRRER CONFIGURATION Use the arrow keys to select the menu option. 5.5.3.1. STIRRER Option: Stirrer 1 or Disabled...
- Page 66 5.5.3.2. STIRRER SPEED Option: 200 to 2500 RPM 5.5.4. PUMP CONFIGURATION Option: Pump 1 or Pump 2 (if installed)
- Page 67 5.5.5. DOSING TYPE Option: Linear or Dynamic 5.5.5.1. LINEAR DOSING Linear dosing dispenses a pre-defined volume of titrant with every addition. The Linear Dosing option is recommended for titrations with a slower reaction rate, difficult nonaqueous titrations, and specific applications. Note: For steep and normal titration curves, smaller volume increments are recommended, to obtain many points around the equivalence point.
- Page 68 5.5.5.2. DYNAMIC DOSING The titrator determines the titrant dose by trying to maintain a certain potential change (delta E) with each addition. After a titrant dose, if the potential change is lower than the set delta E, the next dose will be progressively increased until max Vol is attained.
- Page 69 5.5.6. END POINT MODE Option: Equivalence Point (pH or mV) or Fixed End Point (pH or mV) 5.5.6.1. FIXED END POINT (pH OR mV) Fixed End Point (pH): Option: -2.000 to 20.000 pH The titration is terminated when the preset pH value has been exceeded. The end point volume is a calculated value based on the dispensed volume when pH is under the preset value and the dispensed volume when pH exceeded the preset value.
- Page 70 Fixed End Point (mV): Option: -2000.0 to 2000.0 mV The end point detection algorithm is the same as for pH, but the threshold value is expressed in mV. 5.5.6.2. EQUIVALENCE END POINT (pH OR mV) The titration is terminated when the equivalence point is detected (the point where the added quantity of titrant equals the quantity of analyte present in the sample).
- Page 71 End Point Determination: Option: 1st derivative or 2nd derivative The equivalence point detection algorithm requires three additional titrant doses to be dispensed after the equivalence point is reached. The reported end point volume is a calculated value based on a number of points around the equivalence point. The potentiometric titration curve is the response in mV potential or pH between the indication of the electrode versus the volume of titrant added.
- Page 72 1st Derivative: When first derivative is used to recognize the equivalence point, the titration curve inflection point (EQP) is the point where the first derivative reaches its maximum value. The detection algorithm looks for the maximum value of the first derivative. The first derivative must be greater than the threshold value at the maximum point (see Recognition Options section).
- Page 73 5.5.7. RECOGNITION OPTIONS (EQUIVALENCE END POINT ONLY) The Recognition Options screen is a set of parameters used to avoid false detection of the equivalence point due to the chemical system (titrant/sample species and concentrations) and/or electrode response. 5.5.7.1. THRESHOLD Option: 1 to 9999 mV/mL This parameter must be set by the user according to the analysis.
- Page 74 Depending on the titration curve profile, the following guide can be used: TITRATION CURVE PROFILE THRESHOLD (mV/mL) Flat 1 to 450 Normal 50 to 1800 Steep 1800 to 9999 5.5.7.2. RANGE Option: -2.000 to 20.000 pH or -2000.0 to 2000.0 mV Range is an optional feature for equivalence point recognition.
- Page 75 The Limit 2 value must not be equal to the Limit 1 value. 5.5.7.3. FILTERED DERIVATIVES Option: Yes or No This option adds a filtering procedure in the 1st and 2nd derivative computation algorithm that reduces the influence of pH or mV noise.
- Page 76 5.5.8. PRE-TITRATION VOLUME During a titration, the equivalence point is reached after many titrant doses. These doses take up extra time while having no relevance for equivalence point detection. Pre-titration volume adds a large initial dose to jump directly to the proximity of the equivalence point. This first dose occurs after the pre-titration stir time is completed.
- Page 77 5.5.10. MEASUREMENT MODE Option: Signal Stability or Timed Increment During titration, the acquisition of the potential (mV) value of the solution can be done in two ways: Signal Stability or Timed Increment option. 5.5.10.1. SIGNAL STABILITY When signal stability is selected, the titrator acquires the potential (mV) only when stable conditions are reached. The principles of signal stability are plotted below: The signal stability window (condition) represents the time interval (∆t) during which the potential measured in solution (mV) is confined inside the potential interval (∆E).
- Page 78 maximum change in potential during delta t delta E: The range is from 0.1 to 99.9 mV. delta t: the time interval during which the potential is measured. The range is from 1 to 10 seconds. t min wait: the minimum elapsed time before a stability check. This is also the minimum elapsed time between two doses. The range is from 2 seconds to t max wait time.
- Page 79 5.5.11. ELECTRODE TYPE Option: Up to 20 characters 5.5.12. BLANK OPTION Option: Disabled, V-Blank or Blank-V This feature allows the user to select the procedure for the blank calculations (where V is the volume of titrant dispensed during the titration and blank is the volume of titrant consumed by the blank sample). 5-21...
- Page 80 If one of the options (V-Blank or Blank-V ) is selected in the View / Modify Method screen, the blank value will be active on the View/Modify Method screen and the value of the blank can be set (in liters). 5.5.13.
- Page 81 5.5.13.1.4. SAMPLE CALCULATIONS BY WEIGHT This calculation is used when the concentration of an analyte is determined by the weight of the sample. The results are based on the initial sample weight (in grams). The titrator will calculate the results based on the selected units. The titrator will provide the results based on the titrant and sample units selected.
- Page 82 A formula example is shown below using M (mol/L) as the titrant unit and ppt (g/kg) as the final result unit: Variables can be set according to the amount of sample and titrant used. 5.5.13.1.5. SAMPLE CALCULATIONS BY VOLUME This calculation is used when the concentration of an analyte is determined in terms of the volume of sample. The results are based on the initial sample volume (in milliliters).
- Page 83 Final Result Units: ppt (g/L) parts per thousand (grams/liter) ppm (mg/L) parts per million (milligrams/liter) ppb (µg/L) parts per billion (micrograms/liter) M (mol/L) Molarity (moles/liter) N (eq/L) Normality (equivalents/liter) mg/L milligrams/liter µg/L micrograms/liter mmol/L millimoles/liter mg/mL milligrams/milliliter mg/100 mL milligrams/100 milliliters g/100 mL grams/100 milliliters eq/L...
- Page 84 5.5.13.1.7. STANDARDIZE TITRANT BY VOLUME This calculation is used when the concentration of the titrant is determined using a primary standard solution. Determination of the titrant concentration is based on the primary standard volume (in milliliters). The calculation is based on the selected titrant unit. If the titrant unit is N (eq/L), the formula used to calculate the result is displayed below: 5-26...
- Page 85 5.5.13.1.8. GENERIC FORMULA The user can define their own calculation formula based on the final result units in a solid or liquid sample. Final Result Units: ppt (g/kg) parts per thousand (grams/kilogram) ppt (g/L) parts per thousand (grams/liter) ppm (mg/kg) parts per million (milligrams/kilogram) ppm (mg/L) parts per million (milligrams/liter)
- Page 86 Where: C= the concentration of the titrant F1= general factor F2 = general factor F3 = general factor S = sample size, in grams or milliliters V = the volume delivered, in liters, to reach the preset or equivalence end point (determined by the titrator) General factors: Weight Conversion: One of the general factors should be a weight conversion factor.
- Page 87 5.5.14. DILUTION OPTION Option: Enabled or Disabled When the initial sample is diluted, a titration is made with an aliquot of the diluted sample, dilution calculations can be used. The calculations are based on the original sample weight (volume) in order to express the results for the initial sample. Final Dilution Volume: The volume of the sample after dilution Aliquot Volume:...
- Page 88 5.5.16. TITRANT CONCENTRATION Enter the concentration of the titrant to be used. When determining the titrant concentration, only the concentration unit is displayed. 5.5.17. ANALYTE SIZE Option: 0.001 to 250.0 Enter the size of the sample (for sample concentration determinations) or standard (for titrant concentration determination). 5.5.18.
- Page 89 5.5.18.1. FIXED WEIGHT OR VOLUME Each titration will use a set weight or volume in the calculations. 5.5.18.2. MANUAL WEIGHT OR VOLUME Each titration, the exact weight or volume can be entered. The titrator will prompt for the analyte weight or volume at the beginning of each titration.
- Page 90 5.5.21. VOLUME/FLOW RATE The flow rate for the dosing system can be set by the user in an interval of 0.3 to two times the burette volume: 0.3 to 10 mL/min for a 5 mL burette 0.3 to 20 mL/min for a 10 mL burette 0.3 to 50 mL/min for a 25 mL burette 0.3 to 100 mL/min for a 50 mL burette Note: The titrator will automatically detect the burette size and display the correct high limit volume.
- Page 91 5.5.23. SIGNIFICANT FIGURES Option: Two (XX), Three (XXX), Four (XXXX) or Five (XXXXX) This option allows you to set the format for displaying the final titration result. 5.6. PRINTING To print method parameters, press from the main screen. Press and wait a few seconds until the printer completes the job. If no printer is connected to the dedicated socket, or if the printer is offline, an error message will appear on the display (see Connecting a Printer section, for information about connecting a printer to the titrator).
- Page 92 5-34...
- Page 93 CHAPTER 6. TITRATION MODE 6.1. RUNNING A TITRATION............................. 6.1.1. STARTING A TITRATION .............................. 6.1.2. SUSPENDING A TITRATION ............................6.1.3. VIEWING THE TITRATION CURVE ..........................6.2. STOPPING A TITRATION ............................
- Page 95 6.1. RUNNING A TITRATION Before beginning a titration, make sure that the following conditions are met: • At least one pump is properly installed. • A burette is inserted in the pump and filled with titrant. • The aspiration tube is inserted in the titrant bottle and primed. The dispensing tube is over the titration beaker. •...
- Page 96 The contents of the graph as related to an end point type are as follows: Equivalence End Point (pH): The pH readings and the selected derivative vs. volume of titrant are displayed (see Figure 1). Equivalence End Point (mV): The mV readings and the selected derivative vs. volume of titrant are displayed (see Figure 2). Fixed End Point (pH): The pH readings vs.
- Page 97 6.2. STOPPING A TITRATION The titration is terminated when one of the following conditions is met: • Titration Completed: This is the only mode with valid final result values. The end point/stable reading was successfully detected, the final results will be displayed. •...
- Page 99 CHAPTER 7. pH MODE 7.1. DISPLAY..................................7.2. pH SETUP .................................. 7.2.1. BUFFER ENTRY TYPE ..............................7.2.2. FIRST CALIBRATION POINT ............................7.2.3. EDIT CUSTOM BUFFERS ............................. 7.2.4. EDIT BUFFER GROUP ..............................7.2.5. CALIBRATION REMINDER ............................7.2.6. SET REMINDER PERIOD .............................. 7.2.7. CLEAR CALIBRATION..............................7.2.8.
- Page 101 By pressing from the main screen, the titrator can be switched to Titrator, pH, mV or ISE modes. One Analog Board Switches to Titrator mode. Switches to pH mode. Switches to mV mode. Switches to ISE mode. 7.1. DISPLAY pH Mode Option keys: The General Options screen gives access to options that are not directly related to the measurement process (see General Options section).
- Page 102 7.2. pH SETUP To access pH Setup, press option key while in pH mode. keys to highlight the desired option. Press to access the selected option. 7.2.1. BUFFER ENTRY TYPE Option: Automatic, Semiautomatic or Manual Automatic: The instrument automatically selects the pH calibration point as the closest buffer from the predefined buffer group (see Edit Buffer Group section).
- Page 103 7.2.2. FIRST CALIBRATION POINT Option: Point or Offset If Point is selected, the slope values adjacent to the calibration points will be reevaluated (normal calibration). If Offset is selected the existing slope values will not be changed. 7.2.3. EDIT CUSTOM BUFFERS If you wish to use buffers other than the standard ones, use the Edit Custom Buffers option to set the desired pH value, up to five pH custom buffers can be set.
- Page 104 • Use the numeric keypad to enter the pH buffer value. • Press to save the value. • Press to return to pH Setup menu. 7.2.4. EDIT BUFFER GROUP Option: Up to five Select up to five buffers from the available buffers (Hanna or Custom) to be used for automatic buffer recognition. Within the buffer group, pH values must be at least 1.5 pH far apart.
- Page 105 7.2.5. CALIBRATION REMINDER Option: Daily, Periodic or Disabled Daily: The calibration reminder will appear daily at a specified time. Periodic: The calibration reminder will appear after the set time has elapsed since the last calibration. Disabled: The calibration reminder will not appear. 7.2.6.
- Page 106 7.2.7. CLEAR CALIBRATION This option clears the existing pH calibration for the selected channel. If the calibration is cleared, the factory calibration will be used. • Press to clear the previous calibration or to return to the previous screen without clearing the calibration. 7.2.8.
- Page 107 7.2.10. STABILITY CRITERIA Option: Fast, Medium, Accurate Select the signal stability criteria: Fast: Quicker results with less accuracy Medium: Medium speed results with medium accuracy Accurate: Slower results with high accuracy 7.2.11. pH RESOLUTION Option: One (X.X), Two (X.XX) or Three (X.XXX) decimal places 7.2.12.
- Page 108 7.2.13. STIRRING SPEED Option: 200 to 2500 RPM 7.3. pH CALIBRATION Calibrate the instrument often, especially if high accuracy is required. The instrument should be recalibrated: • Whenever the pH electrode is replaced. • At least once a week. • After testing aggressive chemicals. •...
- Page 109 PREPARATION Pour small quantities of the buffer solutions into clean beakers. If possible, use plastic beakers to minimize any EMC interferences. For accurate calibration and to minimize cross-contamination, use two beakers for each buffer solution: one for rinsing the electrode and one for calibration.
- Page 110 • In ATC mode, the pH value for custom buffers can be modified by pressing • If the Automatic Buffer entry type was selected for the calibration procedure, the titrator will automatically select the closest buffer to the measured pH value from the buffer group. •...
- Page 111 7.4.1. INTERVAL LOGGING The logging interval is set in the pH setup screen. Press to start the log. The logging interval and name of logging file will be displayed on the pH measurement screen. To stop the automatic logging, press 7.4.2.
- Page 112 7-14...
- Page 113 CHAPTER 8. mV MODE 8.1. DISPLAY..................................8.2. mV SETUP .................................. 8.2.1. CLEAR RELATIVE mV OFFSET ............................8.2.2. LOGGING INTERVAL ..............................8.2.3. STABILITY CRITERIA ..............................8.2.4. STIRRER CONFIGURATION ............................8.2.5. STIRRING SPEED ............................... 8.3. RELATIVE mV CALIBRATION ............................8.4. LOGGING ................................... 8.4.1.
- Page 115 By pressing from the main screen, the Titrator can be switched to Titrator, pH, mV or ISE modes. One Analog Board Switches to Titrator mode. Switches to pH mode. Switches to mV mode. Switches to ISE mode. 8.1. DISPLAY The mV screen is shown below. mV Mode Option Keys: The General Options screen gives access to options that are not directly related to the measurement process (see General Options...
- Page 116 8.2. mV SETUP 8.2.1. CLEAR RELATIVE mV OFFSET Press to clear the relative mV offset or to return to the previous screen. 8.2.2. LOGGING INTERVAL Option: 2 seconds to 8h 59min 59sec...
- Page 117 8.2.3 STABILITY CRITERIA Option: Fast, Medium or Accurate: Fast: Quicker results with less accuracy Medium: Medium speed results with medium accuracy Accurate: Slower results with high accuracy 8.2.4. STIRRER CONFIGURATION Option: Stirrer 1 or Disabled 8.2.5. STIRRING SPEED Option: 200 to 2500 RPM...
- Page 118 8.3. RELATIVE mV CALIBRATION • Press to accept the value. • Press to cancel this operation and return to the previous screen. • Press to delete the last digit. 8.4. LOGGING Data logging is available in mV mode. It can be logging on demand (Manual Logging) or automatically (Interval Logging) at predefined time intervals.
- Page 119 8.4.1. INTERVAL LOGGING The logging interval is set in the mV Setup screen. Press to start the log. The logging interval and name of logging file will be displayed on the measure screen. To stop the automatic logging, press again. 8.4.2.
- Page 121 CHAPTER 9. ISE MODE 9.1. DISPLAY..................................9.2. ISE SETUP .................................. 9.2.1. CALIBRATION GROUP ..............................9.2.2. TEMPERATURE COMPENSATION ..........................9.2.3. ISOPOTENTIAL POINT ..............................9.2.4. EDIT CUSTOM STANDARDS ............................9.2.5. EDIT STANDARD GROUP ............................. 9.2.6. CALIBRATION REMINDER ............................9.2.7. SET REMINDER PERIOD .............................. 9.2.8.
- Page 123 By pressing from the main screen, the Titrator can be switched to Titrator, pH, mV or ISE modes. One Analog Board Switches to Titrator mode. Switches to pH mode. Switches to mV mode. Switches to ISE mode. 9.1. DISPLAY The ISE screen is shown below. ISE Mode option keys: The General Options screen gives access to options that are not directly related to the measurement process (see General Options...
- Page 124 9.2. ISE SETUP To access the ISE Setup, press option key in ISE mode. 9.2.1. CALIBRATION GROUP Option: All Standards or Standards Group All Standards: The set of available standards includes the Standard solutions and Custom solutions. Standards Group: The set of available standards includes only the standards selected by the user. 9.2.2.
- Page 125 9.2.3. ISOPOTENTIAL POINT (TEMPERATURE COMPENSATION) Option: 1.00 E to 1.00 E This option allows the user to set an isopotential point for the selected electrode when temperature compensation is enabled. The isopotential point is edited in ppm units only. The isopotential point will vary for different electrodes, if measurements are going to be made at several temperatures, the value should be entered if it is known.
- Page 126 9.2.5. EDIT STANDARD GROUP Option: Up to 5 standards • Use the arrow keys to select the standard to be included/removed in/from the standard group. • Press to add/remove the selected standard to/from standard group. • Press to return to ISE Setup menu. 9.2.6.
- Page 127 9.2.7. SET REMINDER PERIOD If Daily or Periodic option was selected for the calibration reminder, the reminder period must also be set. For a daily reminder period the time of day can be set. For a periodic reminder period the number of days, hours and minutes can be set. •...
- Page 128 9.2.9. ISE GLP DATA Displays the ISE calibration data 9.2.10. ELECTRODE TYPE Option: Ammonia, Bromide, Cadmium, Calcium, Carbon Dioxide, Chloride, Cupric, Cyanide, Fluoride, Iodide, Lead, Nitrate, Potassium, Silver, Sodium, Sulfate, Sulfide or five custom electrodes For Standard ISE: • Press to see the ion constants (name, molar weight, electric charge/slope), press to return to the setup screen.
- Page 129 For Custom ISE: • Press to edit the Ion constants for the selected custom ISE. • Use the keys to highlight the desired ion constant and press to edit the value. • Set the Ion Name (up to 10 characters can be entered). •...
- Page 130 9.2.12. LOGGING INTERVAL Option: 2 seconds to 8h 59 min 59 sec 9.2.13. STABILITY CRITERIA Option: Fast, Medium, Accurate Fast: Quicker results with less accuracy Medium: Medium speed results with medium accuracy Accurate: Slower results with high accuracy 9.2.14. ISE SIGNIFICANT DIGITS Option: One (X), Two (XX) or Three (XXX).
- Page 131 9.2.15. STIRRER CONFIGURATION Option: Stirrer 1 or Disabled 9.2.16. STIRRING SPEED Option: 200 to 2500 RPM 9.3. ISE CALIBRATION It is recommended to calibrate the instruments frequently if high accuracy is required. The instrument should also be recalibrated whenever the “Calibrate Electrode” message appears on the LCD. Due to electrode conditioning time, the electrode must be immersed for several seconds to stabilize.
- Page 132 • Press from the main screen. If the instrument was calibrated before and the calibration was not cleared, the old calibration can be cleared by pressing • Immerse the ISE and the temperature probe approximately 2 cm into the standard with the lowest concentration. •...
- Page 133 9.4.1. INTERVAL LOGGING The logging interval is set in the ISE Setup screen. Press to start the log. The logging interval and name of logging file will be displayed on the measure screen. To stop the automatic logging, press again. 9.4.2.
- Page 134 9-14...
- Page 135 CHAPTER 10. AUXILIARY FUNCTIONS 10.1. BURETTE .................................. 10-3 10.1.1. PRIME BURETTE ..............................10-3 10.1.2. RINSE TIP ................................10-4 10.1.3. MANUAL DISPENSE ..............................10-4 10.1.4. PURGE BURETTE ..............................10-5 10.2. STIRRER ................................... 10-6 10.3. RESULTS .................................. 10-6 10.3.1. REVIEW LAST ANALYSIS REPORT ..........................10-6 10.3.1.
- Page 136 10-2...
- Page 137 10.1. BURETTE To access the Burette screen, press from the main titration screen. Highlight the desired option and then press allows you to select the desired pump for burette operations (it is only active if two pumps are connected). 10.1.1. PRIME BURETTE Option: Up to 5 The Prime Burette option is used to fill the burette with titrant or reagent before starting a titration.
- Page 138 Note: Before starting this operation, the aspiration tube must be inserted in the titrant bottle. A waste container should be placed under the dispensing tip to collect the waste solution. To prime the burette, select Prime Burette, enter the number of rinses and press We recommend at least three rinses to assure that the air bubbles are completely removed.
- Page 139 Use the numeric keypad to enter the volume to be dispensed. The manual dispense volume must be between the limits shown below: 0.001 to 4.750 mL for a 5 mL burette 0.001 to 9.500 mL for a 10 mL burette 0.005 to 23.750 mL for a 25 mL burette 0.005 to 47.500 mL for a 50 mL burette 10.1.4.
- Page 140 10.2. STIRRER The stirrer can be turned on and off by pressing During the titration process, the stirring speed can be manually adjusted using the keys. 10.3. RESULTS From the Data Parameters screen, you can access the following options: 10.3.1. REVIEW LAST ANALYSIS REPORT The information seen in the report is based on the selections made in the Setup Titration Report and Setup ISE/pH/mV Report screen.
- Page 141 10.3.2. REVIEW AVAILABLE REPORTS Up to 100 reports can be saved on the titrator. To view one of the saved reports, highlight a report and then press The report contains only the information selected in the Setup Titration Report and Setup pH/mV/ISE Report screens during report configuration.
- Page 142 Sample Name: Allows the sample name to be recorded in each report. The sample name will increase by one, with each new titration or logging report, if the last character is a number. Company Name: Allows the company name to be recorded in each report. Operator Name: Allows the operator name to be recorded in each report.
- Page 143 10.3.5. SETUP pH/mV/ISE REPORT Customize a unique report to record the pH, mV, and ISE measurements. An asterisk means that it will be included in the report. Adds the highlighted information to the report. Removes the highlighted information from the report. Returns to the Data Parameter Screen.
- Page 144 10-10...
- Page 145 CHAPTER 11. MAINTENANCE, PERIPHERALS 11.1. BURETTE MAINTENANCE ............................11-3 11.1.1. BURETTE ASSEMBLY ..............................11-3 11.1.2. CHANGING THE BURETTE ............................11-3 11.1.3. DISASSEMBLING THE BURETTE ..........................11-3 11.1.4. ASSEMBLING THE BURETTE ............................11-4 11.1.5. CLEANING THE BURETTE ............................11-4 11.1.6. BURETTE PREPARATION (FILLING WITH TITRANT) ....................... 11-5 11.2.
- Page 146 11-2...
- Page 147 The 25-mL burette included with the titrator exceeds the ISO 8655 standard for accurate delivery of liquids by a motor-driven piston burette. 11.1. BURETTE MAINTENANCE 11.1.1. BURETTE ASSEMBLY The burette is delivered with a 25-mL syringe inside and with all of the accessories mounted (see Setup chapter).
- Page 148 11.1.4. ASSEMBLING THE BURETTE To attach the dispensing tube and the aspiration tube, follow these steps: • Insert the flat-shaped end of the titrant tubing into the valve outlet (A) and screw the fitting clock-wise to tighten. The highest of the 9 cuts should be vertical in the final position.
- Page 149 • Reinsert the piston into the syringe. • Reinsert the syringe by screwing it in the valve with your fingers. • Reinsert the protective cap to the bottom of the burette assembly. Carefully position the cap into the burette. • Slide the burette into the burette stand. Notice the position of the piston shaft to the pump couple. •...
- Page 150 11.2. PERIPHERALS Warning! Connection/disconnection of POWER, PUMP ASSEMBLY, PRINTER, RS232 INTERFACE must only be done when Titrator and external devices are turned off. 11.2.1. CONNECTING TO A PRINTER A variety of parallel printers can be connected to the parallel port of the titrator using a DB25 cable. Warning: The titrator and the external printer must be both turned OFF before they are connected.
- Page 151 The correspondence between the titrator’s keypad and the United States 101-type external keyboard are: External PC Keyboard (United States 101) Titrator Keypad Function Key F-1 Function Key F-2 Function Key F-3 Function Key F-4 Function Key F-5 Option Key 1 (from left to right) Function Key F-6 Option Key 2 (from left to right) Function Key F-7...
- Page 152 11.2.3. CONNECTING TO A COMPUTER The titrator can be connected to a computer using a USB cable. HI900 PC application needs to be installed on the PC. Connect the cable to the USB port on the rear panel of the titrator. Connect the cable to the USB port on the PC.
- Page 153 APPENDIX 1. TECHNICAL SPECIFICATIONS A1 HI931 TECHNICAL SPECIFICATIONS..........................A 1-3 A1-1...
- Page 154 A1-2...
- Page 155 A1. HI931. TECHNICAL SPECIFICATIONS Analysis Type Standard Titration (Standardization, Fixed pH/ mV, Equivalence Point pH/ mV) Fixed mV Fixed pH End Point Mode mV Equivalence Point (1 or 2 derivate) pH Equivalence Point (1 or 2 derivate) Size 5 mL / 10 mL / 25 mL / 50 mL Resolution 0.001 mL...
- Page 156 1 x BNC Socket (pH, ORP, ISE half-cell and ISE combination electrodes) 1 x 4 mm Banana Socket (reference electrode) Measurement 1 x RCA Socket (temperature sensor) 1 x 6-pin Connector (stirrer) Connections 1 x 6-pin Mini DIN (external PC keyboard) 1 x DB-25 Socket (printer) Peripheral 1 x USB Standard B (PC connection)
- Page 157 APPENDIX 2. ACCESSORIES A2.1. SOLUTIONS ................................A2-3 A2.1.1. pH BUFFERS ................................A2-3 A2.1.2. pH BUFFERS IN FDA APPROVED BOTTLE ........................A2-3 A2.1.3. pH TECHNICAL BUFFERS ............................A2-3 A2.1.4. pH MILLESIMAL BUFFERS ............................A2-3 A2.1.5. ELECTRODE CLEANING SOLUTIONS ..........................A2-4 A2.1.6. ELECTRODE CLEANING SOLUTIONS IN FDA APPROVED BOTTLE ..................A2-4 A2.1.7.
- Page 158 A2-2...
-
Page 159: A2.1. Solutions
A2.1. SOLUTIONS A2.1.1. pH CALIBRATION BUFFERS HI7001M pH 1.68 Buffer Solution, 230 mL HI7001L pH 1.68 Buffer Solution, 500 mL HI7004M pH 4.01 Buffer Solution, 230 mL HI7004L pH 4.01 Buffer Solution, 500 mL HI7006M pH 6.86 Buffer Solution, 230 mL HI7006L pH 6.86 Buffer Solution, 500 mL HI7007M... -
Page 160: A2.1.5. Electrode Cleaning Solutions
HI6007 pH 7.010 Buffer Solution, 500 mL HI6007-01 pH 7.010 Buffer Solution, 1 L HI6091 pH 9.177 Buffer Solution, 500 mL HI6091-01 pH 9.177 Buffer Solution, 1 L HI6010 pH 10.010 Buffer Solution, 500 mL HI6010-01 pH 10.010 Buffer Solution, 1 L HI6124 pH 12.450 Buffer Solution, 500 mL HI6124-01... -
Page 161: A2.1.10. Electrode Refill Electrolyte Solutions In Fda Approved Bottle
A2.1.10. ELECTRODE REFILL ELECTROLYTE SOLUTIONS IN FDA APPROVED BOTTLE HI8071 3.5M KCl + AgCl Electrolyte, 30 mL, for single junction electrodes HI8072 1M KNO Electrolyte, 30 mL HI8082 3.5M KCl Electrolyte, 30 mL, for double junction electrodes A2.1.11. ORP PRETREATMENT SOLUTIONS HI7091M Reducing Pretreatment Solution, 230 mL HI7091L... -
Page 162: A2.2 Sensors
HI4010-01 0.1 M Fluoride Standard HI4010-02 100 ppm Fluoride Standard HI4010-03 1000 ppm Fluoride Standard HI4011-01 0.1 M Iodide Standard HI4012-01 0.1 M Lead Standard HI4012-21 0.1 M Sulfate Standard HI4013-01 0.1 M Nitrate Standard HI4013-02 100 ppm Nitrate Standard HI4013-03 1000 ppm Nitrate Standard HI4014-01... -
Page 163: A2.1.2. Orp Electrodes
Use: chemicals, field applications and quality control testing. FC100B Plastic-body (PVDF), double junction, refillable, combination pH electrode. Use: cheese FC200B Plastic-body (PVDF), single junction, conical tip, non-refillable Viscolene electrolyte, combination pH electrode. Use: milk, yogurt, dairy products, and semi-solid foods FC210B Glass-body, double junction, conical tip, non-refillable Viscolene electrolyte, combination pH electrode. -
Page 164: A2.1.4. Ion Selective Electrodes
HI5412 Glass-body, single Calomel reference half-cell electrode, refillable with 4mm plug with 1m (3.3’) cable. Use: general purpose with constant temperature range A2.2.4. ION SELECTIVE ELECTRODES HI4101 Ammonia ISE HI4002 / HI4102 Bromide ISE HI4003 / HI4103 Cadmium ISE HI4004 / HI4104 Chloride ISE HI4105 Carbon Dioxide ISE HI4007 / HI4107 Chloride ISE HI4008 / HI4108 Cupric ISE... -
Page 165: A2.3. Titrator Components
A2.3. TITRATOR COMPONENTS A2.3. TITRATOR COMPONENTS 50 mL Syringe Pump Assembly HI900250 HI930100 Titrator Peristaltic Pump Complete Pump Assembly with Peristaltic Pump Tubing Set HI930101 HI930202 Aspiration Tube with fitting and protection tube HI900270 3 Way Valve HI900260 Dispensing Tube with normal dispensing tip, fitting, protection tube and tube guide Tool for burette cap removal... - Page 166 Overhead Electrode Holder HI930310 Shorting Cap HI900945 Temperature Probe Power Adapter (USA Plug) HI7662-TW HI900946 Roller Tube for Titrator peristaltic pump Power Adapter (European Plug) (3 pcs.) HI900947 HI930204 Blank Burette Support USB Cable HI930190 HI920013 Blank Support USB Storage Device HI930191 HI930900U Instruction Manual Binder...
- Page 167 Certification All Hanna Instruments conform to the CE European Directives. Disposal of Electrical & Electronic Equipment. The product should not be treated as household waste. Instead hand it over to the appropriate collection point for the recycling of electrical and electronic equipment which will conserve natural resources.
- Page 168 If the repair is not covered by the warranty, you will be notified of the charges incurred. If the instrument is to be returned to Hanna Instruments, first obtain a Returned Goods Authorization (RGA) number from the Technical Service department and then send it with shipping costs prepaid.
- Page 169 HI931 AUTOMATIC POTENTIOMETRIC TITRATOR...
- Page 171 METHOD ID: HI0001EN 0.1N SODIUM HYDROXIDE TITRANT CONCENTRATION DESCRIPTION • Record the exact weight of the sample once the balance has Method for the standardization (titer determination) of 0.1N Sodium stabilized with an accuracy of 0.0001 grams. Hydroxide (NaOH) titrant solution against Potassium Hydrogen •...
- Page 172 METHOD ID: HI0001EN 0.1N SODIUM HYDROXIDE TITRANT CONCENTRATION METHOD PARAMETERS CALCULATIONS Name: 0.1N Sodium Hydroxide Calculations: Stdz. Titrant by Weight Method Revision: Titrant units: N (eq/L) Analysis Type: Standard Titration Titrant volume dosed: V (L) Analog Board: Analog 1 Standard weight: 0.200 g Stirrer Configuration: mw of standard:...
- Page 173 METHOD ID: HI0002EN 0.1N HYDROCHLORIC ACID TITRANT CONCENTRATION DESCRIPTION • Press , the titrator start the analysis. Method for the standardization (titer determination) of 0.1N • At the end of the titration, after detection of the equivalence Hydrochloric Acid (HCl) titrant solution against Sodium Hydroxide point, “Titration Completed”...
- Page 174 METHOD ID: HI0002EN 0.1N HYDROCHLORIC ACID TITRANT CONCENTRATION METHOD PARAMETERS CALCULATIONS Name: 0.1N Hydrochloric Acid Calculations: Stdz. Titrant by Volume Method Revision: Titrant units: N (eq/L) Analysis Type: Standard Titration Titrant volume dosed: V (L) Analog Board: Analog 1 Standard volume: 10.000 mL Stirrer Configuration: Standard conc.:...
- Page 175 METHOD ID: HI0003EN 0.1M SODIUM THIOSULFATE TITRANT CONCENTRATION DESCRIPTION • Use a Class A volumetric pipette to transfer exactly 10.00 mL of Method for the standardization (titer determination) of 0.1M the solution to a clean 100 mL plastic beaker. Sodium Thiosulfate (Na ) titrant solution against Potassium •...
- Page 176 METHOD ID: HI0003EN 0.1M SODIUM THIOSULFATE TITRANT CONCENTRATION METHOD PARAMETERS CALCULATIONS Name: 0.1M Sodium Thiosulfate Calculations: Stdz. Titrant by Weight Method Revision: Titrant units: M (mol/L) Analysis Type: Standard Titration Titrant volume dosed: V (L) Analog Board: Analog 1 Standard weight: 0.350 g Stirrer Configuration: Dilution Factor:...
- Page 177 METHOD ID: HI0010EN 0.1M FERROUS AMMONIUM SULFATE TITRANT CONCENTRATION DESCRIPTION • Carefully weigh approximately 0.49 grams of dried potassium Method for the standardization (titer determination) of 0.1M dichromate. Ferrous Ammonium Sulfate (FAS) titrant solution against Potassium • Record the exact weight of the sample once the balance has Dichromate (K ).
- Page 178 METHOD ID: HI0010EN 0.1M FERROUS AMMONIUM SULFATE TITRANT CONCENTRATION METHOD PARAMETERS CALCULATIONS Name: 0.1M FAS Calculations: Stdz. Titrant by Weight Method Revision: Titrant units: M (mol/L) Analysis Type: Standard Titration Titrant volume dosed: V (L) Analog Board: Analog 1 Standard weight: 0.490 g Stirrer Configuration: Dilution Factor:...
- Page 179 METHOD ID: HI0200EN 0.02M SILVER NITRATE TITRANT CONCENTRATION DESCRIPTION ANALYSIS Method for the standardization (titer determination) of 0.02M Silver • Place the beaker under the stirrer assembly and lower it to Nitrate (AgNO ) titrant solution against Sodium Chloride (NaCl). The immerse the Silver/Sulfide electrode and stirrer.
- Page 180 METHOD ID: HI0200EN 0.02M SILVER NITRATE TITRANT CONCENTRATION METHOD PARAMETERS CALCULATIONS Name: 0.02M Silver Nitrate Calculations: Stdz. Titrant by Weight Method Revision: Titrant units: M (mol/L) Analysis Type: Standard Titration Titrant volume dosed: V (L) Analog Board: Analog 1 Standard weight: 0.200 g Stirrer Configuration: Dilution Factor:...
- Page 181 METHOD ID: HI1004EN ALKALINITY OF WATER 0 to 2500 mg/L CaCO , pH 4.5 Endpoint DESCRIPTION ANALYSIS Method for the determination of total (methyl red) alkalinity in • Place the beaker under the stirrer assembly and lower it to water by titration of a sample to pH 4.5. The results are expressed in immerse the pH electrode, temperature sensor and stirrer.
- Page 182 METHOD ID: HI1004EN ALKALINITY OF WATER 0 to 2500 mg/L CaCO , pH 4.5 Endpoint METHOD PARAMETERS CALCULATIONS Name: Alkalinity of Water Calculations: Sample Calc. by Volume Method Revision: Titrant units: N (eq/L) Analysis Type: Standard Titration Titrant volume dosed: V (L) Analog Board: Analog 1...
- Page 183 METHOD ID: HI1005EN ACIDITY OF WATER 0 to 2500 mg/L, pH 8.3 Endpoint DESCRIPTION ANALYSIS Method for the determination of total (phenolphthalein) acidity in • Place the beaker under the stirrer assembly and lower it to water by titration of a sample to pH 8.3. The results are expressed in immerse the pH electrode, temperature sensor and stirrer.
- Page 184 METHOD ID: HI1005EN ACIDITY OF WATER 0 to 2500 mg/L, pH 8.3 Endpoint METHOD PARAMETERS CALCULATIONS Name: Acidity of Water Calculations: Sample Calc. by Volume Method Revision: Titrant units: N (eq/L) Analysis Type: Standard Titration Titrant volume dosed: V (L) Analog Board: Analog 1 Final result units:...
- Page 185 METHOD ID: HI1007EN CHLORIDE IN WATER 0 to 150 ppm (mg/L) DESCRIPTION • Press , the titrator will start the analysis. Method for the determination of chloride in water. The results are • At the end of the titration, after detection of the equivalence expressed as ppm (mg/L) as Chloride.
- Page 186 METHOD ID: HI1007EN CHLORIDE IN WATER 0 to 150 ppm (mg/L) METHOD PARAMETERS CALCULATIONS Name: Chloride in Water Calculations: Sample Calc. by Volume Method Revision: Titrant units: M (mol/L) Analysis Type: Standard Titration Titrant volume dosed: V (L) Analog Board: Analog 1 Titrant Conc.: 2.0000E-2 M (mol/L)
- Page 187 METHOD ID: HI1008EN NEUTRALIZATION WITH SULFURIC ACID 0 to 200 meq/L DESCRIPTION ANALYSIS Method for the determination of strong or weak base concentration by • Place the beaker under the stirrer assembly and lower it to titration of a sample to the equivalence point with sulfuric acid. The immerse the pH electrode, temperature probe and stirrer.
- Page 188 METHOD ID: HI1008EN NEUTRALIZATION WITH SULFURIC ACID 0 to 200 meq/L METHOD PARAMETERS CALCULATIONS Name: Neutralization w/ H2S04 Calculations: Sample Calc. by Volume Method Revision: Titrant units: M (mol/L) Analysis Type: Standard Titration Titrant volume dosed: V (L) Analog Board: Analog 1 Final result units: meq/L...
- Page 189 METHOD ID: HI1009EN NEUTRALIZATION WITH SODIUM HYDROXIDE 0 to 200 meq/L DESCRIPTION ANALYSIS Method for the determination of strong or weak acid concentration by • Place the beaker under the stirrer assembly and lower it to titration of a sample to the equivalence point with sodium hydroxide. immerse the pH electrode, temperature probe and stirrer.
- Page 190 METHOD ID: HI1009EN NEUTRALIZATION WITH SODIUM HYDROXIDE 0 to 200 meq/L METHOD PARAMETERS CALCULATIONS Name: Neutralization w/ NaOH Calculations: Sample Calc. by Volume Method Revision: Titrant units: N (eq/L) Analysis Type: Standard Titration Titrant volume dosed: V (L) Analog Board: Analog 1 Final result units: meq/L...
- Page 191 METHOD ID: HI1011EN TROUBLESHOOTING 1 DESCRIPTION • The following information is needed to verify the accuracy of the Method for verifying the dosing and potentiometric signal accuracy dosing system: of the titrator. This method should be used to troubleshoot a titrator •...
- Page 192 METHOD ID: HI1011EN TROUBLESHOOTING 1 ALTERNATIVE CALCULATIONS TEMPERATURE & MV CHANNEL LOGGING PROCEDURE • Connect the shorting cap to the BNC socket on Analog Board 1. If the actual values of the above parameters are not accessible the • Connect the HI762000C 0°C temperature key to the RCA socket following equation can be used: (temperature sensor input) on Analog Board 1.
- Page 193 METHOD ID: HI1012EN TROUBLESHOOTING 2 DESCRIPTION • The following information is needed to verify the accuracy of the Method for verifying the dosing of the titrator. This method should be dosing system: used to troubleshoot a titrator equipped with a 25 mL burette. The •...
- Page 194 METHOD ID: HI1012EN TROUBLESHOOTING 2 ALTERNATIVE CALCULATIONS STIRRING SPEED FAST CHECK PROCEDURE • On the main screen select , if necessary select the If the actual values of the above parameters are not accessible the following equation can be used: analog board and press V=M*F and use the arrow keys to highlight Stirrer...
- Page 195 HI932/HI931 AUTOMATIC POTENTIOMETRIC TITRATOR...
- Page 197 1. GENERAL REVIEW OF TITRATION THEORY ......................1.1. INTRODUCTION TO TITRATIONS ..........................1.2.. USES OF TITRATIONS ............................... 1.3. ADVANTAGES AND DISADVANTAGES OF TITRATIONS ..................... 2. TYPES OF TITRATION ..............................2.1. TITRATIONS ACCORDING TO THE MEASUREMENT METHOD ..................2.1.1. AMPEROMETRIC TITRATIONS ............................2.1.2.
-
Page 199: General Review Of Titration Theory
1. GENERAL REVIEW OF TITRATION THEORY 1.1. INTRODUCTION TO TITRATIONS A titration is a quantitative, volumetric procedure used in analytical chemistry to determine the concentration of an analyte (the species being measured) in solution. The concentration of the analyte is determined by slowly adding a titrant (reagent) to the solution. -
Page 200: Types Of Titration
2. TYPES OF TITRATIONS 2.1. TITRATIONS ACCORDING TO THE MEASUREMENT METHOD 2.1.1. AMPEROMETRIC TITRATIONS An amperometric titration is performed by placing two electrodes (often a metal ISE and a reference electrode) into the sample solution and holding the potential of the metal electrode at a selected voltage. The current that flows, due to the oxidation or reduction of a reactant or product, is plotted vs. -
Page 201: Spectrophotometric Titrations
Figure 2 2.1.3. SPECTROPHOTOMETRIC TITRATIONS The name comes from the method used to detect the endpoint of the titration, not its chemistry. Highly colored indicators that change color during the course of the titration are available for many titrations. More accurate data on the titration curve can be obtained if the light absorption is monitored instrumentally using a light source, a simple monochromator and a photodetector, rather than visually determining the color or light absorption change. -
Page 202: Titrations According To The Reaction Type
2.2. TITRATIONS ACCORDING TO THE REACTION TYPE 2.2.1. ACID-BASE TITRATIONS Acid–base titrations are the most common type of titrations. They are based upon a reaction between an acid and a base, a stoichiometric neutralization, or the exchange of protons. Virtually all acid-base titrations are carried out using a strong acid or a strong base as the titrant. -
Page 203: Argentometric Titrations
Figure 4 2.2.2 ARGENTOMETRIC TITRATIONS Argentometric titrations use silver (nitrate) as the titrant and are generally precipitation titrations, as many silver salts are insoluble. These titrations are commonly used to titrate and determine the concentration of bromide, chloride, cyanide, iodide, and sulfide. Argentometric titrations can be done with Mohr’s indicator (when all of the chloride has reacted, a red silver chromate precipitate is formed) or the titration can be easily followed with a silver ISE (or chloride ISE for chloride titrations) and a reference electrode. -
Page 204: Ion Selective Titrations
An indicator electrode that responds to the metal ion can be used to monitor the titration progress. The titration curve will appear similar to a usual potentiometric titration. Complexation indicators change color at the endpoint as all metal ions are “consumed”, or complexed, by the titrant. -
Page 205: Precipitation Titrations
TITRATION OF BASES Weak bases with pK ’s up to about 11, which do not ionize with water, can be titrated in non-aqueous solvents. These bases include aliphatic and aromatic amines, basic nitrogen heterocycles, alkali metal and amine salts of acids, and many other organic basic compounds. -
Page 206: Karl Fischer Titration
2.2.8. KARL FISCHER TITRATIONS This method is based on a well-defined chemical reaction between water and the Karl Fischer reagent. The chemistry provides excellent specificity for water determination. The method can be used to determine free and bound water in a sample matrix. The Karl Fischer method is widely considered to produce the most rapid, accurate and reproducible results and has the largest detectable concentration range spanning 1 ppm to 100%. -
Page 207: Introduction To Titration Apparatus And Typical Titration Procedure
3. INTRODUCTION TO TITRATION APPARATUS AND TYPICAL TITRATION PROCEDURE 3.1. MANUAL TITRATION Apparatus required for manual titration include: • Volumetric Burette, for precisely controlled delivery of titrant to the reaction vessel • An Erlenmeyer, or similar flask, that facilitates constant mixing or swirling required to ensure solution homogeneity •... -
Page 208: Titration Results
Apparatus required for automatic titration include: • An automatic titrator, equipped with a burette • A beaker • An electronic stirring system, either a propeller stirrer or a magnetic stir bar and stir plate • Volumetric pipettes for the precise addition of samples •... -
Page 209: Dispensing Errors
4.3.2.2. DISPENSING ERRORS Incorrect dispensing due to: • Dead valve volume and leaking valve • Inaccuracy in motor drive and gear lash/ backlash • Poor burette/ piston seal • Non-uniform diameter of burette glass cylinder • Chemical incompatibility with tubing or bubble generation •... -
Page 210: Calculations
5. CALCULATIONS The main variables used in calculating a result from a titration are the sample volume, the concentration of the titrant, and the volume of titrant required to reach the equivalence point. At the equivalence point, an equal number of equivalents of the analyte and titrant has been added. -
Page 211: Blank Titration
By Volume C titrant Concentration of titrant (N) V standard Volume of Standard (mL) C standard Concentration of standard (eq/L) V titrant Volume of Titrant (L) 5.3. BLANK TITRATION In a blank titration a pre-titration is performed, often times on the solvent to be used for the sample titration, and the titrant volume required to reach the endpoint is noted. - Page 212 Ratio Equivalence ratio of analyte/ titrant (mol analyte/ eq titrant) FW analyte 1 Formula Weight of the Analyte 1 (g/mol) FW analyte 2 Formula Weight of the Analyte 2 (g/mol) FW analyte 3 Formula Weight of the Analyte 3 (g/mol) m sample Weight of Sample (mL) 5.5.
-
Page 213: Back Titration
Back Titration A type of titration where an excess amount of titrant is added to a sample, forcing a sluggish reaction to go to completion. The excess reagent is then “back” titrated with a second titrant. Base A chemical species that can accept one or more protons (hydrogen ions). Biamperometric Indication Uses a double platinum pin electrode to measure the current flow through a titration solution. - Page 214 Manual Titration A titration that is carried out by hand. The analyst must add the appropriate amount of titrant, determine the endpoint and calculate the results. Molar The concentration of a solute in a solution. Mole (mol) A quantity of a chemical species. The molecular weight of a substance in grams is equal to the mass of one mole of the substance.
- Page 215 Reduction-Oxidation Reaction (redox) A chemical reaction in which the atoms involved in the reaction have their oxidation numbers changed. Reduction is the gain of electrons, which decreases the oxidation number. Oxidation is the loss of electrons, which increases the oxidation number. Reductants The electron donor in a redox reaction.
- Page 216 THEORY931/932 10/18...
- Page 218 World Headquarters Hanna Instruments Inc. Highland Industrial Park 584 Park East Drive Woonsocket, RI 02895 USA www.hannainst.com Local Office Hanna Instruments Inc. Highland Industrial Park 584 Park East Drive Woonsocket, RI 02895 USA Phone: 800.426.6287 Fax: 401.765.7575 e-mail: tech@hannainst.com MAN931...
Need help?
Do you have a question about the HI931 and is the answer not in the manual?
Questions and answers