
Related Manuals for Horizon Fitness 5.0U


Summary of Contents for Horizon Fitness 5.0U
- Page 1 5.0U UPRIGHT BIKE OWNER’S MANUAL Read the EXERCISE BIKE GUIDE before using this OWNER’S MANUAL.
- Page 2 ENGLISH...
- Page 3 ASSEMBLY WARNING There are several areas during the assembly process that special attention must be paid. It is very important to follow the assembly instructions correctly and to make sure all parts are firmly tightened. If the assembly instructions are not followed correctly, the Upright Bike could have parts that are not tightened and will seem loose and may cause irritating noises.
-
Page 4: Model Information
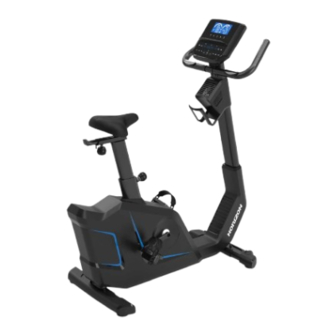
MODEL INFORMATION Tablet holder Console (32) Handlebar set (30) Heart rate sensor Bottle holder Console Mast (33) Mast Cover (26) Seat (35) Seat height knob Seat slider (36) Main frame (20) Seat Slider Cap (10) Seat Adjustment knob (11) Pedal Straps (39 L&R) Pedals (37 L&R) Crank arms (38 L&R) Transport wheels... -
Page 5: Pre-Assembly
PRE ASSEMBLY MAIN PARTS INCLUDED: Main Frame (20) Front Stabilizer (21F) UNPACKING Rear Stabilizer (21R) Due to the weight of the Upright Bike, it is recommended that two people Handlebar Set (30) perform the assembly. Unpack the product where you will be using it. It is Mast Cover (26) recommended that you place a protective covering on your floor. -
Page 6: Assembly Step
ASSEMBLY STEP 1 STEP 1 HARDWARE : Bolt Spring Washer Flat Washer Ø8 Ø8 Qty: 4 Qty: 4 Qty: 4 1.1 Open hardware for Step 1. 1.2 Attach the Front Stabilizer (21F) and Rear Stabilizer (21R) to the Main Frame (20) using 4 Bolts (1), 4 Spring Washers (2) and 4 Flat Washers (3). - Page 7 ASSEMBLY STEP 2 STEP 2 HARDWARE : Bolt Bolt Qty: 4 Qty: 4 Qty: 2 Flat Washer Ø8 Qty: 10 2.1 Attach Lead Wire (24) to Console Cable (23). Pull through Mast Cover(26) and out opening of Console Mast (33). 2.2 Slide Mast Cover(26) over Console Mast (33).
- Page 8 ASSEMBLY STEP 3 STEP 3 HARDWARE : Bolt Flat Washer Ø8 Qty: 4 Qty: 4 3.1 Open hardware for Step 3. 3.2 Attach Lead Wire (24) to Handlebar cable (25) and feed Handlebar Cable (25) through the Console Mast (33). 3.3 Attach Handlebar Set (30) to Console Mast (33) with 4 Bolts (4) and 4 Flat Washers (3).
- Page 9 ASSEMBLY STEP 4 STEP 4 HARDWARE : Flat Washer Plate End Cap Ø10.5 Qty: 1 Qty: 1 Qty: 1 Seat Adjustment Knob Qty: 1 4.1 Open hardware for Step 4. 4.2 Insert Plate (9) into Seat Slider (36). 4.3 Place Seat (35) with Plate (9) onto seat post U-bracket and screw Seat Adjustment Knob (11) with Flat Washer (8) into Plate (9).
- Page 10 ASSEMBLY STEP 5 5.1 Identify Left Pedal (37L) which is labeled L on spindle and Right Pedal (37R) labeled R. 5.2 Insert Left Pedal Strap (39L) into Left Pedal (37L) and Right Pedal Strap (39R) into Right Pedal (37R). 5.3 Insert Left Pedal (37L) into Left Crank Arm (38L), ensure screw threads are aligned.
- Page 11 ASSEMBLY STEP 6 STEP 6 HARDWARE : Bolt Qty: 4 6.1 Open hardware for Step 6. 6.2 Attach Console Cable (23), Handlebar Cables (25), and Fan Cable (27) to Console (32). 6.3 Carefully tuck all cables into Console Mast (33). 6.4 Attach Console (32) to Console Mast (33) using 4 Bolts (7).
- Page 12 ASSEMBLY STEP 7 CONGRATULATIONS! You have successfully assembled your Upright Bike. Product Weight: 39 kg / 87 lbs. Max User Weight: 136 kg / 300 lbs. Assembled Dimensions (L x W x H): 117 x 56 x 135 cm / 46"...
-
Page 13: Console Operation
CONSOLE OPERATION... - Page 14 CONSOLE LCD Display USB Port (Backside) Program Indicators Bluetooth Button Split Button Fan Speed Button Start/Stop Button Quick Keys Up/Down Keys NOTE: There is a thin protective sheet of clear plastic on the overlay of the console that should be removed before use.
-
Page 15: Console Display
CONSOLE OPERATION LCD DISPLAY WINDOWS: time, remain, distance, calories, heart rate, timer, speed, cadence and resistance level. LCD DISPLAY INDICATORS: indicates what information is being displayed. START : press to begin exercising, start your workout, or resume exercising after pause. STOP : press to pause/end your workout. -
Page 16: Program Information
PROGRAM INFORMATION P1) MANUAL: Adjust your resistance manually during your workout. P2) DISTANCE: Push yourself and go further during your workout with 13 distance workouts. Choose from 1 mile, 2 miles, 5k, 5 miles, 10k, 8 miles, 15k, 10 miles, 20k, half marathon, 15 miles, 20 miles, and marathon goals. P3) CALORIES: Set goals for burning calories. - Page 17 GETTING STARTED Check to make sure no objects are nearby that will hinder the movement of the Bike. Plug in the power cord. NOTE: The Bike does not have a power switch and will turn on when power is supplied. QUICK START UP Simply press the START key to begin working out.
- Page 18 HOW TO SWITCH BETWEEN APP MODE & BT HEART RATE MODE Home- P1 Connecting to an App (default mode) Connecting to HR Strap (off by default) If using a 3rd party App, please turn on your device’s In order to access to HR Strap mode, make sure the Bluetooth (BT) and follow the App pairing instructions.
- Page 20 Horizon 5.0U | Rev. 1.0 E ©2023 Horizon Fitness...
Need help?
Do you have a question about the 5.0U and is the answer not in the manual?
Questions and answers