Table of Contents
Advertisement
Quick Links
Advertisement
Table of Contents

Related Manuals for Martindale Electric ET6000


Summary of Contents for Martindale Electric ET6000
- Page 1 ET6000 ET6300 ET6500 MULTIFUNCTION INSTALLATION TESTERS nstructIon anual...
-
Page 2: Table Of Contents
ET6000, ET6300, ET6500 Table of contents TABLE OF CONTENTS Preface Safety & operational considerations Warnings and meaning of symbols Batteries Charging Precautions on charging new battery cells or cells unused for a longer period Standards applied Instrument description Individual model functions... - Page 3 ET6000, ET6300, ET6500 Table of contents 5.2.1 R low test 5.2.2 Continuity test Testing RCDs 5.3.1 Limit contact voltage 5.3.2 Nominal differential trip-out current 5.3.3 Multiplier of nominal residual current 5.3.4 RCD type and test current starting polarity 5.3.5 Testing selective (time-delayed) RCDs 5.3.6...
- Page 4 ET6000, ET6300, ET6500 Table of contents 7.3 RCD testing 7.3.1 General data 7.3.2 Contact voltage 7.3.3 Trip-out time 7.3.4 Trip-out current 7.4 Fault loop impedance and prospective fault current 7.5 Line impedance and prospective short-circuit current 7.6 Phase rotation 7.7 Voltage and frequency 7.8 Earth Resistance 7.9 General data Storing measurements (ET6500) 8.1 Overview 8.2 Saving results 8.3 Recalling results 8.4 Deleting results Test result download (ET6500 only)
-
Page 5: Preface
Safety and operational considerations 1. PREFACE Thank you for using a ET6000 series multifunction tester from Martindale. The ET6000 series are professional, multifunctional, hand-held test instruments intended to perform all the measurements required for verification of electrical safety of installations in buildings. The range consists of 3 products, ET6000, ET6300 and ET6500. -
Page 6: Safety & Operational Considerations
ET6000, ET6300, ET6500 Safety and operational considerations 2. SAFETY AND OPERATIONAL CONSIDERATIONS 2.1 Warnings and meaning of symbols REMEMBER: SAFETY IS NO ACCIDENT These instructions contain both information and warnings that are necessary for the safe operation and maintenance of this product. It is recommended that you read the instructions carefully and ensure that the contents are fully understood. -
Page 7: Meaning Of Symbols And Markings
ET6000, ET6300, ET6500 Safety and operational considerations Meaning of symbols and markings Caution - risk of danger & refer to instructions Caution - risk of electric shock Equipment protected by double or reinforced insulation (Class II) Do not use in distribution systems with voltages higher than 550V... - Page 8 ET6000, ET6300, ET6500 Safety and operational considerations NOTES RELATED TO MEASUREMENT FUNCTIONS General • The “!” indicator means that the selected measurement cannot be performed because of irregular conditions on input terminals. • Insulation resistance, continuity functions and earth resistance measurements can only be performed on de-energized circuits.
-
Page 9: Batteries
ET6000, ET6300, ET6500 Safety and operational considerations Line impedance • Isc depends on Z, Un and scaling factor • The current limit depends on fuse type, fuse current rating and fuse trip-out time • The specified accuracy of tested parameters is valid only if the mains voltage is stable during the measurement. -
Page 10: Precautions On Charging New Battery Cells Or Cells Unused For A Longer Period
ET6000, ET6300, ET6500 Safety and operational considerations 2.4 Precautions on charging of new battery cells or cells unused for a longer period Unpredictable chemical processes can occur during the charging of new battery cells or cells that have been left unused for long periods of time (more than 3 months). -
Page 11: Standards Applied
ET6000, ET6300, ET6500 Safety and operational considerations 2.5 Standards applied The Martindale ET6000 Series instruments are manufactured and tested in accordance with the following directives: Electromagnetic compatibility (EMC) BS EN 61326 Electrical equipment for measurement, control and laboratory use – EMC requirements... -
Page 12: Instrument Description
ET6000, ET6300, ET6500 Instrument description 3. INSTRUMENT DESCRIPTION 3.0 Individual model functions Model ET6000 ET6300 ET6500 SPECIFICATION 0V - 500V Voltage 10HZ - 499HZ Frequency EV ready BS EN 61010-1 CAT III 600V CAT IV 300V BS EN 61557, BS 57671:2018 18th Edition BS EN 61326-1 Complies with 250mm x 107mm x 135mm Dimensions 1.3kg approx (excluding battery) Weight INSULATION RESISTANCE Nominal voltages... -
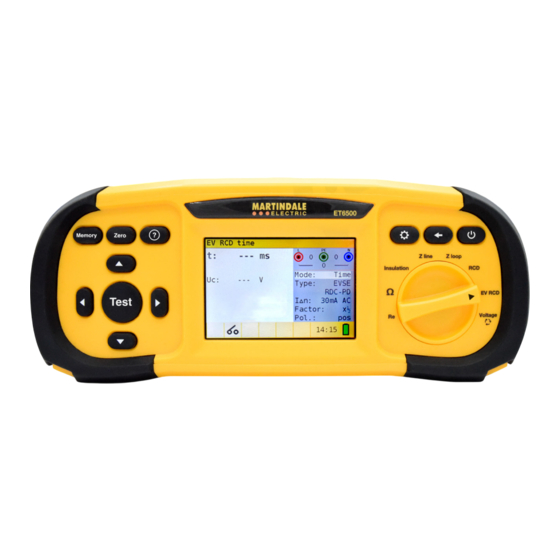
Page 13: Front Panel (Depends On Model)
ET6000, ET6300, ET6500 Instrument description 3.1 Front panel (dependent on model, ET6500 shown) Figure 3.1: Front panel Legend: Function selector switch Setup key Exit/Back/Return key ON/OFF key, to switch the instrument on and off. The instrument will automatically power off (APO) after the last key press and no voltage is applied. -
Page 14: Connector Panel
ET6000, ET6300, ET6500 Instrument description 3.2 Connector panel (dependent on model) L2/N/E L1/L/H CAT III / 600V, CAT IV / 300 V L3/PE/ES Figure 3.2: Connector panel Legend: Test connector- Warning Maximum allowed voltage between test terminals and ground is 600V. Maximum... -
Page 15: Back Panel
ET6000, ET6300, ET6500 Instrument description 3.3 Back panel Martindale Electric Co Ltd Unit 12 Imperial Park Imperial Way, Watford WD24 4PP, United Kingdom Figure 3.3: Back panel Legend: Battery / fuse compartment cover Information label Fixing screws for battery / fuse compartment cover... - Page 16 ET6000, ET6300, ET6500 Instrument description Figure 3.4: Back panel cover removed Legend: Fuse F1 – 4A 500V 6.3 x 32mm HRC Fuse F2 – 4A 500V 6.3 x 32mm HRC Battery contacts Battery cells (size AA) Fuse F3 - 315mA 250V 5 x 20mm HRC...
-
Page 17: Bottom View - Information Label
ET6000, ET6300, ET6500 Instrument operation 3.4 Bottom view - Information label Function EN61557 Range Accuracy Notes Continuity ... 20.0 ±(3% of read. + 3 digits) ... 1999 ±(5% of read. + 3 digits) Test current max. 7 mA Open circuit voltage 5V 0.1 M ... -
Page 18: Instrument Operational
ET6000, ET6300, ET6500 Instrument operation 4. INSTRUMENT OPERATION 4.1 Meaning of symbols and messages on the instrument display The instrument display is divided into several sections: Figure 4.1: Display outlook Legend: Main function line. Result field - In this field the main result and sub-results are displayed Status field - PASS / FAIL / ABORT / START / WAIT / WARNINGS status’ are displayed... -
Page 19: The Online Voltage And Output Terminator Monitor
ET6000, ET6300, ET6500 Instrument operation 4.2 The online voltage and output terminal monitor Online voltages are displayed together with test terminal indication. All three test terminals are used for selected measurement. Online voltages are displayed together with test terminal indication. L and N test terminals are used for selected measurement. -
Page 20: Status Field - Measurement Warnings / Results Symbols
ET6000, ET6300, ET6500 Instrument operation 4.4 Status field - measurement warnings / results symbols Active in function: Dangerous voltage Test leads are Zero zeroing Measurement cannot be started Dangerous voltage on PE Result is not ok Result is ok RCD open... -
Page 21: Sound Warnings
ET6000, ET6300, ET6500 Instrument operation 4.5 Sound warnings Short high sound Button press Continuous sound During continuity test when result is <35Ω Increasing sound Attention, dangerous voltage applied Short sound Power off, end of measurement Decreasing sound Warnings (temperature, voltage at input, start not possible) Periodic sound Warning! Phase voltage on the PE terminal. -
Page 22: Setup Menu
ET6000, ET6300, ET6500 Instrument operation 4.7 Setup menu To enter the Setup menu, press the SETUP key. In the Setup menu, the following actions can be taken: • Isc factor: Set prospective short/fault current scaling factor • Date/Time: Set internal date and time Calibration date (optional) •... -
Page 23: Help Screen
ET6000, ET6300, ET6500 Measurements 4.8 Help screen The Help screens contain diagrams that show the correct use of the device. Figure 4.8: Example of a help screen Press the HLP key to enter the help screen Press the HLP key or the Exit/Back/Return key to exit the help screen... -
Page 24: Measurements
ET6000, ET6300, ET6500 Measurements 5. MEASUREMENTS 5.1 Insulation resistance The Insulation resistance measurement is performed in order to ensure safety against electric shock. Using this measurement, the following items can be determined: • Insulation resistance between installation conductors, • Insulation resistance of non-conductive rooms (walls and floors), •... - Page 25 Ensure that no voltages are present on the item for testing. Connect the test leads to Step 3 the ET6000 series instrument. Connect the test cables to the item under test. (see figure 5.2) to perform insulation resistance measurement. Figure 5.2: Connection of universal test cable...
-
Page 26: Continuity
ET6000, ET6300, ET6500 Measurements Warnings: • Insulation resistance measurement should only be performed on de-energized circuits. • When measuring the insulation resistance between installation conductors, all loads must be disconnected, and all switches closed. • Do not touch the test circuit during the measurement or before it is fully discharged to avoid risk of electric shock. - Page 27 Step 2 • Limit: limit resistance value using the navigation keys. Connect test cable to the ET6000 series instrument. Before performing an R Low Step 3 resistance measurement, compensate for the test leads resistance as follows: 1. Short test leads first as shown in figure 5.5.
- Page 28 ET6000, ET6300, ET6500 Measurements Ensure that the item/circuit for testing is disconnected from any voltage source and Step 4 that it has been fully discharged. Connect the test cables to the item under test. Follow the connection diagrams shown in figures 5.6 and 5.7 to perform a R Low resistance measurement. Figure 5.6: Connection of universal test cable...
-
Page 29: Continuity Test
ET6000, ET6300, ET6500 Measurements Warnings: • Low-value resistance measurements should only be performed on de-energized circuits. • Parallel impedances or transient currents may influence test results. Note: If the voltage between test terminals is higher than 10V the R Low measurement will not be performed 5.2.2 Continuity test... - Page 30 ET6000, ET6300, ET6500 Measurements Connect test cable to the instrument and the circuit under test. Follow the connection Step 3 diagram shown in figures 5.9 and 5.10 to perform the Continuity measurement. Figure 5.9: Connection of universal test cable Check the warnings and online voltage/terminal monitor on the display before starting Step 4 the measurement.
- Page 31 ET6000, ET6300, ET6500 Measurements Displayed result: Low current continuity resistance result. Current used in the measurement Warning: • Low current continuity measurement should only be performed on de-energized circuits Notes: • If a voltage of higher than 10V exists between test terminals, the continuity measurement will not be performed.
-
Page 32: Testing Rcds
Selected nominal differential current can be multiplied by ½, 1, 2 or 5. 5.3.4 RCD type and test current starting polarity The ET6000 series instruments enable testing of general (non-delayed) and selective (time- delayed) RCDs. The types of RCD the instrument is suitable for testing include: •... -
Page 33: Testing Selective (Time-Delayed) Rcds
ET6000, ET6300, ET6500 Measurements positive start polarity (0°) negative start polarity (180°) Figure 5.11: Test current started with the positive or negative half-wave 5.3.5 Testing selective (time-delayed) RCDs Selective RCDs demonstrate delayed response characteristics. Trip-out performance is influenced due to pre-loading during measurement of contact voltage. In order to eliminate the pre-loading a time delay of 30s is inserted before performing the trip-out test. - Page 34 ET6000, ET6300, ET6500 Measurements How to perform contact voltage measurement Select the RCD function with the function selector switch and select the Uc mode with Step 1 the navigation keys. The following menu will be displayed: Figure 5.12: Contact voltage measurement menu...
- Page 35 ET6000, ET6300, ET6500 Measurements Figure 5.14: Example of contact voltage measurement results Displayed results: Contact voltage. Fault loop resistance. Limit Limit earth fault loop resistance value according to BS 7671. Notes: • Parameters set in this function are also kept for all other RCD functions. • The measurement of contact voltage does not normally trip an RCD. However, the trip limit may be exceeded as a result of leakage currents flowing through the PE protective conductor or a capacitive connection between the L and PE conductor.
-
Page 36: Trip-Out Time
ET6000, ET6300, ET6500 Measurements 5.3.7 Trip-out time Trip-out time measurement is used to verify the effectiveness of an RCD. This is achieved by a test simulating an appropriate fault condition. Trip-out times vary between standards and are listed below. Trip-out times according to BS EN 61008 / BS EN 61009: ½... - Page 37 ET6000, ET6300, ET6500 Measurements Set the following measuring parameters: Step 2 : Nominal differential trip-out current, ΔN Factor: Nominal differential trip-out current multiplier, Type: RCD type and Pol.: Test current starting polarity. Connect the leads to the instrument and follow the connection diagram shown in figure Step 3 5.15 (see section 5.3.6 contact voltage) to perform trip-out time measurement.
-
Page 38: Trip-Out Current
ET6000, ET6300, ET6500 Measurements 5.3.8 Trip-out current This test is used to determine the minimum current required to trip the RCD. After the measurement has been started, the test current generated by the instrument is continuously increased, starting at 0.2xI to 1.1xI... -
Page 39: Autotest
ET6000, ET6300, ET6500 Measurements Figure 5.18: Example of trip-out current measurement result Displayed results: Trip-out current Contact voltage Trip-out time. Notes: • Parameters set in this function are also kept for other RCD functions. • RCD trip-out current measurement will be performed only if the contact voltage at nominal differential current is lower than set limit contact voltage. -
Page 40: How To Perform Rcd Autotest
ET6000, ET6300, ET6500 Measurements 5.3.9.1 How to perform RCD autotest Select the RCD function with the function selector switch and select the Auto mode with Step 1 the navigation keys. The following menu will be displayed: Figure 5.19: RCD autotest menu... - Page 41 ET6000, ET6300, ET6500 Measurements Measurement normally trips an RCD within the allowed time period. The following menu is displayed: Figure 5.20: Step 1 RCD autotest results After re-activating the RCD, the autotest sequence automatically proceeds with step 2. 2. Trip-out time measurement with the following measurement parameters: •...
- Page 42 ET6000, ET6300, ET6500 Measurements 3. Trip-out time measurement with the following measurement parameters: • Test current of 5xI ΔN • Test current started with the positive half-wave at 0˚. Trip-out time measurement with the following measurement parameters: Figure 5.22: Step 3 RCD autotest results After re-activating the RCD the autotest sequence automatically proceeds with step 4.
- Page 43 ET6000, ET6300, ET6500 Measurements 5. Trip-out time measurement with the following measurement parameters: • Test current of ½xI ΔN • Test current started with the positive half-wave at 0˚. Measurement does not normally trip an RCD. The following menu is displayed: Figure 5.24: Step 5 RCD autotest results After performing step 5 the RCD autotest sequence automatically proceeds with step 6.
- Page 44 ET6000, ET6300, ET6500 Measurements 7. Ramp test measurement with the following measurement parameters: • Test current started with the positive half-wave at 0˚. This measurement determine the minimum current required to trip the RCD. After the measurement has been started, the test current generated by the instrument is continuously increased, until the RCD trips.
-
Page 45: Loop Fault Impedence And Prospective Fault Current
ET6000, ET6300, ET6500 Measurements Displayed results: x1 (left) Step 1 trip-out time result, t3 (I , 0˚), ΔN x1 (right) Step 2 trip-out time result, t4 (I , 180˚), ΔN x5 (left) Step 3 trip-out time result, t5 (5xI , 0˚), ΔN x5 (right) Step 4 trip-out time result, t6 (5xI , 180˚),... -
Page 46: Loop Fault Impedence
ET6000, ET6300, ET6500 Measurements 5.4.1 Loop fault impedance The fault loop impedance measures the impedance of the fault loop in the event that a short-circuit to an exposed conductive part occurs (i.e. a conductive connection occurs between the phase conductor and protective earth conductor). In order to measure loop impedance, the instrument uses a high-test current. - Page 47 ET6000, ET6300, ET6500 Measurements Figure 5.29: Connection of plug cable and universal test cable Check for any warnings displayed on the screen and check the online voltage/terminal Step 3 monitor before starting the measurement. If everything is ok and the is shown, press the TEST key.
-
Page 48: The Fault Loop Impedance Test Rcd (For Rcd Protected Circuits)
ET6000, ET6300, ET6500 Measurements 5.4.2 The fault loop impedance test RCD (for RCD protected circuits) The fault loop impedance is measured with a low test current to avoid tripping the RCD. This function can also be used for fault loop impedance measurement in system equipped with RCDs which have a rated trip-out current of 30mA and above. -
Page 49: The Fault Loop Impedance Test Rs (For Adjustable Current)
ET6000, ET6300, ET6500 Measurements Figure 5.32: Example of fault loop impedance measurement results using RCD function Displayed result: Fault loop impedance, Prospective fault current (PFC) Notes: • The measurement of fault loop impedance using trip-lock function does not normally trip an RCD. However, if the trip limit may be exceeded as a result of leakage current flowing through the PE protective conductor or a capacitive connection between L and PE conductors. - Page 50 ET6000, ET6300, ET6500 Measurements How to perform Rs trip-lock measurement Select the LOOP function with the function selector switch and select the Rs mode with Step 1 the navigation keys. Then select desired Type (select various types or custom or off), current, Limit and scaling factor option values with the navigation keys.
-
Page 51: Line Impedance And Prospective Short-Circuit Current
ET6000, ET6300, ET6500 Measurements Notes: • The measurement of fault loop impedance using trip-lock function does not normally trip an RCD. However, if the trip limit may be exceeded as a result of leakage current flowing through the PE protective conductor or a capacitive connection between L and PE conductors. - Page 52 ET6000, ET6300, ET6500 Measurements Connect the appropriate test leads to the instrument and follow the connection Step 2 diagram shown in figure 5.36 to perform phase-neutral or phase-phase line impedance measurement. Figure 5.356: Line impedance measurement Check for warnings displayed on the screen and check the online voltage/terminal Step 3 monitor before starting the measurement.
-
Page 53: Voltage Drop Test
ET6000, ET6300, ET6500 Measurements 5.5.1 Voltage drop test (ET6500 Only) The voltage drop function is a measurement of the line impedance (see section 5.5) and result is compared to a reference result which has been taken before on some other point of the installation (usually the entry point since this point has the lowest impedance). - Page 54 ET6000, ET6300, ET6500 Measurements Figure 5.379: Example of voltage drop measurement results Displayed results: voltage drop of the test point compared to the reference point ∆U Line impedance of the reference point Zref Line impedance of the test point Prospective short-circuit current of the test point Notes: •...
-
Page 55: Phase Sequence Testing
Step 1 displayed: Figure 5.40: Phase rotation test menu Connect test cable to the ET6000 series instrument and follow the connection diagram Step 2 shown in figure 5.41 to test phase sequence. Figure 5.41: Connection of universal test cable and optional three phase cable... - Page 56 ET6000, ET6300, ET6500 Measurements Check for warnings on the display and check the online voltage/terminal monitor. The Step 3 phase sequence test is a continuously running test hence the results will be displayed as soon as the full test lead connection to the item under test has been made. All three- phase voltages are displayed in order of their sequence represented by the numbers 1, 2 and 3.
-
Page 57: Voltage And Frequency
Step 1 displayed: Figure 5.43: Voltage and frequency measurement menu Connect test cable to the ET6000 series instrument and follow the connection diagram Step 2 shown in figure 5.44 to perform a voltage and frequency measurement. Figure 5.44: Connection diagram... - Page 58 ET6000, ET6300, ET6500 Measurements Check the displayed warnings. The Voltage and Frequency test continually runs, Step 3 showing fluctuations as they occur, these results are shown on the display during measurement. Figure 5.385: Examples of voltage and frequency measurements Displayed results:...
-
Page 59: Earth Resistance
ET6000, ET6300, ET6500 Measurements 5.8 Earth Resistance (ET6500 only) 5.8.1 Earth Resistance (Re) - 3-wire, 4-wire Earth Spike Kit The ET6500 model allows resistance to earth measurement using 3-wire and 4-wire measuring method. For 3-wire testing use the Martindale ER2KIT-S accessory and for 4-wire testing use the Martindale ER4KIT-S accessory. - Page 60 ET6000, ET6300, ET6500 Measurements Follow the connection diagram shown in figures 5.48 to perform the Earth Resistance measurement with 3 wires (ES connected to E). Figure 5.48: 3 wire connection diagram Check for any warnings and the online voltage/terminal monitor on the display before starting the measurement.
-
Page 61: Specific Earth Resistance (Ro)
ET6000, ET6300, ET6500 Measurements 5.8.2 Specific earth resistance (Ro) It is advisable to measure Earth Resistivity, when defining parameters of earthing system (required length and surface of earth electrodes, most appropriate depth of installing earthing system etc.) in order to reach more accurate calculations. - Page 62 ET6000, ET6300, ET6500 Measurements Check for any warnings and the online voltage/terminal monitor on the display before Step 4 starting the measurement. If everything is ok and the is shown, press the TEST key. After performing the measurement, the results appear on the display together with the indication (if applicable).
-
Page 63: Maintenance
To maintain the integrity of measurements made using your instrument, Martindale Electric recommends that it is returned at least once a year to an approved Calibration Laboratory for recalibration and certification. Martindale Electric is pleased to offer you this service. Please contact our Service Department for details. Email: service@martindale-electric.co.uk... -
Page 64: Service And Storage Conditions
The ET6300 and ET6500 are supplied as standard with rechargeable batteries and a battery charger. The ET6000 is supplied with standard alkaline batteries. To enable the ET6000 to be upgraded to be rechargeable the Martindale ETBATKIT is available which includes a set of rechargeable batteries and a charger. -
Page 65: Technical Specifications
ET6000, ET6300, ET6500 Techinical specifications 7 TECHNICAL SPECIFICATIONS 7.1 Insulation resistance Insulation resistance (nominal voltages 50V DC) Measurement range according to BS EN 61557 from 50kΩ-80MΩ Measuring range (MΩ) Resolution (MΩ) Accuracy 0.1 – 80.0 (0.100 ... 1.999) 0.001 ±(5% of reading + 3 digits) (2.00 ... 80.00) 0.01... -
Page 66: Continuity Resistance
ET6000, ET6300, ET6500 Techinical specifications 7.2 CONTINUITY RESISTANCE 7.2.1 Low R (ET6300 & ET6500) Measuring range according to EN61557-4 is 0.1Ω – 1999Ω. Measuring range (Ω) Resolution (Ω) Accuracy 0.1 – 20.0 (0.10Ω ... 19.99Ω) 0.01Ω ±(3% of reading + 3 digits) 20.0 – 1999 (20.0Ω ... 99.9Ω) 0.1Ω ±(5% of reading) (100Ω ... 1999Ω) -
Page 67: Contact Voltage
ET6000, ET6300, ET6500 Techinical specifications RCD test current selection (r.m.s. value calculated to 20 ms) according to IEC 61009: ½xI RCD I ΔN ΔN ΔN ΔN Δ I ΔN (mA) 10.5 1000 1500 1000 1000 1410 2500 650* 1300 1300... -
Page 68: Trip-Out Current
ET6000, ET6300, ET6500 Techinical specifications 7.3.4 Trip-out current Measurement range corresponds to BS EN 61557-6 for I ≥10mA. Specified accuracies are valid for ΔN complete operating range. Measuring range I Resolution I Accuracy Δ Δ 0.2xI – 1.1xI (AC type) 0.05xI ±0.1xI ΔN ΔN ΔN ΔN 0.2xI – 1.5xI (A type, 0.05xI ±0.1xI ΔN... -
Page 69: Fault Loop Impedance And Prospective Fault Current
ET6000, ET6300, ET6500 Techinical specifications 7.4 Fault loop impedance and prospective fault current Zloop L-PE, I sub-function Measuring range according to BS EN 61557-3 is 0.25Ω – 1999Ω. Measuring range (Ω) Resolution (Ω) Accuracy 0.2 – 9999 (0.20 ... 19.99) 0.01 ±(5% of reading + 5 digits) (20.0 ... 99.9) 0.01... - Page 70 ET6000, ET6300, ET6500 Techinical specifications Zloop L-PE RCD and Rs, I , non trip subfunction Measuring range according to BS EN 61557 is 0.75Ω – 1999Ω. Measuring range (Ω) Resolution (Ω) Accuracy* 0.4 – 19.99 (0.40 ... 19.99) 0.01 ±(5% of reading + 10 digits) 20.0 – 9999 (20.0 ... 99.9) 0.01...
-
Page 71: Line Impedance And Prospective Short-Circuit Current
ET6000, ET6300, ET6500 Techinical specifications 7.5 Line impedance and prospective short-circuit current Line impedance Measuring range according to BS EN 61557-3 is 0.25Ω – 1999Ω. Zline L-L, L-N, I subfunction Measuring range (Ω) Resolution (Ω) Accuracy 0.2 – 9999 (0.20 ... 19.99) 0.01 ±(5% of reading + 5 digits) (20.0 ... 99.9) 0.01... -
Page 72: Phase Rotation
ET6000, ET6300, ET6500 Techinical specifications Voltage drop: Measuring range (%) Resolution (%) Accuracy 0.00 – 9.9 Consider accuracy of the line measurement (only calculated value) 7.6 Phase rotation Measuring according to BS EN 61557-7 Nominal mains 50 V – 550V voltage range Nominal frequency range 45 Hz –... -
Page 73: Earth Resistance
ET6000, ET6300, ET6500 Techinical specifications 7.8 Earth Resistance (ET6500 Only) Measuring range according to BS EN 61557-5 is 100Ω – 1999Ω. Re – Earth resistance, 3-wire, 4-wire Measuring range (Ω) Resolution (Ω) Accuracy 1.0 – 9999 (1.00 ... 19.99) 0.01 ±(5% of reading + 5 digits) (20.0 ... 199.9) (100... 9999) Max. -
Page 74: General Data
ET6000, ET6300, ET6500 Techinical specifications 7.9 General data Power supply voltage 9V DC (6x1.5 V battery cells, size AA) Power supply adapter 12V DC / 1000 mA Battery charging current < 600 mA (internally regulated) Voltage of charged batteries 9 V DC(6x1.5V, at fully charged state) -
Page 75: Storing Measurements (Et6500)
ET6000, ET6300, ET6500 Storing measurements 8 STORING MEASUREMENTS (ET6500 ONLY) After the measurement is completed, results can be stored in internal memory of the instrument together with the sub-results and function parameters. 8.1 Overview • The ET6500 instrument can store up to 1000 measurements •... -
Page 76: Saving Results
ET6000, ET6300, ET6500 Storing measurements 8.2 Saving results When the measurement is finished (Figure 8.3) results are displayed on the screen. Step 1 Figure 8.3: Last results Press the MEM key. The following is displayed (Figure 8.4): Step 2 Figure 8.4: Save results •... - Page 77 ET6000, ET6300, ET6500 Storing measurements The object ID, location ID and customer ID are stored as individual numbers between Step 3 0 and 65535. To change these, press the LEFT key. The following screen will be displayed (Figure 8.5). Figure 8.5: ID editor...
- Page 78 ET6000, ET6300, ET6500 Storing measurements The record number will change from red to black letters. That means that this result will be saved in memory as record 1. Each single result can be shown in coloured letters: • Green: measured and passed • Red: measured but failed •...
-
Page 79: Recalling Results
ET6000, ET6300, ET6500 Storing measurements 8.3 Recalling results To enter the Memory screen press the MEM key. Step 1 When no measurement was made, the last record is directly shown. When a measurement was made, a screen as in figure 8.4 is shown. Press the UP DOWN key to enter the record list. - Page 80 ET6000, ET6300, ET6500 Storing measurements Figure 8.8: delete screen Then press the TEST key to delete all records and return to the measurement screen. When a single record is deleted, its space in memory is freed and can be reused. The record number of the deleted record however is not used for new records.
-
Page 81: Test Result Download (Et6500 Only)
ET6000, ET6300, ET6500 MFT records 9 TEST RESULT DOWNLOAD (ET6500 ONLY) 9.1 MFT Records - PC software Stored results from the Martindale ET6500 can be downloaded to a PC using the MFT Records application for additional activities such as simple report creation and/or further analysis in an Excel spreadsheet. -
Page 82: Warranty And Limitation Of Liability
ET6000, ET6300, ET6500 Warranty and limitation of liability 10 WARRANTY AND LIMITATION OF LIABILITY This Martindale product is warranted to be free from defects in material and workmanship under normal use and service. The warranty period is 2 years and begins on the date of receipt by the end user. -
Page 83: Measurement Categories
ET6000, ET6300, ET6500 Measurement categories INSTALLATION CATEGORIES CAT Ratings Stay safe - Match your test equipment safety BS EN 61010-1 Installation Categories (CAT rating to the installation category. ratings) define the risks from hazardous transient impulses and potentially lethal short circuit... - Page 84 No part of this document shall be deemed to be part of any contract for the equipment unless specifically referred to as an inclusion within such contract. © 2024 Martindale Electric Co. Ltd. Registered in England No. 3387451. LITET6000...
Need help?
Do you have a question about the ET6000 and is the answer not in the manual?
Questions and answers