Table of Contents
Advertisement
Quick Links
Advertisement
Table of Contents

Subscribe to Our Youtube Channel
Related Manuals for SOLIS S6-EH3P7K-H-LV


Summary of Contents for SOLIS S6-EH3P7K-H-LV
- Page 1 User Manual for S6 Series Hybrid Inverter Applicable models S6-EH3P5K2-H S6-EH3P6K2-H S6-EH3P8K2-H S6-EH3P10K2-H S6-EH3P3K-H-EU S6-EH3P4K-H-EU S6-EH3P5K-H-EU S6-EH3P6K-H-EU S6-EH3P8K-H-EU S6-EH3P10K-H-EU S6-EH3P7K-H-LV Applicable System Three phase system Version 1.8, Release Date: 08,2024...
-
Page 2: Table Of Contents
Contents 1. Introduction ……………………………………………………………………………………………………………………………… 1.1 Product Description ……………………………………………………………………………………………………………… 1.2 Packaging ………………………………………………………………………………………………………………………………… 2. Safety & Warning ……………………………………………………………………………………………………………… 2.1 Safety ………………………………………………………………………………………………………………………………………… 2.2 General Safety Instructions ………………………………………………………………………………………………… 2.3 Notice For Use ………………………………………………………………………………………………………………………… 2.4 Notice for Disposal ……………………………………………………………………………………………………………… 3. Overview …………………………………………………………………………………………………………………………………… 3.1 Intelligent LED Indicators …………………………………………………………………………………………………... -
Page 3: Introduction
1. Introduction User Manual 1.1 Product Description The Solis S6 Series is designed for residential hybrid systems, which can work with batteries to optimize self-consumption. The unit can operate in both off- and on-grid modes. This manual covers the Solis S6 Series inverter model listed below:... -
Page 4: Packaging
AC Grid x1 CAN cable x1 Meter cable x1 Dust Cover x1 Eastron Meter x1 CT x3 Manual User Manual x1 RJ45 connector x6 Bluetooth Antenna x1 Data Logging Stick (Optional) x1 If anything is missing, please contact your local Solis distributor. -
Page 5: Safety & Warning
2. Safety & Warning User Manual 2.1 Safety The following types of safety instructions and general information appear in this document as described below: DANGER: “Danger” indicates a hazardous situation which if not avoided, will result in death or serious injury. WARNING: “Warning”... - Page 6 PV module used with inverter must have an IEC 61730 Class A rating. WARNING: Operations below must be accomplished by licensed technician or Solis authorized person. WARNING: Operator must put on the technicians’ gloves during the whole process in case of any electrical hazards.
-
Page 7: Notice For Use
2. Safety & Warning User Manual 2.3 Notice for Use The inverter has been constructed according to the applicable safety and technical guidelines. Use the inverter in installations that meet the following specifications ONLY: 1. Permanent installation is required. 2. The electrical installation must meet all the applicable regulations and standards. 3. -
Page 8: Overview
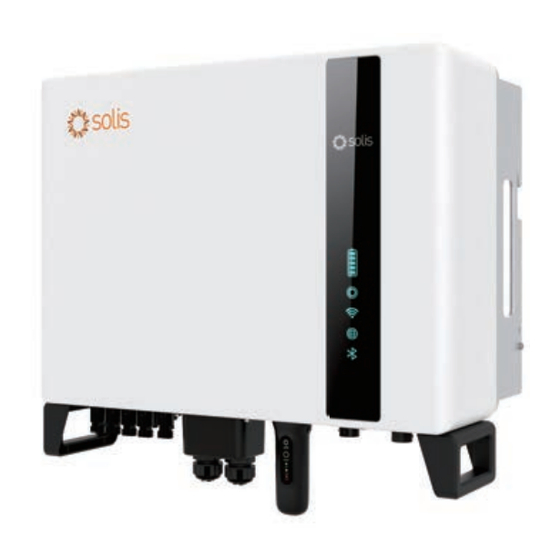
User Manual 3.1 Intelligent LED Indicators There are five indicators on the The Solis S6 Series Inverter (Battery, Power, WiFi, Ethernet and Bluetooth) which indicate the working status of the inverter. The Bluetooth Antenna or WiFi datalogger shall be installed at the Antenna/COM port of the hybrid inverter before local debugging. -
Page 9: Password Reset
3. Overview User Manual 3.2 Password Reset When the password of the owner or the installer needs to be reset,please long press the Inverter indicator for 5s. If the reset command is successfully triggered,the status indicator will be blue and blink for 3s at the frequency of 0.5s, then restore the original state of the indicator. -
Page 10: Installation
4. Installation User Manual 4.1 Select a Location for the Inverter To select a location for the inverter, the following criteria should be considered: Exposure to direct sunlight may cause output power derating. It is recommended to avoid installing the inverter in direct sunlight. It is recommended that the inverter is installed in a cooler ambient which doesn't exceed 104℉/40℃. - Page 11 4. Installation User Manual Install on a wall or strong structure capable of bearing the weight of the machine (24kg). Install vertically with a maximum incline of +/- 5 degrees, exceeding this may cause output power derating. To avoid overheating, always make sure the flow of air around the inverter is not blocked.
-
Page 12: Mounting The Inverter
4. Installation User Manual 4.2 Mounting the Inverter Dimensions of mounting bracket: unit:mm Figure 4.3 Inverter wall mounting Once a suitable location has be found accordingly to 4.1 using figure 4.3 mount the wall bracket to the wall. The inverter shall be mounted vertically. The steps to mount the inverter are listed below: 1. -
Page 13: Pe Cable Installation
4. Installation User Manual 4.3 PE Cable Installation An external ground connection is provided at the right side of inverter. Prepare OT terminals: M4. Use proper tooling to crimp the lug to the terminal. Connect the OT terminal with ground cable to the right side of inverter. The torque is 2N.m. Grounding screw Grounding screw Figure 4.5 Connect the external grounding conductor... -
Page 14: Pv Input Cable Installation
4. Installation User Manual 4.4 PV Input Cable Installation Before connecting inverter, please make sure the PV array open circuit voltage is within the limit of the inverter. Before connection, please make sure the polarity of the output voltage of PV array matches the“DC+”and“DC-”symbols. - Page 15 4. Installation User Manual 3. Pass the stripped DC cable through the nut and waterproof rubber ring. Positive terminal Negative terminal Figure 4.8 4. Connect the wire part of the DC cable to the metal DC terminal and crimp it with a special DC terminal crimping tool.
- Page 16 4. Installation User Manual 6. Measure PV voltage of DC input with multimeter, verify DC input cable polarity. Figure 4.11 7. Connect the wired DC terminal to the inverter as shown in the figure, and a slight "click" is heard to prove the connection is correct. Click Figure 4.12 CAUTION:...
-
Page 17: Battery Power Cable Installation
4. Installation User Manual 4.5 Battery Power Cable Installation 1. Take out the two battery connectors from the package and crimp them as shown in the Figure 4.13. Figure 4.13 The battery connection terminal size: 10mm²/8AWG 2. Connect the battery ends to the battery module positive and negative terminals. 3. -
Page 18: Ac Cable Installation
4. Installation User Manual 4.6 AC Cable Installation There are two AC terminals on the inverter and the assembly steps are similar. AC Grid Port is to connect to the grid and AC Backup Port is to connect to the critical load circuit. - Page 19 4. Installation User Manual 2. Disassemble the AC Grid Connector and set the parts on the cable. A: Body B: Seal body C: Nut Figure 4.18 3. Crimp wires, screw torque 0.8N·m±0.1N·m. AC Grid Figure 4.19 4. Push Housing into Body until you hear a “click” sound. Housing Click Figure 4.20...
- Page 20 4. Installation User Manual 6. Push the AC Grid Connector into the AC Grid Port on the inverter and rotate the rotatory ring on the AC Grid connector to the direction as marked “LOCK” on the connector. (Hold the Body while rotating the ring). Click Figure 4.22 NOTE:...
- Page 21 4. Installation User Manual 2. Disassemble the AC Backup Connector and set the parts on the cable. A: Body B: Seal body C: Nut Figure 4.24 3. Crimp wires, screw torque 0.8N·m±0.1N·m. AC Backup Figure 4.25 4. Push Housing into Body until you hear a “click” sound. Housing Click Figure 4.26...
- Page 22 4. Installation User Manual 6. Push the AC Backup Connector into the AC Backup Port on the inverter and rotate the rotatory ring on the AC Backup connector to the direction as marked “LOCK” on the connector. (Hold the Body while rotating the ring). Click Figure 4.28 NOTE:...
-
Page 23: Communication Cable Installation
4. Installation User Manual 4.7 Communication Cable Installation 4.7.1 Protective Cover for Communication Ports AC-BACKUP AC-GRID ANTENNA Figure 4.31 Inverter in the package is with a protective cover assembled to protect the communication ports. Step 1. Use Phillips screwdriver to take out the 4 screws on the cover. Step 2. - Page 24 4. Installation User Manual 4.7.2 Communication Port Definition Reserved DO/DI RS485 Meter AC-BACKUP AC-GRID ANTENNA Figure 4.32 Port Function Used for CAN communication between inverter and Lithium battery BMS. Used for RS485 communication between inverter and the smart Meter meter. It is necessary to realize the normal hybrid control logics. (Optional)To realize Demand Response or Logic interface function, this function may be required in UK and Australia.
- Page 25 4. Installation User Manual 4.7.3 BMS Port Connection Take out the pre-made CAN cable from the package and connect one end to battery CAN port and then connect another end to the inverter BMS port. Cable Length: 3 meters. Figure 4.33 NOTE: RJ45terminal Pin definition of the BMS Port is following...
- Page 26 4.7.5 DRM Port Connection (Optional) 4.7.5.1 For Remote Shutdown Function Solis inverters support remote shutdown function to remotely control the inverter to power on and off through logic signals. The DRM port is provided with an RJ45 terminal and its Pin5 and Pin6 can be used for remote shutdown function.
- Page 27 If a 3rd party external device or controller needs to communicate with the inverter, the RS485 port can be used. Modbus RTU protocol is supported by Solis inverters. To acquire latest protocol document, please contact Solis local service team or Solis sales.
-
Page 28: Meter Installation
Make sure the AC cable is totally isolated from AC power before connecting the Smart Meter and CT. The Solis S6-EH3P(3-10)K-H Series inverter is able to connected standard Eastron meters to fulfill the control logic of the self-consumption mode, export power control, monitoring, etc. - Page 29 4. Installation User Manual...
- Page 30 4. Installation User Manual...
-
Page 31: Parallel System Wiring
4. Installation User Manual 4.9 Parallel System Wiring Inverter 1 (Master) Reserved DO/DI RS485 Meter AC-BACKUP AC-GRID ANTENNA Battery Inverter 2 (Slave) Reserved DO/DI RS485 Meter AC-BACKUP AC-GRID ANTENNA Battery Inverter 3 (Slave) Reserved DO/DI RS485 Meter AC-BACKUP AC-GRID ANTENNA Battery Grid Backup... -
Page 32: Inverter Remote Monitoring Connection
The USB type COM port at the bottom of the inverter can connect to different kinds of Solis data loggers to realize the remote monitoring on Soliscloud platform. To install Solis data loggers, please refer to corresponding user manuals of Solis data loggers. -
Page 33: Commissioning & Shutdown
5. Commissioning & Shutdown User Manual 5.1 Preparation of Commissioning Ensure all the devices are accessible for operation, maintenance and service. Check and confirm that the inverter is firmly installed. Space for ventilation is sufficient for one inverter or multiple inverters. Nothing is left on the top of the inverter or battery module. - Page 34 5. Commissioning & Shutdown User Manual Step 4: Connect with Bluetooth. Turn on Bluetooth switch on your mobile phone and then open the Soliscloud APP. Click “More Tools”->”Local Operation”->”Connect with Bluetooth” < Local Operation Register Register Hello, Hello, Welcome to SolisCloud Welcome to SolisCloud Username/Email Username/Email...
- Page 35 5. Commissioning & Shutdown User Manual Step 7: After the log in for the first time, initial settings are required. Step 7.1: Set the inverter Date and Time. You can set to follow the time on your mobile phone. Step 7.2: Set the battery model. It must be based on the battery model that is actually connected to the inverter.
-
Page 36: Shutdown Procedure
Step 9: Change Password. If the Owner forgot the password, please contact the installer. Installer log in and go to “Setting”->”More”->”Change Password” to reset the password for owner’s account. If Installer forgot the password, please contact Solis service team. More More... -
Page 37: Work Mode
5. Commissioning & Shutdown User Manual 5.4 Work mode Self-Use Mode stores the excess PV power into the battery. If the battery is charged, or there is no battery, the excess PV power will be exported(sold)back to the utility company. If the system is set to not export any power, then the inverter will curtail the PV power(derate the inverter output power). - Page 38 5. Commissioning & Shutdown User Manual Self-Use Mode Off-Grid Mode Feed in Priority Mode Off-grid Mode Switch Self-Use Mode Switch Feed in Priority Mode Switch > Off-grid Overdischarge SOC Time of Use Switch Time of Use Switch Time of Use Charge Current Set Time of Use Charge Current Set 50.0A >...
-
Page 39: Parallel Settings
5. Commissioning & Shutdown User Manual 5.5 Parallel Settings Set up a parallel system according to the following steps: A. Set the parallel mode as “Parallel”. B. Set the master inverter address ID to 1, the other slaves to 2~6. (Note: the address ID cannot be set to 0, and the physical address of the master must be 1 ) C. -
Page 40: Maintenance
6. Maintenance User Manual Solis S6 Series inverter does not require any regular maintenance. However, cleaning the heatsink will help inverter dissipating heat and increase the lifetime of inverter. The dirt on the inverter can be cleaned with a soft brush. -
Page 41: Troubleshooting
7. Troubleshooting User Manual Message Name Information Description Troubleshooting Suggestion 1. Turn on the device in the ON/OFF Setting. Control device to shutdown 1. Confirm whether the inverter is connected to an external EPM/meter to prevent reverse current. 2. Confirm whether the inverter is controlled The device's output is under LmtByEPM by an external third-party device. - Page 42 7. Troubleshooting User Manual Message Name Information Description Troubleshooting Suggestion 1. Grid side fault, restart the device. Surge Alarm On-site grid surge If it is still not eliminated, please contact the manufacturer's customer service. Grid voltage exceeds the OV-G-V01 upper voltage range Grid voltage exceeds the UN-G-V01 lower voltage range...
- Page 43 7. Troubleshooting User Manual Message Name Information Description Troubleshooting Suggestion 1. Confirm whether the battery model selection Wrong battery brand selection BatName-FAIL is consistent with the actual one. 1. Can failure is a failure of communication between inverter and battery. Check cable conditions.
- Page 44 7. Troubleshooting User Manual Message Name Information Description Troubleshooting Suggestion 1. Confirm that the grid is abnormal. 2. Confirm that the AC cable connection is not DCInj-FAULT The current DC component abnormal. (1037 DATA:0000) exceeds the limit 3. Restart the system, confirm that the fault continues.
- Page 45 Please keep ready with you the following information before contacting us. 1. Serial number of Solis Three Phase Inverter; 2. The distributor/dealer of Solis Three Phase Inverter (if available); 3. Installation date. 4. The description of the problem together with necessary information, pictures, attachment.
-
Page 46: Specifications
8. Specifications User Manual Technical Data S6-EH3P5K2-H S6-EH3P6K2-H Input DC (PV side) Recommended max. PV power 8000W 9600W Max. input voltage 1000V Rated voltage 600V Start-up voltage 160V MPPT voltage range 200-850V Full load MPPT voltage range 250-850V Max. input current 16A/16A Max. - Page 47 8. Specifications User Manual Technical Data S6-EH3P5K2-H S6-EH3P6K2-H Input AC(Grid-side) Input voltage range 304-437V / 320-460V Max. input current 11.4A 13.8A Rated grid frequency 50 Hz/60 Hz Frequency range 45-55 Hz / 55-65 Hz Output AC(Back-up) Rated output power Peak apparent output power 8.0kVA, 60 sec 9.6kVA, 60 sec Back-up switch time...
- Page 48 8. Specifications User Manual Technical Data S6-EH3P5K2-H S6-EH3P6K2-H General data Max. allowable phase imbalance 100% (grid & back up) Max. power per phase (grid & back up) 50% rated power Dimensions(W/H/D) 600*500*210mm Weight 27.58kg Topology Transformerless Self consumption (Night) <25 W Operation temperature range -25℃~+60℃...
- Page 49 8. Specifications User Manual Technical Data S6-EH3P8K2-H S6-EH3P10K2-H Input DC (PV side) Recommended max. PV power 12800W 16000W Max. input voltage 1000V Rated voltage 600V Start-up voltage 160V MPPT voltage range 200-850V Full load MPPT voltage range 300-850V 350-850V Max. input current 16A/16A Max.
- Page 50 8. Specifications User Manual Technical Data S6-EH3P8K2-H S6-EH3P10K2-H Input AC(Grid-side) Input voltage range 304-437V / 320-460V Max. input current 18.2A 22.8A Rated grid frequency 50 Hz/60 Hz Frequency range 45-55 Hz / 55-65 Hz Output AC(Back-up) Rated output power 10kW Peak apparent output power 12.8kVA, 60 sec 16kVA, 60 sec...
- Page 51 8. Specifications User Manual Technical Data S6-EH3P8K2-H S6-EH3P10K2-H General data Max. allowable phase imbalance 100% (grid & back up) Max. power per phase (grid & back up) 50% rated power Dimensions(W/H/D) 600*500*230mm Weight 30.18kg Topology Transformerless Self consumption (Night) <25 W Operation temperature range -25℃~+60℃...
- Page 52 8. Specifications User Manual Technical Data S6-EH3P3K-H-EU S6-EH3P4K-H-EU Input DC (PV side) Recommended max. PV power 4800W 6400W Max. input voltage 1000V Rated voltage 600V Start-up voltage 160V MPPT voltage range 200-850V Full load MPPT voltage range 200-850V Max. input current 16A/16A Max.
- Page 53 8. Specifications User Manual Technical Data S6-EH3P3K-H-EU S6-EH3P4K-H-EU Input AC(Grid-side) Input voltage range 304-437V / 320-460V Max. input current 6.8A 9.1A Rated grid frequency 50 Hz/60 Hz Frequency range 45-55 Hz / 55-65 Hz Output AC(Back-up) Rated output power Peak apparent output power 4.8kVA, 60 sec 6.4kVA, 60 sec Back-up switch time...
- Page 54 8. Specifications User Manual Technical Data S6-EH3P3K-H-EU S6-EH3P4K-H-EU General data Max. allowable phase imbalance 100% (grid & back up) Max. power per phase (grid & back up) 50% rated power Dimensions(W/H/D) 600*500*210mm Weight 26.42kg Topology Transformerless Self consumption (Night) <25 W Operation temperature range -25℃~+60℃...
- Page 55 8. Specifications User Manual Technical Data S6-EH3P5K-H-EU S6-EH3P6K-H-EU Input DC (PV side) Recommended max. PV power 8000W 9600W Max. input voltage 1000V Rated voltage 600V Start-up voltage 160V MPPT voltage range 200-850V Full load MPPT voltage range 200-850V Max. input current 16A/16A/16A Max.
- Page 56 8. Specifications User Manual Technical Data S6-EH3P5K-H-EU S6-EH3P6K-H-EU Input AC(Grid-side) Input voltage range 304-437V / 320-460V Max. input current 11.4A 13.8A Rated grid frequency 50 Hz/60 Hz Frequency range 45-55 Hz / 55-65 Hz Output AC(Back-up) Rated output power Peak apparent output power 8.0kVA, 60 sec 9.6kVA, 60 sec Back-up switch time...
- Page 57 8. Specifications User Manual Technical Data S6-EH3P5K-H-EU S6-EH3P6K-H-EU General data Max. allowable phase imbalance 100% (grid & back up) Max. power per phase (grid & back up) 50% rated power Dimensions(W/H/D) 600*500*210mm Weight 27.58kg Topology Transformerless Self consumption (Night) <25 W Operation temperature range -25℃~+60℃...
- Page 58 8. Specifications User Manual Technical Data S6-EH3P8K-H-EU S6-EH3P10K-H-EU Input DC (PV side) Recommended max. PV power 12800W 16000W Max. input voltage 1000V Rated voltage 600V Start-up voltage 160V MPPT voltage range 200-850V Full load MPPT voltage range 200-850V 250-850V Max. input current 16A/16A/16A/16A Max.
- Page 59 8. Specifications User Manual Technical Data S6-EH3P8K-H-EU S6-EH3P10K-H-EU Input AC(Grid-side) Input voltage range 304-437V / 320-460V Max. input current 18.2A 22.8A Rated grid frequency 50 Hz/60 Hz Frequency range 45-55 Hz / 55-65 Hz Output AC(Back-up) Rated output power 10kW Peak apparent output power 12.8kVA, 60 sec 16kVA, 60 sec...
- Page 60 8. Specifications User Manual Technical Data S6-EH3P8K-H-EU S6-EH3P10K-H-EU General data Max. allowable phase imbalance 100% (grid & back up) Max. power per phase (grid & back up) 50% rated power Dimensions(W/H/D) 600*500*230mm Weight 30.18kg Topology Transformerless Self consumption (Night) <25 W Operation temperature range -25℃~+60℃...
- Page 61 8. Specifications User Manual Technical Data S6-EH3P7K-H-LV Input DC (PV side) Recommended max. PV power 11200W Max. input voltage 1000V Rated voltage 600V Start-up voltage 160V MPPT voltage range 200-850V Full load MPPT voltage range 250-850V Max. input current 16A/16A/16A/16A Max.
- Page 62 8. Specifications User Manual Technical Data S6-EH3P7K-H-LV Input AC(Grid-side) Input voltage range 184-265V Max. input current 17.57A Rated grid frequency 50 Hz/60 Hz Frequency range 45-55 Hz / 55-65 Hz Output AC(Back-up) Rated output power Peak apparent output power 11.2kVA, 60 sec Back-up switch time <...
- Page 63 8. Specifications User Manual Technical Data S6-EH3P7K-H-LV General data Max. allowable phase imbalance 100% (grid & back up) Max. power per phase (grid & back up) 50% rated power Dimensions(W/H/D) 600*500*230mm Weight 30.18kg Topology Transformerless Self consumption (Night) <25 W Operation temperature range -25℃~+60℃...
- Page 64 Ginlong Technologies Co., Ltd. No. 57 Jintong Road, Binhai Industrial Park, Xiangshan, Ningbo, Zhejiang, 315712, P.R.China. Tel: +86 (0)574 6578 1806 Fax: +86 (0)574 6578 1606 Please adhere to the actual products in case of any discrepancies in this user manual. If you encounter any problem on the inverter, please find out the inverter S/N and contact us, we will try to respond to your question ASAP.
Need help?
Do you have a question about the S6-EH3P7K-H-LV and is the answer not in the manual?
Questions and answers