Table of Contents
Advertisement
Quick Links
Phone Overview ............5
Menus Overview..........12
Phone...........................15
The Battery.....................15
Charging the Battery ......17
Battery Charge Level ......19
and Off ...........................19
Making Calls...................20
Redialing Calls................20
Receiving Calls ...............20
Screen Icons ..................21
Convenient Features ...23
Vibrate Mode ..................23
Lock Mode......................23
Mute Function ................23
........................................24
Call Waiting ....................24
Caller ID ..........................25
Voice Command.............25
Speed Dialing .................25
Information ..................27
Text Input .......................27
G'zOne TYPE-S
Contents
Text Input Modes ...........28
Memory........................32
Contacts Entries .............32
Contacts .........................33
Editing Contacts Entries.38
Deleting ..........................42
Pauses............................43
Memory ..........................46
Phone's Memory ............47
Menu Access..................50
GET IT NOW ................51
1. Tunes & Tones............52
1.2 My Ringtones ...........53
1.3 My Sounds...............54
2. Picture & Video ...........55
2.1 Get New Pictures .....56
2.2 My Pictures ..............56
2.3 My Videos ................57
2.4 Take Picture .............59
2.5 Record Video ...........60
1
Advertisement
Table of Contents

Subscribe to Our Youtube Channel
Related Manuals for Casio GZONE TYPE-S PTT


Summary of Contents for Casio GZONE TYPE-S PTT
-
Page 1: Table Of Contents
Contents Phone Overview ....5 Text Input Modes ...28 Contacts in Your Phone’s Menus Overview..12 Memory......32 Getting Started with Your Phone......15 The Basics of Storing Contacts Entries .....32 The Battery.....15 Options to Customize Your Charging the Battery ..17 Contacts ......33 Battery Charge Level ..19 Editing Contacts Entries.38 Turning the Phone On Deleting ......42... - Page 2 Contents 2.6 PIX Place....61 1. Missed ......91 3.4.1 New PTT Group 2.6 Notepad ....120 ........103 3. Games ......61 2. Received.....92 2.7 Countdown Timer...120 3.4.2 Rename PTT Group 4. News & Info ....61 3. Dialed......92 2.8 Stop Watch ....121 ........104 5. Tools on the Go ..65 4.
- Page 3 Phone Overview 6.2 Set Shortcut Keys ..142 Inbox Items....164 6.3 Language ....143 Safety......165 1. Earpiece 6.4 Security ....144 TIA Safety Information..165 6.5 System Select ..150 Tips on Efficient Operation ........165 6.6 NAM Selection ..151 2. Flip Driving ......165 7. Call Settings .....152 3.
-
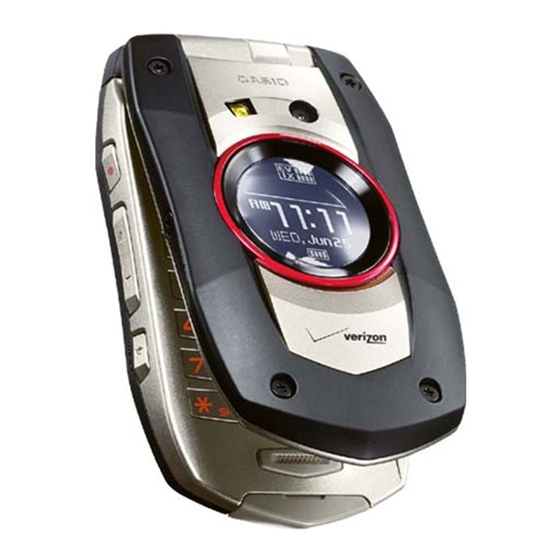
Page 4: Phone Overview
Phone Overview 1. Earpiece 2. Flip Open the case to answer an incoming call and close to end the call. 3. LCD Screen Displays messages and indicator icons. 21. Camera Lens 22. Flash Left Soft Key Press to display the Message menu or access the function listed above the key. - Page 5 Phone Overview Lock Mode Key Press to set the lock Right Soft Key Press to display Contact List or function (from standby mode press and hold for to access the function listed above the key. about two seconds). Speaker / FLASH Key Press to turn 20.
- Page 6 Phone Overview Water Resistant NOTE The G'zOne TYPE-S is water resistant. The device provides the In order to maintain your phone's resistance it is most reliable performance for your outdoor life, in such recommended that you rinse any parts which may appear conditions as driving rain or high humidity.
-
Page 7: Menus Overview
Menus Overview 5. Voicemail Message GET IT NOW SETTINGS & 3.4. PTT Alert 6. Mobile IM TOOLS 1. Tunes & Tones 4. Keypad Volume 7. E-mail 1. Get New Ringtones 1. My Account 5. Earpiece Volume 8. Chat 2. My Ringtones 2. -
Page 8: Getting Started With Your Phone
Getting Started with Your Phone 4.2. My Videos 6. NAM Selection The Battery 5. Display Themes 7. Call Settings Warning! 6. Dial Fonts 1. Answer Options Use only approved batteries for the G'zOne TYPE-S. 7. Clock Format 2. Auto Retry 7.1. -
Page 9: Charging The Battery
Getting Started with Your Phone 2. Insert the Device Lock Tool into the slot of the battery Charging the Battery lock and turn in the direction of the arrow shown To use the charger provided with your phone: below. Warning! Use only the charger provided with the G’zOne TYPE-S. -
Page 10: Battery Charge Level
Getting Started with Your Phone You can also directly connect the AC Charger to the Warning! handset in order to charge the battery. Failure to completely reseal the AC port on the phone after charging may result in damage if exposed to water. NOTE The charge time varies depending upon the battery level. -
Page 11: Making Calls
Getting Started with Your Phone NOTE NOTE Avoid any unnecessary contact with the antenna while your If you press Left Soft Key [Quiet] while the phone is phone is on. ringing, the ringing or vibration is muted for that call. NOTE Turning the Phone Off If you press Right Soft Key... -
Page 12: Quick Access To Convenient Features
Quick Access to Convenient Features Vibrate Mode Voice Privacy. Roaming indicator. The phone is outside of the Vibrate Mode mutes key tones and activates the vibration home service area. mode to alert you of an incoming call or message. To SSL. -
Page 13: Volume Quick Adjustment
Quick Access to Convenient Features them. To activate Mute: Caller ID 1. During a call, press Left Soft Key [Mute]. Caller ID displays the number of the person calling when your phone rings. If the caller’s identity is stored in 2. -
Page 14: Entering And Editing Information
Entering and Editing Information number 1 is automatically set for Voicemail. For detailed Text Input instructions on how to save a phone number to Speed You can input and edit your Banner, Schedule, Contacts, Dial, see page 88. and Messages. NOTE Key Functions You will need to turn One-Touch Dialing on to use Speed... -
Page 15: Text Input Modes
Entering and Editing Information Text Input Modes 2. Press There are five modes for entering text, numbers, special 3. Press to complete the word and add a space. characters, and punctuation. Press Left Soft Key 4. Press a text entry field to display a pop-up list of text modes. Using Abc (Multi-tap) Text Input Call the office. - Page 16 Entering and Editing Information previous 12 symbols. . “Kop” is displayed. 3. Press Navigation Key up, down, left or right to 3. Press Left Soft Key , select [T9Word], then press highlight the special character you want to insert, then Center Select Key [OK].
-
Page 17: Contacts In Your Phone's Memory
Contacts in Your Phone’s Memory Contacts Entries 6. Enter a name for the phone number (up to 32 characters), then press Center Select Key [SAVE]. This provides easy access to your most frequently dialed phone numbers. You may store up to 500 entries with up 7. - Page 18 Contacts in Your Phone’s Memory fields include: Changing the Call Ringtone Name / Mobile 1 / Home / Work / E-mail 1 / Group Allows you to identify who is calling by setting different / Picture / Ringtone / Mobile 2 / E-mail 2 ringtones for different phone numbers in your Contacts.
- Page 19 Contacts in Your Phone’s Memory Adding Speed Dial Navigation Key up or down to highlight an entry. To add an entry to Speed Dial: 2. Press Left Soft Key [Edit]. 1. Press Right Soft Key [Contacts] then press 3. Press Navigation Key up or down to highlight Navigation Key up or down to highlight an entry.
- Page 20 Contacts in Your Phone’s Memory Editing Contacts Entries Center Select Key [OK]. If the entry is not assigned, press Center Select Key [SAVE]. Adding Another Phone Number 8. Press to exit or to place a call to the From the Main Menu Screen phone number.
- Page 21 Contacts in Your Phone’s Memory the Default Number. If more than one number is saved in 6. Press Center Select Key [OK]. a Contact entry, another number can be saved as the A confirmation message appears. Default Number. 7. Press Center Select Key [SAVE] to save.
-
Page 22: Contacts
Contacts in Your Phone’s Memory 3. Edit the name as necessary, then press Center Select 5. Press Navigation Key up or down to select Yes. [SAVE]. 6. Press Center Select Key [OK]. Deleting A confirmation message appears. Deleting a Phone Number from a Contact Deleting a Speed Dial 1. - Page 23 Contacts in Your Phone’s Memory code. There are two different types of pauses you can select Create New or Update Existing, then press Center Select Key [OK]. use when storing a number: 8. Press Navigation Key up or down to select the Wait (W) type of phone number, then press Center Select Key The phone stops dialing until you press Left Soft Key...
-
Page 24: Searching Your Phone's Memory
Contacts in Your Phone’s Memory Searching Your Phone’s Memory Making a Call From Your Phone’s Memory The G’zOne TYPE-S phone is able to perform a dynamic search of the contents in your phone’s memory. A Once you have stored phone numbers into your dynamic search compares entered letters or numbers Contacts, you can place calls to those numbers quickly against the entries in your Contacts. - Page 25 Contacts in Your Phone’s Memory From Recent Calls 2. Your phone recalls the phone number from your Contacts, displays it briefly, and then dials it. 1. Press Center Select Key [MENU]. For Speed Dials From 10 to 96 2. Press Navigation Key right to select RECENT CALLS.
-
Page 26: Menu Access
GET IT NOW Menu Access GET IT NOW Press Center Select Key [MENU] for access to five GET IT NOW allows you to do more than just talk on your phone menus. There are two methods of accessing phone. GET IT NOW is a technology and service that menus and submenus: allows you to download and use applications on your phone. -
Page 27: Tunes & Tones
GET IT NOW right on your wireless phone. Take and trade pictures 3. Select a submenu. with your friends instantly. 1. Get New Ringtones 3. Games: Turn your phone into a handheld arcade 2. My Ringtones with exciting and challenging games. 3. -
Page 28: My Sounds
GET IT NOW • To PIX Place / File Info • Contact ID: When selecting this, the Set As Contact ID screen will appear. Select the Contact 2. Picture & Video you want to assign the ringer to, then press Center Select Key [OK]. -
Page 29: Get New Pictures
GET IT NOW NOTE Rename Rename the selected Picture. From Take Picture mode, you can change to Take Videos Lock Lock / Unlock mode by pressing Camera/Videos Key Erase Yes / No Erase All Yes / No 2.1 Get New Pictures File Info File Name / Date / Time / Resolution To connect to GET IT NOW and download a variety of... -
Page 30: Take Picture
GET IT NOW 2.4 Take Picture • Navigation Key right : FF To take digital pictures: • Navigation Key left: Rewind 1. Press Navigation Key right, Picture & 3. Press Right Soft Key [Options] to select one of Video, Take Picture the following options: Shortcut Send... -
Page 31: Record Video
GET IT NOW NOTE White Balance Auto/Sunny/Tungsten/Fluorescent When the Flash is On, take the Picture within 1' - 26' of the 3. To begin recording, press Center Select Key subject. [REC]. To stop recording, press Center Select Key 5. To take the picture, press Center Select Key [STOP]. - Page 32 GET IT NOW device. Access and selections within this feature are • Text or numbers dependent upon your service provider. For specific You can select the items by moving the cursor, then information on News & Info access through your phone, press the appropriate Soft Keys.
-
Page 33: Tools On The Go
GET IT NOW • Right Soft Key to the screen from which you initiated the call. Right Soft Key is used to access the Menu. 5. Tools on the Go Entering Text, Numbers or Symbols Allows you to download Tools which can help you navigate to entertainment spots, restaurants, and provide When prompted to enter text, the current text entry you with up-to-date weather information. -
Page 34: Messaging
MESSAGING MESSAGING Text messages, Picture/Video messages, and the Voicemail box become available as soon as the phone is powered on. Access and Options • Check the messages you have by pressing Left Soft 1. Press Center Select Key [MENU]. [Message]. 2. - Page 35 MESSAGING (Address) and information (Message). These are 2. Press Picture Message. dependent upon the type of message you want to send. 3. Enter the phone number of the recipient or the email Sending a Text Message address for an email message. •...
- Page 36 MESSAGING Sending a Video Message Customizing the Message Using Options You can customize a new Text Message, Picture Message or [Message] , 1. Press Left Soft Key [Options] Video Message, by pressing the Right Soft Key Message. to access the following features: Video Message.
-
Page 37: Inbox
MESSAGING Remove Sound Removes a Sound from your message. NOTE (Picture Message option) You can send a message to up to ten people at a time. Callback # Inserts a pre-programmed callback 7. Complete the message as necessary. number with your message. Yes / No / Edit (Text Message option) 2. - Page 38 MESSAGING Text MSG xx% FULL deleted by the Erase Inbox and Erase All functions. 2. Pictures/Videos Message Add To Contacts Stores the callback number, email MEMORY FULL address, and numbers from the PIC MSG xx% FULL address of the received message into 3.
-
Page 39: Sent
MESSAGING 3. Sent Message Info Allows you to check the sent message information. The phone can store approximately 60 messages in Sent View lists. However, message storage space may be Message Icon Reference affected due to combined size and content of all Sent messages messages. -
Page 40: Voicemail
MESSAGING message. Locked messages cannot be 2. Options include: deleted by the Erase Drafts and Erase • Press Left Soft Key [Clear] to select Clear All functions. Voicemail Counter. Then, select YES, then press Add To Contacts Stores the callback number, email Center Select Key [OK]. -
Page 41: Chat
MESSAGING 8. Chat Callback # Voicemail # To chat with Internet Messenger users: Entry mode T9Word / Abc / ABC / 123 1. Press Center Select Key [MENU], Navigation Key Quick text left once for MESSAGING, Chat. NOTE • The browser launches. The text entry mode you select also applies to the Notepad and the Calendar. -
Page 42: Message Erase
MESSAGING 5. Signature Message Erase Allows you make/edit a signature to automatically send Allows you to erase all messages stored in your Inbox, with your Text messages. Drafts or Sent folders. You can also erase all messages at the same time. 6. -
Page 43: Contacts
CONTACTS CONTACTS To save the number into an existing Contact, edit the Contact entry. The Contacts menu allows you to store names, phone 1. Press Center Select Key [MENU], numbers and other information in your phone’s memory. Contact. Access and Options 2. -
Page 44: Contact List
CONTACTS 3. Contact List • Press Right Soft Key [Options] to select one of Allows you to view your Contacts List. the following options: New PTT Contact / New PTT Group / Temp PTT 1. Press Center Select Key [MENU], Group / Erase / Save to Contacts Contact List. -
Page 45: Speed Dials
CONTACTS • Press Center Select Key [VIEW] to view the Or Enter the speed dial number, then press Groups contact. Dialing Double Digit Speed Dials (from 10 to 96) 6. Speed Dials Press the first digit and then press and hold the key of the last digit. -
Page 46: Recent Calls
RECENT CALLS RECENT CALLS Shortcut press To view a quick list of all your recent calls, The Recent Calls menu is a list of the last phone from standby mode. numbers or Contact entries for calls you placed, accepted, or missed. It is continually updated as new 1. -
Page 47: Received
RECENT CALLS 2. Received • Press to place a call to the number. • Press Right Soft Key [Options] to select: To view a list of the 90 most recent incoming calls: Save to Contacts / Save to PTT / Erase / Lock 1. -
Page 48: View Timers
Push to Talk Push to Talk • Press Left Soft Key [Message] to select: Text Message / Picture Message / Video The Push to Talk (PTT) feature on your Verizon Wireless Message G'zOne TYPE-S phone allows you to use your phone like a walkie-talkie to communicate with an individual or Shortcut group of individuals who are also Verizon Wireless Push... -
Page 49: Making A Ptt Call
Push to Talk 1. Making a PTT Call 3. Press Left Soft Key [Alert]. 1.1 Call from PTT Contact List (Barge) 4. Press and release PTT Key to alert the selected individual. 1. Press and hold PTT Key to access your PTT Contact List. -
Page 50: Call From Keypad (Barge)
Push to Talk wireless number entered on the display when the alert 1.3 Call from Keypad (Barge) is initiated. 1. Enter the 10-digit wireless number of the Verizon 4. If the called party answers the alert, 'Listening' appears Wireless PTT subscriber you wish to contact. on the display and you will hear the called party speaking. -
Page 51: Incoming Ptt (Alert)
Push to Talk 3. PTT Contacts 2. Press and hold PTT Key to talk. Allows you to view your PTT Contact list. The PTT 3. Release PTT Key to let another party talk. Contact List contains all individual and group PTT contacts in a single list. -
Page 52: Copy To Ptt Contacts
Push to Talk 4. The phone will connect to the network and update 3. Press Right Soft Key [Options], then press Contact information. Erase. A confirmation message will appear on the display when the transaction is complete. 4. Press Navigation Key up or down to select Yes. -
Page 53: New Ptt Group
Push to Talk 3.4.3 Erase PTT Group 2. Press Right Soft Key [Options], then press 1. Press Navigation Key up or down to select Yes. New PTT Group. 2. Press Center Select Key [OK]. 3. Enter the new PTT Group name in the new name field, 3. -
Page 54: Enter Number
Push to Talk A Confirmation message will appear on the display 3.4.4.4 Erase Temp PTT Group Members when the transaction is complete. 1. Press Left Soft Key [Delete]. 3.4.4.2 Enter Number 2. Press Navigation Key up or down, then press 1. -
Page 55: Ptt Settings
5. PTT Screen Icons 4. PTT Settings Connecting to [Individual name] 4.1 PTT On/Off Connected to [Individual name] You can disable the PTT feature on your phone so that it Connecting to [group name] will not be able to receive or send PTT calls or alerts. Connected to [group name] 1. -
Page 56: Settings & Tools
SETTINGS & TOOLS SETTINGS & TOOLS 2. Press Navigation Key right twice for SETTINGS & TOOLS. The Settings & Tools menu has options to customize your phone. 3. Press My Account. • The browser launches. Access and Options NOTE 1. Press Center Select Key [MENU]. -
Page 57: Voice Commands
SETTINGS & TOOLS Clock / World Clock / Notepad / Countdown Timer 3. Prompts / Stop Watch 1. Mode Prompts / Readout / Tones Only 2.1 Voice Commands 2. Time Out Allows you to make phone calls quickly and easily by 5 Seconds / 10 Seconds verbal command. - Page 58 SETTINGS & TOOLS name before dialing. Tools, Voice Commands, Dial 2.1.1.2 Last number number. 1. Press Center Select Key [MENU], Navigation Key 2.1.3 Send right twice for SETTING & TOOLS, 1. Press Center Select Key [MENU], Navigation Key Tools, Voice Commands, Call, right twice for SETTING &...
-
Page 59: Calculator
SETTINGS & TOOLS 2. Select Phone Status / Voicemail / Messages / Tools, Calculator. Missed Calls / Time / Signal Strength / Battery / NOTE Volume Level then press Center Select Key [OK]. To insert a decimal, press . To insert ±, press 2.1.6 Contacts . -
Page 60: Alarm Clock
SETTINGS & TOOLS applicable) will be displayed on the LCD screen and the Navigation Key up Moves to the previous week. alarm will sound. Navigation Key down Moves to the next week. 1. Press Center Select Key [MENU], Navigation Key 3. -
Page 61: Notepad
SETTINGS & TOOLS zone or country. right twice for SETTING & TOOLS, Tools, Countdown Timer. 1. Press Center Select Key [MENU], Navigation Key right twice for SETTING & TOOLS, 2. Press Navigation Key up or down to select a Tools, World Clock. -
Page 62: Bluetooth Menu
SETTINGS & TOOLS NOTE 3. Press Center Select Key [STOP] to stop watch. ® Your phone is based on the Bluetooth specification, but it is not 4. Press Right Soft Key [Split] to split the time. ® guaranteed to work with all devices enabled with Bluetooth ®... - Page 63 SETTINGS & TOOLS on the LCD screen: [Connected Device Name] 2. Press Center Select Key [MENU],Navigation Key Before Connecting. If you would like to confirm right twice for SETTING & TOOLS, always before connecting to the Bluetooth ® device, Bluetooth Menu. Press Center Select Key [OK] select Always Ask, then press Center Select Key to select Add New Device.
- Page 64 SETTINGS & TOOLS Icon References When a Bluetooth ® Wireless Discovery Mode Connection is Searched (neither connected nor Allows you to set whether your device is able to be paired). searched by other Bluetooth devices in the area. When an audio device is searched by your G'zOne TYPE-S device 1.
-
Page 65: Sounds Settings
SETTINGS & TOOLS 1. Remove Device: You can remove the device from the 2. Press Navigation Key right twice for SETTING & pairing list. TOOLS, to select SETTINGS & TOOLS. 2. Rename Device: You can rename the name of the 3. -
Page 66: Alert Sounds
SETTINGS & TOOLS Sounds Settings, Call Sounds. 1. Press Center Select Key [MENU],Navigation Key right twice for SETTING & TOOLS, 4.2.1 Call Ringtone Sounds Settings, Alert Sounds. 1. Press Center Select Key [MENU],Navigation Key • Select Text Message / Picture-Video Message / right twice for SETTING &... -
Page 67: Keypad Volume
SETTINGS & TOOLS NOTE 4.6 Service Alerts PTT ALERT has only two settings Tone/Vibrate. To set any of the three Alert options to either On or Off: 4.4 Keypad Volume 1. Press Center Select Key [MENU],Navigation Key right twice for SETTING & TOOLS, To set the keypad volume: Sounds Settings, Service Alerts. -
Page 68: Alarm Sounds
SETTINGS & TOOLS 4.8.2 Vibrate 1. Press Center Select Key [MENU],Navigation Key 1. Press Center Select Key [MENU],Navigation Key right twice for SETTING & TOOLS, right twice for SETTING & TOOLS, Sounds Settings, Power On/Off. Sounds Settings, Alarm Sounds, 2. Press Power On or Power Off. -
Page 69: Banner
SETTINGS & TOOLS Access and Options right twice for SETTING & TOOLS, 1. Press Center Select Key [MENU]. Display Settings, Banner, 2. Press Navigation Key right twice for SETTINGS Banner. & TOOLS. 2. Press Navigation Key up or down to select On / 3. -
Page 70: Contrast
SETTINGS & TOOLS • Always On means that the backlight is always on. right twice for SETTING & TOOLS, • Always Off means that the backlight is never on. Display Settings, Wallpaper. 2. Keypad 2. Press My Pictures or My Videos. •... -
Page 71: Dial Fonts
SETTINGS & TOOLS 5.6 Dial Fonts • Main Clock Digital/Analog/Off To set the font size: • Front Clock 1. Press Center Select Key [MENU],Navigation Key Digital A / Digital B / Analog / Off right twice for SETTING & TOOLS, 5.8 Power Saver Display Settings, Dial Fonts. -
Page 72: Standalone Mode
SETTINGS & TOOLS 3. Press Phone Settings. 1. Press Center Select Key [MENU],Navigation Key 4. Select a submenu. right twice for SETTING & TOOLS, Standalone Mode / Set Shortcut Keys / Language / Phone Settings, Set Shortcut Keys. Security / System Select / NAM Selection 2. -
Page 73: Security
SETTINGS & TOOLS 6.4 Security 6.4.2 Lock Mode Lock Mode prevents the unauthorized use of your phone. The Security menu allows you to secure the phone Once the phone is locked, it is in restricted mode until the electronically. lock code is entered. You can receive phone calls and still 6.4.1 Common Code make emergency calls. - Page 74 SETTINGS & TOOLS Unlock The phone is never locked (Lock mode Code Enabled / Code Disabled can be used). 6.4.4 Edit Code On Power Up The phone is locked when it is turned 1. Press Center Select Key [MENU],Navigation Key •...
- Page 75 SETTINGS & TOOLS has been made : DEVICE CODE SET. If you make a 6.4.6 Erase Contacts mistake, CODE DOES NOT MATCH will appear on To erase all of your Contacts at once: the screen. 1. Press Center Select Key [MENU],Navigation Key 6.4.5 Emergency #s right twice for SETTING &...
-
Page 76: System Select
SETTINGS & TOOLS Select Key [OK]. Phone Settings, System Select. NOTE 2. Press Navigation Key up or down to select one The default Lock Code is the last 4 digits of your mobile of the following setting, then press Center Select Key telephone number. -
Page 77: Call Settings
SETTINGS & TOOLS 7.1 Answer Options [OK]. To determine how to handle an answered call: NAM1 / NAM2 A confirmation message appears before the phone resets 1. Press Center Select Key [MENU],Navigation Key itself. right twice for SETTING & TOOLS, Call NOTE Settings,... -
Page 78: Auto Retry
SETTINGS & TOOLS To set Ringer to Mute/Unmute press the side volume 1. Press Center Select Key [MENU],Navigation Key Up/Down Key. right twice for SETTING & TOOLS, Call 7.2 Auto Retry Settings, TTY Mode. To set the length of time the phone waits before 2. -
Page 79: Call Restrictions
SETTINGS & TOOLS Contact communication information specifications must right twice for SETTING & TOOLS, Call match the network. Settings, Voice Privacy. 1. Press Center Select Key [MENU],Navigation Key 2. Press Navigation Key up or down to select On / right twice for SETTING & TOOLS, Call Off, then press Center Select Key [OK]. -
Page 80: Ptt Mode
SETTINGS & TOOLS Settings, DTMF Tones. Settings, Ringer ID. 2. Press Navigation Key up or down to select one 2. Press Navigation Key up or down to select On / of the following setting, then press Center Select Key Off, then press Center Select Key [OK]. -
Page 81: My Pictures
SETTINGS & TOOLS 2. Press Right Soft Key [Erase]. right twice for SETTING & TOOLS, Memory, Memory Usage. 3. Press Navigation Key up or down to select the Total Used / Available file, then press Center Select Key [MARK], or press Right Soft Key [Mark All], then press Left 8.2 My Pictures... -
Page 82: Phone Info
SETTINGS & TOOLS 9. Phone Info 9.3 Icon Glossary To view all the icons and their meanings: To display information about your phone: 1. Press Center Select Key [MENU], Navigation Key 1. Press Center Select Key [MENU], Navigation Key right twice for SETTING & TOOLS, right twice for SETTING &... -
Page 83: Inbox Items
Safety Inbox Items TIA Safety Information This package includes all items listed below. Contact the The following is the complete TIA Safety Information for retailer where you purchased the phone if any items are wireless handheld phones. missing. Standard Lithium Ion G’zOne TYPE-S Phone Tips on Efficient Operation Battery... -
Page 84: Electronic Devices
Safety An air bag inflates with great force. DO NOT place objects, the independent research by and recommendations of including either installed or portable wireless equipment, in Wireless Technology Research. the area over the air bag or in the air bag deployment area. Never come closer than six (6) inches to a person with a If in-vehicle wireless equipment is improperly installed and heart pacemaker implant when using your phone. -
Page 85: Hospitals And Health Care Facilities
Safety adequately shielded from external RF energy. Your phone aboard an aircraft. Always follow the instructions physician may be able to assist you in obtaining this of the airline representative whenever using your phone information. aboard an aircraft, to prevent any possible interference with airborne electronic equipment. -
Page 86: Safety Information For Fcc Rf Exposure
Safety Safety Information for FCC RF Exposure do not satisfy these requirements may not comply with FCC RF exposure requirements, and should be avoided. WARNING SAR information Read this information before using. THIS MODEL PHONE MEETS THE GOVERNMENT’S In August 1996 the Federal Communications REQUIREMENTS FOR EXPOSURE TO RADIO Commission (FCC) of the United States with its action in WAVES. -
Page 87: Fda Information
Safety highest certified power level, the actual SAR level of the information on this model phone is on file with the FCC phone while operating can be well below the maximum and can be found under the Display Grant section of value. - Page 88 Safety phones can expose the user to measurable causes no known adverse health effects. Many studies of radiofrequency energy (RF) because of the short distance low level RF exposures have not found any biological between the phone and the user’s head. These RF effects.
- Page 89 Safety • Support needed research into possible biological phones that are sold in the United States must comply effects of RF of the type emitted by wireless phones; with FCC safety guidelines that limit RF exposure. FCC relies on FDA and other health agencies for safety •...
- Page 90 Safety development used animals that had been genetically provide some of the data that are needed. Lifetime engineered or treated with cancer-causing chemicals so animal exposure studies could be completed in a few as to be pre-disposed to develop cancer in the absence years.
- Page 91 Safety Organization International Electromagnetic Fields (EMF) risks, you can take a few simple steps to minimize your Project since its inception in 1996. An influential result of exposure to radiofrequency energy (RF). Since time is a this work has been the development of a detailed agenda key factor in how much exposure a person receives, of research needs that has driven the establishment of reducing the amount of time spent using a wireless...
- Page 92 Safety and increasing the distance between the user and the RF marketed in the U.S. are required to meet safety source will reduce RF exposure. requirements regardless of whether they are used against Some groups sponsored by other national governments the head or against the body.
- Page 93 Safety What about wireless phone interference with harmful interference be found to occur, FDA will conduct medical equipment? testing to assess the interference and work to resolve the problem. For more information, please visit the FDA Radiofrequency energy (RF) from wireless phones can website at http://www.fda.gov/cellphones.
- Page 94 Safety Answering Points (PSAPs) to identify the location of the only. caller in case of emergency. Generally, the rules require 911 IN LOCK MODE that carriers identify an E911 caller’s location within 50 meters of the actual location for 67 percent of calls and The “911”...
- Page 95 Safety • Never wiretap or otherwise intercept a phone call, will be exposed to high temperatures, such as near an unless you have first obtained the consent of the open flame or heat-emitting equipment. parties participating in the call. DO NOT drop your device or subject it to severe shock. When not using, lay down the unit to avoid possible •...
- Page 96 Safety lightning outside. Stop using device, if it starts to smoke, smell, make The device is not water-proof. By placing it under faucet or abnormal sound or generate heat. If abnormality starts to shower and adding water-pressure, or submerging it happen while recharging, remove AC-Adapter or DC- inside water for a long time, the warranty will be invalid Adapter from the plug or cigar lighter adapter, check that...
- Page 97 It may destroy or corrupt these data. Never press or poke display with your finger or other • Only use Casio branded batteries specific to your object. It may cause damage to display Never twist phone model. device. It may cause product failure.
- Page 98 Safety DON’Ts cause injury to the skin or eyes. Should the liquid come into contact with the eyes, irrigate the eyes thoroughly • Don’t attempt to disassemble the battery – it is a with clean water and immediately seek medical attention. sealed unit with no serviceable parts.
- Page 99 Safety from the power source before attempting any cleaning. Games Always use a dry, soft cloth dampened with water Warning dampened with water to clean the equipment, after it has A very small percentage of individuals may experience been unplugged. Handling the cord on this product or epileptic seizures when exposed to certain light patterns cords associated with accessories sold with this product, or flashing lights.
-
Page 100: Accessibility
Safety tunnel syndrome, or other musculoskeletal disorders: Accessibility • Take a minimum 15-minute break every hour of game FCC Hearing-Aid Compatibility (HAC) playing. Regulations for Wireless Devices • If your hands, wrists, or arms become tired or sore On July 10, 2003, the U.S. Federal Communications while playing, stop and rest for several hours before Commission (FCC) Report and Order in WT Docket 01- playing again. - Page 101 Safety depending on the user’s hearing device and hearing loss. For information about hearing aids and If your hearing device happens to be vulnerable to digital wireless phone: interference, you may not be able to use a rated phone FCC Hearing Aid Compatibility and Volume Control successfully.
- Page 102 Safety the most common cause of preventable hearing loss. environment, use noise-cancelling headphones to block Some scientific research suggests that using portable out background environmental noise. Limit the amount of audio devices, such as portable music players and cellular time you listen. As the volume increases, less time is telephones, at high volume settings for long durations required before your hearing could be affected.
- Page 103 Safety increases, less time is required before your hearing 31 Center Drive, MSC 2320 could be affected. Bethesda, MD USA 20892-2320 Voice: (301) 496-7243 • Avoid using headphones after exposure to extremely Email: nidcdinfo@nih.gov loud noises, such as rock concerts, that might cause Internet: http://www.nidcd.nih.gov/health/hearing temporary hearing loss.
-
Page 104: Month Limited Warranty
(including discharged batteries) in appropriate shipping UTStarcom Personal Communications (the Company) warrants to the original retail purchaser of this Casio brand sold thru UTStarcom handheld materials and mail to: portable cellular telephone, that should this product or any part thereof... - Page 105 12 MONTH LIMITED WARRANTY (f) Product damaged from external causes such as fire, flooding, dirt, to the place of purchase for repair or replacement processing. In sand, weather conditions, battery leakage, blown fuse, theft or addition, for reference to an authorized Warranty station in your area, improper usage of any electrical source.
- Page 106 Warranty gives you specific legal rights, and you may also have other Licensed by QUALCOMM Incorporated under one or more of the following United State Patents : rights, which vary from state to state or province to province. 4,901,307; 5,056,109; 5,101,501; 5,109,390; 5,228,054; IN USA: UTStarcom Personal Communications 5,267,261;...
Need help?
Do you have a question about the GZONE TYPE-S PTT and is the answer not in the manual?
Questions and answers