
Related Manuals for HP tz655


Summary of Contents for HP tz655
- Page 1 User Guide SUMMARY This guide provides information about components, network connection, power management, security, backing up, and more.
-
Page 2: Legal Information
HP End Not all features are available in all of Microsoft Corporation in the United States User License Agreement (EULA). -
Page 3: About This Guide
About this guide This guide provides basic information for using and upgrading this product. WARNING! Indicates a hazardous situation that, if not avoided, could result in serious injury or death. CAUTION: Indicates a hazardous situation that, if not avoided, could result in minor or moderate injury. -
Page 4: Table Of Contents
Product features............................................. 1 Components..............................................1 Labels ..................................................2 Setup..................................................3 Warnings and cautions ......................................... 3 Mounting and orienting the HP Trusted Zero Client ..........................4 HP Quick Release........................................4 Supported mounting options..................................7 Supported orientation and placement..............................10 Unsupported placement....................................12 Routine HP Trusted Zero Client care ..............................13 Installing the stand.......................................... - Page 5 Shipping preparation ..........................................32 5 Specifications ..............................................33 6 Electrostatic discharge..........................................34 7 Accessibility................................................. 35 HP and accessibility..........................................35 Finding the technology tools you need................................35 The HP commitment........................................35 International Association of Accessibility Professionals (IAAP)....................36 Finding the best assistive technology................................36 Assessing your needs .....................................36...
-
Page 6: Computer Features
Product features To identify a typical computer configuration, read this section. Features vary depending on the model. For more information about the hardware and software installed on this HP Trusted Zero Client, go to http://www.hp.com/go/quickspecs and search for the HP Trusted Zero Client. -
Page 7: Labels
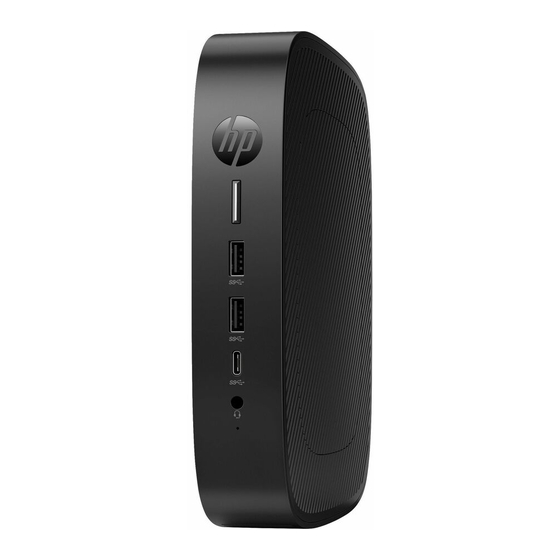
Table 1-1 Identifying the front and rear panel components Components USB ports (2) Security cable slot USB ports (2) Optional port. If used, supports the following: VGA, Power Serial, HDMI, 2 x USB 3.0, USB Type-C® dual role/ display port alternate mode, Dual Serial, Ext Antenna, fiber NIC SC 100FX, fiber NIC LC, SC 1000SX. -
Page 8: Setup
To reduce the risk of personal injury or equipment damage from electric shock, hot surfaces, or fire: ● Install the HP Trusted Zero Client in a location where children are unlikely to be present. ● Disconnect power from the HP Trusted Zero Client and allow the internal system components to cool before you touch them. -
Page 9: Mounting And Orienting The Hp Trusted Zero Client
An optional Quick Release mounting bracket is available from HP for mounting the HP Trusted Zero Client to a wall, desk, or swing arm. When the mounting bracket is used, do not install the HP Trusted Zero Client with the I/O ports oriented towards the ground. - Page 10 To use the HP Quick Release: Lay the HP Trusted Zero Client down with the right side up and the front side with the HP logo facing you. Lift the side cover at the recess (1), and then remove the cover (2) from the HP Trusted Zero Client.
- Page 11 Two spacers are included with the HP Trusted Zero Client. Use the thinner spacer when mounting the HP Trusted Zero Client. Using four 10 mm screws included in the mounting device kit, attach one side of the HP Quick Release to the HP Trusted Zero Client as shown in the following illustration.
-
Page 12: Supported Mounting Options
Using four screws included in the mounting device kit, attach the other side of the HP Quick Release to the device you will mount the HP Trusted Zero Client to. Be sure that the release lever points upward. Slide the side of the mounting device attached to the HP Trusted Zero Client (1) over the other side of the mounting device (2) on the device where you want to mount the HP Trusted Zero Client. - Page 13 On a wall: Under a desk: Chapter 1 Computer features...
- Page 14 Into a dual VESA® mount: Supported mounting options...
-
Page 15: Supported Orientation And Placement
You must adhere to the HP-supported orientation to ensure your HP Trusted Zero Clients function properly. Unless the HP Trusted Zero Client is mounted with the HP Quick Release, you must operate it with the stand attached to ensure proper airflow around the HP Trusted Zero Client. - Page 16 ● HP supports the vertical orientation for the HP Trusted Zero Client: ● You can place the HP Trusted Zero Client under a monitor stand with at least 2.54 cm (1 in) clearance: Supported orientation and placement...
-
Page 17: Unsupported Placement
● HP Trusted Zero Clients require proper ventilation to maintain operating temperature. Do not block the vents. ● Do not install the HP Trusted Zero Client with the I/O ports oriented towards the ground. ● In a desk drawer: ●... -
Page 18: Routine Hp Trusted Zero Client Care
Keep liquids away from the HP Trusted Zero Client and keyboard. ● Turn off the HP Trusted Zero Client and wipe the exterior with a soft, damp cloth as needed. Using cleaning products can discolor or damage the finish. Installing the stand You can use the HP Trusted Zero Client in either a tower or horizontal orientation with the stand included with the HP Trusted Zero Client. - Page 19 Horizontal orientation: Attach the stand to the right side of the HP Trusted Zero Client. Lay the HP Trusted Zero Client down with the right side up and the front side with the HP logo facing you. Lift the side cover at the recess (1), and then remove the cover (2) from the HP Trusted Zero Client.
-
Page 20: Securing The Hp Trusted Zero Client
Line up the captive screws in the stand with the screw holes in the HP Trusted Zero Client (2). Tighten the captive screws securely. Reconnect the power cord and any other cables or USB flash devices. NOTE: Be sure that at least 10.2 centimeters (4 inches) of space on all sides of the HP Trusted Zero Client remain clear and free of obstructions. -
Page 21: Connecting The Power Cord
Removing the access panel To remove the access panel, use these procedures. WARNING! Before removing the access panel, be sure that the HP Trusted Zero Client is turned off and the power cord is disconnected from the AC outlet. Chapter 1 Computer features... - Page 22 Remove or disengage any security devices that prohibit opening the HP Trusted Zero Client. Remove the stand from the HP Trusted Zero Client. Turn the HP Trusted Zero Client upside down and locate the two screw holes in the grid on the bottom of the HP Trusted Zero Client.
-
Page 23: Replacing The Access Panel
HP Trusted Zero Client. Press the latch (1) that secures the access panel to the chassis. Rotate the access panel upward (2) and lift it off the HP Trusted Zero Client (3). Replacing the access panel To replace the access panel, use these procedures. -
Page 24: Locating Internal Components
Replace the HP Trusted Zero Client stand. Reconnect the power cord and turn on the HP Trusted Zero Client. Lock any security devices that were disengaged when the HP Trusted Zero Client access panel was removed. Locating internal components Use this illustration and table to identify HP Trusted Zero Client internal components. -
Page 25: Removing And Replacing The Battery
To remove and replace the battery, use these procedures. WARNING! Before removing the access panel, be sure that the HP Trusted Zero Client is turned off and the power cord is disconnected from the AC outlet. To remove and replace the battery: Remove the HP Trusted Zero Client access panel. -
Page 26: Upgrading System Memory
Regardless of the power-on state, voltage is always supplied to the memory module as long as the HP Trusted Zero Client is plugged into an active AC outlet. Adding or removing the memory module while voltage is present can cause irreparable damage to the memory module or system board. - Page 27 A memory module can be installed in only one way. Match the notch on the module with the tab on the memory socket. Replace the access panel. See Replacing the access panel on page The HP Trusted Zero Client automatically recognizes the new memory when you turn on the HP Trusted Zero Client. Chapter 1 Computer features...
-
Page 28: Troubleshooting
Troubleshooting This chapter provides you with information to help with troubleshooting your HP Trusted Zero Client. Interpreting POST diagnostic front panel lights and audible codes This section identifies the front panel light codes as well as the audible codes that can occur before or during POST that might not have an error code or text message associated with them. - Page 29 Replace memory modules one at a time to isolate the faulty module. Replace third-party memory with HP memory. Replace the system board. Power light flashes red three Prevideo graphics error. Replace the system board.
-
Page 30: Basic Troubleshooting
Basic troubleshooting If the HP Trusted Zero Client is experiencing operating problems or will not turn on, review the following items. Table 2-2 Basic troubleshooting Issue Procedures The HP Trusted Zero Client is experiencing Verify that the following connectors are securely plugged into the HP Trusted Zero operating problems. -
Page 31: Statement Of Volatility
Although the SSD retains its data when power is removed from the system, desktop HP Trusted Zero Clients are supplied with a Secure Erase feature that permits the SSD to be erased, permanently preventing data access. - Page 32 Table 2-3 Available memory devices (continued) Memory devices Types Solid state drive – Data is retained regardless of supplied power. Statement of Volatility...
-
Page 33: Power Cord Set Requirements
Power cord set requirements The power supplies on some computers have external power switches. The voltage select switch feature on the computer permits it to operate from any line voltage of 100 V ac–120 V ac or 220 V ac–240 V ac. Power supplies on those computers that do not have external power switches are equipped with internal switches that sense the incoming voltage and automatically switch to the proper voltage. - Page 34 Table 3-1 Power cord country-specific requirements Country Accrediting Agency Country Accrediting Agency Australia (1) EANSW Italy (1) Austria (1) Japan (3) METI Belgium (1) CEBC Norway (1) NEMKO Canada (2) Sweden (1) SEMKO Denmark (1) DEMKO Switzerland (1) Finland (1) SETI United Kingdom (1) France (1)
-
Page 35: Computer Operating Guidelines, Routine Care, And Shipping Preparation
Follow these guidelines to ensure the best performance and useful life of your computer. Operating guidelines and routine care HP has developed guidelines to help you properly set up and care for the computer and monitor. ● Keep the computer away from excessive moisture, direct sunlight, and extreme heat and cold. -
Page 36: Removing Dirt And Debris From Your Computer
Keep liquids away from the product. Avoid getting moisture in any openings. If liquid makes its way inside your HP product, it can cause damage to the product. Do not spray liquids directly on the product. Do not use aerosol sprays, solvents, abrasives, or cleaners containing hydrogen peroxide or bleach that might damage the finish. -
Page 37: Shipping Preparation
Keep liquids away from the product. Avoid getting moisture in any openings. If liquid makes its way inside your HP product, it can cause damage to the product. Do not spray liquids directly on the product. Do not use aerosol sprays, solvents, abrasives, or cleaners containing hydrogen peroxide or bleach that might damage the finish. -
Page 38: Specifications
Specifications This section provides specifications for your HP Trusted Zero Client. For the latest specifications or additional specifications on the HP Trusted Zero Client, go to http://www.hp.com/go/quickspecs/ and search for your specific HP Trusted Zero Client to find the QuickSpecs. -
Page 39: Electrostatic Discharge
Electrostatic discharge Electrostatic discharge is the release of static electricity when two objects come into contact—for example, the shock you receive when you walk across the carpet and touch a metal door knob. A discharge of static electricity from fingers or other electrostatic conductors can damage electronic components. -
Page 40: Accessibility
(AT) devices or applications. HP and accessibility Because HP works to weave diversity, inclusion, and work/life into the fabric of the company, it is reflected in everything HP does. HP strives to create an inclusive environment focused on connecting people to the power of technology throughout the world. -
Page 41: International Association Of Accessibility Professionals (Iaap)
These links provide information about accessibility features and assistive technology, if applicable and available in your country or region, that are included in various HP products. These resources will help you select the specific assistive technology features and products most appropriate for your situation. -
Page 42: Standards And Legislation
If you need additional support with the accessibility features on your HP product, see Contacting support on page Additional links to external partners and suppliers that may provide additional assistance: ● Microsoft Accessibility information (Windows and Microsoft Office) ● Google Products accessibility information (Android, Chrome, Google Apps) -
Page 43: Legislation And Regulations
NOTE: This is not an exhaustive list. These organizations are provided for informational purposes only. HP assumes no responsibility for information or contacts you encounter on the internet. Listing on this page does not imply endorsement by HP. Organizations These organizations are a few of the many that provide information about disabilities and age-related limitations. -
Page 44: Other Disability Resources
These HP-specific links provide information that relates to disabilities and age-related limitations. HP comfort and safety guide HP public sector sales Contacting support HP offers technical support and assistance with accessibility options for customers with disabilities. NOTE: Support is in English only. ●... -
Page 45: Index
21 accessibility needs blinking PS/2 keyboard 23 assessment 36 assistive technology (AT) ventilation guidelines 30 finding 36 mounting the HP Trusted Zero purpose 35 Client 4 AT (assistive technology) finding 36 purpose 35 orienting the HP Trusted Zero...
Need help?
Do you have a question about the tz655 and is the answer not in the manual?
Questions and answers