Table of Contents
Advertisement
Quick Links
Advertisement
Table of Contents

Related Manuals for FAVI B1-LED-PICO


Summary of Contents for FAVI B1-LED-PICO
- Page 1 Micro SD B1-LED-Pico User Guide...
-
Page 3: Table Of Contents
Contents 1 Introduction and Notices Chapter Introduction Safety Precautions Maintenance and Service FCC Notices European Notices 2 Projector Overview Chapter Features Accessories Main Unit Overview Remote Control Overview Connecting your projector to a video source Connecting your projector to your PC USB and Micro SD card usage overview 3 Using your Projector Chapter... -
Page 4: Introduction And Notices
Introduction and Notices CHAPTER Thank you for purchasing the FAVI B1-LED-Pico projector. This projector is a small, lightweight, versitile unit designed for both business and home use. This projector boasts a 28 lumen light output, built in speakers, SVGA native resolution, VGA support up to 1600x1200, Composite video support, and an integrated Personal Media Player (PMP). -
Page 5: Safety Precautions
Safety Precautions Please avoid looking directly into the projector’s lens while the unit is operating. Doing so could damage your eyes. Do not us e the projector under direct s unlight. Do not use this projector near sources of heat, such as space heaters, Do not block any ventilation holes on this device. -
Page 6: Maintenance And Service
Maintenance and Service Keeping your projector clean will help prolong its life. If the projector becomes dirty, wipe it clean using a dry or damp cloth. Please unplug the projector before cleaning it. Do not use harsh chemicals to clean your projector. -
Page 7: European Notices
Reorient or relocate the receiving antenna. Increase the separation between the equipment and the receiver. receiver is connected. Consult the dealer or an experienced radio/television technician for help. European Union Notices Disposal of Used Electrical and Electronic Equipment (Independent collection progra ms a pplica ble to E U -member s tates and other E uropean countries ) T he la bel s hown on this device or its pa cka ge indi- cates that this device s hould not be dis carded along... -
Page 8: Projector Overview
Projector Overview CHAPTER Features The B1-LED-Pico projector has been designed to be far more functional then previous pico projector models. Here is a summary of the features of your new pico projector. 28 lumen LED lamp output. Supports Divx and Xvid video codecs. -
Page 9: Accessories
Accessories The following accessories come with your projector: A. Projector B. Mini Y Cable C. Mini USB Cable D. DC 12V / 2A Charger E. Remote Control F. Tripod G. Leather Case H. User Guide... -
Page 10: Main Unit Overview
Main Unit Overview 1. F ocus control 2. Go back to previous menu (PMP mode) Play/Pause/Select option (PMP mode) 4. Fast forward/Highlight menu option (PMP mode) Rewind/Highlight menu option (PMP mode) 6. Select mode button (all modes) 7. IR Sensor 8. -
Page 11: Remote Control Overview
Remote Control Overview Your projector’s remote control can operate all of your projector’s functions. Some of the buttons on both the projector and the remote control are multi functional depending on how you are using the projector. PMP mode button functions are explained more thoroughly in chapter 4. - Page 12 P owering your projector On and Off Powering On Press the power button on either the projector or remote control. After a second, the projector will start operating. Powering Off Pressing the power button on either the remote or projector while its operating will POWER OFF SYSTEM bring up this menu...
-
Page 13: Connecting Your Projector To A Video Source
Connecting your projector to a video source Your projector supports both Composite video with line audio, and standard VGA video. A special Y cable is included that will allow you to connect either video source to your projector. When plugging the cable into your projector, make sure the arrow on the connector is facing upward to help prevent plugging in the connector upside grasping the sides of the connector and gently pulling it out. -
Page 14: Connecting Your Projector To Your Pc
Connecting your projector to your PC Your projector supports standard PC VGA in resolutions from 640x480 up to 1600x1200. The B1-LED-Pico projector is designed for use with notebook computers that can connect to an external VGA display device. Standard desktop PC’s will also work with the B1-LED-Pico projector. -
Page 15: Usb And Micro Sd Card Usage Overview
USB and Micro SD card usage overview Your projector comes with internal memory that can be accessed by using the included USB cable to connect it to any computer that supports the USB 2.0 standard. Once the projector is PC / Notebook connected to the computer and powered on, the computer should detect the projector as a... -
Page 16: Using Your Projector
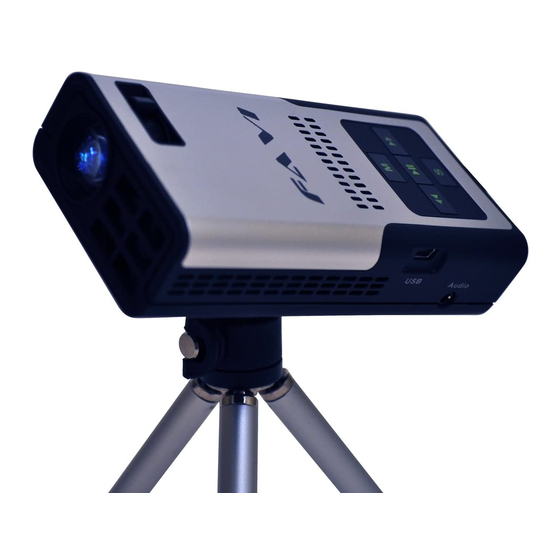
Using your Projector CHAPTER Setting up your projector Screw the tripod to the Adjustable base base of the projector as shown in the illustration. Grasp the tripod’s legs to tighten. Do not over tighten. You can adjust the tripod’s base to make better contact with the base of the projector. -
Page 17: Adjusting The Image Size And Focus
Adjusting the Image Size and Focus Once the projector is connected and powered on, you can adjust the image screen. To adjust the focus, move the focus control slider which is shown in the illustration until the image is clear. The projector’s image size can be adjusted by moving the projector. -
Page 18: A/V And Vga Menu Overview
A/V and VGA Menu Overview While in either A/V or VGA mode, press the MENU button on your remote control to bring up the menu screen. There are two sub-menus available in this menu screen. Use the navigation arrow buttons on the remote control to select which sub-menu you want, then press the OK button on your remote control to select that sub-menu. - Page 19 This menu screen allows you to adjust the settings for the on screen how the menu screen looks and behaves. Here is a list of the settings you can adjust on this menu screen. These settings can be adjusted in either AV or VGA mode. Select between English and Chinese Language language menu screens.
-
Page 20: Pmp Functions
PMP Functions CHAPTER When entering PMP mode, the projector will display the PMP menu screen as seen in this illustration: You can navigate through the PMP menu screen using either the projector’s remote control, or the buttons on the projector itself. -
Page 21: Thumbnail Mode
Slideshow mode function buttons. Buttons on the Buttons on the Remote Function Description Projector Control Enter Thumbnail mode. Go back to previous image. Skip to next image. View photo in Browse mode. Thumbnail Mode Up to 12 photos at a time can be displayed as thumbnails in Thumbnail the right side of the screen. -
Page 22: Browse Mode
Thumbnail mode function buttons. Buttons on the Buttons on the Remote Function Description Projector Control Go back to the main menu screen. Move leftward. Move rightward. Move upward. Move downward. View highlighted photo in Browse mode. Browse Mode PMP settings menu. (Please see Page 25) Full Screen mode Display’s photos in full screen. - Page 23 Browse mode function buttons. Buttons on the Buttons on the Remote Function Description Projector Control Go back to the main menu screen. Move Leftward. Move rightward. Rotate the photo 90 degrees counter-clockwise. Rotate the photo 90 degrees clockwise. While in browse mode, you can zoom in on the current photo you are viewing.
-
Page 24: Playing Movies And Music
Playing Movies and Music From the main PMP menu screen, highlight either the MUSIC or VIDEO option depending on what you want to play. Any compatible video onto a Micro SD card, or the projector’s internal memory will be listed as shown here. The music player screen looks similar to the video player screen shown above. -
Page 25: Pmp Settings
PMP Settings Here you can adjust the settings for your projector’s System, Photo, Video, and Music functions. Listed below are the buttons that will highlight and change these settings. Each setting and its description are listed on the following two pages. -
Page 26: System Setup
System Setup The System Setup screen allows you to change the general PMP system functions such as Language, Gamma correction, and Volume. Menu Option Function Description Select from one of 19 supported languages. English L anguage is the default setting. Change the brightness of the PMP interface by selecting Gamma from one of four settings. -
Page 27: Video Setup
Slides how Effect Select whether you want to display photos from all directories, or just the current directory that the P hotoFrom projector is reading photos from. Default setting is all directories. Video Setup Here you can change how videos will play on the projector. Menu Option Function Description Select how you want videos to be displayed. -
Page 28: Technical Specifications
Technical Specifications CHAPTER LCOS 800x600 LCD native resolution Supported resolutions 640x480 up to 1600x1200 Composite video, and VGA Video inputs Audio inputs Stereo line input jacks LED lamp power 12 watts LED lamp life 20,000 hours Projected image size 5 to 80 inches AVI, MP4, MP3 WMA, OGG, BMP, JPG Supported video codecs Xvid, Divx...
Need help?
Do you have a question about the B1-LED-PICO and is the answer not in the manual?
Questions and answers