Table of Contents

Related Manuals for FAVI J7-LED-PICO


Summary of Contents for FAVI J7-LED-PICO
-
Page 1: User Manual
J7-LED-PICO User Manual Product specification and user manual is subject to change without prior notice due to engineering improvement. Color and appearance of product and icons in user manual may vary from that of actual product. -
Page 2: Table Of Contents
TABLE OF CONTENTS Product Registration Warranties Important Safety Notes What’s In the Box Power Projector Projector Overview Top & Bottom Back & Front Left & Right Image Size Settings Wi-Fi Setup Image Display Volume Adjustment Web Browser Connect Apps USB/Micro SD Card Computer Troubleshooting Specification... -
Page 3: Product Registration
Product Registration allows us to send you important updates, service information and helpful hints. It will also make it easier should you ever need to call in for Technical Support. FAVI values your privacy and will never share your information with other companies. -
Page 4: Warranties
WARRANTIES Your J7-LED-PICO projector is warrantied to be free of defects in material and workmanship for a period of 1 year from the date of receipt. Should your projector develop an issue requiring it to be repaired within this time frame, we will repair or exchange any defective unit at no cost to you. -
Page 5: Important Safety Notes
IMPORTANT SAFETY NOTES Before you use this projector, please read this manual carefully. SAFETY Do not stare directly into the light of projector’s lens. Do not expose projector to water or other sources of moisture to avoid electrical shock. Do not use projector in areas where flammable gases or fumes are present. -
Page 6: What's In The Box
WHAT’S IN THE BOX 1x J7-LED-PICO 1x Carrying Case 1x Projector Sleeve 1x Micro USB Cable 1x AV Cable 1x Power Adapter 1x User Manual... -
Page 7: Power Projector
12V port and plug the other end into an electrical outlet. Step 2: Slide the Power button to the right to turn on the projector. Step 3: Wait for the Favi Pico+ start screen to appear. Note: Manually adjust the focus by sliding up or down on the focus adjustment wheel to your preference. -
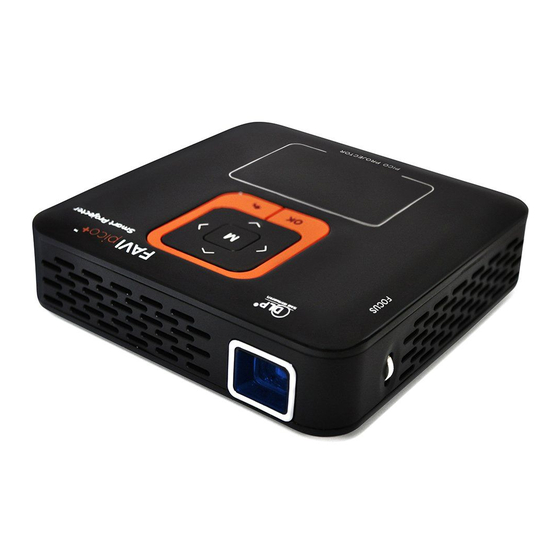
Page 8: Projector Overview
PROJECTOR OVERVIEW The following diagrams point out the features of your projector: Menu Directional Keys Return / Back OK / Select Touchpad tip: Double tap and hold to swipe and drag items BOTTOM Tripod Dock Air Ventilation Speaker... -
Page 9: Back & Front
PROJECTOR OVERVIEW BACK & FRONT DC In 12V Rest Button AV IN / Audio Out (see diagram below) Micro SD Card Slot Connecting Audio and Video via AV IN / Audio Out Headphones Audio L Micro-SD USB HOST AV IN RESET DC 12V Audio R... -
Page 10: Left & Right
PROJECTOR OVERVIEW RIGHT & LEFT Power Switch Air Ventilation Focus Adjustment Turning Projector ON/OFF Switch Power Switch to the RIGHT to turn projector ON. Switch Power Switch to the LEFT to turn projector OFF. Focusing Images Turn Focus Adjustment up or down until picture is clear. -
Page 11: Image Size
IMAGE SIZE Image Size Image sizes are measured diagonally and are approximate. 40” 55.9” 60” 83.9” 80” 111.8” 100” 139.8” Image Adjustment For best image results, the projector should be directly facing the screen. Adjustment to the focus dial will help to improve the picture. -
Page 12: Settings
SETTINGS WI-FI Setup From the main screen, select the Device Setting Icon and locate Wireless & Networks. If Wi-Fi is not already ON, switch Wi-Fi ON. Projector will automatically scan for available wireless networks. Choose your wireless network and enter your password to connect. -
Page 13: Image Display
SETTINGS Settings From the main screen, select the Device Setting Icon Image Display From the main screen, select the Device Setting Icon and then Display Rotate Screen Select this option to flip the display vertically. Use this option for ceiling mount applications. Brightness Select this option to adjust the brightness of the projected image... -
Page 14: Web Browser
WEB BROWSER Launch Web Browser From the main screen, select the Web Browser Icon Note: Web Browser will typically open on the last web page visited. Set Web Browser Homepage 1. From the main screen, select the Web Browser Icon 2. -
Page 15: Connect
CONNECT Apps From the main screen select All Apps Icon to access your apps Download new apps: 1. From the main screen select the App Store Icon 2. Search for desired app. select app, and click “Install.” 3. All downloaded apps will appear on the All App page. Note: Although there are many free apps available on the Google Play Store, some apps require an additional fee or subscription to download or use. -
Page 16: Computer
CONNECT PC Computer Transfer files between your computer and the SD card in your projector. 1. Connect projector (OTG) to computer (USB) using micro USB provided. 2. Follow the on screen instructions. -
Page 17: Usb/Micro Sd Card
TROUBLESHOOTING If you have any issues with using your J7-LED-PICO, please refer to the following solutions below: Problem Solution Check the power cord and power outlet. Projector will not power rt projector. et the projector by long pressing reset button. -
Page 18: Specification
TECHNICAL SPECIFICATION Native Resolution 854 x 480 (WVGA), Max 1080p Display Technology 0.3” DMD, TI DLP LED Brightness 100 ANSI Lumens LED Lamp Life Approximately 30,000 hours Image Size 120” Color Gamut 100% of NTSC Projection Offset 100% offset Contrast Ratio 1000:1 Screen Aspect Ratio 16:9...
Need help?
Do you have a question about the J7-LED-PICO and is the answer not in the manual?
Questions and answers