Advertisement
Quick Links
Advertisement

Related Manuals for Snow Peak Amenity Dome Medium


Summary of Contents for Snow Peak Amenity Dome Medium
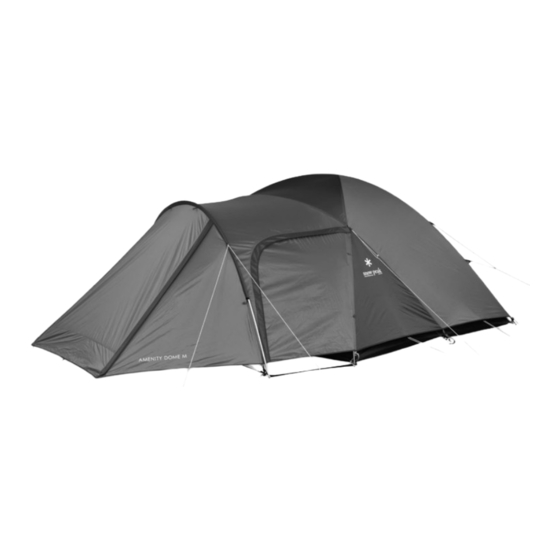
- Page 1 取扱説明書 Ver 2.00 SDE-001RH アメニティ ドームM...
- Page 2 この度は、 ス ノ ーピーク製品をお買い上げいただき、 誠にあ り がと う ご ざいます。 本製品は、 キ ャ ンプ用のテン トです。 安全にご使用いただ く ためにも下記の取扱説明書を よ く 読んでか ら ご使用く だ さ い。 また、 読み終わった後も大切に 保管して く だ さい。 説明内容で理解出来ない点及び製品に不具合が確認さ れた際には直ちに使用を中止しご購 入いただき ま した販売店様も し く は弊社ユーザーサー ビス までお問い合わせ く だ さ い。 ■ セッ...
- Page 3 ご使用の前に よ く 読んで予測さ れる事故を回避 し安全にご使用く だ さ い。 危険 明ら かに生命にかかわる重大な事故が予測さ れる行為を示 し ます。 警告 場合によ り重大な事故に至る行為を示 し ます。 注意 ケガや本体破損、 物品破損と して拡大損害の原因と なる行為を示 し ます。 取扱上の注意 危険 明ら かに生命にかかわる重大な事故が予測さ れる行為を示 し ます。 ●テン ト内では燃焼式のラ ンタ ンやコンロ、 ヒーターな どの熱源や、 マ ッ チ、 ローソク、 ライ ター、 タバコな どの裸火や炎は絶対に使用しないで...
- Page 4 使用前の準備 初めてお使いになる前に 品質には万全を期 しており ますが、 お使いになる前に必ず試 し張り を行い、 付属品や設営手順を確認 して く だ さ い。 万一不具合があ っ た場合は、 お買い求めにな っ た販売店ま たは弊社ユーザーサー ビス係ま でお問い合わせ く だ さ い。 1.シームシーリング剤による目止め ※本品にシームシー リ ング剤は付属 していません。 ご使用の際は、 市販のシームシー リ ング剤をお買い求め く だ さ い。 縫製部分にはシームテープによる防水処理が施してあり...
- Page 5 設営の手順 0) 設営は必ず2人以上で行って く だ さ い。 1) テン ト本体を平ら な場所に広げます。 ※テン ト本体の出入口は2カ所あ り ます。 ビルディ ングテープのある側が前室と な り、 メ イ ンの 出入口と な り ます。 あ らか じめ風雨な どの予測を し、 前室の方向を決めてお く こ と が必要で す。 ※基本的に前室は風下に向けます。 風上に向ける と、 風雨が侵入するばかり か ドアを開け た際に突然風が入り、...
- Page 6 6) Xフ レームの先端にピンを差し込みます。 ( Xフ レームのコーナーテープは黄色です。 ) 〔図D〕 図D Xフ レーム ピン ボ トムの三角力布 黄色のコーナーテープ 7) 差 し込んだXフ レームの反対側の先端にピン を差 し込みます。 〔 図E〕 ※ス リ ーブの位置が中央になる様に本体を調節 しながら、 ゆっ く り と フ レームの端部にピンを 差 し込んで く だ さ い。 一方か ら強引に押 し込む と反対側が大き く 湾曲 し、 フ レームの破損の 原因にな...
- Page 7 10) 本体に付いている プラスチッ ク フ ッ ク を各々のフ レームに 図 I 引っ掛けます。 〔 図I〕 11) 前後の ドアパネルのファスナー を全て閉めます。 次に6カ 所のコーナーテープ先端に付いているループにぺグ を通 し、 ボ トムのたるみを取る様に番号順に軽く 引き打ち込み ます。 〔 図J〕 ※ぺグは最後まで打ち込んで く だ さ い。 ※ぺグは無理に打ち込む と、 曲がりや折れな どの破損につな がり ます。 少しずつ打ち込み、 石などの障害物に当たった 場合は場所を変えてか...
- Page 8 14) フライ シー ト前室のス リ ーブに前室フ レームをゆっ く り と送り込み、 フ レーム両端にピンを 差 し込みます。 〔 図L〕 15) フライ シー ト裾の6個のバッ クルをボ トム側のリ ングに付いているバッ クルに接続 します。 全てのバッ クルを接続 した後フライ シー トの弛みを と る為に調節テープを引き、 テンシ ョ ン をかけます。 〔 図J〕 ※引きすぎにご注意く だ さ い。 引きすぎますと、 フライ シー ト を破損する恐れがあ り ます。 前室フ...
- Page 9 図P ※ロープの引きすぎにご注意く だ さ い。 引き過ぎますと フラ イ シー トに負担がかか り破損する恐れがあ り ます。 図O ■収納時の注意事項 □撤収の際はまず前室ビルディ ングテープを接続 して、 作業を始めて く だ さ い。 □フ レームを ピンか ら外す時はフ レームがハネ返り危険です。 フ レームが真っす ぐになる まで手を離さ ないで く だ さ い。 □サイ ドフ レーム、 Xフ レームを ピンか ら外す際は、 プラスチッ クフ ッ ク をつけたま ま外 して く だ さ い。 ( 全てのフ レームを ピンか...
- Page 10 撥水 ・ 防水性能について ●本製品はポリ エステル生地を組合わせて使用 しています。 いずれの生地にも高性能の撥水加工を施 しています が、 生地の特性上、 撥水性能 (撥水の仕方や、 耐久性) に若干の差が見られる場合があ り ます。 ご了承く だ さ い。 ●撥水加工は、 ご使用を重ねますと撥水機能が低下 します。 撥水性が衰えてきたと きは市販の撥水スプレーな ど を 使用 して く だ さ い。 スプレーご使用の際は、 スプレーの注意書き を よ く お読み く だ さ い。 ●防水性の高い生地を使用しており...
- Page 11 こんなときは Q : キ ャ ンプ場でフ レームが折れて し ま った と き 折れた フ レーム A : 応急処置と して速やかに付属のリペアパイプや添え木をあて、 ビニール リペア パイ プ テープな ど で固定するか、 撤収 して く だ さ い。 テープ Q : キ ャ ンプ場で本体生地が破れて し ま った り、 穴があいて し ま った と き A :...
- Page 12 単位はcm 室内奥行 室内幅 スペック SDE-001RH アメニティ ドームM ●材質 : フライ シー ト/75Dポリエステルタフタ ・ PUコー ティ ング耐水圧1,800mmミ ニマム ・ テフロン撥水加工 ・ UVカ ッ ト加工、 イ ンナーウォ ール/68Dポリ エステルタ フタ、 ボ トム/210Dポリ エステルオ ッ クス ・ PUコーティ ング耐水圧1,800mmミ ニマム、 フ レーム/ジュ ラルミ ン A7001+A6061 (φ12.8mm+φ12mm ・...
- Page 13 Instruction Manual : Ver 2.00 SDE-001RH Amenity Dome Medium...
- Page 14 Thank you for purchasing a Snow Peak product. This product is a tent for camping. For safety, read the following instruction manual before use. Please keep it safe for future reference. Finally, if you find anything that you do not understand in the description or any problems with the product, please stop use immediately and contact the retailer or Snow Peak Customer Service.
- Page 15 ●Before using the product, check each part for abnormalities. If there are abnormalities, take the product to the dealer or Snow Peak Customer Service for inspection or repair. ●Pay close attention to the weather. If extreme weather is in the forecast, pack up camp and evacuate to a safe place.
- Page 16 We have thoroughly checked this product for quality, however, please do a trial set up before actual use to ensure full understanding of the correct usage of the accessories and instructions. If any defects are found, please contact the dealer where the product was purchased or Snow Peak Customer Service.
- Page 17 Set-up Procedure 0) Make sure that two or more people take part in the set-up. 1) Spread the Inner Tent on a flat area. There are two entrances to the Inner Tent; the side that has the Building Tape is the Vestibule side and will become the main entrance.
- Page 18 6) Insert a pin into one end of the X Pole (the corner tape for the X Pole is yellow) (fig. D). Fig. D X Pole Triangular Reinforcing Cloth on the bottom Yellow Corner Tape 7) Insert the additional pin to the other end of the X Pole, which is located diagonally opposite the first end (fig.
- Page 19 10) Attach all the Plastic Hooks to the corresponding Fig. I Poles (fig. I). 11) Close both door panels, front and back. Insert the pegs into the loops at the six ends of each the corner. Peg down the Inner Tent by following the numbers, and by pulling lightly to stretch out any slack at the bottom of the tent (fig.
- Page 20 14) Slowly insert the Vestibule Pole into the sleeve of the Vestibule Fly, then insert the pins into both ends of the Pole (fig. L). 15) Connect the six Buckles on the edge of the Fly to the Buckles on the Bottom Rings.
- Page 21 Fig. P *Do not pull the rope too much. If pulled too far, the Fly may be overloaded or damaged. Fig. O While moving the Guy Line in the direction of the arrow, slide the Rope tensioner to increase the tension.
- Page 22 Water-Repellent and Waterproof Functions ● A combination of Polyester fabric is used in this product. Both materials are treated with a high-quality, water-repellent finish. However, the level of water-repellent capacity and durability may vary slightly due to the characteristics of each material. ●...
- Page 23 Peak Customer Service. If there are apparent defects in the product's manufacturing, the defective product will be repaired or exchanged free of charge. In other cases, Snow Peak will repair the product for an appropriate fee. The decision to repair or replace the product will be at our discretion. Snow Peak will not repair the product for any damage that occurred due to the following: 1.
-
Page 24: Specifications
Inner Depth Inner Width 55cm (1.8’) 80cm (2.6’) Specifications SDE-001RH Amenity Dome Medium ● Material: Fly / 75D Polyester Taffeta, PU coating, Waterproof rating: 1,800mm minimum, Teflon water-repellent finish, UV protection treatment; Inner Wall / 68D Polyester Taffeta; Bottom / 210D Polyester Oxford・PU coating,...
Need help?
Do you have a question about the Amenity Dome Medium and is the answer not in the manual?
Questions and answers