
Related Manuals for Formax FD 87HDS


Summary of Contents for Formax FD 87HDS
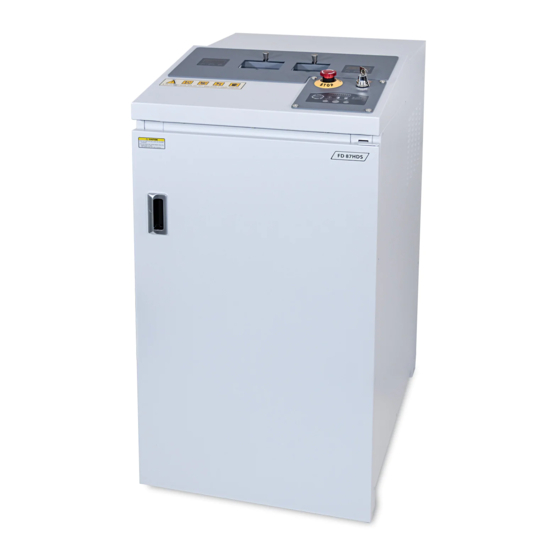
- Page 1 FD 87HDS Hard Drive Shredder OPERATOR/MAINTENANCE/PARTS MANUAL FIRST EDITION 12/2018...
-
Page 3: Table Of Contents
TABLE OF CONTENTS TOPIC PAGE Safety Precautions Checking Safety Devices Overview Specifications Installation Start-up: Main Switch and Control Panel Operation, Overloading Emptying Waste Bin Exterior Cleaning Maintenance & Inspection 7 - 8 Parts 9 - 15... -
Page 4: Safety Precautions
Notes on work safety The FD 87HDS Hard Drive Shredder has been inspected for safety. However, improper operation and misuse risk the following: • the health or life of the operator •... - Page 5 The FD 87HDS Hard Drive Shredder is intended only for shredding discarded hard drives from desktop and laptop computers. The hardened, solid-steel cutting blades are designed to handle these materials. Any other use beyond the scope described here is regarded as not being in accordance with the instructions.
-
Page 6: Checking Safety Devices
Checking the safety devices Check the safety devices: • at the start of each work shift (when operation is sporadic) • at least once a week in continuous operation • after each maintenance or repair Check the safety devices for: •... -
Page 7: Overview
Installation 1. Appropriate power outlet must be available at installation site. 2. The FD 87HDS is delivered completely assembled. During transport, be aware of the shredder’s high center of gravity. 3. The shredder can be moved on its casters. If a fork-lift is used, be sure to use the designated pick-up points. -
Page 8: Start-Up And Operation
Start-up and Operation Main Switch 1. On the left side of the machine, open the door leading to the electrical control panel. Push on the lever (Fig. 1) and the handle will pop out. Pull to open (Fig. 2). 2. Flip the main power switch to the UP position (Fig. 3). Close electrical control panel door. 3. -
Page 9: Operation, Overloading
Operation 1. Set main switch to ON (Fig. 3). Turn the OFF/ON key switch on the control panel to the ON position. 2. Open the appropriate shredding chamber door (based on the size of the hard drive). Drop in the hard drive to be shredded. -
Page 10: Emptying Waste Bin
Emptying the Waste Bin Shredded particles accumulate in the waste bin during normal operation. When the red “Waste Bin Full” lamp lights, empty the waste bin. 1. Switch the shredder off by pressing the STOP pad on the control panel, turn the OFF/ON key switch to the OFF position and flip the main power switch to the OFF position. - Page 11 • Checking the Cutting Head Chain Tension Check the chain tension once every week in the first month, then once a month thereafter. 1. Switch off the shredder and unplug from wall outlet. 2. Remove the right side cover. 3. The sagging of the chain (see Fig. 6) should be 9 - 14 mm, measured from the top inside of the frame to the cutting head chain.
- Page 15 Part number Description 13120HD-A-001 UPPER CASE 13120HD-A-002 BOTTOM CASE 13120HS-A-004 SIDE COVER(R) 13120HD-A-004 SIDE COVER(L) 13120HS-A-005 FRONT COVER 13120HD-A-005 TOP CASE 13120HS-A-006 TOP PLATE 13120HD-A-006 OPERATING PLATE 13120HS-A-007 REAR COVER 13120HD-A-007 DOOR 13120HS-A-008 KEYBOARD PCB COVER 11-1 13120HD-A-008 COUNTER PCB COVER 13120HS-A-009 PCB DOOR 15-1 13120HD-A-009...
-
Page 17: Parts
Parts number Description 13120HD-B-001 SHAFT(Short) 13120HD-B-002 SHAFT(Long) 13120HD-B-003 HARD DRIVE GUIDE 13120HD-B-004 HARD DRIVE CUTTER 13120HD-B-005 NOTEBOOK CUTTER 13120HD-B-006 GUIDE SUPPORT RING 13120HD-B-007 HARD GUIDE SUPPORT 13120HD-B-008 SIDE PLATE(R) 13120HD-B-009 SIDE PLATE(L) 13120HD-B-010 VIBRATION PROOF BRACKET 13120HD-B-011 WASTE BIN GUIDE 13120HD-B-012 CUTTER NUT 13120HD-B-013... - Page 18 Item Part # FD87HDS C 001 CONTROL BOX FD87HDS C 002 CONTROL PANEL FD87HDS C 003 PCB BOX FD87HDS C 004 TERMINAL BLOCK FD87HDS C 005 CIRCUIT BREAKER FD87HDS C 006 EOCR FD87HDS C 007 FD87HDS C 008 VIBRATION PROOF RUBBER FD87HDS C 009 COVER...
Need help?
Do you have a question about the FD 87HDS and is the answer not in the manual?
Questions and answers