Table of Contents
Advertisement
Quick Links
Advertisement
Table of Contents

Related Manuals for Vacmaster CA0701UK


Summary of Contents for Vacmaster CA0701UK
- Page 4 ② ①...
-
Page 5: Table Of Contents
Recycling and Disposal ........................18 Thank you for purchasing this Vacmaster ® carpet cleaner. Feel confident that with Vacmaster ® you are obtaining a high-quality product that is engineered for optimal performance. This carpet cleaner is suitable for use with liquid materials. -
Page 6: Safety Information
SAFETY INFORMATION READ AND UNDERSTAND ALL INSTRUCTIONS BEFORE USING THIS CARPET CLEANER. When using the equipment, a few safety precautions must be observed to avoid injuries and damage. Please read the complete operating manual with due care. Keep this manual in a safe place so that the information is always available. - Page 7 • Do not run the carpet clean over the power cord, as a hazard may occur. • Do not unplug by pulling on the cord. To unplug, grasp the plug, not the cord. • Do not use with damaged cord, plug or other parts. If carpet cleaner is not working as it should, has been dropped, damaged, left outdoors, or dropped in water, immediately discontinue use and contact the after sales helpline.
- Page 8 cleaner at bottom of stairs or on floor. Do not place cleaner on stairs or furniture, as it may result in injury or damage. • Do not use carpet cleaner without tanks in place. To reduce the risk of electric shock, always install float before any wet pick-up operation.
-
Page 9: Unpacking And Product Features
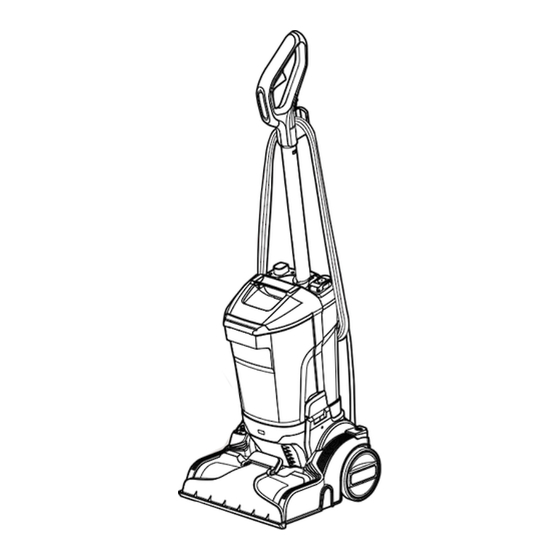
UNPACKING AND PRODUCT FEATURES Handle Power Cord Spray Trigger Upper Locking Notch Clean Water Tank Release Upper Cord Hook Button Wand Lower Cord Hook Clean Water Inlet Cap Recline Release Button Clean Water Tank Suction Hose Dirty Water Tank Tough Stain Nozzle Dirty Water Tank Locking Latch Wide Path Nozzle Power Button... -
Page 10: Assembly
ASSEMBLY NOTE: A Phillips screwdriver is required. 1. Remove all the contents from the packaging; make sure you have all contents as listed on page 9. 2. Insert the handle into the wand and secure with the provided screw (Fig. 1). NOTE: Tighten the screw with a Phillips head screwdriver. -
Page 11: Operation
OPERATION 1. Filling The Clean Water Tank 1) Press the clean water tank release button, and then lift up from the main body using the carry handle (Fig. 5). 2) Open the clean water inlet cap. Fill with a mixture of warm water (Max 40°C) and solution. Ensure the correct proportion of water and carpet cleaning solution is used by referring to the solution label. - Page 12 1) Turn the upper cord hook to either side to release the power cord (Fig. 10). 2) Detach the power cord plug from the power cord. 3) Be sure the power cord is locked into the upper locking notch (Fig. 11). This will help manage the power cord when operating the carpet cleaner.
-
Page 13: Emptying Dirty Water Tank
7) For spills, first collect any excess liquid before using the spray nozzle. Place the cleaning nozzle towards the front of the spill and slowly pull backwards over the area. 8) To dispense cleaning solution, hold the tool about 2.5 cm over the area to be cleaned. Squeeze the spray trigger ( ) to release a mix of water and cleaning solution over the soiled area (Fig. -
Page 14: Maintenance
MAINTENANCE WARNING: Remove the power cord from the power supply before carrying out any maintenance. 1. Cleaning Cycle 1) Turn off and unplug carpet cleaner. 2) Rinse the clean water tank with warm water and empty. 3) Fill the clean water tank with warm water. Reinstall the clean water tank to the unit. 4) To flush and rinse the carpet cleaner, turn on the unit and press the spray trigger for 15 seconds while making back and forth passes on a section of carpet (Fig. - Page 15 5. Cleaning Foam Filter WARNING: Clean filter every 3 months. Foam filters may appear dirty after use - this is normal. 1) Remove the clean water tank and the dirty water tank. 2) Remove the foam filter ( ) with the nozzle cleaning tool as shown (Fig. 34). 3) Wash with cold water only, DO NOT use detergent or soap.
-
Page 16: Troubleshooting
TROUBLESHOOTING WARNING: To reduce the risk of electric shock, unplug before troubleshooting. PROBLEM POSSIBLE CAUSE SOLUTION Unplugged at power outlet. Plug in firmly to suitable power outlet. Check with a good appliance. Be sure Defective power outlet. the power cord plug is fully plugged The appliance is into an electrical outlet. - Page 17 PROBLEM POSSIBLE CAUSE SOLUTION Clean water tank is empty. Fill the clean water tank. Reduced or no spray through Check the clean water tank for correct nozzle of the Clean water tank is not installed installation. Ensure it is installed in appliance.
-
Page 18: Technical Data
TECHNICAL DATA Model Number CA0701UK Motor 220-240V ~ 50-60Hz Power Input 750W Clean Capacity 3.2L Net Weight 8.6kg RECYCLING AND DISPOSAL This marking indicates that this product should not be disposed with other household wastes. The machine must be delivered in rigid packaging to avoid damage during transportation. - Page 19 ① ② ③ ④...
- Page 20 ⑤ 9 30 9 33...
- Page 22 CA0701UK Suzhou Cleva Electric Appliance Co., Ltd. No.8 Ting Rong Street Suzhou Industrial Park, Suzhou Jiangsu Province, China www.cleva-europe.com Made in P.R.C...
Need help?
Do you have a question about the CA0701UK and is the answer not in the manual?
Questions and answers