Advertisement
Quick Links
Advertisement

Subscribe to Our Youtube Channel
Related Manuals for Bachmann Spectrum cityscenes 88006


Summary of Contents for Bachmann Spectrum cityscenes 88006
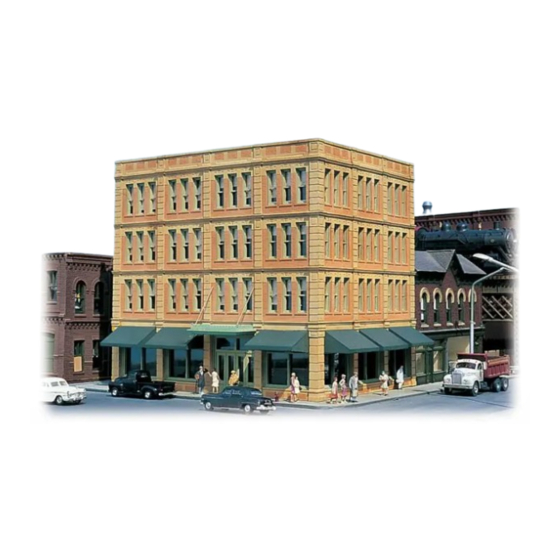
- Page 1 Department Store H O s c a l e i t ys enes a s s e m b l y i n s t r u c t i o n s Item #88006...
- Page 2 roof and sidewalk detailing accessories Your kit comes complete with optional Roof and Sidewalk Detailing Accessories. Some, such as Roof Vents (11) and Fire Hydrants (8), do not require assembly. Others require assembly as shown. After assembly, position the accessories on or around your building as required. Suggested locations: Building Roof Top Sidewalk...
- Page 3 READ PRIOR TO ASSEMBLY To enhance the aesthetic and realistic qualities of this building, parts have been designed and manufactured in scale proportions. As a result, some parts are fragile and require care in assembly. Therefore... easy does it. As with any model builder kit, a degree of patience is required to achieve the best results.
- Page 4 detail parts and accessory assemblies Fire Escapes: NOTE: For proper positioning, make sure that tabs which fit into the Wall are all assembled facing in the same direction. Assem ble four Fire Escapes: Assemble Side Railing (92) to Floor Railing (91). 2.
- Page 5 back wall sub assembly Assemble all parts to BACKSIDE of the Wall. When properly positioned, the Windows and Doors fit solidly into wall window opening; the Clear Part(s) fit onto locator tabs extending from Wall and trap the windows in place. If desired, use glue on Windows and Clear Parts. While a suggested window arrangement is shown, you may position the "Open"...
- Page 6 final building assembly When assembling Walls, carefully align Wall tabs with each Wall. Dry fit each part, prior to applying glue. Apply glue sparingly on the assembly tabs and lower backside edge of walls. Begin assembly with the Front Wall (2). For easy identification, the front side of Base (1) has been marked "FRONT."...
- Page 7 side display wall sub assembly Assemble all parts to BACKSIDE of the Wall. When properly positioned, the Windows and Doors fit solidly into wall openings; the Clear Part(s) fit onto locator tabs extending from Wall and trap the windows in place. If desired, use glue on Windows and Clear Parts. While a suggested window arrangement is shown, you may position the "Open"...
- Page 8 brick trim assembly The brick trim has been manufactured to authentic scale. When removing the parts from sprue, CAREFULLY cut, not break, the parts from the sprue. To clean away the flash, use a piece of sandpaper with a "FINE" grit or an emery board. This will keep the edges straight and avoid gouging.
- Page 9 brick trim assembly The brick trim has been manufactured to authentic scale. When removing the parts from sprue, CAREFULLY cut, not break, the parts from the sprue. To clean away the flash, use a piece of sandpaper with a "FINE" grit or an emery board. This will keep the edges straight and avoid gouging.
- Page 10 front display wall sub assembly Assemble all parts to BACKSIDE of the Wall. When properly positioned, the Windows and Doors fit solidly into wall openings; the Clear Part(s) fit onto locator tabs extending from Wall and trap the windows in place. If desired, use glue on Windows and Clear Parts. While a suggested window arrangement is shown, you may position the "Open"...
- Page 11 wall cap and awning assembly Assemble IN SEQUENCE: Wall Cap (7) to top of Side Wall (4). Use glue sparingly. 2. Wall Cap (8) to top of Back Wall (5). Use glue sparingly. Six Pieces Awning (12) to Front Wall (2) and Side Wall (3). NOTE: The Awnings are correctly assembled when they fit into the Window recesses and directly touch the Window Frames.
- Page 12 brick side wall sub assembly Assemble all parts to BACKSIDE of the Wall. When properly positioned, the Windows and Doors fit solidly into wall openings; the Clear Part(s) fit onto locator tabs extending from Wall and trap the windows in place. If desired, use glue on Windows and Clear Parts. While a suggested window arrangement is shown, you may position the "Open"...
- Page 13 sidewalk assembly Depending on the location of this building on your layout, you have the option of placing Sidewalks on one, two, three, or four sides of this building. Cut each Sidewalk section (88) to the proper length for an appropriate fit. Use Corners (89) to connect the straight Sidewalk sections (88).
- Page 14 Mailboxes 1. Assemble Mailbox Halves (6) and (7). Rotary Exhaust Vents 1. Assemble Rotary Vent (9) to Base (10). Roof Water Tank NOTE: The roof of this building is slanted towards the back wall. To assemble Water Tower “level,” cut approximately 2 mm off the bottom of two supports and place in desired location.
- Page 15 Service Department will be happy to assist you. For more information contact: Service Department Bachmann Industries, Inc. 1400 East Erie Avenue Philadelphia, Pennsylvania 19124 Phone: 1-800-356-3910 Bachmann Industries, Inc., 1400 East Erie Avenue, Philadelphia, PA 19124 www.bachmanntrains.com Printed in Denmark.
Need help?
Do you have a question about the Spectrum cityscenes 88006 and is the answer not in the manual?
Questions and answers