Advertisement
Quick Links
Please read these instructions carefully before beginning the assembly. Failure to understand and
follow assembly instructions may result in injury to technician and/or end user and may void the
warranty. If you have any questions call Sunrise Medical Technical Support at +1 (800) 333-4000.
Parts:
1. 4 ea Adapter plate screws (A)
2. 4 ea Seat screws (B)
3. 1 ea Adapter plate RH (C)
4. 1 ea Adapter plate LH (D)
5. 6 ea Interface screws (E)
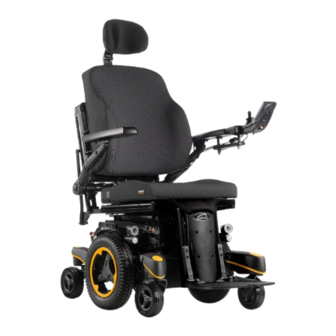
6. 1 ea SEDEO Pro Seat (F)
7. 1 ea Module (Tilt, Lift, Tilt Lift Combo, Filler) (G)
8. 1 ea Interface (H)
(F)
Required tools:
A. REMOVE SEAT/ADAPTER PLATES/ MODULE
1. 5mm hex key
1.
2. 6mm hex key
3. Torque wrench
2.
1
3.
4.
B. ASSEMBLE SEAT/ADAPTER PLATES/ MODULE
1.
2.
3.
C. INSPECT:
1.
2.
3.
4.
(G)
Attention dealers and qualified technicians, do not operate or service
this device without first reading the owners
manual. If you do not understand the instructions and warnings in the
owners manual please contact the Quickie Technical Service
Department before operating and/or servicing the Quickie device.
(H)
Failure to do so may result in damage and/or injury.
Interface
Find more information and important warnings see the
screws (E)
wheelchair owner's manual or at: www.Sunrisemedical.com.
Sunrise Medical 2842 N. Business Park Ave Fresno, CA 93727 USA
Customer service: +1 (800) 333-4000
or visit www.SunriseMedical.com
Q700M/Q500M SEDEO PRO
SEAT MOUNTING MATRIX
Remove Seat (F): Note position of seat screws (B) on the seat
(F) as well as the position to the adapter plates (C, D).
Remove the 4 seat screws (B) holding the seat to the adapter
(C, D) and remove the seat (F) (Fig 1). (Use 5mm hex key)
Remove adapter plates (C and D): If your chair does not
have adapter plates (C, D) skip this step, move on to step 3.
Note the position of the adapter screws (A) to the plates (C,
D) as well as to the module (G). Remove the 4 screws (A)
holding the adapter (C, D) to the module (G) and remove
the adapter plates (C, D) (Fig 1). (Use 5mm hex key)
Note- tilt module is shown, but directions apply to all
modules (lift, tilt, tilt lift combo, or filler).
Remove module (G): Note the position of the interface
screws (E) to the interface (H) as well as to the module (G).
Remove the 6 screws (E) holding the module (G) to the
interface (H) and remove the module (G) (Fig 1). (Use 6mm
hex key)
Note position of all mounting locations if the seat depth is not
changing. If the seat depth is changing, see pages 2 to 10.
Assemble module (G) to the interface (H) using the
interface screws (E). See pages 2 and 6 for mounting
location.
Torque to 120-132 in-lbs (13.6-14.9Nm).
Assemble adapter plates (C, D) to module (G). If adapter
plates (C, D) are not used, skip this step and move on to step
3. See pages 3-9 for mounting location.
Torque to 120-132 in-lbs (13.6-14.9Nm).
Assemble seat (F) to the adapter plates (C, D) or the module
(G) using the seat screws (B). See pages 3-9 for mounting
location, and page 9 for seat depth detail.
Torque to120-132 in-lbs (13.6-14.9Nm).
All torque values with a torque wrench.
Ensure that all the wire harnesses are out of the way and are
not being pinched.
Verify that the harnesses are not put under tension in any
position.
Ensure the screws are mounted in the same location as they
were before removal or are mounted to new seat depth
locations as specified in Mounting Matrices below.
DEALER/TECHNICIAN WARNING
In Canada (800) 263-3390
© 2019 Sunrise Medical (US) LLC
DATE 05/2020 P/N 248759 Rev. C
Pg 1of10
Advertisement

Related Manuals for Sunrise Medical Quickie Q700M SEDEO PRO


Summary of Contents for Sunrise Medical Quickie Q700M SEDEO PRO
- Page 1 Please read these instructions carefully before beginning the assembly. Failure to understand and follow assembly instructions may result in injury to technician and/or end user and may void the warranty. If you have any questions call Sunrise Medical Technical Support at +1 (800) 333-4000. Parts: Required tools: A.
- Page 2 4 - H 3 - H Lift/ Tilt Lift Combo (TLC) Tilt Sunrise Medical 2842 N. Business Park Ave Fresno, CA 93727 USA In Canada (800) 263-3390 Customer service: +1 (800) 333-4000 © 2019 Sunrise Medical (US) LLC DATE 05/2020 P/N 248759 Rev. C or visit www.SunriseMedical.com...
- Page 3 Adapter Plate - Mount Holes Tilt Power Module – Mount Holes SEDEO Pro Seat Pan - Mount Holes Sunrise Medical 2842 N. Business Park Ave Fresno, CA 93727 USA In Canada (800) 263-3390 Customer service: +1 (800) 333-4000 © 2019 Sunrise Medical (US) LLC DATE 05/2020 P/N 248759 Rev.
- Page 4 Adapter Plate - Mount Holes TLC Power Module – Mount Holes SEDEO Pro Seat Pan - Mount Holes Sunrise Medical 2842 N. Business Park Ave Fresno, CA 93727 USA In Canada (800) 263-3390 Customer service: +1 (800) 333-4000 © 2019 Sunrise Medical (US) LLC DATE 05/2020 P/N 248759 Rev.
- Page 5 Adapter Plate - Mount Holes Lift Power Module – Mount Holes SEDEO Pro Seat Pan - Mount Holes Sunrise Medical 2842 N. Business Park Ave Fresno, CA 93727 USA In Canada (800) 263-3390 Customer service: +1 (800) 333-4000 © 2019 Sunrise Medical (US) LLC DATE 05/2020 P/N 248759 Rev.
- Page 6 2 - F 6 - H 4 -H Lift Tilt Sunrise Medical 2842 N. Business Park Ave Fresno, CA 93727 USA In Canada (800) 263-3390 Customer service: +1 (800) 333-4000 © 2019 Sunrise Medical (US) LLC DATE 05/2020 P/N 248759 Rev. C or visit www.SunriseMedical.com...
- Page 7 Adapter Plate - Mount Holes Tilt Power Module – Mount Holes SEDEO Pro Seat Pan - Mount Holes Sunrise Medical 2842 N. Business Park Ave Fresno, CA 93727 USA In Canada (800) 263-3390 Customer service: +1 (800) 333-4000 © 2019 Sunrise Medical (US) LLC DATE 05/2020 P/N 248759 Rev.
- Page 8 Adapter Plate - Mount Holes Lift Power Module – Mount Holes SEDEO Pro Seat Pan - Mount Holes Sunrise Medical 2842 N. Business Park Ave Fresno, CA 93727 USA In Canada (800) 263-3390 Customer service: +1 (800) 333-4000 © 2019 Sunrise Medical (US) LLC DATE 05/2020 P/N 248759 Rev.
- Page 9 SP1 - B Filler Module Interface SEDEO Pro Seat Pan - Mount Holes Sunrise Medical 2842 N. Business Park Ave Fresno, CA 93727 USA In Canada (800) 263-3390 Customer service: +1 (800) 333-4000 © 2019 Sunrise Medical (US) LLC DATE 05/2020 P/N 248759 Rev. C or visit www.SunriseMedical.com...
- Page 10 SEDEO Pro Backrest Seat Depth Adjustment Seat Depth Detail Short Seat Pan Long Seat Pan Sunrise Medical 2842 N. Business Park Ave Fresno, CA 93727 USA In Canada (800) 263-3390 Customer service: +1 (800) 333-4000 © 2019 Sunrise Medical (US) LLC DATE 05/2020 P/N 248759 Rev.
Need help?
Do you have a question about the Quickie Q700M SEDEO PRO and is the answer not in the manual?
Questions and answers