Table of Contents
Advertisement
Available languages
Available languages
Quick Links
CAFETEIRA PARA ESPRESSO SUPER AUTOMÁTICA®
OSTER® SUPER AUTOMATIC ESPRESSO MAKER
BVSTEM8100_23PEM1 (LA).indd 1
BVSTEM8100_23PEM1 (LA).indd 1
MODELO
MODEL
Manual de Instruções
LEIA TODAS AS INSTRUÇÕES ANTES DE USAR ESTE APARELHO
Instruction Manual
PLEASE READ ALL INSTRUCTIONS BEFORE USING THIS APPLIANCE
BVSTEM8100
2023/7/7 09:24
2023/7/7 09:24
Advertisement
Table of Contents

Related Manuals for Oster SUPER BVSTEM8100


Summary of Contents for Oster SUPER BVSTEM8100
- Page 1 Manual de Instruções CAFETEIRA PARA ESPRESSO SUPER AUTOMÁTICA® LEIA TODAS AS INSTRUÇÕES ANTES DE USAR ESTE APARELHO Instruction Manual OSTER® SUPER AUTOMATIC ESPRESSO MAKER PLEASE READ ALL INSTRUCTIONS BEFORE USING THIS APPLIANCE BVSTEM8100_23PEM1 (LA).indd 1 BVSTEM8100_23PEM1 (LA).indd 1 2023/7/7 09:24...
-
Page 2: Precauções Importantes
PREC AUÇ ÕES IMPO RTA NTES Ao usar aparelhos elétricos, as precauções básicas de segurança devem sempre ser seguidas para reduzir o risco de incêndio, choque elétrico e / ou lesões a pessoas, incluindo o seguinte: 1. Leia todas as instruções. 2. - Page 3 • Tome os cuidados e a manutenção adequadas para garantir vida útil longa e o uso sem problemas da a Cafeteira para Espresso Super Automática Oster . Guarde ® estas instruções e consulte-as com frequência quando for limpar e cuidar do aparelho.
- Page 4 I NTROD UÇÃ O ¡Parabéns! Você selecionou a nova Cafeteira para Espresso Super Automática Oster ® Este eletrodoméstico exclusivo foi desenvolvido para preparar espressos, cappuccinos, lattes, lungos, água quente e muitas outras bebidas quentes de forma rápida, conveniente e no conforto de sua casa.
-
Page 5: Descrição Do Aparelho
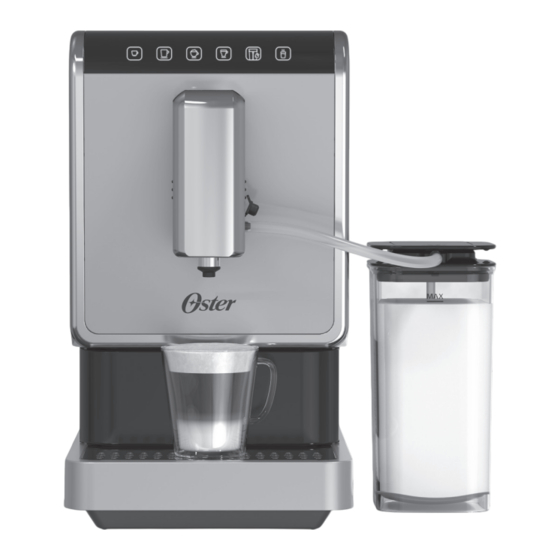
DESC RIÇ Ã O DO APAREL HO 1. Bandeja de Gotejamento Externa 11. Tampa para Manutenção 2. Bandeja de Gotejamento Interna 12. Escova para Limpeza 3. Recipiente do Pó de Café Usado 13. Reservatório para o Leite 4. Saída do Café Ajustável 14. -
Page 6: Painel De Controle
PAINEL DE CONTROLE IMPORTANTE: O painel digital é sensível ao toque e pode ser ativado acidentalmente. Se for ativado sem querer, pressione o botão do ícone selecionado novamente para cancelar o funcionamento. Espresso Faltam grãos de café Cappuccino Piscando: Nível da Água Baixo/ Reservatório Não Encaixado Piscando: Bandeja de gotejamento Lungo... - Page 7 A NTE S D E US AR S E U E LE TROD OM ÉSTI CO PE L A PRI ME I RA V E Z 1. Consulte a seção “Descrição do Aparelho” para se familiarizar com o produto e identificar suas peças.
- Page 8 8. Conecte o fio elétrico removível em seu encaixe na parte traseira do eletrodoméstico. 9. Para garantir a vida útil ideal do aparelho, é necessário enxaguar seus componentes internos várias vezes com água quente antes de usar pela primeira vez. Siga as instruções da seção “PREPARANDO A CAFETEIRA PARA EXPRESSO ANTES DE USAR PELA PRIMEIRA VEZ”.
- Page 9 3. Certifique-se de que o reservatório de água esteja devidamente instalado em seu lugar. IMPORTANTE: Nunca use água morna ou quente para encher o reservatório de água. Use sempre água fresca na temperatura ambiente para uma obter o melhor resultado no preparo. Para evitar o transbordamento de água no reservatório, não adicione água diretamente no aparelho usando um outro recipiente.
- Page 10 2. Encha o recipiente do moedor com grãos de café de sua preferência. Não encha demais, pois isso poderá interferir no funcionamento. A capacidade máxima do recipiente para grãos de café é de 150 g. 3. Feche a tampa. Não deixe a tampa do compartimento de grãos de café aberta, para evitar que os grãos não permaneçam frescos.
- Page 11 US O DOS AJUSTES DE MOAGEM Observação: Nunca ajuste o moedor quando estiver em funcionamento, pois isso poderá danificar o mesmo. 1. Localize os 5 níveis de moagem dentro do recipiente de grãos de café para definir a moagem desejada. 2. Gire o botão de nível para a posição marcada com “+” para selecionar uma moagem mais espessa e gire-o na direção oposta (-) para selecionar uma moagem mais fina. Para grãos de café mais robustos ou escuros, recomenda-se uma configuração de moagem mais espessa e, para grãos de café...
- Page 12 P RE PAR AN D O A CAF E T EI RA PA R A ESP RE SSO AN T ES DE U SAR PE L A PR IM EI R A V EZ IMPORTANTE: Para garantir a vida útil ideal do aparelho, é necessário enxaguar seus componentes internos várias vezes com água quente antes de usar pela primeira vez.
- Page 13 MO N TAGEM DO SISTEMA D ISPENSADOR DE L EITE AUTOMÁT ICO 1. Coloque a borracha de conexão no encaixe dentro da tampa. 2. Insira o tubo do recipiente do leite na borracha dentro da tampa. 3. Feche o reservatório de leite. Po r t u guê...
- Page 14 4. Insira o tubo conector do leite na borracha do lado de fora da tampa do reservatório de leite. 5. Insira o tubo conector do leite ao orifício dispensador de leite (antes abra a tampa de entrada). Tampa protetora P o r t ug uê s-1 3 BVSTEM8100_23PEM1 (LA).indd 13 BVSTEM8100_23PEM1 (LA).indd 13 2023/7/7 09:24...
- Page 15 P REPARANDO CAP P UCCI NO OU LAT TE Recomendações: • Limpe sempre o sistema dispensador automático de leite antes e depois de usar • Use leite frio (a uma temperatura de aproximadamente 5°C). Recomenda-se usar leite integral para garantir o melhor resultado ao espumar o leite. 1. Certifique-se de que o sistema dispensador de leite esteja instalado da forma correta.
- Page 16 Preparando Cappuccino Monte o sistema automático para espumar o leite conforme descrito na seção preparando cappuccino ou latte. 1. Encha o reservatório de leite com leite e feche a tampa. 2. Coloque uma xícara grande abaixo do orifício de saída. 3.
- Page 17 1. Remova a bandeja de gotejamento externa da cafeteira expresso. 2. Esvazie na pia a água que estiver acumulada na bandeja de gotejamento e enxágue-a bem com água limpa. Em seguida seque bem. 3. Abra a bandeja de gotejamento interna e o recipiente de pó de café usado. 4.
- Page 18 2. Retire a tampa de manutenção. 3. Pressione o botão para soltar. 4. Retire o dispositivo de preparo e enxágue bem com água. 5. Coloque o dispositivo de preparo e a tampa de manutenção de volta em seus lugares. Dicas Úteis: Se a luz acender sem piscar o aparelho está...
- Page 19 Limpando o sistema dispensador de leite automático Observação: é importante fazer isso diariamente para garantir que o sistema para espumar o leite funcione corretamente. 1. Coloque uma xícara grande abaixo do orifício de saída. 2. Encha o reservatório de leite com água. 3.
- Page 20 Limpando o reservatório de leite e o tubo de conexão Observação: é importante fazer isso diariamente para garantir que o sistema dispensador de leite funcione corretamente. 1. Esvazie o reservatório de leite e lave-o com água, retire a borracha de conexão e o tubo do reservatório de leite e lave com água, em seguida monte-os novamente na tampa.
- Page 21 7. Agora, toda vez que aquela função for selecionada, a cafeteira para expresso irá preparar ou dispensar a mesma quantidade. Recomendação: Ao personalizar as quantidades para as funções para preparar latte e cappuccino, certifique-se de programar primeiro a quantidade de leite espumado e em seguida a quantidade de café, seguindo os passos indicados acima. É necessário programar a quantidade para ambas as configurações - leite e café.
-
Page 22: Limpeza E Manutenção
IMPORTANTE: Este aparelho não possui peças cuja manutenção possa ser feita pelo usuário. Qualquer serviço além do descrito na seção de limpeza deve ser realizado apenas por um representante de serviço autorizado. Verifique o cartão de garantia para entrar em contato com um centro de serviço autorizado Oster ® FUNÇÃO DE SISTEMA VAZIO É... - Page 23 IMPORTANTE: Este aparelho não tem peças que possam ser reparadas pelo usuário. Qualquer manutenção além das descritas nesta seção deverá ser efetuado por um representante de uma Assistência Técnica Credenciada. Consulte o certificado de garantia e contate uma Assistência Técnica Credenciada Oster ® CUIDADO: Mantenha os pacotes de pó para limpeza fora do alcance de crianças.
- Page 24 Limpando a saída do pó de café O pó de café poderá grudar na parede da saída do pó após o uso por um longo período. Siga estes passos para limpar a saída do pó de café. 1. Empurre a tampa de manutenção. 2.
-
Page 25: P Roblemas, Causa S E Soluções
P ROBLEMAS, CAUSA S E SOLUÇÕES PROBLEMA CAUSA SOLUÇÃO O aparelho não O aparelho não está ligado na Conecte o aparelho na tomada funciona. tomada. e pressione o botão para ligar. Cheque o fio e o plugue. Após várias tentativas O aparelho está sofrendo uma Desligue o aparelho na tomada. - Page 26 PROBLEMA CAUSA SOLUÇÃO O moedor de café A saída interna do pó café Siga os passos da seção “Limpando a está piscando está bloqueada. saída do pó de café”. para indicar que seu Não há grãos de café Deixe a aparelho funcionar uma vez recipiente está...
-
Page 27: Important Safeguards
IMPORTANT SAFE GUAR D S When using electrical appliances, basic safety precautions should always be followed to reduce the risk of fire, electric shock, and/or injury to persons including the following: 1. Read all instructions. 2. Do not touch hot surfaces. Use handles or knobs. 3. -
Page 28: Product Notices
Read ALL of the instructions, precautions, notes and warnings included in this instruction manual carefully before you begin to use this appliance. • Proper care and maintenance will ensure the long life of the Oster Super Automatic ® Espresso Maker and its trouble-free operation. Save these instructions and refer to them often for cleaning and care tips. - Page 29 I NTROD UCTIO N Congratulations! You have selected the new Oster Super Automatic Espresso Maker. ® This unique appliance has been designed to help you prepare espressos, cappuccinos, lattes, lungos, hot water and many other hot beverages quickly, conveniently, and at the comfort of your house.
-
Page 30: Description Of The Appliance
DESC RI PTI ON OF THE APPLI ANC E 1. External Drip Tray 11. Service Door 2. Internal Drip Tray 12. Clean brush 3. Used Coffee Grounds Container 13. Milk Tank 4. Adjustable coffee spout 14. Milk tank lid 5. Control Panel 15. -
Page 31: Control Panel
CONTROL PANEL IMPORTANT: The digital panel is sensitive to the touch and could be activated by accident. If it is activated by mistake, the operation can be canceled by pressing the selected icon again. Espresso Lack of coffee beans Cappuccino Flashing: Low water level/ Water Tank is missing Lungo... -
Page 32: Before Using Your Appliance For The First Time
BEFORE U SIN G YOUR A PP LIANCE FOR TH E FIRST T IME 1. Please refer to the “Description of the Appliance” section to familiarize yourself with the product and identify all parts. 2. Remove all packaging and removable stickers on the unit. 3. Ensure the espresso maker is positioned onto a dry, stable, flat & horizontal surface. - Page 33 8. Connect the removable power cord to the socket at the back of the appliance. 9. To ensure the optimal lifetime of the appliance, it is necessary to allow its internal components to be rinsed out several times with hot water prior to first use. Follow the instructions in section “PRIMING THE ESPRESSO MAKER BEFORE FIRST USE”. Filling the water tank 1.
- Page 34 3. Make sure that the water tank is properly installed in its place. IMPORTANT: Never use warm or hot water to fill the water reservoir. Always use fresh water for better brewing quality. To prevent overflow of water from the water tank, do not add water directly into the appliance with another container. Filling the coffee bean grinder hopper 1. Remove the coffee bean hopper lid. E ng li s h -8 BVSTEM8100_23PEM1 (LA).indd 8 BVSTEM8100_23PEM1 (LA).indd 8 2023/7/7 09:24...
- Page 35 2. Fill the bean hopper with coffee beans of your preference. Do not overfill or it might affect performance. The bean hopper max capacity is 150g. 3. Close the lid. Do not leave the lid of the coffee bean compartment open, otherwise, the coffee beans will lose their freshness quicker. IMPORTANT: Do not use instant coffee or ground coffee containing sugar as that could result in damage to the integrated grinder and the appliance overall.
- Page 36 U SE OF GRINDING SETT ING S NOTE: Never adjust the grinder when it is not operating, as it may damage it. 1. Locate the 5 levels of grinding inside the coffee bean hopper to set the grinding preference. 2. Turning the level knob towards the position marked with “+” will set a thicker grind and turning it in the opposite direction (-) will set a finer grind. For more robust or dark coffee beans, a thicker grind setting is recommended, and for lighter coffee beans using a finer grind is recommended.
- Page 37 PRIM ING THE ESP RESSO MAKER BEFORE FIRST USE To ensure the optimal lifetime of the appliance, it is necessary to allow its internal components to be rinsed out several times with hot water prior to first use. 1. Remove the outer drip tray and place a mug or bowl underneath the brewing head to dispense water.
- Page 38 AS SEM BLING THE AUTOMAT IC MILK DIS P ENS ING SYSTEM 1. Place the connection rubber into the slot inside the lid. 2. Insert the container milk tube to the rubber inside the lid. 3. Close the milk tank. En gli sh -1 2 BVSTEM8100_23PEM1 (LA).indd 12 BVSTEM8100_23PEM1 (LA).indd 12...
- Page 39 4. Insert the connection milk tube to the rubber outside the milk tank lid. 5. Insert the milk tube connector to the dispensing spout milk dispensing system inlet (open the inlet cover first). Protective cover En gli sh -1 3 BVSTEM8100_23PEM1 (LA).indd 13 BVSTEM8100_23PEM1 (LA).indd 13 2023/7/7 09:24 2023/7/7 09:24...
- Page 40 P REPARING CAPP UC CINO O R LAT T E Recommendations: • Clean the automatic milk dispensing system before first and each use • Use cold milk (at a temperature of approximately 5°C/41°F), It is recommended to use whole milk to ensure an optimal frothing result. 1. Make sure the milk dispensing system is properly installed. 2.
- Page 41 Preparing Cappuccino Assemble the automatic milk froth system as described in Preparing Cappuccino or Latte section. 1. Fill the milk container with milk and close the lid. 2. Place a cup under the spout. 3. Switch on and press Cappuccino button. The indicator keeps on during preparation process.
- Page 42 Attention: The espresso maker will perform auto rinsing once it switches on, this is to clean inside of the espresso maker before usages. During the auto-rinsing, around 30ml hot water will be poured out. The auto rinsing would not appear if the appliance is just switch off for a while.
- Page 43 2. Remove the service door. 3. Press the release knob. 4. Remove the brewer and rinse it with fresh water. 5. Place the brewer and the service door in their original position. Helpful Tips: When lights up stably, it indicates that the brewer is missing or is installed improperly.
- Page 44 Cleaning the automatic milk dispensing system Note: it is important to do this daily to make sure the automatic milk frother works properly. 1. Place a cup under the spout. 2. Fill the milk container with fresh water. 3. Connect the milk container to the espresso maker as described in “Preparing Latte” section 4.
- Page 45 Cleaning the milk container and connection milk tube Note: it is important to do this daily to ensure the automatic milk dispensing system works properly. 1. Empty the milk container and wash it with clean water,remove the connection ruber and milk tube container and wash with clean water, then assemble them to the lid again.
-
Page 46: Mode Selection
MODE SELECTION The espresso maker has three different settings: default setting, ECO mode and speed mode. In ECO mode, the appliance helps to save more energy. In speed mode, the user can make their coffee faster than in default setting. ECO Mode Speed Mode Default Setting... -
Page 47: Cleaning And Maintenance
2. If possible add a package of powdered descaler or some other liquid to descale the water tank. Ask Oster Authorized Service Centers for recommendations or questions. IMPORTANT: Do not use vinegar or another cleaning agent to clean this appliance. This could damage the coffeemaker and affect its performance. - Page 48 CLEANING & MANTAINANCE OF THE APPLIANCE IMPORTANT: This appliance has no user serviceable parts. Any servicing beyond that described in the Cleaning Section should be performed by an Authorized Service Representative only. See warranty card for contacting an authorized Oster service ®...
- Page 49 Cleaning coffee powder outlet Coffee powder may stick on the wall of powder outlet after a long period or no use. Follow these steps to clean the coffee powder outlet. 1. Push the service door recess area. 2. Take out the service door. 3.
-
Page 50: P R Obl Em S, Cau Ses And Soluti Ons
P R OBL EM S, CAU SES AND SOLUTI ONS PROBLEM CAUSE SOLUTION The appliance does not work. The appliance is not plugged Plug in and press the switch. in to an outlet. Check the cable and the plug. No or delayed response in Appliance is under an Unplug the appliance. - Page 51 PROBLEM CAUSE SOLUTION Lack of bean indicator flashes Internal coffee powder outlet Follow the steps of section E (V. but there is still a lot of coffee is blocked. Cleaning coffee powder outlet). beans in bean hopper. Run 2nd cycle without light There are not enough coffee flashing grounds in hopper No frothed milk being...
- Page 52 XXX where X is any number between 0 and 9 or any letter between A and Z. La siguiente información es para México solamente. The following information is intended for Mexico only. CAFETERA SUPER AUTOMÁTICA PARA ESPRESSO OSTER ® MODELO: BVSTEM8100-013 LA SIGUIENTE INFORMACIÓN ES PARA MÉXICO:...
Need help?
Do you have a question about the SUPER BVSTEM8100 and is the answer not in the manual?
Questions and answers