
Related Manuals for Celestron 127SLT


Summary of Contents for Celestron 127SLT
-
Page 2: Table Of Contents
ASSEMBLY ... 6 Assembling the NexStar... 6 Attaching the Hand Control Holder ... 7 Attaching the Fork Arm to the Tripod ... 7 Attaching the Telescope to the Fork Arm ... 7 The Star Diagonal ... 7 The Eyepiece... 8 Focusing... 8 The Star Pointer Finderscope ... - Page 3 Scrolling Menu ... 23 Calibrate Goto... 23 Set Mount Position... 23 TELESCOPE BASICS ... 25 Focusing... 25 Image Orientation ... 25 Calculating Magnification... 26 Determining Field of View ... 26 General Observing Hints... 26 CELESTIAL OBSERVING... 27 Observing the Moon ... 27 Lunar Observing Hints...
-
Page 4: Introduction
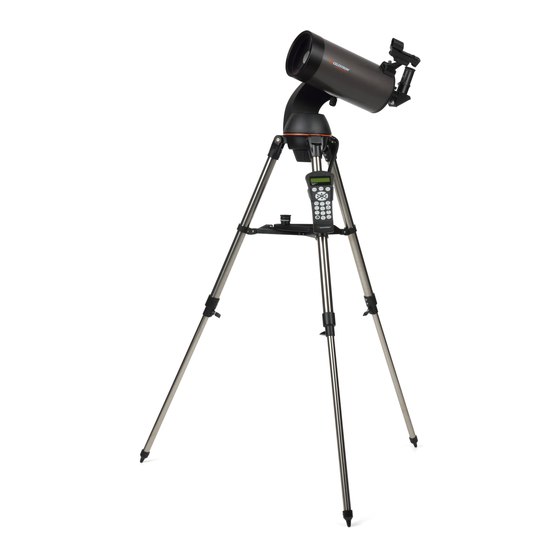
Congratulations on your purchase of the Celestron NexStar telescope! The NexStar ushers in a whole new generation of computer automated technology. Simple and friendly to use, the NexStar is up and running after locating just three bright celestial objects. It’s the perfect combination of power and portability. If you are new to astronomy, you may wish to start off by using the NexStar's built-in Sky Tour feature, which commands the NexStar to find the most interesting objects in the sky and automatically slews to each one. - Page 5 The NexStar SLT Telescope Corrector Lens Fork Arm Battery Compartment Tripod Coupling Screw Tripod Accessory Tray (NexStar 127MAK Shown) Tripod Leg Extension Clamp Hand Control Star Diagonal Eyepiece Star Pointer Finderscope Telescope Tube...
-
Page 6: Assembly
Remember to save all of the containers so that they can be used to transport the telescope. Before attaching the visual accessories, the telescope tube should be mounted to its tripod. First, install the accessory tray onto the tripod legs: Remove the tripod from the box and spread the legs apart until the center leg brace is fully extended. -
Page 7: Attaching The Hand Control Holder
Coupling Screw Your telescope optical tube has a built on dovetail mounting bar used to attach the tube to the fork arm. To attach the telescope tube: Loosen the tube clamp tightening knob. Slide the dovetail mounting bar of the telescope tube into the fork arm clamp. -
Page 8: The Eyepiece
The Star Pointer is the quickest and easiest way to point your telescope exactly at a desired object in the sky. It's like having a laser pointer that you can shine directly onto the night sky. The Star Pointer is a zero magnification pointing tool that uses a coated glass window to superimpose the image of a small red dot onto the night sky. -
Page 9: Star Pointer Installation
"click". To increase the brightness level of the red dot, continue rotating the control knob about 180º until it stops. Locate a bright star or planet and center it in a low power eyepiece in the main telescope. With both eyes open, look through the glass window at the alignment star. If the Star Pointer is perfectly aligned, you will see the red LED dot overlap the alignment star. -
Page 10: Attaching The Hand Control
The NexStar SLT hand control has a phone jack type connector at the end of its cord. Plug the phone jack connector into the outlet at the base of the telescope’s fork arm. Push the connector into the outlet until it clicks into place and place the hand control into its holder as described previously in the Assembly section of the manual. -
Page 11: Hand Control
NexStar SLT hand controller: Liquid Crystal Display (LCD) Window: comfortable viewing of telescope information and scrolling text. Align: Instructs the NexStar to use a selected star or object as an alignment position. Direction Keys: Allows complete control of the NexStar in any direction. Use the direction keys to center objects in the StarPointer finderscope and eyepiece. -
Page 12: Hand Control Operation
This section describes the basic hand control procedures needed to operate the NexStar. These procedures are grouped into three categories: Alignment, Setup and Utilities. The alignment section deals with the initial telescope alignment as well as finding objects in the sky; the setup section discusses changing parameters such as tracking mode and tracking rate;... -
Page 13: Alignment Procedure
In order for the NexStar to accurately point to objects in the sky, it must first be aligned to known positions (stars) in the sky. With this information, the telescope can create a model of the sky, which it uses to locate any object with known coordinates. - Page 14 Pressing the UNDO button will allow you to go back and select a new city location or longitude/latitude. Use the arrow buttons on the hand control to slew (move) the telescope towards any bright celestial object in the sky. Align the object with the red dot of the finderscope and press ENTER.
-
Page 15: Auto Two-Star Align
As with Sky Align, Auto Two-Star Align requires you to enter all the necessary time/site information as before. Once this information is entered, NexStar will prompt you to select and point the telescope at one known star in the sky. -
Page 16: One-Star Align
Solar System Align is designed to provide excellent tracking and GoTo performance by using solar system objects (Sun, Moon and planets) to align the telescope with the sky. Solar System Align is a great way to align your telescope for daytime viewing as well as a quick way to align the telescope for night time observing. -
Page 17: Nexstar Re-Alignment
Press ALIGN to make the change. Now that the telescope is properly aligned, you can choose an object from any of the catalogs in the NexStar’s database. The hand control has a key designated for each of the catalogs in its database. There are two ways to select objects from the database;... -
Page 18: Slewing To An Object
To see the next tour object, press the Down key. In addition to the Tour Mode, the NexStar telescope has a Constellation Tour that allows the user to take a tour of all the best objects within a particular constellation. Selecting Constellation from the LIST menu will display all the constellation names that are above the user defined horizon (filter limits). -
Page 19: Direction Buttons
The NexStar has four direction buttons in the center of the hand control which controls the telescope motion in altitude (up and down) and azimuth (left and right). The telescope can be controlled at nine different speed rates. Pressing the RATE key (11) allows you to instantly change the speed rate of the motors from high speed slew rate to precise guiding rate or anywhere in between. -
Page 20: Tracking Rate
The NexStar stores celestial objects to its database by saving its right ascension and declination in the sky. This way the same object can be found each time the telescope is aligned. Once a desired object is centered in the eyepiece, simply scroll to the "Save Sky Obj"... -
Page 21: Identify
For example, if you would like to slew to an object that is close to the zenith and are certain that the tube will not hit the tripod legs, you can set the slew limits to 90º in altitude. This will allow the telescope to slew to any object above the horizon without warning. -
Page 22: Goto Approach
– Cord wrap safeguards against the telescope slewing more than 360º in azimuth and wrapping accessory cables around the base of the telescope. This is useful any time that the telescope is powered using an external power supply. By default, the cord wrap feature is turned off when the telescope is aligned in altazimuth and turn on when aligned on a wedge. -
Page 23: Sun Menu
Calibration calculates the amount of distance and time it takes for the mount to complete its final slow goto when slewing to an object. Changing the balance of the telescope can prolong the time it takes to complete the final slew. - Page 24 MENU ALIGNMENT TRACKING MODE ALT-AZ EQ NORTH EQ SOUTH RATE SIDEREAL SOLAR LUNAR VIEW TIME-SITE SCOPE SETUP SETUP TIME-SITE ANTI-BACKLASH SLEW LIMITS FILTER LIMITS DIRECTION BUTTONS GOTO APPROACH CORDWRAP UTILITIES GPS ON/OFF LIGHT CONTROL FACTORY SETTING VERSION GET ALT-AZ GOTO ALT-AZ HIBERNATE SUN MENU SCROLLING MENU...
-
Page 25: Telescope Basics
Once you have found an object in the telescope, turn the focusing knob until the image is sharp. To focus on an object that is nearer than your current target, turn the focusing knob toward the eyepiece (i.e., so that the focusing tube moves away from the front of the telescope). -
Page 26: Calculating Magnification
Continuing with our example, multiply the angular field .83° by 52.5. This produces a linear field width of 44 feet at a distance of one thousand yards. The apparent field of each eyepiece that Celestron manufactures is found in the Celestron Accessory Catalog (#93685). -
Page 27: Celestial Observing
To increase contrast and bring out detail on the planetary surface, try using Celestron eyepiece filters. Although overlooked by many amateur astronomers, solar observation is both rewarding and fun. However, because the Sun is so bright, special precautions must be taken when observing our star so as not to damage your eyes or your telescope. -
Page 28: Solar Observing Hints
The best time to observe the Sun is in the early morning or late afternoon when the air is cooler. To center the Sun without looking into the eyepiece, watch the shadow of the telescope tube until it forms a circular shadow. -
Page 29: Seeing
Seeing conditions refers to the stability of the atmosphere and directly affects the amount of fine detail seen in extended objects. The air in our atmosphere acts as a lens which bends and distorts incoming light rays. The amount of bending depends on air density. Varying temperature layers have different densities and, therefore, bend light differently. -
Page 30: Telescope Maintenance
To check the collimation of your telescope you will need a light source. A bright star near the zenith is ideal since there is a minimal amount of atmospheric distortion. Make sure that tracking is on so that you won’t have to manually track the star. - Page 31 To collimate your telescope, remove the diagonal and eyepiece and look into rear opening of the tube (also remove the dust cover from the front of the tube). This can be done indoors, with the telescope pointed at a white wall in a well-lit room.
-
Page 32: Collimation
For ease of reference, all the accessories are listed in alphabetical order. Adapter, Car Battery (#18778) – Celestron offers the Car Battery Adapter that allows you to run the NexStar drive off an external power source. The adapter attaches to the cigarette lighter of your car, truck, van, or motorcycle. - Page 33 They reduce the amplitude and vibration time of your telescope when shaken by the wind or an accidental bump. A full description of all Celestron accessories can be found on our web site at www.celestron.com...
-
Page 34: Appendix A - Technical Specifications
APPENDIX A - TECHNICAL SPECIFICATIONS Design Maksutov-Cassegrain Aperture 90mm Focal Length 1250mm F/ratio of the Optical System Optical Coatings Fully Coated Highest Useful Magnification 213x Resolution: Rayleigh Criterion 1.55 arc seconds Dawes Limit 1.29 arc seconds Light Gathering Power 165x unaided eye Field of View: Standard Eyepiece 1º... -
Page 35: Appendix B - Glossary Of Terms
Sun against the stars". Equatorial mount A telescope mounting in which the instrument is set upon an axis which is parallel to the axis of the Earth; the angle of the axis must be equal to the observer's latitude. - Page 36 1 and those increasingly fainter from 2 down to magnitude 5. The faintest star that can be seen without a telescope is about magnitude 6. Each magnitude step corresponds to a ratio of 2.5 in brightness. Thus a star of magnitude 1 is 2.5 times brighter than a star of magnitude 2, and 100 times brighter than a magnitude 5 star.
- Page 37 Terminator The boundary line between the light and dark portion of the moon or a planet. Universe The totality of astronomical things, events, relations and energies capable of being described objectively. Variable Star A star whose brightness varies over time due to either inherent properties of the star or something eclipsing or obscuring the brightness of the star.
-
Page 38: Appendix C - Rs-232 Connection
RS-232 cable (#93920). For information about using NSOL to control your telescope, refer to the instruction sheet that came with the CD and the help files located on the disk. In addition to NSOL, the telescope can be controlled using other popular astronomy software programs. -
Page 39: Appendix D - Maps Of Time Zones
APPENDIX D – MAPS OF TIME ZONES... - Page 47 2835 Columbia Street Torrance, CA 90503 Tel. (310) 328-9560 Fax. (310) 212-5835 Web site at http://www.celestron.com Copyright 2010 Celestron All rights reserved. (Products or instructions may change without notice or obligation.) This device complies with Part 15 of the FCC Rule. Operation is subject to the following two conditions: 1) This device may not cause harmful interference, and 2) This device must accept any interference received, including interference that may cause undesired operations.
Need help?
Do you have a question about the 127SLT and is the answer not in the manual?
Questions and answers