
Related Manuals for Celestron StarSeeker


Summary of Contents for Celestron StarSeeker
- Page 1 INSTRUCTION MANUAL StarSeeker 70mm • StarSeeker 80mm •StarSeeker 114mm • StarSeeker 130mm IN 264 Rev. B 4/06...
-
Page 2: Table Of Contents
Attaching the Hand Control ....8 Powering the StarSeeker....8 HAND CONTROL . - Page 3 Objective Lens Tube Ring Star Pointer Clamp Finderscope Eyepiece Fork Arm Accessory Tray w/ Hand Control Holder Hand Control Tripod Star Diagonal Focuser Knob The Starseeker 70mm and 80mm Refractor Telescopes (80mm model shown)
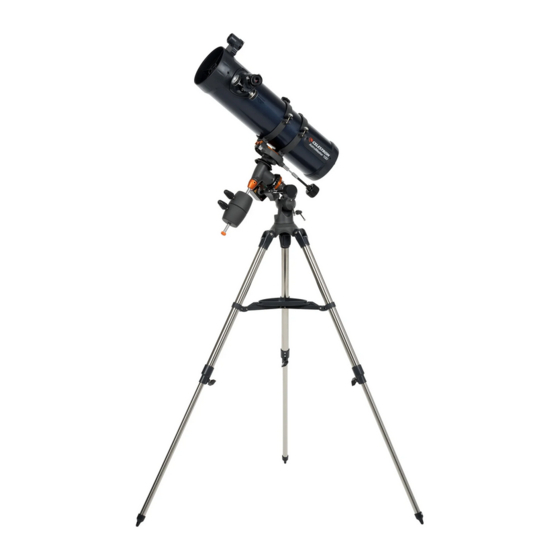
- Page 4 Star Pointer Finderscope Eyepiece Focuser Knob Tube Ring Optical Tube Fork Arm Tripod Collimation Adjustment Knobs Accessory Tray w/ Hand Control Holder Hand Control StarSeeker 114mm & 130mm Reflecting Telescopes (114mm model shown)
-
Page 5: Introduction
StarSeeker! The StarSeeker ushers in a whole new genera- tion of computer automated technology. Simple and friendly to use, the StarSeeker is up and running after locating just three bright objects. It’s the perfect combination of power and porta- bility. If you are new to astronomy, you may wish to start off by using the StarSeeker’s built-in Sky Tour feature, which com-... -
Page 6: Assembling The Starseeker
Fork Arm Base Figure 2-1. 2. Thread the coupling screw into the hole at the bottom of the fork arm base and hand tighten. Your StarSeeker is fully assembled and is ready to attach the accessories. Accessory tray Figure 2-2. -
Page 7: Focusing
“Calculating Magnification.” Barrel diameter is the diameter of the barrel that slides into the star diagonal or focuser. The StarSeeker uses eyepieces with a standard 1-1/4" barrel diameter. Focusing To focus your telescope, simply turn either of the focus knobs at the eyepiece end of the optical tube (see figures 2-3 and 2.4). -
Page 8: Attaching The Hand Control
Use the direction keys to center objects in the StarPointer finderscope and eyepiece. 4. Catalog Keys: The StarSeeker has a key on the hand con- trol to allow direct access to each of the catalogs in its 4,000+ object database. -
Page 9: Hand Control Operation
Alignment Procedure In order for the StarSeeker to accurately point to objects in the sky, it must first be aligned to known positions (stars) in the sky. With this information, the telescope can create a model of the sky, which it uses to locate any object with known coordi- nates. -
Page 10: Sky Align
StarSeeker model from the displayed list (see Select Model later in this section). Sky Align Sky Align is the easiest way to get your StarSeeker aligned and ready to observe. Even if you do not know a single star in the If you have this model... -
Page 11: Auto Two-Star Align
With the StarSeeker set up outside with all accessories attached and the tripod leveled, follow the steps below to align the telescope: 1. Once the StarSeeker is powered on , Press ENTER to begin alignment. 2. Use the Up and Down scroll keys (10) to select Auto Two- Star Align and press ENTER. -
Page 12: One-Star Align
(9 = fastest , 1 = slowest). 6. StarSeeker will then ask you to select and center a sec- ond alignment star and press the ALIGN key. It is best to choose alignment stars that are a good distance away from one another. -
Page 13: Selecting An Object
(such as displaying information about the object). If you slew to an object that is below the horizon, StarSeeker will notify you by displaying a message reminding you that you have selected an object outside of your slew limits (see Slew Limits in the Scope Setup section of the manual). -
Page 14: Tour Mode
• To see the next tour object, press the Up key. Direction Buttons The StarSeeker has four direction buttons in the center of the hand control which controls the telescope motion in altitude (up and down) and azimuth (left and right). The telescope can be controlled at nine different speed rates. -
Page 15: View Time-Site
View Time-Site - View Time-Site will display the last saved time and longitude/latitude entered in the hand control. User Defined Objects - The StarSeeker can store up to 50 different user defined objects in its memory. The objects can be daytime land objects or an interesting celestial object that you discover that is not included in the regular database. -
Page 16: Slew Limits
(rate 1-6) and will not affect the slew rates (rate 7-9). Select Model - The first time the StarSeeker is powered on, the hand control display allows you to select your StarSeeker from a list of different models. If for some reason the incorrect... - Page 17 StarSeeker StarSeeker Menu Tree: The following figure is a menu tree showing the sub-menus associated with the primary command functions.
-
Page 18: Telescope Basics
The image orientation of any telescope changes depending on how the eyepiece is inserted into the telescope. When observing through the StarSeeker 70mm or 80mm using a diagonal, the image will be right side up, but reversed from left to right. When observing straight through, with the eye- piece inserted directly into the telescope, the image will be inverted. -
Page 19: Celestial Observing
Change to higher power (magnification) to focus in on a smaller area. Choose the lunar tracking rate from the StarSeeker’s MENU tracking rate options to keep the moon centered in the eye- piece even at high magnifications. -
Page 20: Viewing Conditions
The optical performance of your StarSeeker telescope is directly related to its collimation, which is the alignment of its optical system. Your StarSeeker was collimated at the factory after it was completely assembled. However, if the telescope is dropped or jarred severely during transport, it may have to be collimated. - Page 21 Figure 6-1. The view of a collimated telescope as seen through the focuser of the StarSeeker 114mm and 130mm reflectors. NOTE: The center ring sticker need not ever be removed from the primary mirror. Because it lies directly in the...
-
Page 22: Technical Specifications
Appendix A - TECHNICAL SPECIFICATIONS... -
Page 23: Appendix B - Glossary Of Terms
The brightest stars are assigned magnitude 1 and those increasingly fainter from 2 down to magnitude 5. The faintest star that can be seen without a telescope is about magnitude 6. Each magnitude step corresponds to a ratio of 2.5 in brightness. Thus a star of magnitude... - Page 24 Parfocal: Refers to a group of eyepieces that all require the same distance from the focal plane of the telescope to be in focus. This means when you focus one parfocal eyepiece all the other parfocal eyepieces, in a particular line of eyepieces, will be in focus.
-
Page 25: Appendix C - Rs 232 Connection
Appendix C - RS-232 CONNECTION You can control your StarSeeker telescope with a computer via the RS-232 port located on the computerized hand control and using an optional RS-232 cable (Celestron #93920). The telescope can be controlled using popular astronomy soft- ware programs, such as Starry Night ™... -
Page 26: Maps Of Time Zones
Appendix D - MAPS OF TIME ZONES... - Page 34 CELESTRON TWO YEAR WARRANTY A. Celestron warrants this telescope to be free from defects in materials and workmanship for two years. Celestron will repair or replace such product or part thereof which, upon inspection by Celestron, is found to be defective in materials or workmanship.
Need help?
Do you have a question about the StarSeeker and is the answer not in the manual?
Questions and answers