Table of Contents
Advertisement
Quick Links
Instruction Manual
Model:
GTX2-M-EU
CORDLESS LINE TRIMMER
• SAFETY
• ASSEMBLY
• OPERATION
CAUTION: Before using this tool, please read this manual completely,
• MAINTENANCE
and follow all operating safety measures.
Senix Australia Pty Ltd. 32/3 Westside Avenue, #Port Melbourne, Victoria, 3207
For customer support, please call 1300 461 825 or email us at info@senixtool.com
SENIX.COM.AU
v. 1.1
English
Advertisement
Table of Contents

Related Manuals for Senix GTX2-M-EU


Summary of Contents for Senix GTX2-M-EU
- Page 1 CAUTION: Before using this tool, please read this manual completely, • MAINTENANCE and follow all operating safety measures. Senix Australia Pty Ltd. 32/3 Westside Avenue, #Port Melbourne, Victoria, 3207 For customer support, please call 1300 461 825 or email us at info@senixtool.com SENIX.COM.AU v.
-
Page 2: Table Of Contents
Wear eye protection. Local Authority or local store for recycling advice. Wear ear protection. RCM Mark Do not expose to rain. Wear protective gloves. Wear sturdy, non-slip footwear. Beware of foot injury by cutting attachment. Keep bystanders away. EN - 2 SENIX.COM.AU... -
Page 3: Safety Instructions
When operating a power tool outdoors, hazards. use an extension cord suitable for Do not let familiarity gained from outdoor use. Use of a cord suitable for 3 - EN SENIX.COM.AU... - Page 4 WARNING! Slippery handles and grasping surfaces do not allow for safe handling and control of Only use following batteries: B20X2/B25X2/ the tool in unexpected situations. B40X2/B50X2/B60X2/B80X2 and chargers: CHX2/CHQX2/CHQX2-M-EU/CHDX2-M-EU. EN - 4 SENIX.COM.AU...
- Page 5 Keep bystanders away while operating risks early. Fast intervention can prevent the machine. Thrown debris can result in serious injury and damage to property. 5 - EN SENIX.COM.AU...
-
Page 6: Residual Risks
SAVE THIS INSTRUCTIONS INTENDED USE The 18V cordless line trimmer is only intended for cutting weed, grass or similar soft vegetation in domestic gardens. It is designed EN - 6 SENIX.COM.AU... -
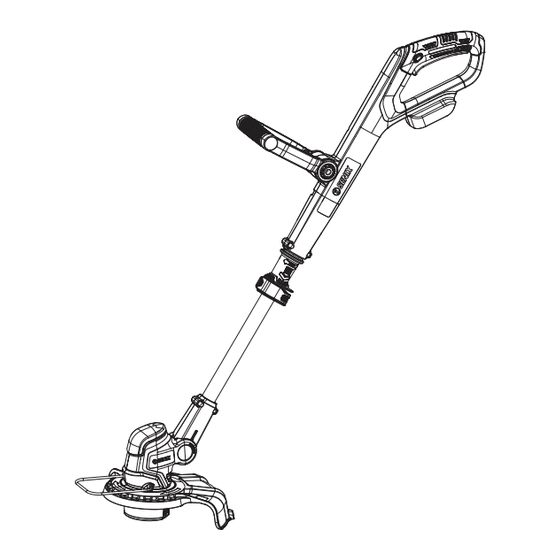
Page 7: Know Your Unit
KNOW YOUR UNIT APPLICATIONS Model: GTX2-M-EU As a cordless line trimmer: Cutting grass, weeds or soft vegetation in domestic garden. Handle Telescoping Lock Clip Switch Trigger Aluminium Pipe Safety Switch Motor Housing Auxiliary Handle Button Flower Protection Auxiliary Handle Trimmer Head... -
Page 8: Specifications
Unpack all parts and lay them on a flat, stable surface: Remove all packing materials and shipping devices, if applicable. The scope of delivery varies depending on the country and purchased variant. Model of GTX2-M-EU • Cordless line trimmer x1 • Auxiliary handle x1 •... -
Page 9: Installing/Removing The Battery Pack
“click”. shoes at all times while operating the power Five optional angles (0~60°) set for tool. meeting your using requirement. SWITCHING ON/OFF Keep the safety switch being pressed at first. Then press the switch trigger to 9 - EN SENIX.COM.AU... - Page 10 2) Manual Line Feeding On the contrary, pull the pipe sleeve again Press the line-feed button and adjust the line and rotate 180° counterclockwise back to to desired length. normal trimming. EN - 10 SENIX.COM.AU...
-
Page 11: Overheat Protection
Remove the battery before replacing the Mount the spool back into the trimmer spool. head and straighten the line. Affix the Press both latches of the spool cover 11 - EN SENIX.COM.AU... - Page 12 10°C and 30°C. • We recommend using the original package for storage or covering the product with a suitable cloth or enclosure to protect it against dust. NOTE: To prolong battery life, never store battery EN - 12 SENIX.COM.AU...
-
Page 13: Troubleshooting
Have the product repaired by a qualified Cutting system damaged service. Heavy vibrations Grass between spool housing and line-feed Disassemble spool cover and remove grass button Grass in hole for line feed Remove grass from hole for line feed 13 - EN SENIX.COM.AU...
Need help?
Do you have a question about the GTX2-M-EU and is the answer not in the manual?
Questions and answers