Table of Contents
Advertisement
MICROWA VE OVEN
OPERATING INSTRUCTIONS
Model No.:
Before operating this oven, please read these instructions completely.
KOR-810P
Stage
Defrost
Auto
1
2
Weight
Time
Start
Lock
No
Cups
g
AUTO COOK
Menu
1. Baked Potato
2. Fresh Vegetable
3. Soup
Weight
4. Fish Filets
5. Meat Loaf
Auto
Clock/
defrost
A.start
Speedy
Clock/Timer
1 HOUR
10 MIN
1 MIN
10
1
10
min
min
sec
1000g
100g
10g
High
M-High
Med
M-Low
Low
Stop/Clear
Start
Advertisement
Table of Contents

Subscribe to Our Youtube Channel
Related Manuals for Daewoo KOR-810P


Summary of Contents for Daewoo KOR-810P
-
Page 1: Operating Instructions
MICROWA VE OVEN OPERATING INSTRUCTIONS KOR-810P Model No.: Before operating this oven, please read these instructions completely. Stage Defrost Auto Weight Time Start Lock Cups AUTO COOK Menu 1. Baked Potato 2. Fresh Vegetable 3. Soup Weight 4. Fish Filets 5. -
Page 2: Table Of Contents
• This appliance is supplied with cable of special type, which, if damaged, must be repaired with cable of same type. Such a cable can be purchased from DAEWOO and must be installed by a Qualified Person. Examine the oven after unpacking for any damage such as: A misaligned door, Broken door, A dent in cavity. -
Page 3: Specifications
Also, the cooking tray can become too hot to handle or may break. 11. Should the microwave oven emit smoke in quantity to indicate a fire, keep the oven door shut, switch the appliance off and disconnect the mains lead from the outlet. -
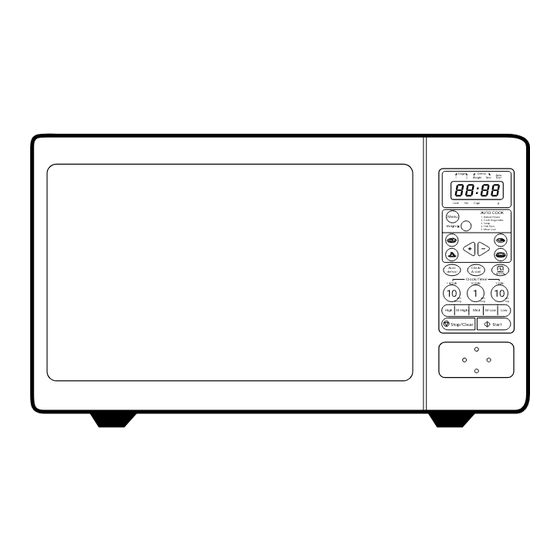
Page 4: Features Diagram
FEATURES DIAGRAM Lock Stage Weight Defrost Time Auto Start Lock Cups AUTO COOK Menu Menu 1. Baked Potato 2. Fresh Vegetable 3. Soup Weight 4. Fish Filets 5. Meat Loaf Weight Auto Clock/ defrost A.start Speedy Clock/Timer 1 HOUR 10 MIN 1 MIN 1000g 100g... -
Page 5: Controls
CONTROLS SETTING THE CLOCK When the oven is first plugged in, the display will flash " :0" and a tone will sound. If the AC power ever goes off, the display will flash " :0" when the power comes back on. DO THIS... -
Page 6: Time Defrosting
TIME DEFROSTING When TIME DEFROST is selected, the automatic cycle divides the defrosting time into periods of alternating defrost and stand times by cycling on and off. DO THIS... THIS HAPPENS... The WEIGHT DEFROST indicator Auto STAGE DEFROST AUTO defrost START WEIGHT TIME... -
Page 7: Cooking In Two Stages
For best results, some recipes call for one Power Level for a certain length of time and another power level for a different length of time. Your microwave oven can be set to change from one to another. DO THIS... -
Page 8: Auto Start
DO THIS... THIS HAPPENS... 1 HOUR 10 MIN 1 MIN EXAMPLE: To set the time to STAGE DEFROST AUTO “4:20”. START WEIGHT TIME 1000g 100g • Touch 1 min 4 times. 6. Touch the TIME set pads • Touch 10 sec 2 times. for the cooking time you want in the second stage. -
Page 9: To Check Auto Start Time
• 300g: Touch FROZEN PIZZA twice within 1.5 seconds. NOTE: 1. Use only one frozen pizza at a time. 2. Use only frozen pizza for microwave oven. 3. If the cheese of frozen pizza does not melt sufficiently, cook a few seconds longer. -
Page 10: Auto Cook (Menu & Weight)
AUTO COOK (MENU & WEIGHT) Auto cook allows you to cook or reheat many of your favorite foods by repeatedly touching menu pad. After the menu selection, touch chosen pad until number in display is same as desired quantity to cook. DO THIS... -
Page 11: Cooking Utensils
* Q : Why do I have moisture in my microwave oven after cooking? A : The moisture on the side of your microwave oven is normal. It is caused by steam from cooking food hitting the cool oven surface.
Need help?
Do you have a question about the KOR-810P and is the answer not in the manual?
Questions and answers