
Related Manuals for Mitel Unify OpenScape S6


Summary of Contents for Mitel Unify OpenScape S6
- Page 1 A MITEL PRODUCT GUIDE Unify OpenScape DECT Phone Unify OpenScape DECT Phone S6 on Unify OpenScape Cordless Enterprise User Guide 03/2024 A31003-D1000-U113-02-7619...
- Page 2 Notices The information contained in this document is believed to be accurate in all respects but is not warranted by Mitel Europe Limited. The information is subject to change without notice and should not be construed in any way as a commitment by Mitel or any of its affiliates or subsidiaries.
-
Page 3: Table Of Contents
Contents Overview ......... 5 Safety precautions . - Page 4 Making calls to multiple parties ......40 Consultation ............. . . 40 Call waiting .
-
Page 5: Overview
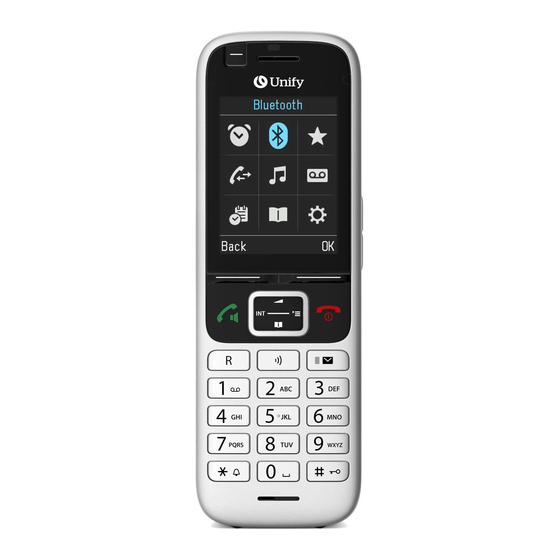
Overview 1 Display 2 Status bar( p. 38) Icons display current settings and operating status of the phone 3 Volume keys ( p. 11) for receiver/headset, ringtone, handsfree mode and appointment reminders 4 Display keys ( p. 12) INT 1 Various functions, depending on the operating situation 5 End call key / On/off key... - Page 6 Illustration in the user guide Warnings, which if not heeded, can result in injury to persons or damage to devices. Important information regarding function and appropriate handling or functions that could generate costs. Prerequisite for being able to carry out the following action. Additional helpful information.
-
Page 7: Safety Precautions
Safety precautions Read the safety precautions and the user guide before use. The device cannot be used in the event of a power failure. In case of a power failure it is also not possible to make emergency calls. Emergency numbers cannot be dialled if the keypad/display lock is activated! Use only rechargeable batteries that correspond to the specification (see list of permitted batteries www.wiki.unify.com /wiki/DECT_Mobilteile). -
Page 8: Getting Started
Contents of the package Getting started Contents of the package • One handset • One battery cover (rear cover for the handset) • One battery • One belt clip • One rubber cover for the headset socket • One user guide The charging cradle is designed for use in closed, dry rooms within a temperature range of +5°C to +45°C. - Page 9 Contents of the package Charging the batteries ¤ Charge the batteries fully prior to first use in the charging cradle or using a standard USB mains adapter. The batteries are fully charged when the power icon disap- 8,5 h pears from the display. The battery may heat up during charging.
-
Page 10: Attaching The Belt Clip
Contents of the package Attaching the belt clip The handset has notches on each side for attaching the belt clip. • Attaching the belt clip: Press the belt clip onto the back of the handset so that the tabs on the belt clip click into place in the notches. •... -
Page 11: Using The Telephone
Getting to know your telephone Using the telephone Getting to know your telephone Switching the handset on/off ¤ Switch on: Press and hold the End call key on the handset when switched off ¤ Switch off: When the telephone is in idle status, press and hold the End call key Locking/unlocking the keypad The keypad lock prevents any accidental use of the telephone. -
Page 12: Functions Key
Getting to know your telephone Functions key The Functions key can be assigned a function of your choice (QuickDial / Send Key). ¤ Press the key . . . The function assigned is performed Assign Functions key p. 30 Display keys The display keys perform a range of functions depending on the operating situation. -
Page 13: Entering Text
Getting to know your telephone Entering text Input position ¤ to select an entry field. A field is activated when the cursor is New Entry blinking inside it. . ¤ First Name: to move the position of the cursor. Peter| Correcting incorrect entries Surname: •... -
Page 14: Making Calls
Making calls Making calls Making calls ¤ . . . use to enter the number briefly press the Talk key ¤ Press and hold the Talk key . . . use to enter the number Cancel dialling: Press the End call key If the display backlight is deactivated, you can reactivate it by pressing any key. -
Page 15: Incoming Calls
Making calls Enter a dial pause when dialling ¤ Press and hold the hash key. A P is shown on the display Incoming calls An incoming call is indicated by ringing, by a display on the screen and by the flashing Talk / Handsfree key ( Accept a call: •... -
Page 16: Call Lists
Call lists Call lists The telephone saves different types of calls (missed, accepted and outgoing calls) in lists. Enable/disable local call lists ¤ Press buttons . . . then ¤ For enabling: ¤ For disabling: List entry The following information is displayed in the list entries:: Example •... -
Page 17: Message Lists
Message lists Message lists Notifications about missed calls, messages on the network mailbox and missed alarms are saved in the messages list and can be shown on the handset display. As soon as a new message arrives, an advisory tone will sound. The Message key also flashes (if activated). -
Page 18: Directory
Directory Directory The local directory is unique to the handset. However, it is possible to send entries to other handsets. Opening the directory ¤ Briefly press in idle status ¤ . . . use to select Directory Directory entries Number of entries: up to 500 Information: First name and surname, up to three telephone numbers, e-mail... -
Page 19: Copying An Entry/Directory
Directory Setting the order of the directory entries Directory entries can be sorted by first name or surname. ¤ Options Sort by Surname / Sort by First Name If no name was entered, the default telephone number is shown in the surname field. These entries appear at the beginning of the list, regardless of how the entries are sorted. - Page 20 Directory Copying a vCard using Bluetooth Copy directory entries in vCard format, e.g. to exchange entries with a mobile phone. Bluetooth mode is activated The other handset/mobile phone supports Bluetooth. ¤ . . . use to select an entry if needed Options Copy entry / Copy all vCard via Bluetooth .
-
Page 21: Network Mailbox
Network mailbox Network mailbox Enter number ¤ . . . use to select Answer Machine Network Mailbox ¤ . . . use to enter or amend the network mailbox number Save To activate/deactivate the network mailbox use the phone number and a function code of your network provider. -
Page 22: Additional Functions
Sound profiles Additional functions Sound profiles The telephone has sound profiles for adapting the handset to the environmental conditions: Profile Loud, Profile Silent, Profile Personal. ¤ Press the Profile key . . . The profile currently set is shown ¤ Switch between profiles using key ¤... -
Page 23: Timer
Timer Saving appointments to the calendar Date and time have been set. ¤ . . . use to select Organizer Calendar to select desired day OK . . . then ¤ Switch on/off: Activation: use to select On or Off Enter information for the appointment: ¤... -
Page 24: Alarm Clock
Alarm clock Alarm clock Date and time have been set. Activating/deactivating the alarm clock and setting the wake-up time ¤ . . . use to select Organizer Alarm Clock OK . . . then ¤ Switch on/off: Activation: . . . use to select On or Off ¤... -
Page 25: Resource Directory
Resource Directory Resource Directory Sounds for ringtones and images that can be used as caller pictures (CLIP pictures) or as a screensaver are saved in the handset's resource directory. A range of monophonic and polyphonic sounds and pictures have been pre-set but further images and sounds can be downloaded using a PC ( Gigaset QuickSync). -
Page 26: Bluetooth
Bluetooth Bluetooth The handset is able to use Bluetooth™ to communicate wirelessly with other devices that also use this tech- nology, e.g. to connect a Bluetooth headset or hearing aid. Bluetooth is activated and the devices have been registered to the handset. The following devices can be connected: •... - Page 27 Bluetooth ¤ Options Delete entry OK ¤ Edit name: Options Edit Name . . . use to edit name Save If an active Bluetooth device is de-registered, it may try to re-connect as a "non- registered device". Rejecting/accepting a non-registered Bluetooth device If a Bluetooth device that is not registered in the list of known devices tries to connect to the handset, a prompt will appear asking you to enter the PIN of the Bluetooth device (Bonding).
-
Page 28: Additional Functions Using The Pc Interface
Additional functions using the PC interface Additional functions using the PC interface The Gigaset QuickSync program has been installed on the computer. QuickSync functions: • Sync the handset's directory with Microsoft® Outlook® • Upload CLIP-pictures (.bmp) from the computer to the handset •... -
Page 29: Setting The Handset
Setting the handset Changing the language ¤ . . . use to select Settings Language . . . use select language Select ( = selected) If the handset has been set to an incomprehensible language: ¤ Press the keys slowly one after the other . -
Page 30: Tones And Signals
Keypad illumination The keypad has 5 levels of brightness to choose from. ¤ . . . use to select Settings Display & Keypad Illumination . . . use to select Brightness (1 - 5) Save Activating/deactivating automatic keypad lock Automatically lock the keypad when the handset has been in idle status for around 15 seconds. ¤... - Page 31 Automatic volume control Crescendo is not set for the ringtone volume ( p. 31). The phone is able to automatically adjust the volume of the receiver and ringtone to the ambient volume. Here you can set the sensitivity with which the phone reacts to changes in noise level (Very High, High, Medium, Low, Very Low).
-
Page 32: Auto Answer
Switching the ringtone on/off Switching the ringtone off permanently ¤ Using the Star key: Press and hold the Star ¤ Using the Profile key: Use the Profile key to set Profile Silent . . . When the ringtone is disabled, the following is shown in the status bar: Reactivating the ring tone ¤... -
Page 33: Fast Access To Numbers And Functions
Fast access to numbers and functions Assigning a number to digit keys (quick dial) It is possible to assign a number from the directory to the keys A number has not been assigned to the digit key. ¤ Press and hold the digit key ¤... -
Page 34: Resetting A Handset
Resetting a handset Reset any individual settings and changes that you have made. ¤ . . . use to select Settings System Handset Reset Yes . . . the handset's settings are reset The following settings are not affected by a reset •... -
Page 35: Appendix
Manufacturer’s advice Appendix Manufacturer’s advice Care Wipe the device with a damp cloth or an antistatic cloth. Do not use solvents or microfibre cloths. Never use a dry cloth; this can cause static. In rare cases, contact with chemical substances can cause changes to the device’s exterior. Due to the wide variety of chemical products available on the market, it was not possible to test all substances. -
Page 36: Technical Data
Technical data Technical data Battery Technology: 2 x AAA NiMH Voltage: 1.2 V Capacity: 750 mAh Handset operating times/charging times The operating time of your handset depends on the capacity and age of the battery and the way they are used. (All times are maximum possible times.) Standby time (hours) Talktime (hours) -
Page 37: Character Charts
Accessories Character charts Standard characters Press the relevant key the number of times indicated. 9x 10x ä á à â ã ç ë é è ê ï í ì î ö ñ ó ò ô õ ß ü ú ù û... -
Page 38: Display Icons
Display icons Display icons The following icons are displayed depending on the settings and the operating status of your telephone. Icons in the status bar Icon Meaning Icon Meaning Signal strength (No Radiation off ) Headset / hearing aid connected via Bluetooth 1% -100% white, if Maximum Range on;... -
Page 39: Accessing System Functions
Accessing system functions The system functions can be accessed via the Service menu. The following example shows how to select the "Camp-on" function. Opening the Base menu. > < BASIC SERVICE Select and confirm the basic service. The Service menu is displayed. >... -
Page 40: Making Calls To Multiple Parties
Consultation Making calls to multiple parties Consultation You interrupt your call to consult with a user (including external users) and then resume the original call. You are conducting a call. Activating and conducting an inquiry/consultation call > < CONSULT Activate inquiry. The current call is placed "on hold", so that the first user waits. Enter the phone number for the consultation call. -
Page 41: Call Waiting
Call waiting Call waiting You need to speak to a user in your communications system urgently, even though this user's line is busy. You can send a call waiting signal during the call to let the user know you want to talk to him or her. The user either answers im- mediately or you will be automatically connected when he or she has finished his call. -
Page 42: Override
Override Override You need to speak to an internal user urgently, even though his or her line is busy. The "Override" function allows you to interrupt the ongoing call to pass on a message. The user is busy. > < Select the menu item and confirm. -
Page 43: Transferring A Call
Transferring a call Transferring a call If the person you are speaking to wishes to be forwarded to one of your colleagues, you can transfer the call. Transferring the call with prior announcement: > < Select the menu item and confirm. CONSULT Enter the number of the party to whom you want to transfer the call. -
Page 44: Toggling (Switching Between Calls)
Toggling (switching between calls) Toggling (switching between calls) The Toggle function allows you to switch between two users without allowing them to speak to each other directly. The two users can be either external or internal users. You can also start a conference. You are conducting a call. -
Page 45: Conducting A Conference
Conducting a conference Conducting a conference In a system-assisted conference you can include up to 8 internal and external users. Users with system telephones can perform or use all the following func- tions simultaneously. ISDN telephones and external stations are passive users –... -
Page 46: Expanding A Conference
Conducting a conference Call another user. The second user answers, you announce the conference. > < CONFERENCE Select the menu item and confirm. You will briefly see the message: "1 is your position". Setting up a conference from a second call You are connected to one user and receive a second call, which is signaled by an alerting tone. -
Page 47: Transferring The Conference
Conducting a conference Expanding the conference from a consultation call You wish to make a consultation call during the conference. > < Select the menu item and confirm. The conference is placed on hold. CONSULT Call a party. Make the consultation call. Either: >... -
Page 48: During The Conference
Conducting a conference Announce that you are transferring the conference > < Select and confirm the option shown. CONF. TRANSFER You are disconnected from the conference. Press the End call key. During the conference You are taking part in a conference with 3 to 8 members and you wish to know about the other members or to disconnect a certain member or to disconnect the last member added to the conference. -
Page 49: Using The Second Call Feature
Using the second call feature Using the second call feature If you are expecting an important call, you should activate the camp-on function. A second call will then be signaled while a call is in progress. You can accept or ignore the second call. -
Page 50: Caller List
Caller list Callers who have tried to reach you during your absence are saved in the "Caller list". Callback requests page 67 are also recorded here. Retrieving the caller list An advisory message appears and the message key flashes when one or more information messages or voicemails have been received for you. -
Page 51: Central Directories (Group Directory)
Central directories (group directory) You can save your private phonebook that is saved on your handset to a central server and add group phonebooks that are saved on this server to your private phonebook. To protect phone numbers in your private phonebook from being modified when a group phonebook is added, we recommend first saving your private phone- book using the function "Send List"... -
Page 52: Sending And Receiving An Entry Or List Of Entries
Sending and receiving an entry or list of entries Sending and receiving an entry or list of entries You can send either an individual entry or the entire list to the communications system. This list can be received by the communications system and returned. Furthermore, it is also possible to load group directories. - Page 53 Sending and receiving an entry or list of entries Press the INT key. > < PHONEBOOK Select the menu item and confirm. > < PRIV. DELETE Select the menu item and confirm. The handset starts to delete the list/entry. Press the End call key to end the operation. Loading the group directory A group directory has to be created in the communications system by the service engineer and assigned to the authorized users.
-
Page 54: Call Forwarding
Using call forwarding Call forwarding Using call forwarding You can program two types of call forwarding: • Fixed call forwarding and • Variable call forwarding. For fixed call forwarding, you program a forwarding destination that will remain valid until you change or delete it. You can activate and deactivate this forward- ing function. -
Page 55: Fixed Forwarding
Using call forwarding Fixed forwarding If you have programmed a forwarding destination for fixed forwarding, you can activate and deactivate the forwarding facility in the Service menu. The pro- grammed forwarding destination remains valid until you change or delete it. Programming and activating a forwarding destination Open the system menu. - Page 56 Using call forwarding Deleting the destination for fixed forwarding You can delete the destination for fixed forwarding. Open the system menu. > < BASIC SERVICE Select and confirm the basic service. > < DESTINATIONS Select the menu item and confirm. FORWARD Confirm the option shown.
-
Page 57: Variable Forwarding
Using call forwarding Variable forwarding For variable forwarding you can choose between six different call forwarding types: • Variable forwarding (unconditional forwarding) • Forwarding for internal • Forwarding for external • Forwarding on busy • Call forwarding no reply • Forwarding on busy/after timeout Remark: The various forwarding types must be configured for the user. - Page 58 Using call forwarding Programming a forwarding destination Open the System Menu. > < BASIC SERVICE Select and confirm the basic service. > < DESTINATIONS Select the menu item and confirm. FORWARD Confirm the option shown. "Variable forwarding" is displayed. NEXT Confirm the option shown.
-
Page 59: Forwarding Calls Automatically
Using call forwarding Checking forwarding To check the status of the forwarding types, proceed as described on page 57. The forwarding destination is shown in the second line if this variable forwarding type is activated. Activating and deactivating forwarding by means of an option If a forwarding destination has been programmed for fixed forwarding, you can use the option to activate and deactivate the forwarding facility. - Page 60 Using call forwarding Call forwarding with codes Note: The codes are dependent on the configuration in your communication system. Please consult your administrator. You can use codes to set up the following forwarding types: Forwarding type Code (example) * 51 Program and activate fixed forwarding * 41 Activate fixed forwarding...
-
Page 61: Deactivating Call Forwarding
Using call forwarding Programming and activating call forwarding Hold down the Talk key. Enter the code, for example *51 (ask your administrator). You will hear the dial tone. Enter the destination number. Enter the termination character. You will hear a confirmation beep and call forwarding is activated. -
Page 62: Delayed Call Forwarding
Delayed call forwarding Delayed call forwarding Note: This is configured for the entire system by your administrator. Prerequisite: The second call function must be activated page 49. If "Forwarding on busy / after timeout" or "Forwarding after timeout" is activated on your handset page 57 and a second call comes in, you will automatically ... -
Page 63: Deactivating/Checking Call Forwarding For Another Telephone
Forwarding calls for a different terminal Deactivating/checking call forwarding for another telephone Open the system menu. > < BASIC SERVICE Select and confirm the basic service. > < Feature settings Select the menu item and confirm. > < FORWARD NUMBER Select the menu item and confirm. -
Page 64: Mailbox
Mailbox Callers who have tried to reach you during your absence can leave a callback request in your mailbox. In the mailbox you will also find voice or fax messages from the mail server (if this has been set up). Viewing the mailbox/selecting a mailbox entry An advisory message appears and the message key flashes when one or more information messages or voicemails have been received for you. -
Page 65: Using The Openscape Xpressions Mailbox Function (Optional)
Using the OpenScape Xpressions mailbox function (optional) Using the OpenScape Xpressions mailbox function (optional) Users with a mailbox (OpenScape Xpressions) can dial the messaging phone number to use this system's features and thus configure call forwarding types or listen to available messages. User voice prompts explain how to obtain all the available functions. -
Page 66: More Features
Making calls using project assignment (cost billing) More features Making calls using project assignment (cost billing) You can assign external calls to certain projects. Prerequisite: Project numbers (from 1 to 5) have been configured for certain projects and you have an account code (ACCT) for the project. Note: The function must be approved for your communications system. -
Page 67: Callback
Callback Callback This function enables you to call a user who does not answer or whose line is busy. The Callback function enables you to contact this user as soon as he or she hangs up or re-uses his or her telephone. Please note that a line is signaled as busy when it is being called by another user. -
Page 68: Using A Different Telephone In The Same Way As Your Own
Using a different telephone in the same way as your own Using a different telephone in the same way as your own You can log on to another telephone belonging to the HiPath 4000 system using a personal identification number (PIN). This also applies to telephones in net- worked HiPath 4000 systems, for example at other company locations. -
Page 69: Caller Id Suppression
Caller ID suppression Enter a phone number. Call forwarding - follow me after successful identification: > < VARY FORWARD Select the menu item and confirm. SAVE Confirm the option shown. Call forwarding is activated immediately. Caller ID suppression The caller ID display can only be suppressed for one subsequent call and the setting is not saved if the number is redialed. -
Page 70: Activating/Deactivating Do Not Disturb
Activating/deactivating do not disturb Activating/deactivating do not disturb If you do not wish to take calls, you can activate do not disturb. Internal callers will hear the ringing tone and the announcement "Do Not Disturb"; external calls will be diverted to the attendant. Your administrator can also set up call forward- ing destinations for the "Do not disturb"... -
Page 71: Tracing A Call
Tracing a call Tracing a call You can identify malicious external callers. You can record the caller's phone number during a call or for up to 30 seconds after a call. You should not hang up in the process. Note: The function must be approved for your communications system. -
Page 72: Entering Commands Via Tone Dialing (Dtmf Suffix Dialing)
Entering commands via tone dialing (DTMF suffix dialing) Entering commands via tone dialing (DTMF suffix dialing) After dialing a phone number, you can activate DTMF tone dialing (dual-tone multifrequency signaling) in order to operate devices, such as answering ma- chines or automatic directory inquiry or switching systems, by means of com- mand inputs. -
Page 73: Parking/Activating Calls
Parking/activating calls Parking/activating calls You can park up to 10 internal and/or external calls and resume them at another telephone. Calls cannot be parked if: • All parking positions are busy. • The parking position you have selected is busy. •... -
Page 74: System-Wide Speaker Call
System-wide speaker call System-wide speaker call You can place a speaker call to an internal party on HiPath 4000 using the loud- speaker on their telephone to establish a connection. You can also initiate a speaker call from a consultation call. To cancel a speaker call, replace the handset or - during an inquiry - resume the call that was in progress. -
Page 75: Activating Or Deactivating
System-wide speaker call Activating/deactivating "Speaker call protect" You can protect yourself against being addressed directly with a speaker call. Attempts to address you directly over the speakerphone will then become normal calls. Open the system menu. > < BASIC SERVICE Select and confirm the basic service. -
Page 76: System Appointment Function
System appointment function System appointment function You can arrange for the communications system to remind you of an appoint- ment. For this to happen, you need to save the times at which you wish to be reminded. This is possible for a period of up to 24 hours in advance. Saving an appointment Open the system menu. -
Page 77: Locking The Telephone Line To Prevent Misuse
Locking the telephone line to prevent misuse Locking the telephone line to prevent misuse You can prevent unauthorized persons from using your telephone (and the system directory) during your absence. Prerequisite: You have been assigned a personal identification number (PIN) by the administrator responsible for your communications system. -
Page 78: Index
Index Transferring ............43 Call charge assignment ........... 66 Call forwarding ............54 via codes ............60 Call list copying a number to the directory ..... 16 Activating/deactivating message LED ...... 17 delete ..............16 Advisory tones ............32 delete an entry ........... 16 Alarm ................ - Page 79 Entering umlauts ............13 Delayed call forwarding ..........62 De-registering devices (Bluetooth) ......26 Dialling Fast access .............. 14 from the call list ..........14 Fax messages ............64 from the directory ..........14 Firmware updates ............ 28 from the redial list ..........14 Fixed forwarding ............
- Page 80 Icons Mailbox ............64 alarm clock ............24 deleting entries ..........64 displaying new messages ........17 viewing .............. 64 indications ............38 Making anonymous calls ......... 69 on display keys ..........38 Making calls status bar ............38 accepting a call ..........15 timer ..............
- Page 81 formats ............... 25 delete ..............25 rename .............. 25 formats .............. 25 Play sound ............... 25 playback ............25 Power adapter ............7 rename .............. 25 Profile key ............5 Sound profiles ............22 Profiles ..............22 Sounds for ringtones ..........25 Project assignment ..........
- Page 82 © 2024 Mitel Networks Corporation. All Rights Reserved. Mitel and the Mitel logo are trademark(s) of Mitel Networks Corporation. Unify and associated marks are trademarks of Unify Software and Solutions GmbH & Co. KG. All other trademarks herein are the property of their respective owners.
Need help?
Do you have a question about the Unify OpenScape S6 and is the answer not in the manual?
Questions and answers