Table of Contents
Advertisement
Quick Links
Owner's Instruction and Operation Manual
Model Number:
CGWS1500
NM680
Report Number: F19-473
Tested Per EPA Methods ASTM E2515, ASTM
E3053-ATM and CSA B415
Certified to UL 1482-2022 and CAN/ULC S627:2023
Mobile home/transportable buildings approved
USA & Canada
* All Pictures In This Manual Are For Illustrative Purposes Only. Actual Product May Vary.
Save These Instructions In A Safe Place For Future Reference.
SAFETY NOTICE: If this heater is not properly installed, a house fire may result. For
your safety, follow the installation instructions. Never use make-shift compromises
during the installation of this heater. Contact local building or fire officials about
permits, restrictions and installation requirements in your area. NEVER OPERATE
THIS PRODUCT WHILE UNATTENDED.
CAUTION! Please read this entire manual before you install or use your new room
heater. Failure to follow instructions may result in property damage, bodily injury, or
even death. Improper Installation Will Void Your Warranty!
U.S. Environmental Protection Agency
Certified to comply with 2020 particulate
emissions standards.
THIS MANUAL IS SUBJECT TO CHANGE WITHOUT NOTICE.
World Marketing of America, Inc, 12256 William Penn Hwy, Mill Creek, PA 17060
R
Email: info@worldmkting.com PH: 1-800-776-9425
CALIFORNIA PROPOSITION 65 WARNING:
This product can expose you to chemicals including carbon
monoxide, which is known to the State of California to cause
cancer, birth defects, and/or other reproductive harm. For
more information, go to
854095-1006N
www.P65warnings.ca.gov
Advertisement
Table of Contents

Related Manuals for Comfort Glow CGWS1500


Summary of Contents for Comfort Glow CGWS1500
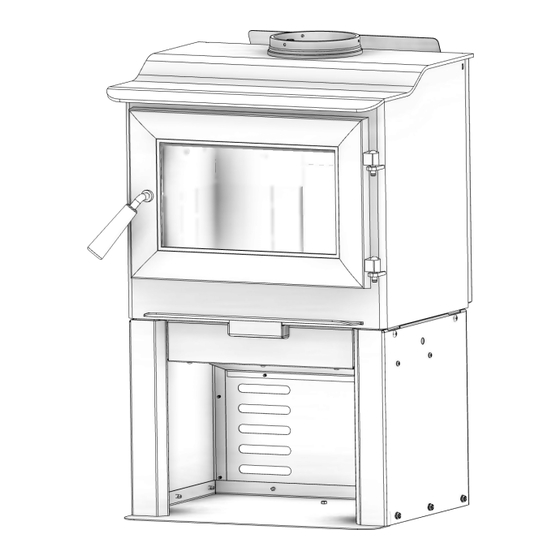
- Page 1 Owner’s Instruction and Operation Manual Model Number: CGWS1500 NM680 Report Number: F19-473 Tested Per EPA Methods ASTM E2515, ASTM E3053-ATM and CSA B415 Certified to UL 1482-2022 and CAN/ULC S627:2023 Mobile home/transportable buildings approved USA & Canada * All Pictures In This Manual Are For Illustrative Purposes Only. Actual Product May Vary.
- Page 2 INTRODUCTION This manual describes the installation and operation of the Comfort Glow, CGWS1500, NM680 wood heater. This heater meets the 2020 U.S. Environmental Protection Agency’s cordwood emission limits for wood heaters sold after May 15, 2020. Under specific test conditions this heater has been shown to deliver heat at rates ranging from 13,846 to 39,683 Btu/hr with 2.4 g/hr and 66% efficiency.
-
Page 3: Installation Checklist
INSTALLATION CHECKLIST Your Wood Stove should be installed by a qualified installer only. An NFI qualified Installer can be found at www.nficertified.org/public/find-an-nfi-pro/ CUSTOMER SERVICE 1-800-776-9425 COMMISSIONING CHECKLIST This checklist is to be completed in full by the qualified person who installs this unit. Keep this page for future reference. Failure to install and commission according to the manufacturer’s instructions and complete this checklist will invalidate the warranty. -
Page 4: Tools And Materials
ASSEMBLY INSTRUCTIONS FOR CUSTOMER SERVICE CALL: 1-800-776-9425 TOOLS AND MATERIALS Use the six (6) provided #10 sq-drive screw and two (2) provided 1/4-20 x 1/2 self-tapping screw to attach the You will need a drill with a 1/8” bit to install sheet metal back panel to the pedestal assembly. - Page 5 ASSEMBLY INSTRUCTIONS Place the assembled pedestal into the desired location. Slide the pedestal heat shield through the front opening With the assistance of a second person, set the stove of the pedestal assembly. Use the nine (9) provided #10 onto the pedestal base. Use the eight (8) provided 1/4- sq-drive screw to secure the pedestal heat shield to the 20 X 3/4 Hex Bolt and washers to secure the stove to the front, back, left, and right sides of the pedestal base.
-
Page 6: Flue Collar Assembly
ASSEMBLY INSTRUCTIONS BLOWER ASSEMBLY (OPTIONAL) FIREBRICK CONFIGURATION The blower assembly must be disconnected from Replace the Firebrick as shown in the illustration. the source of electrical supply before attempting the installation. The blower assembly is intended for use only with a stove that is marked to indicate such use. Do not route the supply cord near or across hot surfaces! Fix the assembly to the back of the stove with the four screws provided. -
Page 7: Installation
INSTALLATION the house. The stove must therefore be installed in the SAFETY NOTICE room where the most time is spent, and in the most • IF THIS STOVE IS NOT PROPERLY INSTALLED, spacious room possible. Recall that wood stoves produce A HOUSE FIRE MAY RESULT. -
Page 8: Outside Combustion Air
INSTALLATION FOR CUSTOMER SERVICE CALL: 1-800-776-9425 • The chimney connector must not pass through an attic mentioned in this booklet. Installation instructions are or roof space, closet or similar concealed space, a floor, supplied with the air intake kit. Outside combustion air or a ceiling. -
Page 9: Chimney Connector (Stove Pipe)
INSTALLATION to penetrate paint or protective coating to ensure FOR USE IN MOBILE HOME/TRANSPORTABLE grounding. BUILDINGS • When moving your mobile home/transportable • WARNING! DO NOT INSTALL IN SLEEPING buildings, all exterior venting must be removed ROOM. while the mobile home/transportable buildings is •... -
Page 10: Importance Of Proper Draft
INSTALLATION system is prohibited. Furthermore, the installation of It must rise above the roof at least 3’ (0.9m) from the a draft damper is not recommended. With a controlled uppermost point of contact. combustion wood stove, the draft is regulated upon 2. -
Page 11: Masonry Chimney
INSTALLATION cap, etc. Maintain proper clearance to the structure as grout or cement the clay liner in place to the chimney flue recommended by the manufacturer. The chimney must be liner. the required height above the roof or other obstructions for safety and proper draft operation. - Page 12 INSTALLATION outer surface of the wall thimble to wall combustibles. (25.4 mm) off the chimney connector by way of sheet Support the wall thimble, and cover its opening with a metal support plates at both ends of chimney section. 24-gage minimum sheet metal support. Maintain the 6” Cover opening with and support chimney section on both (152.4 mm) space.
- Page 13 OPERATION INSTRUCTIONS NEVER OPERATE THIS PRODUCT WHILE UNATTENDED WOOD STOVE UTILIZATION CAUTIONS: HOUSE FIRE HAZARDS Your heating appliance was designed to burn well • DO NOT STORE WOOD ON FLOOR PROTECTOR, seasoned natural wood only; no other materials should UNDERNEATH STOVEPIPE(S) OR ANYWHERE be burned.
-
Page 14: Testing Your Wood
OPERATION INSTRUCTIONS the logs. A 24” to 48” air space should be left between wood heater in a manner inconsistent with operating each row of logs, which should be placed in the sunniest instructions in this manual. location possible. The upper layer of wood should be EFFICIENCIES protected from the element but not the sides. -
Page 15: Fueling Instructions
OPERATION INSTRUCTIONS FUELING INSTRUCTIONS CAUTION: THE DOOR IS HOT DURING OPERATION. AVOID CONTACT WITH HEATED SURFACES DURING OPERATION. This wood stove has been certified by the US EPA to meet strict 2020 guidelines. To ensure this unit 14 lbs produces the optimal minimum emissions it is critical that only well-seasoned cordwood is burned (see the “Fuel Recommendations”... -
Page 16: Air Tubes
OPERATION INSTRUCTIONS VISIBLE SMOKE The amount of visible smoke being produced can be an effective method of determining how efficiently the combustion process is taking place in the given settings. Visible smoke consists of unburned fuel and moisture leaving your stove. Learn to adjust the air settings of your specific unit to produce the smallest amount of visible smoke. -
Page 17: Chimney Maintenance
CHIMNEY MAINTENANCE NEVER OPERATE THIS PRODUCT WHILE UNATTENDED • Always check for creosote deposit once every two CAUTION: months and have your chimney cleaned at least once OVERFIRE APPLIANCE. a year. OVERFIRING IF ANY PART OF THE APPLIANCE • If a chimney or creosote fire occurs, close all dampers GLOWS RED. -
Page 18: Glass Care
CHIMNEY MAINTENANCE GASKET CARE out the chimney, exposure to the gases in closed or confined areas can be dangerous. Make sure your stove WARNING: gaskets and chimney joints are in good working order and sealing properly to ensure unintended exposure. It is NEVER OPERATE THE STOVE WITHOUT THE recommended that you use both smoke and CO monitors GASKET OR WITH A DAMAGED OR BROKEN... - Page 19 CB36 BLOWER WIRING DIAGRAM (OPTIONAL) CAUTION: MOVING PARTS CAN CAUSE DANGER: SHOCK HAZARD DISCONNECT POWER SOURCE BEFORE INJURY. DO NOT OPERATE WITH INSTALLATION AND WHENEVER SERVICING BLOWER ASSEMBLY. COVER REMOVED. WHITE / BLACK / BLACK / BLANC NOIR NOIR BLACK / BLACK / BLACK / NOIR...
-
Page 20: Repair Parts
REPAIR PARTS Part # Description 88042 1/4” Rope Gasket 40924 Low Profile Flue Collar 29139 Deflector, Air 891824 Heatshield Weldment CB36 Blower Assy. (optional) 610928 Weldment, Damper 893149 Damper Rod 891987 Plastic Knob 894147 Ped Back, 11 894152 Ped Right Side, 11 894148 Ped Base, 11 894150 Ped Front, 11 894151... - Page 21 REPAIR PARTS Part # Description Part # Description 83178 3/8-16 Jamb Nut 40881 Medium Sq Cast Door Wooden Thru Handle, Lt Oak 88324 1” Round Rope Gasket-Blk 5.48 ft 893156 Stain Gasket - Flat, Glass 88174 4 ft Washer, 3/8”Id x 7/8” Od x (3/16T x 3/8W) 83045A 1/16 Thk...
-
Page 22: Service Record
SERVICE RECORD It is recommended that your heating system is serviced regularly and that the appropriate Service Interval Record is completed. SERVICE PROVIDER Before completing the appropriate Service Record below, please ensure you have carried out the service as described in the manufacturer’s instructions. -
Page 23: Limited Warranty
LIMITED WARRANTY Limited Warranty (Wood and Pellet Stoves) Warranty Period Branded Solid Fuel Burning Products Component Parts Labor Pellet Wood Component Parts Covered by this Warranty Cast Iron Components, Steel liners, Retainers, Gaskets, Firebrick and All 2 Years from Electrical Components. All Parts including handles, external enameled Date of Purchase components and other material except as covered by Warranty conditions, Warranty Exclusions, and Warranty Limitations listed. -
Page 24: Limitations Of Liability
LIMITED WARRANTY • WMAI’s obligation under this warranty does not extend to the appliance’s capability to heat the desired space. Information is provided to assist the consumer and the dealer in selecting the proper appliance for the application. Consideration must be given to appliance location and configuration, environmental conditions, insulation and air tightness of the structure.
Need help?
Do you have a question about the CGWS1500 and is the answer not in the manual?
Questions and answers